Prevention of hard disk failures. Preventive maintenance of the hard disk Preventive maintenance of the electronics unit of the hard disk
Read also
In most cases, the most valuable thing on a computer is information. Information can be valuable information, and over time, a huge amount of such data accumulates on each computer. Even if there is no particular value in the information, no one wants to lose software distributions or downloaded web pages.
That is why, since the appearance of the first computer, it is very important to archive important information for subsequent storage on external media.
Today, storage media are cheap and available to everyone. It seems that saving important data is not difficult, and yet many users neglect this precaution. The consequences of such an irresponsible attitude are deplorable.
In order not to replenish the army of losers who forgot or did not want to save important information, back up your data periodically. You can read about how to do this correctly in the previous section of the book.
Monitoring the condition of components
The number of components installed in the computer is quite large, and their cost is sometimes very high. First of all, this concerns the central processor, hard drive and graphics adapter.
The stability of the computer depends on the operating conditions of its components. Any overclocking of components greatly affects the operation of the computer. It leads to an increase in their temperature, which, in turn, affects the operation of other installed components.
Of course, the temperature inside the case may not rise at all due to overclocking of computer components. This can happen, for example, due to the fact that the ventilation system cannot cope with its functions, which should draw warm air out of the case and draw cold air in.
So, the state of computer components must be constantly monitored using specialized software for this.
The temperature regime of components is monitored by many thermal sensors installed on the processor, memory, hard drive and other devices of a modern computer. The program only needs to collect, analyze and display the necessary information.
Among the programs that this function, you can call MotherBoard Monitor, SpeedFan, CPUCool, Hdd Temperature, etc. In practice, it is quite enough to use the MotherBoard Monitor and HDD Temperature utilities. The MotherBoard Monitor program displays information about the processor temperature, fan speed and other parameters on the computer screen, and HDD Temperature is only for indicating the current temperature of the hard disk.
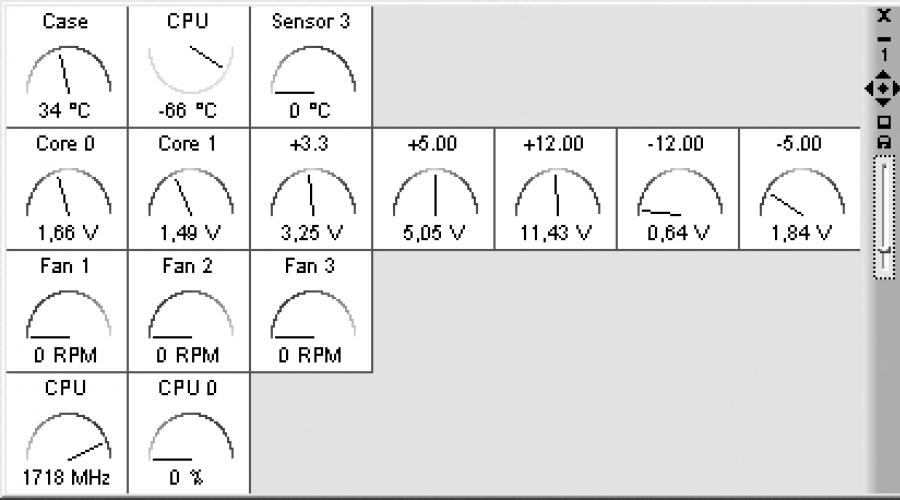
MotherBoard MonitorMotherBoard Monitor (Fig. 6.1) is one of the most complex programs for displaying information about the status of computer components.
So, the program can show the temperature in the system unit, the temperature of the processor, the voltage on the processor, the constant voltage of the stabilizers, the frequency of the processor, the speed of rotation of all fans installed in the system, and much more.
Rice. 6.1. MotherBoard Monitor utility window
After launch, several program icons appear in the notification area, with which you can manage it.
For clarity, there is the possibility of alternative display of information, as on the speedometer of a car (Fig. 6.2). The main feature of the program is the ability to program the appearance of a message that one of the parameters has reached a critical value.

Rice. 6.2.Alternative way information display
Naturally, for the maximum functionality of the program, it is necessary that the computer components are equipped with appropriate thermal sensors.
HDDlife ProThe HDDlife Pro program (Fig. 6.3) is used to monitor the status of a hard drive. It has a multilingual interface, including Russian, so it is not difficult to understand all the displayed information and program settings.
The application provides a lot interesting information and in an accessible and simple form.

Rice. 6.3. HDDlife Pro window
You will not only see what partitions are on your hard drive, but also find out how much free space is left, get information about the file system, the load on a particular partition and how often it is accessed, the temperature of the hard drive at the moment, and much more. However, if your computer has more than one hard drives, the program will add the required number of tabs with the relevant information.
Among other things, HDDlife Pro closely "cooperates" with S.M.A.R.T. technology, so you will always have information about the real "health" of your hard drive. Among the advantages, we can note the presence of a noise control mechanism, support for external hard drives, read / write indication, and much more. At the same time, the program can work with all existing hard drive interfaces.
If you do not need the program, just minimize it to the notification area and be sure that even in this state it will show all the necessary information and any changes in the state of your hard drive.
The program has many options with which you can configure the type and method of notification, the type of information that is displayed in the notification area, change the appearance of the program, etc.
It should also be noted that during the installation of the program, you can install a gadget (mini-application), which will be displayed on the sidebar. windows panel Vista. This will allow you to see the result of HDDlife Pro in a special small window on the sidebar.
The power supply in Russia and the CIS countries will be unstable until all power supply transformer stations and installations are updated. And it will happen very, very soon.
In this regard, in order to obtain a more or less stable supply of electricity, one has to use all possible means at hand.
A lot has been said about the consequences of power supply instability, but let's dwell on this again.
First of all, the power supplies of all devices connected to the computer suffer. These are the power supply of the system case, the power supply of the monitor and the power supplies of all connected peripherals. In addition, voltage fluctuations in the mains negatively affect the operation of the input circuits. motherboard and storage devices. The biggest blow, unless, of course, it is stopped by all previous circuits, falls on the central processing unit and RAM. As you can see, all the main components of the computer are at risk, without which it is not able to function.
Since it is impossible to change the quality of the voltage supplied to an apartment or office, you should try to influence the voltage supplied to the computer and devices connected to it.
The first means of defense are extension cords that are protected from impulse noise and sudden power surges. There are a lot of such models of extension cords, and they differ only in price. The higher the price, the better the extension cords and, accordingly, your computer will be more secure. As a rule, outwardly, such an extension cord looks like a box with a switch and five sockets for connecting devices (Fig. 6.4).

Rice. 6.4. Extension
More complex extension cords are equipped with separate switches for each outlet. If the fuse blows (and there must be one), only one outlet stops working in such an extension cord, and not the entire unit.
However, even the highest quality extension cord cannot be compared with a block uninterruptible power supply, whose main task is to stabilize the voltage and keep it at the same level. In addition to protection electrical circuits, an uninterruptible power supply very often allows you to protect and telephone line, which is also sensitive to power surges that can damage the input stage of a modem or other similar device.
In addition to using auxiliary devices, you should take care that devices that do not have a noise filter and can make their own adjustments to the operation of the computer are not connected to the extension cord to which the computer is connected.
Dust control
Dust, like the instability of electricity, also carries a certain threat to the operation of the computer.
Why is she harmful? First, dust shortens the life of any mechanical and electronic devices. How does this happen? Very simple. I'll give you an example. Dust settling in the power supply fan mechanism causes the fan shaft lubricant to dry out faster, which leads to increased friction in the seat. This sooner or later leads to unstable operation of the fan, which means an increase in the temperature of the components of the power supply and inside system block. As a result, the power supply may fail, and this, in turn, leads to the breakdown of other components of the computer. As you can see, milligrams of dust that settle on the insides of computer components every day are no less dangerous than, for example, power surges.
Dealing with dust is very easy. It is only necessary to periodically carry out wet cleaning, be sure to wipe all the surrounding objects from accumulated dust.
In addition, occasionally, but also periodically, the internal surface of the system unit and all devices connected to the computer should be cleaned of dust. This can be done with a vacuum cleaner and a damp cloth, or with special cleaning kits (fig. 6.5), which are sold in any computer store. At the same time, be sure to clean all the dust from the computer's power supply!

Rice. 6.5. Computer cleaning kit
In addition, the location of the computer is also important. The lower its system unit is located, the more dust it will suck in. It should be installed at least 10–15 cm above floor level.
On this, perhaps, we will finish, although you can come up with more than one way to deal with dust. By following the rules described, you can at least double the life of your computer.
Prevention of power supply failures
The normal functioning of the entire computer depends on the quality of the power supply. If something is wrong with the power supply, you will immediately know about it by fan noise, exhaust air temperature, computer reboots, etc. Therefore, in order for the power supply to last a long time (and work stably), two rules should be followed.
normal nutritional conditions. To connect a computer, use a filter, or better, an uninterruptible power supply. Try not to connect a computer and powerful devices, such as an iron or a microwave oven, to the same filter. If possible, connect the computer to a grounded line.
Normal temperature. Several factors influence the temperature regime, in particular the power supply capacity and the condition of its fan. If you notice that the temperature of the air blown out by the fan of the power supply has increased, get ready to replace it with a more powerful one. The fan should be periodically cleaned and, if necessary, lubricated with a seat of its impeller.
If the power supply unit overheats and shuts down due to overload when using the computer in the summer, provide additional cooling for the computer. This can be done, for example, by connecting an additional fan inside the case. If the case does not provide for the installation of a stationary fan, you can purchase a fan placed in a PCI slot or in a storage compartment.
To avoid disturbing the optimal air circulation inside the system unit, check the presence of all the plugs on the back of the computer. This will also further block the path of dust ingress into the system unit.
Over time, a lot of dust accumulates inside the power supply, which, together with moisture, leads to the fact that the dust begins to conduct electricity. And this means one thing: the imminent failure of the power supply unit. Therefore, if possible, systematically vacuum the power supply. In this case, it is not at all necessary to open it: just use one of the ventilation holes.
Prevention of CPU cooler failure
A processor cooler, consisting of a heatsink and a fan, performs a very important function - it cools the processor, which, by the way, loves to heat up very much. Therefore, the stability of the system as a whole directly depends on the quality of the cooler.
The main component of the cooler is the fan, since the heatsink is passive. It is known that any mechanical device requires special care, especially if it contains rubbing elements. Over time, the lubricant loses its properties, which leads to a deterioration in the operation of the device: the fan starts to make noise, vibration appears, etc. Therefore, if you hear a characteristic noise inside the system unit, know that it's time to intervene.
By the way, any cooler installed in the case can make noise, for example, a video card cooler or an additional air ventilation cooler. You can prevent all these devices in the same way as a CPU cooler.
Be sure to carry out a “wet cleaning” of the fan, cleaning it of dust and lubricating the axles with special oil. There is, of course, another way out - buying a new radiator (fan), but for obvious reasons, it is not suitable for everyone.
To gain access to the fan, it must be unhooked from the radiator. Usually the fan is attached to the radiator with four small screws. Having unscrewed them, remove the fan, not forgetting to first disconnect it from the power supply.
To clean the fan blades from dust, you can use a cotton swab dipped in alcohol. If the fan has not been prevented for a long time, then the dust can form a hard crust. If so, don't be afraid to use a little force to remove it.
To clean the dust from the blades, it is not necessary to pull the impeller itself out of the socket. However, the fan will have to be removed.
Typically, there is a sticker on the bottom of the fan slot with a mounting mechanism underneath. With the help of an annular recess at the end of the iron base, the impeller is held in the socket. After the impeller is installed in the socket, it must be fixed. A plastic washer should be put on the annular recess at the end of the iron base of the impeller, which will hold it (Fig. 6.6).

Rice. 6.6. Peel off the sticker and carefully remove the plastic ring
Your task is to remove the puck without damaging it. If the fan is old enough, then this washer could lose its flexibility properties. In this case, you must act carefully so as not to destroy it. In addition, the difficulty lies in the fact that the washer fits very tightly into the recess of the impeller. To get the washer, pry it with a thick needle and pull it out with tweezers. After that, the impeller can be pulled out.
Then wipe the inside of the socket with a cotton swab dipped in alcohol. The hole in which the impeller is installed must be lubricated with a special oil of sufficient viscosity. However, before lubricating the hole, put the impeller in place and try to shake it slightly. If you find a slight play, then the fan has been exhausted. The development manifests itself in the form of an uneven vibrating spin-up of a working device.
Unfortunately, it is impossible to completely eliminate the production. The only way out in this situation is to use oil with a sufficient degree of viscosity. This oil has a high resistance to temperature rise, which allows you to create the most comfortable environment for the fan, in which vibration may not occur. Over time, of course, this lubricant will lose its properties, the noise will reappear and this procedure will need to be repeated.
Thus, after applying grease to the impeller shaft, install it in place. Then rotate the impeller around the axis several times so that the lubricant is evenly distributed. At the same time, not a large number of oil may appear from the side of the impeller mounting, and this excess grease must be wiped off. Finally, install the fixing washer and attach the sticker.
This completes the fan troubleshooting. Screw it back to the heatsink and plug in the power. Now you can boot your computer and check the result of your efforts.
Prevention of hard drive failures
The hard drive is the main device used to store information needed by both the operating system and application programs. It is clear that the stability of the system depends on the safety of these data.
To always be aware of the physical state of the hard drive, you need to check it from time to time using specialized utilities. In particular, you can enable the use of S.M.A.R.T. technology in the BIOS of the computer, which allows real-time monitoring of many disk indicators at the hardware level. If the system detects impending serious problems, it will warn you about this immediately after turning on the computer and initializing the devices. If this message appears, you should immediately back up your data to another hard drive or storage device.
In addition, sometimes it is necessary to check the surface of disks, using, for example, the built-in verification mechanism. To activate it, just open the disk properties window (to do this, right-click on the disk icon and select in the opened context menu Properties), go to the Service tab and click the Run Check button (Fig. 6.7). Depending on the specified parameters, the disk check may start immediately or after the computer is restarted, which the system will inform you about.
If a message about the presence of bad sectors appears on the screen during the check, get ready for the fact that the disk will need to be replaced with a new one, unless, of course, the number of bad sectors increases.

Rice. 6.7. Click the Run Check button
Keyboard breakage prevention
The keyboard, as an input device, is exposed to contamination, which can soon lead to the fact that some buttons will no longer be pressed or will be pressed with difficulty.
You can clear the keyboard in the following way. Turn it upside down and give it a good shake. At the same time, dust, bread crumbs, hair, cockroaches, paper clips and everything that once fell between the keys will begin to pour from the keyboard.
If the described cleaning method did not help, use another.
First, pull out all the keys from the keyboard, prying them, for example, with scissors. Remember to lay out the keys in the same order as they were located on the keyboard.
Then wipe down each key to get rid of stubborn dirt.
After that, assemble the keyboard and try to work on it.
Mouse troubleshooting
The mouse, like the keyboard, is prone to contamination, which leads to poor control of the mouse pointer on the monitor screen. This is especially true of mechanical mice, the main element of which is a ball.
If you have a mechanical mouse, turn it upside down, open the socket (the cover covering this socket shows how to remove it correctly) and pull out the ball. Then clean the rollers in contact with the ball from adhering dirt. It is also useful to wipe the ball itself with an alcohol wipe.
Assemble the mouse and clean any dirt from the corner supports on which the body of the device slides. Then wipe the body of the mouse itself.
If the control of the mouse pointer has not improved much, you can try to disassemble it and remove dirt from the photo sensors responsible for moving the mouse in different directions.
The world we live in is not perfect. We always have to choose between the good and the better.
Undoubtedly, Windows XP is a fast and beautiful operating system. But if it suddenly seemed to you that games are running a little slowly, and applications do not open fast enough, then this problem can be solved in two ways.
Buy a new video card, more RAM, or better yet, a whole new computer.
Disable all unnecessary functions that use computer resources inefficiently.
Further recommendations are optional. Get creative with them and choose only those that are personally acceptable to you. By improving the performance of your computer, you also increase the life of your computer, as the load on the processor, motherboard and video card is reduced. However, this will have to sacrifice some elements of decoration.
And a little more advice. Before changing the default settings, create a system restore point. In case of undesirable consequences of the change, it will be possible to return the original settings. The optimization techniques suggested below can in no way damage the computer, but what if you misunderstand something, find yourself on the wrong tab and press the wrong button. Then, if desired, you can restore the previous state of the operating system.
Create a system restore point
To create a system restore point, type Start? All programs? Standard? Official? System Restore, select the radio button Create a restore point and click Next. In the Recovery checkpoint description field, enter any combination of characters (Fig. 4.1) and try not to forget it. current time and the date will be added automatically.
Rice. 4.1. Create a restore point.
Click the Create button. A window with the full name of the created control point will appear on the screen. To cancel, press the Home button, to confirm - Close.
Visual effects
Let's start with the simplest. Execute Start? Control Panel, in the window that opens, double-click on the System icon and go to the Advanced tab. In the Performance area, click the Options button. In the Performance Options window that opens, on the Visual Effects tab (Fig. 4.2), you can set the switch to the following positions:
Restore default values;
Provide the best view;
Ensure the best performance;
special effects.

Rice. 4.2. Visual effects.
I recommend that you choose Best performance, but you can leave some effects by setting the switch to Special Effects and checking the boxes for the desired effects. Then click Apply and OK to close the window.
Desktop and screen
Right-click on an empty spot on the desktop and select Properties from the context menu. In the Properties: Display window that opens, go to the Desktop tab and in the Wallpaper list select no, then click the Apply button. Click the Desktop Settings button and in the Desktop Items window that opens, on the General tab, in the Desktop Cleanup area, uncheck Perform desktop cleanup every 60 days, and then click OK.
If you suddenly don’t remember whether or not the program icons you need are located on your desktop, then you can clean the Desktop manually. Click the Clean Desktop button - we will see the Desktop Cleanup Wizard window. Click Next - in the window that appears, shortcuts to rarely used programs will be displayed.
If you find it necessary to leave some labels, then uncheck the corresponding boxes. Click the Next button - the Desktop Cleanup Wizard will show only those shortcuts that will be sent to a specially created folder on the Desktop, from which, if necessary, you can return the shortcut back. Click Done.
In the Properties: Display window, go to the Screensaver tab and in the Screensaver area, select No, and then click the Apply button.
Note.
Most modern monitors run on cathode ray tubes. The principle of operation of their kinescope is the same as in regular TV. The glass screen of the monitor is coated from the inside with a special layer called phosphor. The flow of electrons "bombards" it with great speed and not all of it is extinguished by the phosphor and protective coatings of the screen. A dark monitor screen is the best way to save your monitor's luminous layer and your health, as a dark screen requires less electron flow.
We remain on the Screensaver tab. In the Energy Saving area, click the Power button. In the window that opens, on the Power Schemes tab, in the Power Schemes area, select Home/Desktop, and then click the Apply button.
In the Home/Desktop Scheme Setup area, from the Turn Off Display, Turn Off Disks, Standby After, and Hibernate After lists, select Never. Click the Apply button and close the window by clicking OK.
The question may arise: “What should I do if I need to move away from the computer for 10-20 minutes?” Then select the line Shutdown in the Start menu and click the Standby button:
You can exit standby mode by pressing any key on the keyboard or by pressing the mouse button.
If you run the command Start? Switch off by holding down Shift key, then Standby will change to Sleep. You can exit sleep mode by restarting your computer. Why then do you need sleep mode? Then, that the loading time is halved, all windows remain open, the settings of the user who worked before switching to sleep mode are loaded, and information is stored in RAM.
Start menu and folder options
Right-click on the Start button and select Properties from the context menu. In the window that opens, on the Start Menu tab, set the switch to the Classic Start Menu position. The Configure button becomes available. If necessary, customize the appearance of the Start menu, but you can also immediately click the Apply button.
In the Control Panel window, double-click the Folder Options icon. A window of the same name will open, in which, on the General tab in the Tasks area, set the switch to Use regular Windows folders. By doing this, we get rid of unnecessary elements, but this does not deprive us of the ability to change the appearance of folders.
Right-click on a folder icon and select Properties from the context menu. In the window that opens, go to the Settings tab and click the Change Icon button at the bottom. A window will open (Fig. 4.3), in which we double-click on the icon you like. After that, click the Apply button in the folder properties window.

Rice. 4.3. Select an icon for the folder.
Note.
Changing the folder icon is worth it if you have 20 folders in one folder containing various information, which makes it easier to navigate them.
In the Control Panel window, double-click the Folder Options icon. In the window that opens, go to the View tab and check the box Do not cache thumbnails (get rid of thumbnails graphic files), as well as the Hidden files and folders switch - to the Show hidden files and folders position. If children work on the computer, then it is better not to set this switch.
Click successively the buttons Apply to all folders, Yes and OK.
Note.
Some programs (eg. Microsoft Word) work with copies of documents. The computer hides these copies. After the completion of work with the document, temporary files are destroyed, but if the program crashed and the document was restored, then temporary files are not always deleted. In Microsoft Word, temporary files are marked with ~$ symbols. Other programs may have other characters, but it doesn't matter. The important thing is that if the switch is set to Do not show hidden files and folders, then you do not see these files, therefore, you can delete them only together with the folder in which the document was created (if it is not system folder). If the switch is set to Show hidden files and folders, then you will immediately notice that an incomprehensible message has appeared in the folder. hidden file and you can delete it.
Remote use
In the Control Panel window, double-click on the System icon. In the window that opens, go to the Remote use tab (Fig. 4.4).

Rice. 4.4. Remote use.
In the Remote Assistance area, uncheck the Allow sending invitations to Remote Assistance check box, and click the Apply button.
Note.
Checking the box Allow sending invitations to remote assistance is needed if the computer is broken, but the system can be booted and one of your friends on the Internet will fix the problem, provided that both users have Windows XP installed and the same mail program. What will happen to the computer if the connection to the Internet is interrupted during the repair, nothing is said in the instructions for using the Remote Assistance.
In area Remote control desktop uncheck Allow remote access to this computer. Press the Apply and OK buttons.
Note.
Selecting the Allow remote access to this computer check box allows the owner (and makes it easy for other users) to access files on this computer.
error reporting
On the Advanced tab in the System Properties window, click the Error Reporting button. The Error Report window of the same name will open (Fig. 4.5), in which we set the switch to Disable error reporting and leave the But notify about critical errors. This will help to some extent get rid of the appearance of windows with a suggestion to connect to the Internet and send an error notification to Microsoft. But at the same time, you will be aware if something serious and not very pleasant happens to your computer, and you can take appropriate measures.

Rice. 4.5. Disable error reporting.
System update
On the tab Automatic update In the System Properties window, clear the Perform system update check box.
Scheduler
In the Control Panel window, double-click the Scheduled Tasks icon. From the Advanced menu, select Stop Scheduler. It is better to run all preventive programs manually (see section "Hard disk prevention").
Accounts
Disable or remove any extra user accounts.
In the Control Panel window, double-click on the User Accounts icon. In the window that opens, click on the Change user logon link and uncheck Use the welcome page. Click the Apply Settings button and close the User Accounts window.
Prefetch folder
Do we execute the Start command? Run. We will see the window Starting the program (Fig. 4.6).

Rice. 4.6. The Startup window.
Enter the word Prefetch in the Open line. Prefetch is Windows folder XP, which stores log files to optimize the most commonly called programs. Over time, a lot of these files accumulate, and if you uninstalled some programs, then links to them will still be stored in this folder. It will not be superfluous to clean the contents of the Prefetch folder once a month, but this should be done after defragmenting the hard drive.
System Services
Disabling unnecessary system services that consume computer resources will increase Windows performance xp. The average user does not need 50% of the system services enabled by default. Naturally, there is a completely understandable desire to turn them off.
Keep in mind that some system services depend on other services, so be careful when changing default settings. If a service is disabled, then services that depend on it will not be able to start. But remember also that if you have disabled the service, then you can also enable it.
Take a sheet of paper and write down all the operations performed, since in the window below there is no button Set by default, and if you have the necessary entries, you can return everything to its place. In addition, I will give some explanations on the purpose of system services.
So, to open the Services window (Fig. 4.7), in the Control Panel window, double-click on the Administrative Tools icon, and then on Services.

Rice. 4.7. Services.
System services can be in three modes:
Auto - services are automatically started at system startup;
Manually - for the service to start working, the user must start it;
Disabled - The service cannot be started either automatically or manually.
The list of services may vary, depending on the components selected during installation of the system, and on additional programs installed.
To switch operating modes, double-click on the selected service and in the window that opens, on the General tab, from the Startup type list, select Auto, Manual or Disabled. If you click on a service once, a description of the purpose of the service appears on the left side of the Services window. To display this description, you must select the extended window view. To do this, there are Advanced and Standard tabs at the bottom of the window.
If you double-click on the selected service, then in the window that opens, on the Dependencies tab, you can find out on which programs or components this service depends.
Consider which services can be disabled, and which are best left enabled.
DHCP client. Allows the computer to automatically obtain the necessary network settings(network address, gateway, nameserver addresses) from a DHCP server. If there is no network (neither local nor Internet), then this service can be disabled, but Windows XP connects to the Internet fine even without this service.
DNS client. Allows for this computer DNS names in the address and cache them. If there is no network and directory service Active Directory not used, this service can be disabled.
MS Software Shadow Copy Provider. Manages shadow copies obtained by shadow copying a volume. Disable this service.
NetMeeting Remote Desktop Sharing. Allows authenticated users to access the Work Windows table using NetMeeting. Disable.
Plug and play. Many services depend on it. Leave it unchanged (Auto).
telnet. Allows a remote user to log in and run programs, supports a variety of TCP/IP Telnet clients, including computers running UNIX and Windows operating systems. Disable.
Windows Audio. Control audio devices for Windows programs. Leave it unchanged (Auto).
windows installer. Installs, uninstalls, or repairs software. Leave the startup type as Auto.
Automatic update. Includes download and installation Windows updates. Disable.
WMI Performance Adapter. Provides information about performance libraries from WMI HiPerf providers. Disable.
Wireless setup. Provides automatic tuning 802.11 adapters ( wireless networks). Disable.
Internet firewall. Prevents service intrusion on a home or small office network. Leave the value Auto.
Web client. Allows Windows programs to create, access, and modify files stored on the Internet. Leave it unchanged (Auto).
Secondary login. Allows you to run processes as a different user. If there is only one user account on the computer, then this service can be disabled.
Remote Access Auto Connection Manager. Creates a connection to a remote network when a program accesses a remote DNS or NetBIOS name or address. Disable.
Logical Disk Manager. Detect and monitor new hard drives and report hard drive volume information to the Logical Disk Manager management service. Leave it unchanged (Auto).
Shipping manager. Manages synchronous and asynchronous file transfers between clients and servers on a network. If there is no Internet connection, then disable this service. If the Internet is available, then leave the startup type as Auto.
Print spooler. Loads files into memory for later printing. If there is no printer, then disable this service. If there is a printer, then leave it unchanged (Auto).
Remote Access Connection Manager. Creates network connection. If there is no Internet connection, then turn off. If there is Internet, then set the startup type to Manual.
Remote Desktop Help Session Manager. Manages Remote Assistance features. Disable.
Network DDE Manager. Manages Dynamic Data Exchange (DDE) network shares. Set the startup type to Manual.
Security Accounts Manager. Stores security information for account local user. Disable.
Access to HID devices. Provides universal access to HID devices (Human Interface Devices). If you do not have HID devices, then the service is disabled by default, and if it is, then you should not change the settings.
The event log. Provides support for event log messages generated by Windows programs and system components. Leave it unchanged (Auto).
Performance logs and alerts. Controls the collection of performance data from local or remote computers. You can disable this service if you wish.
Protected storage. Provides secure storage of sensitive data. You can disable this service if you wish.
Windows Management Instrumentation. Provides a common interface and object model for accessing operating system management information. Leave it unchanged (Auto).
Uninterruptable power source. Controls the operation of uninterruptible power supplies (UPS) connected to the computer. We disable this service.
Changed link tracking client. Supports associations of NTFS files moved within a computer or between computers in a domain. If you have a FAT32 file system, then disable this service.
Distributed transaction coordinator. Coordination of transactions spanning multiple resource managers such as databases, message queues, and file systems. Leave the startup type as Auto.
Remote procedure call (RPC) locator. Manages the RPC Naming Service database. Leave the startup type as Auto.
Routing and remote access. Offers routing services to organizations in the local and global networks. For the average user, this feature is useless. We turn it off.
NetBIOS support module over TCP/IP. Enables NetBIOS over TCP/IP (NetBT) service support and NetBIOS name resolution in an address. Leave it unchanged (Auto).
Smart card support module. Provides support for older smart card readers (non-Plug and Play). Disable.
Computer Explorer. Maintains a list of computers on the network and provides it to programs upon request. Disable.
Annunciator. Sends administrative alerts to selected users and computers. Disable.
Shell hardware definition. Leave it unchanged (Auto).
Task Scheduler. Allows you to configure the schedule for automatic execution of tasks on the computer. Disable.
NT LM Security Support Provider. Provides security for programs that use remote procedure calls (RPCs). Disable.
Work station. Provides support for network connections and communications. If there is no Internet connection, then disable this service. If the Internet is available, then leave it unchanged (Auto).
WMI driver extensions. Provides the exchange of control information with devices. Leave the value Auto.
Server. Provides support public access to files, printers, and named pipes over a network connection. Disable.
Exchange folder server. Allows you to view the pages of (your) exchange folders of remote computers. Disable.
The serial number of the portable media device. Receives serial numbers portable media devices connected to the system. Disable.
Network logon. Supports pass-through identification of account logon events for a domain computer. Disable.
Network connections. Manages the objects in the Network and Dial-Up Networking folder. Leave the value Auto.
COM+ event system. Support for system event notification service. Leave the value Auto.
IMAPI CD Burning COM Service. CD burning management using IMAPI (Image Mastering Applications Programming Interface). Leave the value Auto.
Logical Disk Manager Administration Service. Configures hard drives and volumes. Set the startup type for this service to Manual.
System Restore Service. Performs system restore functions. Leave it unchanged (Auto).
Windows Time Service. Controls date and time synchronization on all clients and servers on the network. Disable. They wanted to synchronize time with Internet servers - they turned on this service, and then turned it off again.
Image Download Service (WIA). If there is no scanner or digital camera, then this service can be disabled.
indexing service. Indexes the contents and properties of files on the local and remote computers. Disable.
SSDP discovery service. Enables discovery of UPnP (Universal Plug and Play) devices on the home network. UPnP devices are rare. We disable this service.
Error logging service. Allows you to log errors for services and applications running in a non-standard environment. Disable.
Network Location Service (NLA). Collects and stores information about the location and configuration of the network. Disable.
Message service. Sends and receives messages translated by administrators or the alert service. Disable.
Application level gateway service. Leave the value Auto.
IPSec services. Manages the IP security policy. Disable.
cryptographic services. Leave it unchanged (Auto).
Terminal Services. Provides the ability for multiple users to connect interactively to a computer, and displays the desktop and applications on remote computers. Disable.
Smart cards. Controls access to smart card readers. Disable.
Compatibility fast switching users. Manages applications that require support in a multi-user environment. If you are the only user on the computer, then this service can be disabled.
Help and support. If you are not using help system Windows, this service can be disabled.
Removable memory. Disable.
Telephony. Leave the value Auto.
Themes. If you have disabled Desktop Themes, you can disable this service as well.
Volume shadow copy. Controls the creation of shadow copies (state checkpoints) of disk volumes that are used for backup and restore or other purposes. Leave the value Auto.
System event notification. Logs system events. Leave it unchanged (Auto).
Remote procedure call (RPC). Provides endpoint mapping and other RPC services. Leave it unchanged (Auto).
remote registry. Allows remote control registry on your computer. Disable.
Generic PnP Device Node. Supports generic PnP host devices. We leave it unchanged.
Application management. Provides installation services software, such as assign, publish, and delete. We leave it unchanged.
Background Intelligent Transfer Service. Uses network bandwidth reserves for data transmission. Disable.
If you are afraid to disable any service, then set its startup type to Manual. The computer will boot when any service is disabled, but not all programs will work.
Hard Drive Prevention
Disk CleanupIf you want your computer to serve for a long time and properly, then you will need a minimum of effort. Once a week it is necessary to clear the hard disk of unnecessary information.
Open the My Computer window, right-click on the C: drive and select Properties from the context menu. The properties window for your disk will open (Fig. 4.8).

Rice. 4.8. Drive C Properties:
In this window, on the General tab, click the Disk Cleanup button.
The program will analyze the state of the hard drive and provide information. You can check all boxes.
Deleting temporary Internet files.
Delete all program files downloaded from the Internet (ActiveX controls and Java applications).
Temporary files.
Temporary offline files.
Temporary error reporting files.
Basket.
offline files.
If you want to view files prepared for deletion, then select any line (for example, Recycle Bin). The Description area will display explanatory text and, if the Trash is not empty, the Browse Files button will be available. After reviewing the information of interest, press the OK button. As a result, unnecessary data will be deleted from the hard drive.
Checking the disk for errorsCheck your hard drive for errors at least once a week.
In the properties window of drive C: (see Fig. 4.8), go to the Service tab.
In the Check Disk area, click the Check Now button. The Check Disk window will open (Fig. 4.9).

Rice. 4.9. The Check Disk window.
In the Check Disk Options area, select the Automatically fix checkboxes. system errors and Scan for and repair bad sectors. Press the Start button. Before starting the disk check, you must complete all processes, otherwise the program will ask you to restart the computer (Start? Shutdown? Restart).
After checking the disk, a message about the corrected errors will appear on the screen. Click OK - Windows XP is loaded. If no faults were found, then the operating system loads immediately, and you can start defragmenting the disk.
Disk DefragmenterAttention!
Disk defragmentation is the easiest way to improve your computer's performance.
The information on the hard disk is constantly changing. During operation, the operating system overwrites some files, which leads to the splitting of documents or programs into separate fragments stored in different areas of the disk. Fragmentation also occurs in the process of removing or adding files and programs. With significant fragmentation, data access slows down and the overall performance of the operating system decreases. To collect the files of one program in the same place, you should defragment the disk.
You also need to understand that accessing data at the beginning of the disk is slightly faster than accessing data at the end of the disk. Windows analyzes how often you use a particular program and, during defragmentation, places the most used applications at the beginning of the disk. Conduct defragmentation of the hard disk is needed at least once a week.
In the properties window of the C: drive, on the Tools tab, in the Disk defragmentation area, click the Defragment button. The Disk Defragmentation window opens (Fig. 4.10).

Rice. 4.10. The Disk Defragmenter window.
To start the process, it remains to click the Defragmentation button. The program will analyze the disk and start defragmentation, after which you can read the report and see the state of the disk before and after defragmentation.
Programs for system optimization
Often, independent actions of an inexperienced user to optimize a computer lead to the opposite result - some program starts to work more slowly, and something does not want to start at all. To make life easier for the user and save his time, many programs have been created that, with less risk to the operating system, will perform actions aimed at optimizing the computer.
winboostIf you do not try to change the settings yourself, you will never learn anything and will not be able to use the computer at 100%. However, any of your actions must be meaningful, you must understand what you are doing and why. If you do not understand something, then entrust the execution of the task to a program specially created for this purpose. Do not try to immediately change 1000 settings and install 20 optimization programs, otherwise you will not understand the cause of random errors and will not be able to troubleshoot. The main thing is that there is nothing to be afraid of. The worst thing that threatens you is reinstalling windows xp. You should also understand that each installed program for optimizing your computer will itself consume computer resources and take up space on your hard drive. Before you decide to install any program, think about whether you need it?
The WinBoost program (Fig. 4.11) will perform all the steps to optimize and change appearance Windows XP is for you. You only need to uncheck or check the appropriate boxes.

Rice. 4.11. WinBoost program window.
After installation, WinBoost will test the operating system and make the necessary changes, but you can change the settings as you wish.
Registry optimizationThe registry is the database of the operating system. All programs installed on a computer enter the necessary information into the registry. However, after these programs are uninstalled, registry entries remain, and a large amount of unnecessary information can slow down your computer. Therefore, the registry should be cleared of unnecessary entries.
Unfortunately, Windows XP does not have the hardware to clean and optimize the registry. You can, of course, manually remove unnecessary information using the Registry Editor (Fig. 4.12). Does it open when you run the start command? Run, type regedit in the Open box, and then click OK.

Rice. 4.12. Registry editor.
The registry contains five root sections (branches) displayed on the left side of the window as folder icons.
HKEY_CLASSES_ROOT - information about registered in Windows types files.
HKEY_CURRENT_USER - settings for the current user.
HKEY_LOCAL_MACHINE - Information related to the computer: drivers, installed software and its settings.
HKEY_USERS - settings for all users.
HKEY_CURRENT_CONFIG - Information about the configuration of Plug and Play devices and the configuration of a computer with variable hardware.
The final element of the registry tree are parameters (keys).
Attention!
Incorrectly changing or deleting information in the registry can cause serious problems.
A novice user should not change the values in the registry, it is better to use specially created programs.
Registry utilities can be divided into the following categories.
Editors. Allow the user to edit the registry.
Programs for diagnostics and treatment. Scan the registry, find and fix errors.
Optimizers. Defragment the registry.
Monitors. Monitor registry changes.
Multifunctional programs.
The RegClean utility (Figure 4.13), which was created by Microsoft, finds and removes invalid registry settings located in the HKEY_CLASSES_ROOT key.

Rice. 4.13. RegClean program window.
We start the program. The scanning process will begin. After its completion, two buttons will be available.
Cancel - refuse to make changes and exit the program.
Fix Errors - agree with the changes made. The program will create a file that will display all the changes made. In the event of an unstable computer, you can restore the previous registry values by double-clicking on this file. The file is located in the same folder where the program itself is installed. Close the program by pressing the Exit button.
The Registry Defragmentation utility performs physical defragmentation of the system registry of the operating system, removes unnecessary entries left after the removal of applications and programs, corrects the linear structure of the registry, and optimizes the registry, which allows you to increase the speed and stability of your computer.
Ad-awareThe Ad-aware utility (Figure 4.14) checks the memory system registry and computer hard drive for spyware. Most often, such tracking programs are installed along with free applications downloaded from the Internet.

Rice. 4.14. Ad-aware program window.
Spyware doesn't harm your computer, it only collects information about what you do, what programs you use, what websites you visit, and what hardware you have installed. The information obtained can be used to create sites and programs that most closely match the needs of the consumer. In general, this is not so bad, but who likes to realize that someone is watching him all the time? In addition, disk space and RAM are wasted, and the speed of the modem is also reduced.
While browsing the Internet, move the mouse pointer over the icon located on the right side of the Taskbar (in the notification area) that displays the connection status. On the tooltip, you can see how much information you received and transmitted. If you have not used email, then who transmitted such a volume of data?
The Ad-aware program is easy to manage and does not require special settings. Open the program and press the Start button. You can choose from three scan modes.
Quick system check - uses the settings set by the program itself. I recommend using this mode.
Default settings - by selecting this option and by clicking the Customize button, the user can change the scan settings as they wish.
Drive/Folder Selection - by selecting this mode and pressing the Select button, the user can limit the scope of the scan by specifying the folders to be scanned.
Select the Quick System Check, select the Detailed View check box, and click the Next button. The scanning process will begin, lasting from 3 to 15 minutes, depending on the size of the hard disk and the amount of information. The Summary area will display the following information:
Processes found;
Registry keys found;
Registry values found;
Files found;
Folders found.
Once the scan is complete, you will be able to see how many objects have been scanned and detected. Click Done. Go to the Check Results window. If you double-click on the file name, the Details window will open, containing the following information:
Manufacturer;
Object type;
Location;
Last access;
Level of risk;
A comment.
Set the checkboxes next to all found objects and click the Quarantine button. A window will appear Enter a name for the archive, in which we enter a name and click OK. In the next window, you will be asked to confirm your decision - click the OK, Next and OK buttons. Let's go back to the original tab.
Note.
Quarantining means that detected objects will not be deleted from the hard drive, but will be isolated by the program from the operating system. If there are problems with the operation of the computer, then all quarantined objects can be easily restored.
Try to use programs to optimize and prevent the operating system, allowing you to roll back or placing suspicious files and programs in quarantine.
Let us once again pay attention to Fig. 4.14 and click on the link Open Quarantine-list - objects placed in quarantine will be available. You will see the following information.
File name. If the list of quarantined objects has been repeatedly updated, it is convenient to navigate by the name of the saved files.
Size. Shows how much space the file takes up on the disk.
Date of creation.
Total objects. The number of isolated objects in the file.
Right-click on the saved file (archive). From the menu that appears, you can select the following.
Archive recovery. By selecting this item, you can restore the archive.
Delete archive. Deletes the selected archive.
Delete all archives.
We choose what we consider necessary and close the Ad-aware program.
Antivirus Doctor WebNot all programs installed on your computer without your knowledge are as harmless as spyware. There are also viruses. Computer viruses are malicious programs written by programmers specifically to harm someone close (or far away).
Viruses can reside in program files and become active when these files are run. After loading into RAM, such viruses begin to multiply and corrupt or destroy various data on the computer. Similar viruses sometimes they stay on your hard drive for months and do not give themselves away until you run infected programs.
When copying information from your friends, do not forget to check the recorded data for viruses before installing it on your computer, as your friends may not suspect that their files are infected with a virus.
Boot viruses infect a computer through the boot sectors of disks while the computer is booting from a disk.
Viruses cannot be activated by copying files or programs. For example, if an infected document created in Microsoft program Word, then until you open this file, the virus will not be initiated.
Place all data received from the Internet in a specially created folder and do not open them without checking for viruses. However, it is safer to set antivirus program, which will check your mail and all information received from the Internet.
At present, the Doctor Web program is very popular (Fig. 4.15).

Rice. 4.15. Doctor Web program window.
As soon as you open Doctor Web, it will start checking the processes taking place in RAM. For a more detailed check, you need to select the desired object.
Disk 3.5 (A:). All information recorded on floppy disks must be checked before being copied to a hard drive.
Drive (C:). You can check the entire hard drive or by clicking on the "+" icon, select the necessary folders to check.
CD-RW drive (D:). Checking CDs in the drive.
To select the scan object, click on the selected object. After that, you will see a red dot on the selected object, and the image of the standing red man on the right will change to a walking green man.
We click on the image of a walking green man or press the key combination Ctrl + F5. The check will start. By default, the program is configured in such a way that it will not perform any actions with infected files, but will only find them. To delete or disinfect infected files, right-click on the name of the object and select one of the following items from the menu that appears.
Cure:
– Remove the incurable;
– Rename the incurable;
– Move the incurable.
Delete.
Rename.
Move.
Doctor Web does a good job of finding viruses, but it doesn't cure them very well, mostly removes them. Unfortunately, such a function as quarantine is not provided, but to remove an important system file operating room Windows system XP won't let you.
Doctor Web for Windows includes the following components.
Doctor Web Scanner - virus scanner with a graphical interface. The program starts at the user's request or according to a schedule and scans the computer for viruses.
SpIDer Guard is an anti-virus guard (also called a monitor). The program is constantly in RAM, checking files "on the fly" and detecting manifestations of virus activity.
SpIDer Mail is a mail anti-virus guard. The program intercepts requests from any computer mail clients to mail servers via POP3 and SMTP protocols, detects and neutralizes mail viruses before receiving emails email client from the server or before the email is sent to the mail server.
Automatic update module.
If, after reading this section, you decide to install all the programs described, then it would be more reasonable to install a software package created by one company. Symantec's Norton package is the most popular. This company has developed programs for optimizing the registry, defragmenting and cleaning the disk, antiviruses, programs that check Windows for errors, and many more. useful programs to keep the operating system running. But we should not forget that any installed software uses computer resources.
In most cases, the most valuable thing on a computer is information. Information can be valuable information, and over time, a huge amount of such data accumulates on each computer. Even if there is no particular value in the information, no one wants to lose software distributions or downloaded web pages.
That is why, from the moment the first computer appeared, it is very important to archive information for subsequent storage on external media.
Today, storage media are cheap and available to everyone. It seems that saving important data is not difficult, and yet many users neglect this precaution. The consequences of such an irresponsible attitude are deplorable.
In order not to replenish the army of losers who forgot or did not want to save important information, periodically archive the data.
Windows XP, one of the latest operating systems from Microsoft, has its own data archiving mechanism. To run it, type Start? All programs? Standard? Official? Data archiving. The Backup or Restore Wizard window will appear on the screen (Fig. 6.1).
Rice. 6.1. The start window of the Backup and Restore Wizard
As you can see, the wizard allows you to work both in backup mode and in recovery mode. You can select the required option in the following steps, to proceed to which you need to click the Next button.
Indeed, in the next window (Fig. 6.2), the wizard will ask you to specify the operation option: Archiving files and settings or Restoring files and settings (from a previously created copy). Since we are going through the process of backing up files, select the radio button for Backing up files and settings and click Next.

Rice. 6.2. Choose the required action
In the next window (Fig. 6.3), the wizard will prompt you to select the level of process automation and the type of data to be saved. The first three positions of the switch correspond to the archiving of specific folders and data. To select a mechanism in which you can independently specify what exactly to archive, set the radio button to Provide the ability to select objects for archiving. Then click the Next button.

Rice. 6.3. Set the mode of self-selection of archiving objects
In the next window (Fig. 6.4), you will have the opportunity to mark all the necessary data on any of the available disks, including a floppy disk, removable devices, CDs, network drives and so on. After entering the required information using the appropriate checkboxes, click Next.

Rice. 6.4. Select archiving objects
Finally, you must specify the location of the future archive (Fig. 6.5). By clicking the Browse button, you will see a standard folder selection window, in which you can specify both the drive and the folder where the data archive created by the wizard should be located. In addition, you can enter the name of the archive file.

Rice. 6.5. Choose the location of the future archive
After entering all the required information, click Next.
In the next window (Fig. 6.6), the wizard will display the summary information that you entered as archiving parameters. If you do not agree with something, click the Back button and change the necessary settings. If everything is in order, then click on the Done button.

Rice. 6.6. Summary Information
As a result, the archiving process will start, which can be observed in the window shown in Fig. 6.7. In this window, you can see the number of files involved in archiving, the size of the archive, the end time of the process, etc.

Rice. 6.7. Archiving in progress
After the archiving is completed, a file with the BKF extension will be created in the specified folder, containing all the necessary data. If necessary, this file can be unzipped using the same wizard. To do this, just double-click on the file icon and adjust the actions of the wizard.
Monitoring the condition of components
The number of components installed in the computer is quite large, and their cost is sometimes very high. First of all, this concerns the central processor, hard disk and graphics adapter.
The stability of the computer depends on the operating conditions of its components. Any overclocking of components greatly affects the operation of the computer. It leads to an increase in their temperature, which in turn affects the operation of other installed components.
Of course, the temperature inside the case may not rise at all due to overclocking of computer components. This can happen, for example, due to the fact that the ventilation system cannot cope with its functions, which should draw warm air out of the case and draw cold air in.
So, the state of computer components must be constantly monitored using specialized software for this.
The temperature regime of components is monitored by many thermal sensors installed on the processor, memory, hard drive and other devices of a modern computer. The program only needs to collect, analyze and display the necessary information.
Among the programs that perform this function are Motherboard Monitor, SpeedFan, CPUCool, HDD Temperature, etc. In practice, it is quite enough to use the Motherboard Monitor and HDD Temperature utilities. Motherboard Monitor, SpeedFan displays information about CPU temperature, fan speed and other parameters on the computer screen, and HDD Temperature is only for displaying the current temperature of the hard disk.
Motherboard MonitorMotherboard Monitor (Fig. 6.8) is one of the most complex programs for displaying information about the status of computer components.

Rice. 6.8. Motherboard Monitor window
So, the program can show the temperature in the system unit, the temperature of the processor, the voltage on the processor, the constant voltage of the stabilizers, the frequency of the processor, the speed of rotation of all fans installed in the system, and much more.
After launch, several program icons appear in the notification area, with which you can manage it.
For visual display, there is the possibility of alternative display of information, as on a car speedometer (Fig. 6.9). The main feature of the program is the ability to program the appearance of a warning message when one of the parameters reaches a critical value.

Rice. 6.9. Alternative way to display information
Naturally, for the maximum functionality of the program, it is necessary that the computer components are equipped with appropriate thermal sensors.
HDD TemperatureHDD Temperature (Fig. 6.10) is a simple, but at the same time quite effective program for monitoring the current temperature of hard drives installed in a computer.

Rice. 6.10. HDD Temperature Program
The temperature of the hard drive is a rather critical parameter, especially if a lot of information storage devices are installed in the system, and the ventilation system does not have time to properly cool the inside of the system unit. In addition, the heat generated by some components, such as the processor or graphics card, may be increased if the computer is overclocked.
Despite its apparent simplicity, the HDD Temperature program is quite functional and performs all the operations that may be required to protect the hard drive from damage. You can set up an alert system when the temperature of the hard drive exceeds a predetermined level, as well as set the automatic shutdown of the operating system when the temperature rises to a critical level.
You can constantly monitor the temperature of the drive thanks to the program icon in the notification area, which displays this information in degrees Celsius or Fahrenheit.
The power supply in Russia and the CIS countries will be unstable until all power supply transformer stations and installations are updated. And this will happen very, very soon.
In this regard, in order to get a more or less stable supply of electricity, you have to use all possible means at hand.
A lot has been said about the consequences of power supply instability, but let's dwell on this again.
First of all, the power supplies of all devices connected to the computer suffer. These are the power supply of the system case, the power supply of the monitor and the power supplies of all connected peripherals. In addition, voltage fluctuations in the mains negatively affect the operation of the input circuits of the motherboard and storage devices. The biggest blow, unless, of course, it is stopped by all the previous circuits, falls on the central processor and RAM. As you can see, all the main components of the computer are at risk, without which it is not able to function.
Since it is impossible to change the quality of the voltage supplied to an apartment or office, you should try to influence the voltage supplied to the computer and devices connected to it.
The first means of defense are extension cords that are protected from impulse noise and sudden power surges. There are a lot of such models of extension cords, and they differ only in price. The higher the price, the better the extension cable and, accordingly, your computer will be more secure. As a rule, outwardly such an extension cord looks like a box with a switch and five sockets for connecting devices (Fig. 6.11).

Rice. 6.11. Extension
More complex models are equipped with a separate switch for each outlet. If the fuse blows (and there must be one), only one outlet in the extension cord stops working, and not the entire unit.
However, even the highest quality extension cord cannot be compared with an uninterruptible power supply, the main task of which is to stabilize the voltage and keep it at the same level. In addition to protecting electrical circuits, an uninterruptible power supply very often allows you to protect the telephone line, which is also sensitive to power surges that can damage the input stage of a modem or other similar device.
In addition to using auxiliary devices, you should take care that devices that do not have a noise filter and can make their own adjustments to the operation of the computer are not connected to the power strip to which the computer is connected.
Dust control
Dust, like the instability of electricity, also carries a certain threat to the operation of the computer.
Why is she harmful? First, dust shortens the life of any mechanical and electronic devices. How does this happen? Very simple. I'll give you an example. Dust settling in the power supply fan mechanism causes the fan shaft lubricant to dry out faster, which leads to increased friction in the seat. This sooner or later leads to unstable operation of the fan, which means an increase in the temperature of the components of the power supply and inside the system unit. As a result, the power supply may fail, which in turn leads to damage to other components of the computer. As you can see, milligrams of dust that settle on the insides of computer components every day are no less dangerous than, for example, power surges.
Dealing with dust is very easy. It is only necessary to periodically carry out wet cleaning, be sure to wipe all the surrounding objects from accumulated dust.
In addition, occasionally, but also periodically, the internal surface of the system unit and all devices connected to the computer should be cleaned of dust. This can be done with a vacuum cleaner and a damp cloth, or with special cleaning kits (Fig. 6.12), which are sold at any computer store. At the same time, be sure to clean all the dust from the computer's power supply!

Rice. 6.12. Computer cleaning kit
In addition, the location of the computer is also important. The lower its system unit is located, the more dust it will suck in. It should be installed at least 10–15 cm above floor level.
This, perhaps, can be completed, although you can come up with more than one way to deal with dust. By following the rules described, you can at least double the life of your computer.
Prevention of power supply failures
The normal functioning of the entire computer depends on the quality of the power supply. If something is wrong with the power supply, you will immediately know about it by the silence of the fan, the temperature of the exhaust air, computer reboots, etc. Therefore, in order for the power supply to last a long time (and work stably), two rules should be followed.
normal nutritional conditions. To connect a computer, use a filter, or better, an uninterruptible power supply. Try not to connect a computer and powerful devices, such as an iron or a microwave oven, to the same filter. If possible, connect the computer to a grounded line.
Normal temperature. Several factors influence the temperature regime, in particular the power supply capacity and the condition of its fan. If you notice that the temperature of the air blown out by the fan of the power supply has increased, get ready to replace it with a more powerful one. The fan should be periodically cleaned and, if necessary, lubricated with a seat of its impeller.
If the power supply unit overheats and shuts down due to overload when using the computer in the summer, provide additional cooling for the computer. This can be done, for example, by connecting an additional fan inside the case. If the case does not provide for the installation of a stationary fan, you can purchase a fan placed in a PCI slot or in a storage compartment.
To avoid disturbing the optimal air circulation inside the system unit, check the presence of all the plugs on the back of the computer. This will also further block the path of dust ingress into the system unit.
Over time, a lot of dust accumulates inside the power supply, which, together with moisture, leads to the fact that the dust begins to conduct electricity. And this means one thing: the imminent failure of the power supply unit. Therefore, if possible, systematically vacuum the power supply. In this case, it is not at all necessary to open it: just use one of the ventilation holes.
Prevention of CPU cooler failure
A processor cooler, consisting of a heatsink and a fan, performs a very important function - it cools the processor, which, by the way, loves to heat up very much. Therefore, the stability of the system as a whole directly depends on the quality of the cooler.
The main component of the cooler is the fan, since the heatsink is passive. It is known that any mechanical device requires special care, especially if it contains rubbing elements. Over time, the lubricant loses its properties, which leads to a deterioration in the operation of the device: the fan starts to make noise, vibration appears, etc. Therefore, if you hear a characteristic noise inside the system unit, know that it's time to intervene.
By the way, any cooler installed in the case can make noise, for example, a video card cooler or an additional air ventilation cooler. You can prevent all these devices in the same way as a CPU cooler.
Be sure to carry out a “wet cleaning” of the fan, cleaning it of dust and lubricating the axles with special oil. There is, of course, another way out - buying a new radiator (fan), but, for obvious reasons, it is not suitable for everyone.
To gain access to the fan, it must be unhooked from the radiator. Usually the fan is attached to the radiator with four small screws. Having unscrewed them, remove the fan, not forgetting to first disconnect it from the power supply.
To clean the fan blades from dust, you can use a cotton swab dipped in alcohol. If the fan has not been prevented for a long time, then the dust can form a hard crust. If so, don't be afraid to use a little force to remove it.
To clean the dust from the blades, it is not necessary to pull the impeller itself out of the socket. However, the fan will have to be removed.
Typically, there is a sticker on the bottom of the fan slot with a mounting mechanism underneath. With the help of an annular recess at the end of the iron base, the impeller is held in the socket. After the impeller is installed in the socket, it must be fixed. A plastic washer should be put on the ring-shaped recess at the end of the iron base of the lid, which will hold it (Fig. 6.13).

Rice. 6.13. Peel off the sticker and carefully remove the plastic ring
Your task is to remove the puck without damaging it. If the fan is old enough, then this washer could lose its flexibility properties. In this case, you must act carefully so as not to destroy it.
In addition, the difficulty lies in the fact that the washer fits very tightly into the recess of the impeller. To get the washer, pry it with a thick needle and pull it out with tweezers. After that, the impeller can be pulled out.
Then wipe the inside of the socket with a cotton swab dipped in alcohol. The hole in which the impeller is installed must be lubricated with a special oil of sufficient viscosity. However, before lubricating the hole, put the impeller in place and try to shake it slightly. If you find a slight play, the reason for this is the exhaustion of the fan. The development manifests itself in the form of an uneven vibrating spin-up of a working device.
Unfortunately, it is impossible to completely eliminate the production. The only way out in this situation is to use oil with a sufficient degree of viscosity. This oil has a high resistance to temperature rise, which allows you to create the most comfortable environment for the fan, in which vibration may not occur. Over time, of course, this lubricant will lose its properties, the noise will reappear, and this procedure will need to be repeated.
Thus, after applying grease to the impeller shaft, install it in place. Then rotate the impeller around the axis several times so that the lubricant is evenly distributed. In this case, a small amount of oil may appear from the side of the impeller mounting, and this excess grease must be wiped off. Finally, install the fixing washer and attach the sticker.
This completes the fan troubleshooting. Screw it back to the heatsink and plug in the power. Now you can boot your computer and check the result of your efforts.
Prevention of hard drive failures
The hard drive is the main device used to store information needed by both the operating system and application programs. It is clear that the stability of the system depends on the safety of these data.
To always be aware of the physical state of the hard drive, you need to check it from time to time using specialized utilities. In particular, you can enable the use of S.M.A.R.T. technology in the BIOS of the computer, which allows real-time monitoring of many disk indicators at the hardware level. If the system detects impending serious problems, it will warn you about this immediately after turning on the computer and initializing the devices. If this message appears, you should immediately back up your data to another hard drive or storage device.
In addition, sometimes it is necessary to check the surface of disks, using, for example, the built-in verification mechanism. To activate it, just open the disk properties window (to do this, right-click on the disk icon and select the Properties item in the context menu that opens), go to the Service tab and click the Run Check button (Fig. 6.14). Depending on the specified parameters, the disk check may start immediately or after the computer is restarted, which the system will inform you about.

Rice. 6.14. Click the Run Check button
If a message about the presence of bad sectors appears on the screen during the check, get ready for the fact that the disk will need to be replaced with a new one, unless, of course, the number of bad sectors increases.
Keyboard breakage prevention
The keyboard, as an input device, is exposed to contamination, which can soon lead to the fact that some buttons will no longer be pressed or will be pressed with difficulty.
You can clear the keyboard in the following way. Turn it upside down and give it a good shake. At the same time, dust, bread crumbs, hair, cockroaches, paper clips and everything that once fell between the keys will begin to pour from the keyboard.
If the described cleaning method did not help, use another.
First, pull out all the keys from the keyboard, prying them, for example, with scissors. Remember to lay out the keys in the same order as they were located on the keyboard.
Then wipe down each key to get rid of stubborn dirt.
After that, assemble the keyboard and try to work on it.
Mouse troubleshooting
The mouse, like the keyboard, is prone to contamination, which leads to poor control of the mouse pointer on the monitor screen. This is especially true of mechanical mice, the main element of which is a ball.
If you have a mechanical mouse, turn it upside down, open the socket (the cover covering this socket shows how to remove it correctly) and pull out the ball. Then clean the rollers in contact with the ball from adhering dirt. It is also useful to wipe the ball itself with an alcohol wipe.
Assemble the mouse and clean any dirt from the corner supports on which the body of the device slides. Then wipe the body of the mouse itself.
If the control of the mouse pointer has not improved much, you can try to disassemble it and remove dirt from the photo sensors responsible for moving the mouse in different directions.
A computer, like a dog, is a friend of man. Accordingly, care for him should be the same as for a living being. If you don't take care of your computer, it will frustrate you by malfunctioning. Well, of course, if these are software failures that can be fixed quite easily. However, if components begin to fail, then it may happen that you say: “Why did I buy it - only problems.” Therefore, you need to be able not only to take care of the computer, but also to correct the malfunctions that arise.
You have read about the many troubleshooting steps that will help you bring your computer friend back to life. Of course, it was not possible to describe all the malfunctions and methods of dealing with them in a small book, but this does not mean that you cannot deal with them. The main thing is a conscious approach to the problem, which will help to deal with it using familiar means. It is in such situations that a great thing is born - experience.
The answer to such a disgrace can be either the recently discovered eleventh commandment “Honor the Saturday backup and do not kill the system disk image”, or an entire article about problems and methods. In any case, competent backup of the proper level is, as it turns out, a rather costly thing both in terms of money and effort.
The habit of connecting an external hard drive to the computer at least once a week and starting a backup should be recognized as extremely useful and cultivated in every possible way
Not all users can boast of the constant availability of fresh, working copies stored in a safe place and ready at any time to replace files lost for one reason or another. Despite the variety of software for Reserve copy and all the cloud technologies that have developed in recent years, regular backup is hindered by both banal inertia and laziness, and the unwillingness of many to go to tangible costs. The same NAS-storage costs in a decent version as a whole system unit, and with the current rise in price of HDD, even more. Internet services that provide really sufficient amounts of data storage are also by no means free.
Therefore, it is best not to lose data, but to do this, behave prudently and try to ensure that hard drives - the main information carrier of our era - fail as rarely as possible. A competent choice of HDD model, its correct installation and operation will help to avoid emergency situations. It will not be superfluous to monitor the condition of the drive and periodic preventive maintenance. We'll talk about all this.
But first I would like to dwell on the causes of data loss. According to statistics collected by specialized companies, they are distributed as follows:
- 40% - malfunctions and equipment failures;
- 29% - user errors;
- 13% - software errors (OS, utilities, application programs);
- 9% - deliberate damage to data (theft, damage, etc.);
- 6% - exposure to viruses and other malware;
- 3% - external impacts (natural disasters, fires, etc.).
As you can see, the widespread opinion that the user himself is to blame for computer problems is wrong - most often, equipment failures lead to trouble. And the “human factor” (read: the curvature of the hands) occupies only the second, but also a significant place in this rating.
How do hard drives fail? There are not too many symptoms, so here are the most common ones along with their likely causes. We will omit the reasons that boil down to incorrect actions of the user himself.
| Symptom | Problem |
|---|---|
| HDD won't start | Electronics board failure |
| HDD starts, but the spindle does not spin up and makes unusual sounds (screeching, buzzing, clicking) | Sticking heads on the plate, or wedge of the spindle bearing. Also, the control chip on the board is very hot. |
| The HDD normally starts and spins up, but is not recognized in the computer, the BIOS cannot read the passport | Destruction of firmware boot modules (located in ROM on the board or in the service area on the platters) |
| HDD starts but is not recognized and knocks | Mismatch of data in the ROM and the service area (occurs when the ROM is damaged or the board is replaced with a “foreign one”), or the block of magnetic heads or the microcircuit that controls it on the board fails |
| The HDD is recognized, but during operation it makes uncharacteristic sounds (knocking, creaking, rustling, etc.) | Multiple surface defects up to table overflow |
| HDD is recognized, but data is not available, reading any sector returns "dirt" or an error | Damage to service area modules, primarily the translator (responsible for translating logical LBA addresses into physical ones, taking into account the tables of defects - both factory-made and those that appeared during operation) |
This classification will help diagnose most breakdowns. It is clear that a modern hard drive is an extremely complex product, and it cannot be brought back to life at home. There are exceptions, but they are increasingly rare. Universal advice: in case of any malfunctions, immediately turn off the disk and take it to a specialist for diagnostics. Decent people and companies do not take money for it. This is especially important with rattling heads - they can pretty much spoil the magnetic surface (scratches, gashes, potholes), and then the data cannot be pulled out.

This illustration shows the only correct position of the user's hands after turning off the power of the computer in the event of an apparent hard drive failure. When you come to your senses, you need to carefully remove the HDD from the computer and take it to a specialist. Everything else is dangerous for your data
Choosing a hard drive
Customers often ask: which brand of hard drives is better and more reliable? So, from the point of view of the repairman, no brand is in the lead. All HDD manufacturers (and you can already read them on the fingers of one hand) have reached an approximately equal level of quality. Companies that have faced serious problems have long since left the market, and those that remain are placing reliability at the forefront. All this actually removes the issue of choosing a brand.
Yes, every vendor has unsuccessful models and families, well, that's why you have the Internet at your side to go over specialized forums. As a rule, stories about problem models always hang from above. Just keep in mind that the information becomes outdated pretty quickly, because the production program is updated twice a year, and already released lines are constantly being finalized, and sometimes significantly. So, a manufacturer can quietly replace three 333 GB platters with two 500 GB platters in a terabyte model; it will cost him less, and performance will jump significantly (a bonus to the user, however). But how modernization will affect reliability is an open question.

Western Digital has always been famous for its “love” for quietly upgrading its drives. Outwardly, they can look like twins, but from the inside they can have completely different component implementations.
The rate of change of HDD models today is such that it is useless to ask repairmen about their reliability - they begin to massively carry drives for repairs when they are already out of production and disappear from sale. They are replaced by new developments - attractive in terms of specifications, but "black boxes" in terms of internal device and reliability. So, alas, it is impossible to draw technically sound conclusions about the weak points of new products.
From my point of view, it is not worth buying a disk of a new model that has just appeared on the market. There are untested solutions in new products, besides, the quality of the first batches is unstable, you can run into a manufacturing defect. Problems with the firmware (“brakes”, incompatibility, etc.) are also more common among beginners. Nothing can be done - mass production in a highly competitive market cannot be established without flaws. I advise you to take a closer look at the models announced at least six months ago - during this time, technological refinement will end, failure statistics will accumulate (see reviews on the Web), and prices will have time to drop.
An important issue is the choice of HDD model range. Today, under the same brand, lines for various purposes are produced, belonging to different price categories and, accordingly, having very different performance and reliability. First of all, the consumer and corporate segments are separated. You should not expect the same reliability from a “household” disk as from a server one. Enterprise-class drives (Seagate ES.2/Constellation 2, Hitachi Ultrastar, WD RE4/VelociRaptor) are assembled from particularly high-quality components, tested more rigorously, have a more complex design and improved firmware. Often the recording density in them is deliberately reduced. As a result, the drives have a long time between failures (MTBF up to 2 million hours), are resistant to overheating, can withstand 24/7 operation under high load, and a long warranty (five years, but since January 2012 in some cases - three year) warms the soul. The only drawback, but important for many, is the high price: one and a half to two times more expensive for the same capacity.

For drives used in everyday life, heat and noise are very important. It is not for nothing that the “green” 3.5” lines have gained such immense popularity. In them, the spindle speed is deliberately reduced from 7200 to 5400-5900 rpm, and this significantly reduces noise and power consumption. As a result, the drives heat up little and demonstrate good reliability, but their performance is low. These models are ideal for storing media files with predominantly sequential access, as well as for use in external drives and network storage(There the interface itself imposes its limitations). "Green" disks are used to complete consumer electronics (video recorders, media servers, etc.) and especially compact PCs, where active cooling is undesirable due to noise or is completely impossible. Many are also attracted by the cheapness of such drives: in terms of dollar / GB, they are the market leaders. Even as skewed as the current one.
To host the OS, applications, and random-access databases, you need a high-performance drive. Here, 7200 rpm models with a powerful magnetic head drive and read-ahead algorithms are better suited. However, such disks heat up more and, as a rule, need active cooling (the best thing is a large-sized low-speed fan at the end of the disk cage). Otherwise, the drive may quickly fail due to overheating. The recommended temperature limits for drives are rather narrow - 25-45 °С with short-term rises up to 55 °С. In a windproof case, during active work, “hot” models (for example, Hitachi 7K2000) constantly heat up to 50 ° C and above.

The next thing that interests the user is the capacity of the HDD. The higher it is, the better: such is the general belief. However, it is often overlooked that reliability is inversely proportional to capacity. After all, the higher the latter, the more magnetic plates and heads are used in the design and the more likely the failure of one of the heads. In addition, a multi-platter disk consumes more energy and heats up more, and the considerable weight of the package (3-4-5 plates 1.6 mm thick) gives an increased load on the axle and provokes a spindle wedge even with mild impacts. This, by the way, is one of the most difficult malfunctions in the practice of data recovery.
So high-capacity drives (2 TB and above) are very capricious. They really do not like even minor mechanical influences, and are also sensitive to overheating. I would advise to treat such discs as with crystal glasses. Even putting them on the table (in a non-working state!) Should be done with care. Showing off in the specifications of 300-350 g - this is at least unconvincing. Nobody knows how it was measured.
I'm out of practice. Our discs are sold in antistatic bags, no cushioning. A dvuhterabaytnik blurted out like a pack of butter - and a week later fifty candidates for "bads" (in the jargon of repairmen - "pendings"). There is also submicron accuracy, the track width is only 150-200 nm, as many as four hundred of these fit into the thickness of a hair. Any misalignment of the shaft generates positioning errors (the S.M.A.R.T. Seek Error Rate attribute increases) and defects. By the way, repairmen have all movements with discs in their hands slow and smooth, as if in wushu. A good reflex based on bitter experience.

Slowly I summarize: for reasons of reliability, it is worth dividing all the disks by the number of platters. To install the OS, a model on one plate is best suited (they are the most reliable, and they heat up less), and for storing working data (documents, current images, databases, etc.) - on two. High-capacity HDDs with three or more platters (it is better if they are of the "green" series) should be assigned to less important information that does not require backup. After all full backup of such a volume at home, for obvious reasons, is difficult. These can be multimedia files, including those downloaded from the Web, or something else that has duplicates. Anyone who “shoves” a three- or four-plate into an outer case takes a big risk: the shock absorption and stability of such cases are usually weak, and there are problems with power supply.
By the way, about the purchase. It seems to be clear to everyone, but I repeat: you should not buy an HDD from your hands, in the markets or in small dubious shops. You may come across a disk from a gray import, or even a second-hand copy or after repair. It will look like new, especially since with any qualified repair, all S.M.A.R.T. counters indicating “mileage” are reset. But the wear of the mechanics does not go anywhere, and the life of such a disk will not be long. You should not count on warranty obligations - they are in similar places ghostly. Minor savings can turn into big problems, and who needs it?

When buying an HDD it is not clear where, it is impossible to imagine its past. Maybe the disc lay peacefully on the shelf, waiting for the owner, or maybe some amateur photographer managed to take it apart for a similar picture ...
It is even more fun if the hard drive has suffered a serious blow, and the owner urgently sells it, while the breakdown has not yet manifested itself in its full glory (it sometimes takes several days). Of course, if you have known the seller for a long time, then he will not go for such tricks. But it's best to take discs from serious trading companies that have been on the market for a long time and provide a real guarantee for the full period set by the manufacturer (and not like others like - 6 months, at least according to the ZOZPP, and go for a walk). Let it be more expensive.
From time to time, one or another trading company or service center publishes its HDD return statistics under warranty. Some people take it too seriously and plan to buy only models from the bottom lines of these ratings. What can I say to this - do not worry. In such cases, you need to understand three simple things:
- We do not know what sample this statistic was based on;
- Many models with inherent design flaws have a "case" peak; if the disc was recently released, it might not have arrived yet. Seagate 7200.11 were also considered reliable drives for the first six months;
- For the retail customer, any such statistic is nothing more than entertainment. Choosing between several models for returns ranging from 1.5 to 4% makes sense only when buying a batch of thousands of pieces. When buying one device, the probability of a breakdown in such a situation is 50% - it will either break or not. Like that dinosaur joke.
The only thing that statistical reports are really useful for is that they clarify qualitative trends. In particular, publications in early 2011 confirmed that two terabyte drives had a breakdown rate that was about twice as high (4-7%) as that of less capacious drives. Particularly "dead" were the models at 7200 rpm (WD Caviar Black - almost 10% returns). So this is a solution for special cases.

The golden rule of reliability: if you need a large volume, lower the spindle speed
Well, the last thing I would like to say in this section. Ideal, absolutely reliable drives do not exist, any of them can break. As repairmen like to say, hard drives are not reliable. Instead, they have a warranty card. All we can do is to choose a disk according to our needs and tasks and use it correctly. Naturally, do not forget about backing up important data - with all the difficulties, a backup will cost much less than a restore.
Well, if the need for data recovery nevertheless arose, contact the specialists. Handicraftsmen, they are “system administrators for everything”, they are also “generalist computer scientists”, they will not be able to cope with many cases, but finishing off a disk is easy. Here is a recent real life example. The hard drive is not detected in the BIOS. The amateur is armed with an asterisk screwdriver and transfers the board from a working twin disk to the patient, after which he already receives two corpses. It turns out that it was impossible to do this: the interaction of the ROM on the board and the "service" modules on the plates is much more complicated than the would-be repairman thought.
About correct operation
So, you have correctly chosen a new 3.5” HDD in your system, carefully delivered it to its place, installed it correctly and connected it with high-quality cables. There is a period of operation. In order for it to last as long as possible and not cause problems, you should provide the disk with comfortable conditions (for people, by the way, everything is about the same). Every drive needs quality power, cooling and mechanical protection. It will not be superfluous to periodically monitor the status of the disks.
Drive power is mainly determined by the quality of the computer's power supply. Also important are the contacts on which a voltage drop can occur. The PSU must be of a proven brand and of sufficient power, and the power supply must be grounded. A typical PC has enough PSU for 350-400 W, enhanced equipment increases demands (from 500-700 W on powerful workstations to 800-1200 W on extreme gaming machines).

Choosing the right power supply is a big and important topic that we constantly turn to. And yet, it must be admitted that even very budget models have recently become prettier, and hard drives have been able to adapt to their quirks.
Fortunately, in recent years, the quality of power in computers has improved significantly, and HDDs now rarely fail for this reason. The situation progressed on both sides. Firstly, the technical level of the PSU has grown significantly, which was facilitated by the introduction of the ATX 2.3 standard, as well as increased competition in the lower price segment. Short-lived ugly crafts like KME have disappeared from the market, and the remaining brands use more or less decent element base and circuitry. Moreover, there are no problems in the middle and upper echelons. Now any PSU can properly feed the disks, you just need to choose an instance of suitable power and spread the main 12 V consumers (video cards and hard drives) along different lines.
Secondly, the drives themselves have become less “fastidious” to power supply and do not require such strict parameters as before. First of all, this is the merit of the “green” models, which consume much less, especially along the critical 12 V line. of the Barracuda 7200.10 series, it reached 3 A, then modern disks “eat” half as much at startup. A lower peak load on the PSU responds with greater voltage stability.
In high-speed HDD series (7200 rpm), manufacturers improved the stabilization on the board, as a result of which 12 V input deviations doubled: from ± 5% to ± 10% (in models with a capacity of 3 TB and higher, the requirements are slightly stricter: + 10% -8%). Almost any power supply fits into such boundaries - even not too thoroughbred and young. And this means that failures of overheated microcircuits that were not uncommon in the past (often with pyrotechnic effects and burnout of tracks on the board) will not happen again.
Temperature regime
Cooling is a serious problem for many three-inch HDDs: they get very hot during active work, and the heat sink in the system unit is often insufficient. The optimum temperature for hard drives is 25-45°C. Both heating above 50 °C and cooling below 20 °C are harmful to the drive - they accelerate the wear of the mechanics and slow down work due to unnecessary thermal calibrations. Reading heads quickly degrade from overheating, causing HDD crashes and failures. The situation is aggravated by sudden changes in temperature and high humidity (in the tropics and at sea, the temperature interval narrows further).

Some manufacturers that do not have low-speed HDD models in their lineup were forced to install 7200 rpm disks in their external drives. Of course, there was no place for a cooler in them. This club will soon be joined by Seagate, which announced its refusal to manufacture HDDs with reduced spindle speeds. True, according to the assurances of the company, the temperature will be in full order.
As a result, most drives need active cooling. Airflow is not required only for "green" low-speed models that work with a low load (a typical example is a media server where one MKV file is read from a disk in sequential mode). In good cases, the 120mm cooler is installed opposite the drive cage, which can be considered the optimal solution. It is advisable to reduce its rotation speed to a barely audible 700-1000 rpm and put a dust filter made of rare fabric at the inlet. This simple measure will really increase the life of all components. It's not bad when the drive is in a five-inch bay on spacers and is blown from the end by a small fan. More expensive, but completely silent options are also possible, such as passive radiators or heat pipes. Some modders even rivet a thick copper or brass disc basket for a steampunk solution (the heat dissipation is excellent, and the vibrations are well damped).

It looks like an inexpensive and very effective tool for killing a hard drive
But a compact cooler screwed to the "belly" of the HDD is undesirable - primarily because of the vibrations of the impeller transmitted to the case. They especially grow after a few months, when a low-quality plain bearing becomes loose (others are not put there). In this state, the cooler does more harm than good and must be replaced. Home-made improvements to the basket also do not lead to good, since they rarely provide for a mechanical decoupling. And modern disks, I repeat, are EXTREMELY sensitive to vibrations. During a test scan, it is enough to click rhythmically on the can with a pencil to get a trail of red emissions (indicates a positioning failure).

In the right cases, HDDs are cooled correctly without any additional tricks on the part of the user
A couple more cooling tips. If there is an exhaust fan on the rear panel of the case, then its performance should be 20-30% less than the front blower. Adjust the number of revolutions - by software or using a load resistor. In this case, excess pressure is created in the housing, and much less dust will penetrate. You can do it even easier: move the 92-120 mm fan from the rear panel to the front, where it will blow through the disk basket and the entire case. In its original form, such a cooler is of little use, because all three fans (rear, in the PSU and on the CPU) "suck" from one point and the flow almost does not reach the disks.
Stop vibration!
Vibration protection is no less important in HDD operation. Vibration usually does not threaten the disc physical damage, but greatly reduces its performance, especially when positioning heads. The wear of mechanics is growing, the probability of reading or writing errors is increasing, the data stream is losing stability. All this reduces the resource of the drive and adversely affects the operation of the entire computer.
The main sources of vibration in PCs are fans, optical CD/DVD drives, and nearby hard drives. The former interfere with the operation of the HDD only if the case design is poor or improperly installed, when the vibrations of the impeller are transmitted to the disk basket. Provide fans with mechanical decoupling (elastic mounts are useful), clean the blades of dust, if the bearing is worn, replace the entire propeller. Optical drives can generate strong vibrations when they are loaded with poor quality, often unbalanced, media. Try not to use such blanks. However, in good cases, the baskets for optical drives and HDDs are specially separated and mechanically untied.

In this basket from the Lian Li case, despite the rather dense placement of the HDD, there are no problems with vibration
The neighborhood of several disks in one basket is a difficult case. During positioning, they interfere with each other, and slightly different spindle speeds cause beats and resonances. The result is an unpleasant hum and bounce of the case, a decrease in disk performance and an increase in the number of failures. There are three practical solutions: to increase the rigidity of the basket (complete replacement or stiffeners along the edges); add independent seats for disks (a second basket, or even just a layer of foam rubber on the bottom of the case); mount all HDDs through damping elements (rubber bushings, gaskets, hangers). In the latter case, the heat sink to the basket is blocked, so airflow to the disks is mandatory.
Trust but check
Monitoring the HDD status is an important stage of operation that allows you to identify emerging problems. First of all, we pay attention to how the disk is recognized in the BIOS: the name and capacity must exactly match the label. Next - scanning the surface and viewing SMART attributes that reflect the state of the disk. Temperature monitoring is also sometimes useful.
These tasks are solved by a number of free utilities that do not require installation. I use MHDD 4.6 under DOS, Victoria 4.46b and HDDScan 3.3 under Windows. The first two can also carry out minor repairs on disks (by reassigning bad sectors - the so-called remap). All programs are capable of monitoring disk temperatures, but I prefer the tiny (94 KB) utility DTemp 1.0 b 34 - it does not take up memory and prints out S.M.A.R.T. attributes along the way. Wider in terms of capabilities, but also a cumbersome option - program HDD Temperature 1.4, besides, it became paid in the latest version (150 rubles).
Separately, I note the outstanding program HDD Sentinel 3.70. Although it is paid ($35 for a professional version), it offers rich opportunities for monitoring disks. Many consider it the best in its class, since it supports almost any drive and combinations thereof (external drives with USB / eSATA / FireWire interfaces, disk controllers and bridges from IDE to SAS, RAID arrays based on them, SSDs). In addition to temperature tracking and other S.M.A.R.T. attributes, data is collected on current read/write operations, including general and daily statistics (useful for SSDs), disk testing is available, data backup in threatening situations, and much more.

HDD Sentinel statistics. Average read/write volumes per day are calculated
S.M.A.R.T. for SSD OCZ. Understanding new attributes
Finally, each HDD or SSD manufacturer offers proprietary utilities tailored for diagnosing and testing their models. It is important to know that their results are unconditionally recognized in the warranty departments, and the possibilities are sometimes unique (undocumented commands are used, which allow, for example, to exclude defective areas from addressing and thus return the disk to a new state). Look for utilities on manufacturers' websites in technical support sections. Before downloading, find out what environment the utilities work in, what they can do and whether they support your models - misunderstandings happen with this.
Sometimes undocumented features are found in utilities. So, Intel SSD ToolBox allows you to do something useful only with an Intel solid-state drive - “foreign” SSDs are not serviced. It turned out that with its help you can easily view the attributes of S.M.A.R.T. for all hard disks of the RAID array built on the Intel southbridge controller (ICH6R, ICH7R, ICH8R, ICH9, ICH10). A valuable feature, because the native Intel Rapid Storage Technology driver does not want to show attributes in any way. So it makes sense to install ToolBox even if you don't have a single SSD from Intel.
A problematic HDD, in which defects are growing, areas of slow reading are observed, S.M.A.R.T is deteriorating. (albeit not in the most critical attributes) should be decommissioned. Despite the fact that such a disk remains operational for quite a long time - weeks and even months - it can fail at any time. Thanks to the developed means of correcting and hiding defects, a degrading drive keeps up to the last, and then suddenly fails. After that, recovering data from it will be very difficult.
Repairmen on the confrontation between SSD and HDD
In the forums and conferences of colleagues, there are remarkable observations and conclusions. Of course, the statements I have written out are not always accurate; there are also omissions and exaggerations. But there is certainly a healthy grain.
- Reliability is the Achilles heel of SSDs. All defect management mechanisms, such as redundant page replacements, are very unreliable in and of themselves. A little food failed - and hello to the data. Or a lot of transistors failed at once, more than ECC can digest, and the translator is destroyed. No matter how sophisticated you programmatically, you cannot completely remove this problem.
- There are a lot of credible stories that show that with active work, SSDs “burn out” in a year or two, and if you are not lucky, then even earlier. In addition, contrary to theory, SSDs die suddenly, leaving no chance to copy data. A SSD recovery- fun for a fat wallet.

Taking into account the specifics of SSDs (limited number of write cycles), it can be assumed that such drives will become the next target of cybervillains. Today crackers are already trying to reprogram laser printers in order to disable them. Tomorrow they will remotely “burn” NAND chips
- On modern SSDs, there is up to 25% return in the first year and another 25% can be repaired, but often with data loss. In fact, we have 50% failures. On the first models, it generally reached 80%. With increasing capacity and decreasing cell sizes, the problem will only get worse. After all, now multi-bit recording of 2-3 bits per cell is used in the mass (MLC / TLC technologies).
- Even for the server segment, Intel began to use e-MLC chips. These are, in fact, ordinary 2-bit MLCs that have simply passed additional selection and have an increased spare area. "Impenetrable" SLCs go down in history (or in big money).

In fairness, Intel SSDs continue to enjoy an excellent reputation among users and are often sold under other brands - for example, Kingston or Hitachi
- It can be predicted that consumer SSDs will still fall in quality. In general, the main problem with them is the insufficient production of NAND flash memory. A sharp increase in output in the coming months is not expected.
- For HDDs, together with failures and problems to be solved, this figure for the first year is somewhere around 12-15% - three to four times better than for SSDs. Hard drives have another weak point: vulnerability to shock and vibration. And this is unavoidable. Almost 80% of HDD failures are from mechanics.
- Hard disks irreplaceable. So far, there is nothing on the horizon with the same capacity at the same price, not even close. SSD looks like a nimble disabled person in a wheelchair who needs a lot of conditions for normal functioning. He will remain in his niche for a long time. Without a large HDD next door, a normal computer will not work.
- A two-terabyte hard drive at a unit price per gigabyte covers all removable media. And the stillborn Blu-Ray, and outgoing DVDs, and exotic expensive LTOs (a kind of tape streamers). The only thing is that you can’t throw a working disk against the wall without consequences, unlike an SSD. True, in mobile technology this "only" can be the main ...

- I see such a scheme of modern workstation: a system on an SSD, a fast HDD (or RAID) of medium size for working files, a large green disk for recoverable data (file cleaner). As for reliability, of course, there is a problem: SSDs, unlike HDDs, like to die suddenly. But system images are made without problems and dumped to an external drive. With such insurance, I live in peace.
- Take laptops with HDD or SSD? We can recommend models with SSD in cases where their active mobile use is expected and there is a high risk of damaging the hard drive due to vibration, shock or drop of the device. At the same time, an indispensable companion of such a laptop will be a capacious external hard drive, if necessary, connected via USB. If such a scheme seems inconvenient and unnecessary, use the HDD. The benefits of an integrated hard drive will outweigh the hypothetical benefits of an SSD.

- HDD is just a consumable, the main cost of which is the data recorded on it. So at the first sign of an impending failure, the disks must be ruthlessly replaced!
- It is generally pointless to repair an SSD, it is a quickly wearing out resource.
WD Green and too economical heads
The "green" series of WD Green hard drives has become infamous due to next feature. The developers were so eager to reduce power consumption that they programmed the automatic parking of the heads after only 8 seconds of inactivity. They saved energy (keeping the BMG in working condition requires noticeable power), but such a scenario for desktop drives turned out to be inconvenient and even harmful. For example, in RAID arrays, such a "feature" is categorically unacceptable - the collapse of the array occurred very quickly, the controller simply could not digest the huge delays in unpacking the heads.
Apparently, it was planned that the "greens" would stand in outer case and be activated from time to time for data transfer. But life, as often happens, turned out to be simpler and rougher. With constant parking / unparking of heads, and even acceleration and braking of the spindle, death comes to these disks very soon - the mechanics simply wear out. So, a nominal resource of 300 thousand parking lots can be used up in just a year.
After massive complaints, the company did not change the firmware, but released the WDIDLE3.EXE utility, which can be downloaded from the official website. Wdidle3 works directly with the disk firmware and allows you to change the auto-parking parameters (enable, disable the function, and also directly set the waiting time). What can I say, the solution is not very convenient, especially since the utility works under DOS, and you have to create bootable flash drive or a floppy disk, who else has them. The mass user, I'm afraid, is too tough.
And here is what they say about WD Green on the forums:
- Tell me, are you using them as the only disk? And you put the system on it? Then it is clear why they fly with you. On the manufacturer's website, they are positioned as additional drives for storing large amounts of data. They have both the speed is underestimated, and the resource is lower. And under the OS, Blue or Black models are recommended.
- The "green" series cannot be placed on servers. From a large number of calls, they sour - the speed of work drops sharply. Suitable for home storage of multimedia files, but no more.
- Multi-threaded work is also not for them, for example, when I download a torrent to my Green, it is impossible to watch a movie from it - it slows down a lot. This behavior is both on the built-in controller and on the external Adaptec. You can put “green” in NAS, but you can’t put it in SAN (Storage Area Network).
- These disks are too smart firmware, it compensates for common shortcomings, but does the job in a way that is more convenient for it. As a result, you will not achieve synchronism from the "green" ones, and they will not work normally in arrays.
- Those who suggested to put WD Green in RAID, urgently send to learn materiel. Then they will understand why it is impossible to do this and why they fall off.
WD RE drives and their features
WD produces not only slow "green" drives, but also their opposite - powerful enterprise-class drives. They received a prefix to the name RE4 (RAID Edition, version 4). Drives are crammed modern technologies, which provides high performance and reliability, and unfortunately, they ask for a considerable price for this. Of greatest interest is the TLER (Time-Limited Error Recovery) technology, which reduces the likelihood of disk array collapse. How does it work?
If the disk detects a defect, it tries to process it on its own. The correction time is sometimes quite significant and can exceed 10 seconds. But for a RAID controller, such a delay is unacceptable. If the response from the disk takes more than 8 seconds, the RAID controller will consider the disk to be faulty and exclude it from the array, which can lead to unpleasant consequences (“array collapse” is a nightmare for any system administrator). Although there is no standard for timeout, this 8 seconds is typical for most controllers.

For each task - its own hard drives
For a WD hard drive using TLER technology, the situation is different. When an error occurs, the drive tries to fix it on its own for 7 seconds, and then transfers information about the error to the RAID controller, which decides whether to fix it now or leave it for later. The disk remains included in the array, and the controller takes care of the consequences of the failure. Therefore, it is possible to build arrays of various levels at a relatively low cost, limited to inexpensive external RAID controllers or even using controllers built into motherboards.
Note that TLER assumes the indispensable presence of a RAID controller. Let's imagine the reverse situation: a WD RE4 drive with TLER is working outside the array and there is a defect on the platters. It's a common thing. However, the drive "thinks" that it is connected to a RAID controller, and if it is not possible to quickly fix the error by its own means, it shifts the solution of the problem to the controller. And he is not! The result is a disk freeze out of the blue.

It turns out that WD server disks are a specialized solution that is of little use for ordinary computers. Outside of a RAID array with a validated (that is, manufacturer-approved) controller, they will fail cleaner than an ordinary hard drive for half the money. So the stupid buying of equipment according to the principle “the more expensive the better” in the field of hard drives (and many other places) no longer works.
Since the beginning of 2012, two major HDD manufacturers have been reducing the warranty period for their drives. So, the Caviar Blue, Caviar Green and Scorpio Blue models will get two years instead of three. The "black" series, like external drives, will remain with a three-year commitment. Seagate acted even more radically and dropped the warranty on the mass-produced Barracuda and Momentus families to 1 year. Corporate drives (XT and ES.2 series) remained at their three years.
Official explanations sound in such a spirit that the funds saved on warranty returns will be used to develop new lines. So the period of model change will become even shorter, and life cycle disk will shrink to a couple of years. Repairmen “rub their hands” in anticipation of a wave of orders…
How to extend the life of "older" drives
There is a folk wisdom: load the donkey in moderation. Hard drives are, in fact, the same donkeys. After three years of operation, their resource has already been largely depleted and the probability of failures is growing greatly. It has been experimentally established: if the positioning of the heads is slightly slowed down on such a disk, it behaves noticeably calmer and lives much longer, and you won’t notice much difference in performance.
Specifically, we are talking about AAM (Advanced Acoustic Management) technology, which regulates the current in the magnetic head drive. This affects the acceleration with which the MG moves, and hence the positioning speed and indirectly the disk noise. AAM management is available in many utilities (I use HDDScan). The corresponding parameter varies from 0 to 255, when released from the factory, it is usually fixed at the last mark (corresponds to top speed). So, it is enough to drop the value from 255 to 252, and it will become easier for the disk to live. A radical option is to set the value to 128, but in this case the slowdown is already noticeable.
Evil thoughts on an empty stomach
- It is good that repairmen are peaceful and conscious people, they do not sit without work, they do not conflict with customers. Otherwise, out of malice, they could write such Trojans ...
- Knowing the undocumented technological commands of disks, it is easy to ruin them hopelessly or make it so that only the "pests" themselves can restore the data, of course, for decent money. You can, for example, change some firmware modules that are stored on plates in the service area and are read only when the power is turned on. Then the computer will not be bent immediately, but thoroughly. I will not develop this dangerous idea ...
- Write a script to format client volumes at noon. Bring a server with a RAID array to his office and copy all the information before 11:50. In a few minutes...
- We recently found a good malware site. Follow the link, wait a couple of minutes - and oops! Hard Disk Error. It helps only the complete demolition of Windows and reinstallation. Do not test without a backup! It was checked, by the way, on a computer with an antivirus.
- The best means of persuasion is coercive marketing. Brutal, but effective. Here the Indians in America never wore shoes, and the European colonists brought them for sale. Clearly, no one was buying. Then, along the surrounding roads, the fruits of the local thorn plant were scattered ...
- Choosing a hard drive according to the declared characteristics is like choosing a wife according to a resume.
How to protect it from premature failure?
- the main long-term memory of each computer. It is on it that the user writes all the important information for him, and only he can save large amounts of different information for a long time without compromising its quality. That is why it is highly recommended to conserve hard disk resources.
Premature failure of the hard drive can occur for a variety of reasons. And this is by no means due to its natural aging, as many users believe. For some one and a half - two years HDD cannot grow old enough to completely fail and not even “start up”. For correct use hard drive, it is important to understand that it is far from the most powerful device in the world, which consumes a lot of energy, but it is the most demanding on the quality of the supplied voltage and current strength. Winchester is very sensitive to power surges and other network interference.
Thus, if for no reason at all your files begin to disappear or the files being recorded are displayed with errors or, moreover, are not displayed at all, if bad sectors, in 90 percent of cases this occurs due to poor-quality electrical power supply of the hard drive.
The stable operation of a hard drive directly depends on the quality of the energy supplied to it. Therefore, it is important. There are many companies that produce cheap power supplies for desktop computers. But their use does not give any guarantees of quality and no guarantees of the stable operation of the entire system. Cheap Chinese consumer goods break down after about a year of heavy use. But, the user may not always notice this, as a rule, the malfunction consists in the appearance of interference or power surges on or peripherals, which includes the hard drive. Therefore, it is strictly not recommended to use a power supply of the type "NONAME" .
It is impossible to determine the quality of the power supply by the stickers and labels pasted on it. As a rule, unscrupulous manufacturers of cheap blocks glue more serious stickers on them. Therefore, you need to buy a high-quality power supply only in a certified store. Moreover, when buying a PSU, immediately pay attention to its weight. If it is too light, then most likely the manufacturer saved on some components and on this power supply. A decent PSU should also weigh decently.
Too short a warranty on the power supply is a sign of fraud on the part of the manufacturer. As a rule, the warranty on power supplies is only one year. In rare cases, manufacturers give a two-year warranty. This is because the elements that make up the power supply are too susceptible to very heavy loads and break down easily. And this is the first of the reasons for the appearance of interference and damage to the hard drive.
Recommendation four
When working with a computer, you should try to maintain its entire logical part (software) in a normal state. You should try to avoid any conflicts in the system, since with even small problems and freezes, you can fix the voltage drop on the periphery. If for typically electronic devices (, etc.) this is not so scary, then for mechanical device(hard drive) is very noticeable. The fact is that information is constantly written to the magnetic disk of the hard drive, and if in certain moment there is a voltage drop, it has a detrimental effect on it.

Indoor electrical wiring must be in good condition. Do not forget that complex electronic devices, to which it belongs, appeared much later than the house in which you live was built and the wiring may not be designed for high-quality electrical supply. Possible voltage fluctuations in the network or insufficient throughput networks. For one computer, this may be enough, but if you suddenly connect an iron, electric kettle or refrigerator to a weak network in parallel with the computer, the voltage drop will be very noticeable, which, first of all, will not have a good effect on the health of the hard drive.
It is highly recommended to use network filters, and even better network stabilizers with autonomous power supplies. These devices allow you to smooth out the emerging network interference and save the hard drive. Network stabilizers have their own power source, and if suddenly there is an upward voltage surge in the network, then a special microcircuit stabilizes it, and the excess discharge is sent to the ground (the device must be grounded). If the jump is downward, then due to an independent energy source, the stabilizer again smoothes the voltage. Thus, the shape and quality of the power supplied to the hard disk will meet the requirements.
When you use the hard disk daily, fragmented files appear on it. This is due to the fact that something is being deleted, something is being recorded. And the hard disk does not overwrite all the files on its own, but simply uses the free space for part of the file, and writes the rest further. In the future, because of this, the magnetic head will have to work several times more intensively in attempts to read the necessary information. Due to overload, it will quickly fail. To avoid this, it is important to defragment the disk space in a timely manner using special utility included with any operating system. You can also use other third-party programs for this purpose. You will find a lot of positive reviews on the Internet about defragmenters. Defraggler , Smart Defrag , O&O Defrag , Auslogics Disk Defrag .
Periodically, it is recommended to release the hard drive from information and produce it low-level formatting using the program "Victoria". With its help, you can fully diagnose the condition of the disk.
Repair and prevention of the hard drive
The hard drive is very sensitive to vibration and shock. Therefore, it is not recommended to use while driving and subject to movement during operation.
Avoid overheating of the hard drive, as at high temperatures the wear of the hard drive mechanics, and especially its read heads, increases many times, as a result of which failures and failures appear more often. The optimum temperature for a hard drive is 30 - 40 degrees Celsius. Ultimately allowable temperature For almost all types of modern hard drives (HDD), a temperature of about 65 degrees is considered. The temperature of the hard disk in the system can be monitored using various utilities, for example HDD life , AIDA .