Setting up a Wi-Fi router TP-LINK TL-WR940N and TL-WR941ND. Instructions for connecting and setting up Wi-Fi
Read also
The wr941nd router is a modern representative of the line wireless routers N series from Tp-link.
This article will focus on versions V5 and below with data transfer rates up to 300 Mbps, but do not forget that version V6 is the last of the currently released in this model range- Provides a speed of already 450 Mbps.
A brief overview of the tp link tl wr941nd router
So, the tp link tl wr941nd router is the perfect choice for creating a high-quality working home and small corporate network. Specifications for pretty low price- and it varies on average from 2,500 to 3,000 rubles - worthy of special praise.
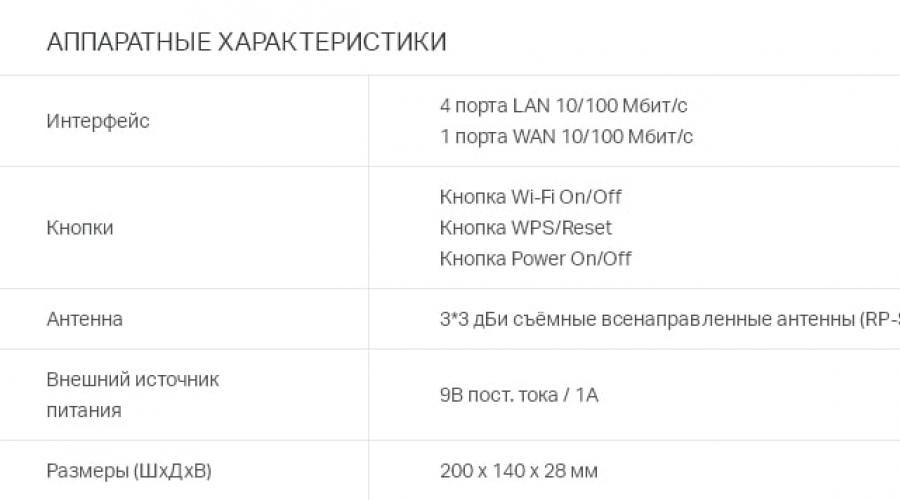
Yes, the main specifications router are shown in the following illustrations:


Like most Tp-Link models, the design of the router is made in white. The router is equipped with three signal receiving / transmitting antennas, which allows you to cover a greater distance, getting the most out of the equipment's capabilities.
On the front side of the case there is an indicator panel consisting of nine elements:
- "PWR" - informs about the presence of power supply to the router;
- "SYS" - system information: if the indicator is inactive, a system error, blinking – the system is working correctly;
- "WLAN" - informs about the work wireless network;
- "LAN 1-4" - state of connection and activity of network devices;
- "WAN" - state and connection of the line of the Internet service provider;
- "QSS" - connecting devices to a wireless network using ( when the indicator blinks slowly, connection is in progress mobile devices to the network, with a fast one, the connection failed).
On the front panel there is also a button to enable / disable the "QSS" function, which is analogous to "WPS".
On the back panel of the tp link tl wr941nd router there are ports and connection connectors:

- "Power" - used to connect the power adapter;
- "Reset" - this button resets to factory settings;
- "WAN" - used to connect the provider's cable;
- "LAN 4-1" - for connecting network devices.
Installing and connecting the tp link tl wr941nd router
When installing a router, you should also consider external factors:
- must be well ventilated;
- the router should be away from heating elements, heating radiators, etc.;
- The router must not be exposed to direct sunlight.
The connection itself is carried out according to the standard scheme:
- connect the Internet cable provided by the provider to the “WAN” port on the router;
- "LAN" through the corresponding ports;
- connect the power adapter to the appropriate socket and plug it into the network.

How to set up internet connection on tp link wr941nd router?
To enter the router interface, use the address 192.168.1.1, which must be specified in the address bar of any Internet browser (by default, login and password are admin).

It is also worthwhile to prepare an agreement with the provider for the provision of Internet services in advance, where you can see the authorization data and the required settings for the router.
Now you can proceed directly to creating a new Internet connection.
To do this, open the "Network" menu, the "WAN" section.

In the "Connection type" line, select one of the options according to your contract:
dynamic ip address

With this choice, all other parameters remain unchanged.
static ip address
Here you just need to specify the "IP address", "Subnet mask" and "Default gateway" provided by your provider.
PPPoE/Russia PPPoE

This is the most "popular" type of connection. Specify in the lines "Username" and "Password" (duplicate in the line "Repeat password") the authorization data according to your agreement.

Fill in the rest of the parameters as needed.
Bigpond cable

For of this type connection must be specified:
- "Username" and "Password";
- "Authentication Server";
- "Authentication domain".
L2TP/ Russia L2TP or PPTP/ Russia PPTP

In addition to the login and password, when choosing "Statistically ip", you will need to specify the data from the contract (similar to the connection type of the same name).

To complete the configuration of the tp link tl wr941nd router, click "Save".
tl wr941nd router: wifi setup
Setting wireless mode carried out in the menu section of the same name:

- in the first line "Network name" - specify the name of the network to be created;
- “Channel” is the most important mode in a wireless network: you can leave it in the “Auto” value - for automatic detection, but if known, you can select manually (in Russia, from 1 to 13 are used);
- the following parameters can be left unchanged or you can specify the required values as desired.


Here, select one of the provided encryption methods:
A). "WEP" - the method is based on the "IEEE 802.11" standard.

"WEP Key Format" can be either "Hexadecimal" (in the format 0-9, a-f, A-F) or "ASCII" (combination of keyboard characters)
Fill in one of the lines "WEP key" and in the column "Key type" select "64-bit", "128-bit" or "152-bit".
b). "WPA / WPA2" - works on the basis of the Radius server.

- in the "Version" and "Encryption" lines, select "Automatic";
- "IP address of the Radius server";
- "Radius-port" - the port can be left by default;
- Radius server password.
V). WPA-PSK/WPA2-PSK.

By analogy with the previous methods, enter the password in the "PSK Password" line.
To complete the setup wifi networks click "Save".
Setting up IPTV
Setting up IPTV is somewhat more complicated: the fact is that not all hardware versions of the WR941ND router support this technology.
Only the V5 version with firmware "TL-WR941ND_V5_130509_RU" is equipped with "IGMP Proxy", "Bridge" and "802.1Q TAG VLAN" support. Version V3 with firmware "TLWR941ND_V3_121224_RU" has "IGMP Proxy" support.
A complete list of TP-Link products with Multicast/IPTV support can be found on the official website: http://www.tp-linkru.com/article/?faqid=518
To configure IPTV, you only need to go to the "Network" menu - the "IPTV" or "Bridge" section and specify the port number to which the set-top box is connected.
Additional features of the wifi router tp link wr941nd
It is also worth paying attention to the “QSS” technology: to activate and make settings for adding devices, open the “QSS function” menu and click on the “Enable” button in the first line.

Devices can be added in several ways:
I). With "PBC" (push button):
First option:
Press and hold the "QSS" button (located next to the indicator panel) for 2-3 seconds.
The QSS Service window will appear - click Finish.

Second option:
- press the "QSS" button;
- in the "QSS Service" window, select "Press the button on my access point".

II). By entering a pin code:
In the "QSS function" section, click on the "Add device" button.

In the window that opens, in the line "Enter the PIN code of the new device", enter the pin code - it is indicated in the previous step in the line "Current pin code".

In the "QSS Service" window, select the second line "Enter a PIN code into my access point or registrar" and click "Next".

Thus, the WR941ND router is a worthy representative of the line of public routers with clear interface and excellent characteristics, it ensures the creation and maintenance of a high-quality network.
In this article, we will take a closer look at the process of connecting and configuring two excellent router models from TP-LINK. This is a model TL-WR940N And TL-WR941ND. I see no reason to write a separate article for each model, since the TL-WR941ND and TL-WR940N are almost the same in terms of appearance and by connectors. Also, they have the same control panels. The only difference is that the TL-WR940N router does not have removable antennas, and most likely there is a difference in hardware. For us it is not very important.
By the way, an updated model of the router has recently appeared, in a black case. It doesn't matter what model you have, you can set it up with this guide. I will try to describe everything in as much detail and as clearly as possible. We will configure through the control panel. Therefore, you can leave the disk that you most likely found in the kit. We won't need it. It only has a setup utility and a manual. You can try to configure the router using utilities, but I would advise you to do it through the WEB interface.
A few tips before setting up:
I recommend connecting the router to a computer or laptop using the network cable that you will find in the kit. For customization only. It is better to carry out the configuration by cable. Once configured, you can disable network cable.
If it is not possible to connect via LAN, then you can configure via Wi-Fi. Just connect to an unsecured network, which should appear immediately after turning on the router. Do not flash the router via Wi-Fi! Only by cable.
It is possible that the router has already tried to configure. Either you or the store. Those settings that may already be indicated there may interfere with us. I advise doing a factory reset on your TL-WR940N, or TL-WR941ND before proceeding with the setup there.
Plug the router into a power outlet. Make sure the lights on the device are lit. If not, then turn on the power with a special button on the rear panel.
Press and hold the button for 10 seconds RESET on the back of the router.
If there is a button recessed into the body, then press it with something sharp. For example, a paper clip.
 All indicators on the front panel should flash. This means that the settings have been reset.
You can read more about restoring factory settings on TP-LINK routers in the article.
Everything, you can transgress to the setting.
How to connect TL-WR940N/TL-WR941ND?
First, we need to connect everything.
Connect antennas (if they are removable).
Connect the power cable to the router and plug it into a power outlet.
Connect the network cable that came with the kit to one of the yellow connectors. Connect the other end of the cable to the computer's network connector. If you are setting up via Wi-Fi, then connect your laptop to open network, which by default is named something like this: "TP-LINK_37DE50". You can turn off the power on the router, if the network disappears, then yours.
If the factory wireless network is password-protected (upgraded model), then the default password from Wi-Fi is indicated on the bottom of the router on the sticker.
Connect the cable from your Internet provider (or, for example, from an ADSL modem) to the blue connector (WAN).
Here is a picture for clarity:

B photo of connecting the updated model TP-LINK TL-WR940N (in black case):

Connected? We continue.
Setting up TP-LINK TL-WR940N (TL-WR941ND)
Open on computer (to which you connected our TP-LINK TL-WR940N, or 941ND) any browser. Opera, Chrome, Internet Explorer- doesn't matter.
In the address bar of the browser, type the address http://192.168.1.1 and go through it.
IN updated version(which is in a black case), to access the settings, use the address tplinkwifi.net, or 192.168.0.1.
You should be prompted for a username and password. By default, these are admin and admin (this information can be found on the sticker on the bottom of the router).
 The TP-LINK router control panel should open.
We advise you to check the firmware on which the router is running before setting it up. And, if there is a new one, then flash the router. How to find and download firmware for TP-LINK, read the article. Firmware instructions are located. If you do not want to update the software, then continue the setup according to the instructions.
WAN setup
This is the most important setup step. We need to configure the router so that it can connect to the provider and distribute the Internet to your devices. If we specify wrong settings on the WAN tab, then the Internet through the router will not work.
Your devices will simply connect to WiFi networks from TL-WR940N, or TL-WR941ND, but the Internet will not work. Therefore, everything must be done very carefully here.

Settings for other connection technologies:
If you correctly specify the type of connection, then the Internet should immediately work. Save your settings and reboot your router. You can reboot from the control panel System Tools - Reboot, button Reboot. After the reboot, the Internet on the computer should already work.
Near the network icon, should already be gone yellow triangle, and the connection status should be " Internet access". If the Internet did not work through the TL-WR941ND, then check the settings on the WAN tab, most likely you made a mistake there. Check if you cloned the MAC address correctly (if necessary).
If you have previously launched a connection on the computer (high speed connection), then it can be removed.
Setting up Wi-Fi, setting network protection
Go to the tab Wireless - Wireless Settings.
Enter a name for your Wi-Fi network, and select your region from the list.
 Next, go to the tab Wireless - Wireless Security. Set a Wi-Fi password so that no one can connect to our network.
Highlight an item WPA/WPA2 - Personal(Recommended). In field Wireless Password, specify the password. I recommend specifying exactly 8 characters. English letters and numbers.
 Click the button below Save to save the settings.
 That's all, it remains only to reboot the TP-LINK TL-WR940N, or TL-WR941ND, if you configured it, and you can connect your devices to the Internet: laptops, computers, tablets, phones, TV, etc.
If you have any problems while setting up the router, then write about them in the comments, we will try to help you figure out your problem.
Setting up TP-Link WR941ND equipment
to connect to the Smile network
First, you need to connect all cables to the appropriate connectors:
- Nutrition.
- ISP's incoming Ethernet cable (to the appropriate WAN port.)
- Ethernet cable from network card to any LAN port on the router. (usually indicated by numbers.)
For Windows XP:
Go to the menu ![]() , .
, .
In the network connections window (Figure 1), click right click mouse on " ' and select ' Properties».

Figure 1. Network connections window in Windows XP.
In the window " Local Area Connection Properties» (Figure 2) select « Internet protocoltcp/ipProperties».

Figure 2. Local Area Connection Properties.
In the window " Internet Protocol propertiesTCP/IP» (Picture 3) select:
- « GetIP address automatically»
- « Get addressDNS servers automatically»
and click the " OK»

Figure 3. TCP/IP protocol
For Windows 7:
Go to menu
, ![]() ,
,  , .
, .
In the window " Network and Sharing Center» (figure 4) press ![]() .
.

Figure 4. Network and Sharing Center window in Windows 7.
In the window " Network connections " (Figure 5) find " LAN connection", right-click on it and select " Properties».

Figure 5. Network Connections window in Windows 7
In the window " Local Area Connection Properties» (Fig. 6)) select « Internet Protocol Version 4 (TCP/IPv4)” (NOT unchecking) and press the button “ Properties».

Figure 6. Local Area Connection Properties in Window 7.
In the window " Properties: Internet Protocol version 4 (TCP/IPv4)» (picture 7) select:
- « GetIP address automatically»
- « Get addressDNS servers automatically»
and click the " OK»
Figure 7. TCP/IP protocol
Go to the command line (Start => Run => enter the command "cmd" and click the "OK" button) (Figure 8).

Figure 8 Program launch
IN command line(Figure 9) type the command "ipconfig -all". Make sure the IP address is assigned and is in the same range as the IP address of the Internet Router.

Figure 9 Command line
Type the command ping 192.168.0.1. Make sure packets are exchanged with the Internet router
Next to set up outer connection from the Internet, you need to go to the web-based management interface of the router. To get there, launch any available WEB browser and enter the IP address of the router in the address bar (Figure 10). Enter http:// and the default IP address, 192.168.1.1 into the address bar of the browser. The URL in the address bar will look like: http://192.168.1.1 .
Figure 10 Browser address bar
Go to web interface router under credentials (Figure 11):
- Login: admin
- Password: admin

Figure 11 Authentication in the web interface
Quick Setup

Your Internet TP link router configured to work in the Smile network!
Setting up Internet access manually
For manual setting Internet access:

Setting up a wireless network manually
To manually set up a wireless network:

Changing the password for accessing the web interface
To increase the security of the router, we recommend changing the password for accessing the web interface of the router. For this:

Router Status
You can check the connection status of the router to the Internet. For this:

Router syslog
In case of problems with connecting to the Internet, you can find out the approximate cause. For this:

- Easy to set up. Works stably. Bought as a replacement, provider Billain. Speed does not cut, the Internet distributes. There is support for IPTV over the wire and over the air.
- There are no drawbacks for its price.
Many were interested in what version of the model is on sale I have a revision of the 5th. stood latest firmware with IPTV support. The bridge really works. All channels on the set-top box show without artifacts, even HD. There were problems with the NTV + Nash Football channel, but I turned off the SPI filter and everything shows fine. Unlike the old zyxel 460n router, it works much faster with air and keeps the connection more stable, although at a price this one is more than three times cheaper, with one difference, the old ports were gigabit, but this is not at all relevant if there is no many computers with organized local network. At the same time, 1 computer was connected by wire, 1 TV set-top box and one smartphone by air. Everything worked normally and without glitches. For the money that is asked for this miracle of technology, it can be recommended for purchase.
4 0
- - Optimal price;
- Easy to install and configure parameters;
- Excellent signal;
- Design;
- Does not cut the speed on Wi-Fi;
- Green LEDs that do not strain;
- Russified web interface with an accessible explanation of each function.
- - There may be a low Wi-Fi speed if your smartphone is (let's say) old (about 3 years old), but no pattern was detected;
- Lack of a usb port (perhaps this is the prerogative of more expensive devices);
- Antennas 3 dB;
- Doesn't make coffee
An excellent router, model version 5.2, the firmware immediately costs 3.14.19 Build 130509 Rel.63583n, I thought to update it on the official website, but no, the need for this has disappeared, the entire interface is Russified and correctly explained, beginners will immediately figure out what each function is for.
Below they wrote that the router requires a reboot every two days, I don’t have such a need, I’ve been using it for more than two weeks.
Excellent model in price category take it, you won't regret it!
Complain Did the review help? 3 0
- - Setting for one, two, three (according to the instructions)
- The case and power supply do not heat up
- Not bright LEDs and good quality assembly
- Excellent connection for 30 sq.m. (4 devices)
- Ability to configure the local network
- In my case, I came across a power supply that “whistles” when turned on for about 15 minutes, then passes. I haven't figured out what's wrong yet, but I think it's a choke ...
The kit includes drivers and instructions in Russian. I got caught with the 5th revision, no problems were noticed in the work: the speed does not cut on the wafer, it does not cut off the connection. Friendly with Android smartphone browsers. How switch also works can be configured, for example, home network for file sharing. Put four only because of the power supply. In general, I liked it))
Complain Did the review help? 3 0
- - Sufficiently strong Wi-Fi signal. Covers a three-room apartment in a panel house without any problems. You can also hang out in the yard.
- Not complicated setup
- Stable work, if you do not load Wi-Fi.
- - At watching IP-TV in FullHD quality, Wi-Fi drops after a while. And it is the receiving device that falls off Wi-Fi. I have this effect on all devices laptop, TV, tablet.
- Not the most user-friendly interface settings. Lists of 8 positions with page switching are especially annoying. Couldn't they have done it all in one long list?
I have been using the router for 3 years now. Until I used IP-TV, I was 100% satisfied rebooted extremely rarely, always worked without problems.
As the TV appeared at home and I mastered IP-TV for myself, my assessment of this device fell. The problem is in the Wi-Fi transmitter of the router. If you connect the device via a wire, then you can play fullHD video from the Internet for days on end, the router will work like clockwork.
I will change the subject to Mikrotik. I decided for myself that consumer goods like D-link, TP-link, Zyxel, Asus, etc. I won't take any more.
Judging by the sales statistics, this is the most popular router from our range. There are a great many reasons for this, but two of them, in our opinion, are the most significant: firstly, it only costs $20, Secondly, this is Mikrotik. In total it turns out "Mikrotik for $20", which is really impressive.
We will express our opinion about it in advance: the router is more than worthy of attention. It works very stably, the speeds of wired and wireless connections provides quite consistent with the declared ones, and its functionality is comparable to the top-end Cisco / Juniper routers, which cost sky-high thousands of dollars in price tags. There are also disadvantages: it has only 4 Ethernet ports (including the WAN port), the radio module is rather weak and does not support the 802.11ac standard. However, here, as in a well-known vulgar joke: "Well, what did you want for 20 dollars?"
So, let's tame the hero of our material. Our prerequisite is an ISP giving us a dynamic IP address. Let's get started:
1. Turn on the provider's cable in 1st router port
2. We turn on the cable from the computer to any remaining free port
3.
Like all Mikrotik devices, hAP Lite default IP address is 192.168.88.1. Assign to our computer network settings from the same subnet. For example, address 192.168.88.10, mask 255.255.255.0, gateway 192.168.88.1, DNS 192.168.88.1:
4. Let's go to the router via browser:

Here we will make a small digression: in hAP Lite, Mikrotik has implemented a default configuration that provides fast start. The router is already configured to receive a dynamic address on the 1st interface, the DHCP server is enabled, the bridge between the ports is configured. In fact, in our topology, the router worked as expected immediately after being turned on. That's not what we're here for though, so...
5. Let's reset the router to factory settings. To do this, click on the section System button Reset Configuration:

6. Tick the option No Default Configuration and press Reset Configuration:

7. We confirm our intention:

8. After about a minute, the router will reboot. Here there is a slight hitch: after resetting the router with the removal of the default configuration, it will no longer be assigned an IP address, and it will not be possible to access it with a browser. No problem, in this case, Mikrotik provides special application for configuration - WinBox. Download it from the site http://www.mikrotik.com/download in the section Useful tools and utilities:

9. WinBox does not require installation. Let's run it and click on the tab at the bottom Neighbors. All Mikrotik devices within the broadcast domain should appear in the list below. In our case, this will be the only hero of the article. Click on its MAC address (it is important!), then press the button Connect at the top of the screen:

10. Before us appears in all its glory the interface of the router. R window outerOS Default Configuration close by pressing OK:

11. Click on the menu on the left Interfaces. Note that in an empty configuration on the router is disabled wireless interface . It is called wlan1. Select it and click the blue checkmark at the top of the window. This will be useful to us in the near future:

12. double click open ether2 interface, change its name to ether2-master and press OK:

13. Now open ether3 interface, and change the parameter Master Port on ether2-master:

14. We repeat the same action for the ether4 interface: open it and change the Master Port parameter to ether2-master.
This paragraph should be read only by those who are very interested in the technical side of the issue! If you opened the article just to have a setup cheat sheet in front of your eyes, then you can skip it!
And now let's decipher what was done in paragraphs 12-14: unlike more familiar household routers, ports in Mikrotik routers are not included in a single switching matrix by default, i.e. are not part of the switch as such. To "assemble" them into a logical switch, there are 2 ways: software and hardware. Software - bridge - uses the central processor of the router for switching. The hardware one uses a special hardware switching chip, while the CPU is not used. Thus, for the ports to work in switch mode, the use of a switching chip suggests itself. Now back to what we did earlier: we renamed the ether2 port to ether2-master so that we can clearly see in the configuration console which port is the master port for the others, and we told the router that the ether2 port is the master port for the other two. Using the master port, we have enabled the switching chip, and the CPU is no longer involved in calculating packet switching between the ether2-ether4 ports. You can read more about switching chips and their capabilities here: http://wiki.mikrotik.com/wiki/Manual:Switch_Chip_Features
15. Let's create a bridge for the interfaces that form the loop of the local network. Click on the menu on the left Bridge, in the first tab Bridge press + , in the opened window enter bridge name(For example, LAN) and press Ok:

16. Let's move on to the Ports tab, press + , choose Interface- wlan1, Bridge- LAN, press OK:

17. Repeat the procedure for the ether2-master interface.
18. Your the final list of ports in the bridge should look like this:

19. As mentioned above, in our topology, the provider provides us with a dynamic IP address. Enable the DHCP client on the WAN port of the router. To do this, open the menu on the left IP-> DHCP Client and in the window that appears, click + :

20. The provider cable is inserted into the 1st port of the router. Choose Interface- ether1, Necessarily set the parameter Add default route into position Yes and press OK:

21. Now in the DHCP client window you will see on which interface the DHCP client is enabled and what address it received:

22. Enable NAT. To do this, in the menu on the left, open IP-> firewall, go to the tab NAT, press + , in the window that appears, set the parameter Chain into position srcnat, parameter out. Interface into position ether1:

23. Without leaving the New NAT Rule window, go to Action tab, and set the parameter Action into position masquerade, then press Ok:

24. Set up DNS. Menu on the left IP-> DNS. Our provider has already given us 2 dynamic servers, but their list can be supplemented (filled in the Servers parameter) with our own hands. The main thing in this window do not forget to check the Allow Remote Requests checkbox, after which you can press Ok:

25. It's time to assign an IP address to the router to work on the local network. Go to the menu on the left IP-> Addresses, in the window that opens, click + And enter IP address/subnet mask. In our case we will use 192.168.88.1/24. Parameter Interface should be set to LAN(this is our Bridge created in step 15; your name may be different), after which you can press OK:

Now our list of IP addresses should look something like this(of course, the address on the ether1 interface will be different for you):

26. By the way, we should already have access to the Internet on our computer! Let's check:

Really showed up! But the celebration will be postponed until later.
27. Now let's configure the DHCP server. Go to the menu on the left IP-> DHCP Server, in the window that opens, click DHCP Setup:

28. We choose as the interface on which DHCP will work, our bridge is LAN, press Next:

29. Set the address space. We plan to issue addresses on the 192.168.88.0 network with a mask of 255.255.255.0, That's why enter 192.168.88.0/24 and press Next:

30. Specify the gateway. Ours is 192.168.88.1. Click Next:

31. Determine the pool of IP addresses that will be issued to clients. Here we advise you to make a decision yourself, based on the network topology. We will use the range 192.168.88.2-192.168.88.254, enter and press Next:

32. Enter DNS servers(you can have your own, or use public DNS from Google or Yandex), click Next:

33. Enter the lease term for IP addresses(you can not change the default one), click Next:

On this DHCP server setup completed:

34. Now let's set up WiFi. Click on the menu on the left Wireless, in the opened window open double click interface wlan1, And set parameters:
- mode- ap bridge
- Band- 2GHz-B/G/N
- SSID- enter the name of your WiFi network
- Wireless Protocol - 802.11
- WPS Mode - disabled
After that press OK:

35. Now let's set a password for our network. let's move on to the Security Profiles tab, open default profile. Now:
-set the Mode parameter into position dynamic keys
- tick WPA2 PSK in parameter Authentication Types
- put all the checkboxes in Unicast Ciphers and Group Ciphers
- in the WPA2 Pre-Shared Key field, enter the password from WiFi network
- press OK

36. Connect to WiFi, check its performance. Active connections can be viewed in the Registration tab:

37. Now disable all router management interfaces, except for WinBox(if necessary, leave the ones you need, but from a security point of view, we do not recommend using a firewall without using a firewall). For this we go to IP-> Services, select unnecessary services and click the red cross:

38. It remains to set the administrator password. Let's go to System-> Users, login to admin user profile, press Password, enter the password twice in the fields New Password And Confirm Password and click OK:

