Little tricks of big requests. Predefined Data Types
Read also
To form and execute queries to database tables in the 1C platform, a special programming language object is used. Request. This object is created by calling the construct New request. It is convenient to use a query when you need to get a complex selection of data, grouped and sorted as necessary. A classic example of using a query is getting a summary of the state of the accumulation register on certain moment time. Also, the query mechanism makes it easy to obtain information in various time sections.
The request text is the instruction according to which the request should be executed. The body of the request describes:
- infobase tables used as query data sources;
- table fields that need to be processed in the query;
- grouping rules;
- sorting results;
- etc.
The query language of the 1C platform is very similar to the syntax of other SQL languages, but there are differences. The main advantages of the built-in query language are: dereferencing fields, the presence of virtual tables, comfortable operation with totals, untyped fields in queries.
- enum values;
- predefined data:
- directories;
- plans of types of characteristics;
- charts of accounts;
- plans for types of calculations;
- empty links;
- values of waypoints of business processes.
An example of using a literal MEANING:
WHERE City = VALUE(Directory.Cities.Moscow)
WHERE City = VALUE(Reference.City.EmptyReference)
WHEREItemType = VALUE(Enumeration.ProductTypes.Service)
WHEREMovementType = VALUE(MovementTypeAccumulation.Income)
WHERE RoutePoint = VALUE(BusinessProcess.BusinessProcess1.RoutePoint.Action1
2) Using instructions AUTO ORDER in a query, the query execution time can be very high, so if sorting is not required, then it is better not to use it at all. In most cases, the best way to apply sorting is with the statement SORT BY.
Auto-arranging works according to the following principles:
- If the ORDER BY clause was specified in the query, then each reference to the table in this clause will be replaced by the fields by which the table is sorted by default (for directories, this is the code or name, for documents, the date of the document). If the ordering field refers to a hierarchical directory, then hierarchical sorting by this directory will be applied.
- If there is no ORDER BY clause in the query, but there is a TOTAL clause, then the query result will be ordered by the fields present in the TOTAL clause after keyword Software, in the same sequence and, if the totals were calculated by the fields - links, then by the default sorting fields of the tables that were referenced.
- If there are no ORDER BY and TOTAL clauses in the query, but there is a GROUP BY clause, then the query result will be sorted by the fields present in the sentence in the same sequence and, if the grouping was carried out by fields - links, then by default sorting fields tables that were referenced.
- If the query does not contain the clauses and ORDER BY, TOTAL, and GROUP BY, the result will be ordered by the default sort fields for the tables from which the data is selected, in the order they appear in the query.
If the query contains the TOTAL clause, each level of totals is ordered separately.
3) To avoid re-querying the database when displaying the query result to the user (for example, building a query or displaying the query result using spreadsheet document) it is useful to use the instruction PRESENTATIONLINKS A that allows you to get a representation of a reference value.
It is also possible to use the instruction PERFORMANCE- designed to get a string representation of a value of an arbitrary type. The difference between these instructions is that in the first case, if the instructions pass a reference, the result will be a string. In other cases, the result will be the value of the passed parameter. In the second case, the result of the instruction will always be a string!
4) If the query contains a field with a composite type, then for such fields it becomes necessary to cast the field values to a specific type using the instruction EXPRESS, which will allow you to remove unnecessary tables from the left connection with a field of a composite data type and speed up the query.
Example:
There is a register for the accumulation of Remains of Goods, in which the Registrar field has composite type. In the request, the Date and Number of the Goods Receipt documents are selected, while accessing the details of the document through the Registrar field does not result in many left connections of the accumulation register table with the tables of register documents.
CHOOSE
EXPRESS(Remains of Goods.Registrar AS Document.Receipt of Goods).Number AS Receipt Number,
EXPRESS(Remains of Goods.Registrar AS Document.Receipt of Goods).Date AS Date of Receipt
FROM
Accumulation Register.Remains of Goods AS Remains of Goods
If the type cast is not considered feasible, then the result of the type cast will be NULL.
5) Do not forget about the instructions ALLOWED, which means that the query will select only those records for which current user have rights. If this word is not specified, then in the case when the query selects records for which the user does not have rights, the query will work with an error.
6) If the query uses a join, and in some parts of the join there are nested tables (document with tabular part), and some do not, it becomes necessary to supplement the selection list with fields - empty nested tables. This is done using the keyword EMPTYTABLE, after which the aliases of the fields that the nested table will consist of are indicated in brackets.
Example:
// Select fields Number and Composition
// from virtual table Document.Invoice
CHOOSE Reference.Number, EMPTYTABLE.(Nom, Tov, Qty) AS COMPOSITION
FROM Document.Invoice
UNITE ALL
SELECT Link.Number, Composition.(LineNumber, Product, Quantity)
FROM Document.Invoice Document.Invoice.Composition.*
7) In order to avoid duplicate lines in the query result, you should use the instruction VARIOUS, because it is clearer and clearer, and the instruction GROUP BY used for grouping aggregate functions. By the way, when using aggregate functions, the sentence GROUP BY may not be specified at all, while all query results will be grouped into one single line.
Example:
// It is necessary to find out which counterparties
// the goods were shipped for the period.
Select Various
Document.Invoice.Contractor
8) Instruction GROUP BY allows you to access fields top level, without grouping results by those fields, if aggregate functions are applied to nested table fields. Although it is written in the 1C help, when grouping query results, aggregate functions must be indicated in the list of selection fields, and in addition to aggregate functions, only the fields by which grouping is carried out can be indicated in the list of selection fields.
Example:
CHOOSE
Receipt of Goods and Services. Goods. (SUM (Quantity), Nomenclature),
Receipt of Goods and Services. Link,
Receipt of Goods and Services. Counterparty
FROM
Document. Receipt of Goods and Services AS Receipt of Goods and Services
GROUP BY
Receipt of Goods and Services. Goods. (Nomenclature)
9) Instruction IS NULL is intended to replace the NULL value with another value, but do not forget that the second parameter will be converted to the type of the first if the type of the first parameter is a string or a number.
10) When referring to the main table, you can refer to the data of the subordinate table in the condition. This feature is called dereferencing the fields of a sub-table.
Example (search for documents containing a certain product in the tabular section):
CHOOSE
Entrance.Link
FROM
Document.Incoming Where Incoming.Goods.Nomenclature = &Nomenclature.
The advantage of this query over the query on the Incoming.Products subtable is that if there are duplicates in documents, the query result will return only unique documents without using the keyword VARIOUS.
11) An interesting operator option IN is a check of the occurrence of an ordered set in the set of such sets (Field1, Field2, ... , FieldN) In (Field1, Field2, ... , FieldN).
Example:
CHOOSE
Contractors.Link
WHERE
(Contractors.Link, Goods.Link)
(SELECT Sales.Customer, Sales.Product
FROM Accumulation Register. Sales AS Sales)
FROM
Directory. Counterparties,
Directory.Products
12) Whenever possible, use virtual tables requests. When creating a query, the system provides a number of virtual tables as data sources - these are tables that are also the result of a query that the system generates at the time of execution of the corresponding code section.
The developer can independently obtain the same data that the system provides to him as virtual tables, however, the algorithm for obtaining this data will not be optimized, because:
- All virtual tables are parameterized, i.e. the developer is given the opportunity to set some parameters that the system will use when generating a request to create a virtual table. Depending on what virtual table parameters are specified by the developer, the system can generate DIFFERENT queries to get the same virtual table, and they will be optimized in terms of the parameters passed.
- It is not always possible for a developer to gain access to the data that the system has access to.
Microsoft OLE DB Provider for SQL Server: Warning: The query processor could not produce a query plan from the optimizer because the total length of all the columns in the GROUP BY or ORDER BY clause exceeds 8000 bytes.
HRESULT=80040E14, SQLSTATE=42000, native=8618
To avoid this error, it is not recommended to use the SUBSTRING() function to convert strings of unlimited length to strings of limited length. Instead, it is better to use the cast operator EXPRESS().
14) Use with care OR in the WHERE construct, since the use of a condition with OR can significantly "heavier" the query. You can solve the problem with the CONNECT ALL construction.
Example:
CHOOSE
FROM
WHERE
_DemoContractors.Link = &Link1
UNITE ALL
CHOOSE
_Demo Counterparties.NameFull
FROM
Directory._DemoContractors HOW _DemoContractors
WHERE
_DemoContractors.Link = &Link2
15) Condition NOT IN in the WHERE construct increases the execution time of the query, since it is a kind of NOT (OR1 OR2 ... ORn), so for large tables, try to use a LEFT JOIN with the IS NULL condition.
Example:
CHOOSE
_DemoContractors.Link
FROM
Directory._DemoContractors HOW _DemoContractors
LEFT JOIN Document._DemoBuyerOrder AS _DemoBuyerOrder
Software _DemoContractors.Link = _BuyerDemoOrder.Contractor
WHERE
_Buyer's DemoOrder.Counterparty IS NULL
15) When using Temporary tables you need to index the condition and join fields in these tables, BUT, when using indexes, the query can run even slower. Therefore, it is necessary to analyze each query with and without an index, measure the speed of query execution and make a final decision.
If you place data in a temporary table that is initially indexed on some fields, then there will no longer be an index on these fields in the temporary table.
16) If you don't use Temp table manager, then there is no need to explicitly delete the temporary table, it will be deleted after the completion of the batch query, otherwise the temporary table should be deleted in one of the following ways: using the DELETE command in the query, call the TemporaryTable Manager.Close() method.
To work with queries, an object of the built-in language is used Request. It allows you to receive information stored in the fields of the database in the form of a selection formed according to specified rules..
The query receives initial information from a set of tables. These tables represent the data of real database tables in a form convenient for analysis. They can be divided into two large groups: real And virtual.
Real tables, in turn, can be object (reference) or non-object (non-reference), fig. 97.
Rice. 97. Query tables
A distinctive feature of real tables is that they contain data from any one real table stored in the database.. For example, the table Directory.Customers, corresponding to the directory Customers, or the Accumulation Register.Remainders of Materials table, corresponding to the accumulation register of Remains of Materials, is real.
Virtual tables are formed primarily from data from multiple database tables. For example, the table Accumulation Register.Remains of Materials.Remains and Turnovers, formed from several tables of the accumulation register Remains of Materials, is virtual.
Sometimes virtual tables can also be formed from one real table (for example, the virtual table Prices. Slice of the Last is formed on the basis of the table of the Price information register). However, what all virtual tables have in common is that they can be given a number of parameters that determine what data will be included in these virtual tables. The set of such parameters may be different for different virtual tables, and is determined by the data stored in the source database tables.
Real tables are divided into object (reference) and non-object (non-reference).
IN object (reference) tables information of reference data types (directories, documents, plans of types of characteristics, etc.) is presented. And in non-objective (non-referential)– all other data types (constants, registers, etc.).
Distinctive feature object (reference) tables is that they include a Link field containing a link to the current entry. In addition, for such tables it is possible getting a custom representation of an object. These tables may be hierarchical, and the fields of such tables may contain nested tables (table sections).
The algorithm by which the data will be selected from the source tables of the query is described in the query text in a special language - query language . The request text consists of several parts:
a description of the request;
Consolidation of requests
ordering of results;
· AUTO-ORDERING;
a description of the results.
The obligatory part of the request is only the first one - the description of the request. All others are present as needed.
The query description defines data sources, selection fields, groupings, etc.
Query aggregation determines how the results of multiple queries will be merged.
The ordering of the results defines the conditions for ordering the query result rows.
AUTOORDER allows you to enable automatic ordering of query result rows.
The description of the totals determines which totals are to be calculated in the query and how the result is grouped.
It should be noted that when a query language is used to describe data sources in a data composition system, the summary section of the query language is not used. This is due to the fact that the data composition system independently calculates the totals based on the settings made by the developer or user.
Data composition system designed to create custom reports in the 1C:Enterprise 8.1 system and consists of several main parts.
The initial data for the layout of the report contains data composition schema are datasets and methods of working with them(Fig. 98).
The developer creates a data composition scheme that describes the text of the request, data sets, relationships between them, available fields, parameters for obtaining data, and sets initial settings layouts - report structure, data layout layout, etc.
For example, a layout diagram might contain the following set of data (Figure 99).
Rice. 98. General scheme work with the data composition system
Rice. 99. An example of a layout schema (a dataset and a query using it)
On fig. Figure 99 shows the data composition schema designer window, which contains the data source, query text, and fields selected by the query.
The data composition system report that the user receives is not just a table of records that match the query. It has a complex hierarchical structure and can consist of various elements such as groupings, tables and charts. At the same time, the user can change the existing or even create a completely new report structure, set up the selection he needs, design the elements of the report structure, get a breakdown for each element, etc.
For example, the following report structure can be set (Fig. 100):
Rice. 100. Structure of a possible report
The generated report may have next view(Fig. 101).
In the presented report, the table will consist of accumulation register entries Sales Turnovers about clients and services provided to them. These records are grouped by the masters who completed the orders. And in the grouping, a list of masters will be displayed.
IN general view a data composition system is a collection of several objects. When generating and executing a report, data is sequentially transferred from one object of the data composition system to another, until the final result is obtained - a document shown to the user.
The algorithm for the interaction of these objects is as follows: the developer creates a data composition scheme and default settings. In the general case, based on one data composition scheme, one can create a large number of various reports. Data composition settings - either created by the developer or modified by the user - determine which report will be received in a particular case.
Rice. 101. Sample report
Based on the layout schema and the available settings, the layout builder creates a data layout layout. This is the stage of preparation for the execution of the report. The data layout layout is already ready task to be executed by the layout processor. The layout layout contains the necessary queries, report area layouts, etc.
The data composition processor selects data from the infobase according to the composition layout, aggregates and formats this data.
The result of the layout is processed by the output processor, and as a result, the user receives the resulting spreadsheet document.
The sequence of the layout system can be represented as the following diagram (Fig. 102):
Rice. 102. Scheme of the layout system
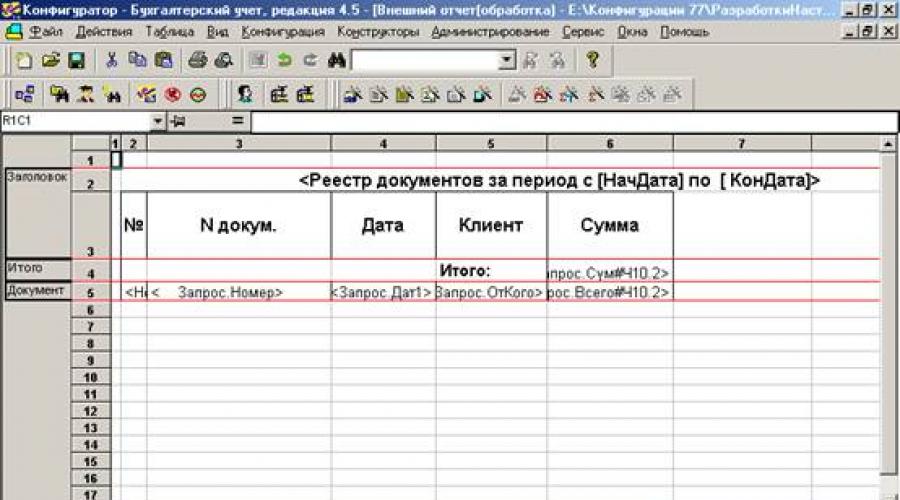
3.12.1. Creation of the report "Register of documents Provision of services"
Report Register of documents Provision of services will display a list of existing Services documents in the database in the order of their dates and numbers.
Report. Give it a name RegisterDocumentsProvisionServices. Bookmark Main click " Ready". In the data composition schema constructor, add Dataset - Query Request constructor".
Select the object (reference) document table as the data source for the query RenderingServices. From this table, select the following fields (Fig. 103):
Date of; Number; Stock; Master; Client.
Rice. 103. Selected fields
After that go to bookmark Order and specify that the query result should be first ordered by field value date, and then by field value RenderingServices.Link(Fig. 104).
Rice. 104. Order of query result output
Click " OK" and see what query the query constructor generated.
Go to bookmark Settings and add a new grouping to the report structure (Fig. 105).
Rice. 105. Command panel of the Settings tab
In the grouping field selection window, click the " OK" and on the tab Selected fields set the fields that will be displayed in the report:
Date of; Number; Stock; Master; Client (Fig. 106).
Rice. 106. Customizing the structure of the report
Register of documents provision of services. Click " Form" and look at the result of the report (Fig. 107).
Rice. 107. Report Register of documents providing services
Report. name it Service Rating. Bookmark Main click " Open Data Composition Diagram". In the Layout Designer dialog box that opens, click the " Ready".
In the data composition schema constructor, create Dataset - Query(DataSet1) and click the " Request constructor".
Nomenclature And virtual table accumulation register Sales. Turnovers. To avoid name ambiguity in the query, rename the Nomenclature table to Spr Nomenclature (context menu right mouse button - Rename table).
Then select from tables fields Spr Nomenclature. Link And SalesTurnover.RevenueTurnover(Fig. 108).
Rice. 108. Selected fields
Go to bookmark Connections and note that the constructor has already created a relationship between the two selected tables - the value of the change in the Nomenclature register must be equal to the reference to the item in the Nomenclature reference book.
The only thing to do is to reset the flag All at the register table and set it at the reference table Spr Nomenclature(Fig. 109).
Setting the flag All for the directory table will mean that all elements will be selected from the directory and these elements will be assigned the value of the revenue turnover from the register. Thus, as a result of the request, all services will be present, and for some of them the revenue turnover will be indicated. For those services that were not provided in the selected period, nothing will be indicated.
Rice. 109. Setting table links
Go to bookmark Conditions and set the conditions for selecting elements from the Nomenclature reference book (Fig. 110). When setting selection conditions, you will need to use query parameters. The first condition must be that the selected element is not a group (to do this, switch to the Arbitrary condition- set flag Arbitrary). Then in the field condition enter the following text:
SprNomenclature.ThisGroup = FALSE
The second condition must be that the selected item is a service (this is simple condition) (Fig. 110).
Rice. 110. Conditions for selecting elements
In the future, before executing the request, in the parameter Type Nomenclature you must pass the corresponding enum value.
Go to bookmark Unions/Aliases and specify that the reference item view will have an alias Service, and the register field will have an alias Revenue(Fig. 111).
Rice. 111. Unions/Aliases
Go to bookmark Order and specify that the query result should be sorted in descending order of the field value Revenue. The creation of the request is finished, click the button " OK". Look at the query text generated by the constructor.
Go to bookmark Resources and click " >> " so that the constructor selects all available resources on which to calculate the totals. In your case, this is the only resource Revenue(Fig. 112).
Rice. 112. Data composition schema resources
Go to bookmark Options(Fig. 113).
Rice. 113. Data Composition Options
On this tab, you will see three options: Beginning of period, EndPeriod And Type Nomenclature. The first parameter is the start of the totals calculation period, the second is the end of the period. As a result, the source table will contain only the turnovers calculated in the transferred period.
For parameter Beginning of period set the title that will be displayed to the user − start date.
Here you should always remember that if you pass a date as these parameters, then the date also contains the time to the nearest second.
Suppose it is known in advance that the user will not be interested in the results of the report in the periods specified with an accuracy of up to a second. In this case, two features should be taken into account.
First, the user must be relieved of the need to specify the time when entering a date. To do this, modify the existing type declaration for the parameter Beginning of period. Double click in a cell Available types, corresponding to the parameter Beginning of period, press select button " … " and at the bottom of the edit data type window, set Date Composition into meaning date(Fig. 114).
Click " OK".
The second feature is that the default time in the date is 00:00:00. Therefore, if the user sets the report period from 10/01/2009 to 10/31/2009, the register totals will be calculated from the beginning of the day 10/01/2009 00:00:00 to the beginning of the day 10/31/2009 00:00:00. Thus, data for the 31st day, other than the beginning of the day, will not be included in the calculation, which will greatly surprise the user. To eliminate this situation, add another parameter in which the user will enter the end date. Parameter value EndPeriod will be calculated automatically so that it indicates the end of the day of the date entered by the user. Therefore, for the parameter EndPeriod set the flag Availability restriction.
Rice. 114. Editing the composition of the date
Use the command bar button to add new parameter named End Date (Fig. 115).
Rice. 115. Adding EndDate parameter
For this parameter, the platform will automatically generate a header − expiration date. Leave it unchanged. Set the parameter value type − date. In this case, as for the parameter Beginning of period, specify the composition of the date - date.
Please note that by default the parameter you added is available to the user (the accessibility restriction in the last column is removed).
Go to parameter EndPeriod. For it, the system has set the availability restriction flag. Do not uncheck it, because the value of this parameter will be calculated based on the value set by the user for parameter Expiration date.
To set the formula by which the parameter value will be calculated EndPeriod, use the data composition system expression language. It contains the function EndPeriod(), which allows you to get the date corresponding to the end of some period, for example, the specified day.
In a cell Expression set the parameter EndPeriod the following expression:
As a result of the above actions, the layout parameters will look like this (Fig. 116):
Rice. 116. Layout system options
Finally, set the parameter Type Nomenclature. Since the report should display the revenue received only from the sale of services, the value of the parameter Type Nomenclature the user should not change. It must be set directly in the layout as . Parameter restriction flag Type Nomenclature the platform has set it by default, so you only need to specify the desired enum value SpeciesNomenclature in a cell Meaning, corresponding to the parameter Type Nomenclature(Fig. 117).
Rice. 117. Setting the value of the Nomenclature Type parameter
Proceed to the formation of the report structure. Bookmark Settings add a grouping and again don't specify the grouping field. Bookmark Selected fields specify the fields Service And Revenue(Fig. 118).
Then go to bookmark Other settings and set the title of the report - Service Rating(Fig. 119).
Rice. 119. Setting the title of the report
Run 1C:Enterprise in debug mode.
Select report Service rating, but before clicking the " Form", open Settings and on the bookmark Data Options set the report period from 03/01/2004 to 04/30/2004 (Fig. 120). If the creation dates of your documents differ from those given in the example, then the report period should be set differently.
Rice. 120. Report settings
Click " OK" and generate a report. The result will look like this (Fig. 121):
Rice. 121. Result of the report execution
Now change the end date to 3/31/2004. Data for March 31 are included in the report (Fig. 122).
Rice. 122. The result of the report execution
3.12.3. Creation of the report "Revenue of masters"
Report Masters revenue will contain information on what revenue was received by Master LLC due to the work of each of the masters, with details for all days in the selected period and a breakdown for clients served on each of the days. Using this report as an example, you will learn how to build multilevel groupings in a query and how to bypass all dates in a selected period.
Create new object configuration Report. name it RevenueMasters and run the main data composition schema constructor.
Add Dataset - Query(DataSet1) and click the " Request constructor". Select the virtual table of the accumulation register Sales. Turnovers.
Set one of the options of this virtual table − Periodicity. To do this, go to the field tables and press the "" button (Fig. 123).
Rice. 123. Changing the parameters of a virtual table
In the parameters window that opens, set the parameter value Periodicity - Day(Fig. 124). Press the button " OK".
Rice. 124. Virtual Table Options
Then select the following fields from the table:
· Sales Turnovers. Master;
· Sales Turnovers.Period;
· Sales Turnovers. Client;
· Sales Turnover. Revenue Turnover (Fig. 125).
Rice. 125. Selected fields
Now go to bookmark Unions/Aliases and set an alias Revenue for the field SalesTurnover.RevenueTurnover(Fig. 126).
Rice. 126. Unions/Aliases
Bookmark grouping define that grouping will be done by fields Master, Period And Client, and field values RevenueTurnover will be summed up (Fig. 127).
Rice. 127. Grouping fields
Bookmark Order specify that the query result will be sorted in ascending order of the field value Period. Click " OK". Consider the query text generated by the constructor.
Now move on to editing the data composition schema. Bookmark Resources click " >> " and make sure the constructor has selected the only available resource - Revenue.
Bookmark Options follow the same steps as when creating the previous report.
For parameter Beginning of period set a title start date. In field Available types set the composition of the date - date.
For parameter EndPeriod set an expression:
EndPeriod(&EndDate, "Day")
In field Limitation availability set the availability restriction flag.
Finally add one more parameter − Expiration date, set its type as date, the composition of the date is date.
As a result of the above actions, the data composition parameters will look like this (Fig. 128):
Rice. 128. Data Composition Options
Now we need to create the report structure. Bookmark Settings sequentially create two nested groupings: top-level - by field Master, nested in it - by field Period. Then add another grouping nested within the grouping by field Period, – Detail records(without specifying the grouping field) (Fig. 129).
Rice. 129. Structure of the report
Now, being at the level of the global report, go to the tab Selected fields and add fields to the list Client And Revenue.
Finally, from the global report level, go to the tab Other settings and change the following settings. For parameter set value Separately and only in the results; for parameter set the value Start and for the parameter header set the value Masters revenue(Fig. 130).
Rice. 130. Setting the output of grand totals to the beginning
Run 1C:Enterprise in debug mode and look at the result of the Masters Revenue report for the period from 03/01/2004 to 04/30/2004 (Fig. 131).
Rice. 131. Result of the report execution
If you remember, this report should show data with details for all days in the selected period. Now only those days are displayed for which there are non-zero entries in the accumulation register table. Therefore, now it is necessary to change the report settings in such a way that each date from the period for which the report was generated falls into the report.
To do this, return to the configurator mode and perform more fine tuning report structures. So far, all the structure settings that you have made have applied to the entire report as a whole. But the data composition system also allows you to customize each element of the structure individually.
You will need to change the grouping setting Period. In order to go to the settings of this particular grouping, in the structure field, place the cursor on this grouping, and then click the " Period" in the command panel (Fig. 132).
Rice. 132. Grouping settings Period
The settings available for this grouping will be displayed at the bottom of the form.
Go to bookmark Grouping fields. For field Period install Add-on Type - Day(Fig. 133).
Rice. 133. Setting the period's complement type
By doing so, you have indicated that for this grouping, existing records with a non-zero resource value will be supplemented with records for each of the days.
After that, you should specify in which period such an addition will be performed. In the fields below, you can enter the start and end dates for this period. But explicitly specifying dates is not suitable, because the user can generate a report for an arbitrary period. It is necessary that the addition of dates is performed not in some fixed period, but in the period that the user has chosen for the entire report.
In order to ensure exactly this work of the report, enter the edit mode of the first field (for example, by double-clicking on it) and click on the "clear" button X". After that, by clicking on the button " T", you will be able to select the type of data displayed in this field. Select Data composition field(Fig. 134).
Rice. 134. Choosing a data type
Click " OK". Now click in the input field the select button " … " and in the field selection window that opens, check the option Beginning of period(Fig. 135). Click " OK".
Rice. 135. Field selection
For the second input field, specify in the same way that the end date of the period will be obtained from the parameter Expiration date(Fig. 136).
Rice. 136. Grouping settings Period
Run 1C:Enterprise in debug mode and run the report Masters revenue for the period from March 20, 2004 to April 20, 2004 (Fig. 137).
Rice. 137. Result of the report execution
3.12.4. Creating a Service Inventory Report
Report Service list will contain information about what services and at what price LLC "Master" provides. On his example, you will get acquainted with the possibility of obtaining latest values from the periodic register of information and the output of hierarchical directories.
Create a new config object Report. name it Service list and run the Data Composition Schema Designer. Create a new Dataset - Query(DataSet1) and call the query constructor.
Select the object (reference) lookup table Nomenclature and a virtual table of information register Prices.SliceLast. In order to eliminate the ambiguity of names in the query, rename the table Nomenclature to Spr Nomenclature.
Call the dialog for entering parameters of the virtual table PricesSliceLast and indicate that the period will be passed in the parameter Report Date(Fig. 138).
Rice. 138. Virtual Table Options
Then select the following fields from the tables:
· SprNomenclature.Parent;
· PricesSliceLast.Price (Fig. 139).
Rice. 139. Selected fields
Go to bookmark Connections, drop the flag All at the register table and set it at the reference table.
Bookmark Conditions set the condition for selecting dictionary elements Nomenclature– the elements to be selected must correspond to the item type passed in the query parameter Type Nomenclature(Fig. 140).
Rice. 140. Conditions for selecting elements
Bookmark Unions/Aliases indicate that the field Parent will have an alias Service Group, and the field Link - Service(Fig. 141).
Rice. 141. Unions/Aliases
Go to bookmark grouping and indicate that the grouping will be done by the field SprNomenclature.Parent. It is not necessary to set the values of the summarized fields (Fig. 142).
Fig.142. Grouping fields
Click " OK". Look at the text of the request.
Proceed to editing the data composition schema. Bookmark Resources pressing the button " >> " select the only available resource Price.
Bookmark Options set the parameter value Type Nomenclature How Enumeration.Types of Nomenclature.Service. In addition, remove the accessibility restriction for the parameter Report Date and give it a title - Report date. In field Available types set the composition of the date - date. For parameter Period, on the contrary, set the availability restriction (Fig. 143).
Rice. 143. Layout scheme options
Proceed to the formation of the report structure. Go to bookmark Settings and create a group by field Service Group, specifying the type of grouping Hierarchy. Within this grouping, create another grouping without specifying a group field. It will contain detailed report records (Fig. 144).
Rice. 144. Structure and highlighted fields of the report
Go to bookmark Selected fields and specify that the Service and Price fields will be displayed in the report (Fig. 145).
Rice. 145. Structure of the report
And finally set up appearance bookmark report Other settings. Since the report will be just a list of services provided, in which prices for specific services are of interest, display resource values Price for each of the groupings and for the entire report as a whole does not make sense.
To disable the display of totals in the report, set the parameter Positioning Grand Totals Vertically into meaning No.
Then go to the specific grouping settings − Service Group. For parameter Location of totals this grouping, specify the value No. Return to the settings of the entire report as a whole.
For parameter Location of grouping fields enter a value Separately and only in the results(so the report will be better "read"). Finally, set the title of the report - Service list.
Run 1C:Enterprise in debug mode and first of all open the periodic register Prices.
Add another value to it for the service Diagnostics: the new price of the service as of 01.04.2004 is 350 (Fig. 146). This will test the report.
Rice. 146. Entries of the register "Prices"
Now run the report Service list as of March 31, 2004 (Fig. 147).
Rice. 147. Result of the report execution
Your report correctly reflects the price of the Diagnostics service as of 03/31/2004 - 200 rubles.
Run the report again, but now for a different date - 04/01/2004 (Fig. 148).
Rice. 148. Result of the report execution
As you can see, the new price of the Diagnostics service is shown - 350 rubles.
Report Customer Rating will show what is the income from the provision of services to each of the clients for the entire period of operation of Master LLC. On its example, the possibility of using a chart to display the result of a query will be demonstrated.
Diagram is a control element intended for placement in tables and forms of charts and graphs of various types of the 1C:Enterprise system.
Logically diagram is the collection of points, series, and series values at the point(Fig. 149).
As a rule, moments or objects for which you get the values of characteristics are used as points, and characteristics for which you are interested in values are used as series.
For example, a chart of sales of types of items by months will consist of points - months, series - types of items and values - sales turnover.
The diagram as an object of the built-in language has three areas that allow you to control the design of the diagram: the construction area, the title area and the legend area (Fig. 150).
The chart can be inserted into the report structure as a separate element. When creating a report Customer Rating the chart will be used in the data composition schema settings structure.
Rice. 149. Chart example
Rice. 150. Chart areas
Create a new configuration object in the configurator Report. name it RatingClients, open its main data layout schema.
Create data set - query(DataSet1) and call the query constructor. Select virtual accumulation register table Sales. Turnovers and from it one field - SalesTurnover.Customer.
Then add a new field (icon Add in the command bar above the list of fields) and using the expression builder, define it as the difference between revenue and cost (Fig. 151).
Rice. 151. Custom field expression editor
As a result, the list of selected fields will look like this (Fig. 152):
Rice. 152. Selected fields
Bookmark Unions/Aliases specify that the calculated field will have an alias Income(Fig. 153).
Rice. 153. Unions/Aliases
Bookmark Order indicate that the result rows should be sorted in descending order of the field value Income. Click " OK" and see what text the query constructor generated.
Go to bookmark Resources and add a field Income to the layout resources. Then go to bookmark Settings in order to create the structure of the report.
Unlike all previous reports, the structure of which contained groupings, this time add a diagram to the report structure (Fig. 154).
Rice. 154. Structure of the report
Add grouping by field to chart points Client. Leave the chart series unchanged.
Now go to bookmark Selected fields and select field Income for output to the report. The report structure should take the following form (Fig. 155):
Rice. 155. Report structure and chart settings
Bookmark Other settings set the title of the report - Customer Rating, and also select the chart type − Circular volumetric.
Run 1C:Enterprise in debug mode and open the report Customer Rating(Fig. 156).
Rice. 156. Pie volume chart in the report
Please note that when you hover over a sector of the chart, a tooltip appears.
Open the report settings and change the chart type to Measuring. Generate the report again (Fig. 157).
Rice. 157. Measuring chart in the report
3.12.6. Generating a Generic Report
Using the example of creating a universal report, you will learn how the data composition system can interact with a pivot table.
Create a new configuration object in the configurator Report. Give it a name Universal. Open its main data composition schema and create a new one data set - query(DataSet1).
Call the query constructor and select the accumulation register virtual table Sales. Turnovers. From this table, select all fields (Fig. 158).
Rice. 158. Selected fields
On the Grouping tab using the " >> " select all fields available for grouping, and add all resources to Summarized fields (Fig. 159).
Rice. 159. Grouping fields and resources
Click " OK" and look at the text generated by the query constructor.
Finish creating the data layout schema by doing the following on the layout design tab Resources select all available resources (click " >> "). This completes the work with the data composition scheme, close it and return to the window for editing the configuration object Report Universal.
Go to bookmark Forms and create the main form of the report by clicking on the view button next to the table field Main report form. Since there is no main form yet, the system will call the form designer. Accept what the system suggests by default and immediately press the button " Ready".
The main form of the report will open on the screen. As you can see, the system has already inserted the spreadsheet document field for you and named it Result(Fig. 160).
Rice. 160. Editing the report form
You need to insert a pivot table into this field. But spreadsheet document field cells Result are currently in View only. In order to insert a pivot table, you need to turn off this mode, so click on the spreadsheet document field and do Table –> View –> View Only. Now you can edit the table field.
Place the cursor in the upper left cell of the spreadsheet document field and execute Table –> Embedded Tables –> Insert PivotTable. The system will add a pivot table to the table field and open the fields window pivot table(Fig. 161).
Rice. 161. Pivot table
In order to display data in a pivot table, you will need to write several lines in the form module. Open the report form module and add the variable you need to the text:
Variable Source of PivotTable;
After that create the report form event handler When opening(In the properties window of the Generic Report form) and add the following text to it:
Procedure OnOpen()
PivotTableSource = NewDataCompositionPivotTableDataSource;
PivotTableSource.SetSchema(DataCompositionSchema);
FormElements.Result.EmbeddedTables.PivotTable1.DataSource =
PivotTable Source;
PivotTable Source.SetSettings(SettingsComposer.Settings);
EndProcedure
With this text, you set the data composition scheme for the pivot table as a data source and set the settings for the settings builder for it.
Run 1C:Enterprise in debug mode and open the report Universal. A report form and a window for selecting the fields of the pivot table will appear on the screen (Fig. 162).
Rice. 162. Report Universal
Put the value of the resource RevenueTurnover to Data area, dimension Nomenclature– to the Rows area, and the dimension Master– in the Speaker area. The report will take the following form (Fig. 163):
Rice. 163. The result of the report execution
Now, in the PivotTable Field Selection window, expand the group Nomenclature and add the value (No Hierarchy) to the rows (in the drop-down list of the "Pivot Table Fields" window, select Fit to lines), and the measurement Client add to columns (in the drop-down list of the "Pivot Table Fields" window, select Place in columns). The report will change its appearance (Fig. 164).
Rice. 164. The result of the report execution
Thus, using the data of the data composition schema, you provided the user with an alternative opportunity to independently generate a report on the register RenderedServices.
3.12.7. Generating a Generic 2 Report
Using the example of creating a second universal report, you will learn how to directly control the layout system settings and generate layouts based on standard design options.
Create a new config object Report With name Universal2. Open its main data composition schema, create a new one data set - query(DataSet1) and run the query builder. Select all fields from the accumulation register virtual table Sales. Turnovers and click " OK". On the tab Resources data composition schema designer, click the " >> " and make sure the system picked up three resources: RevenueTurnover, QuantityTurnover And CostTurnover.
Bookmark Settings create a new group Detail records(without selecting the grouping field).
Now bookmarked Forms report editing windows Universal2 using the constructor, create the main form of the report and edit it.
Stretch the shape and place two labels with names in it fields And Order and with headers Fields: And Order: respectively (Fig. 165).
Under the inscription fields CommandPanelFields. Under the inscription Order place a command bar named CommandPanelOrder. Under the command panels, arrange accordingly the table fields with the names TableFieldFields And TableFieldOrder.(Fig. 166). In the command panel properties window CommandPanelFields set the flag AutoComplete And ActionSource - TableFieldField. In the command panel properties window CommandPanelOrder set the flag AutoComplete And ActionSource - TableFieldOrder.
Rice. 165. Editing the report form
Rice. 166. Report form Universal2
Now for the table field TableFieldFields set the datasource as ReportObject.SettingsComposer.Settings.Selection(Fig. 167).
Rice. 167. Set the data source for the table field
Same as table field TableFieldOrder specify data source ReportObject.SettingsComposer.Settings.Order.
Having performed the described actions, you have associated the controls located in the form with the settings of the report layout system, - Choice And Order. Choice allows you to manage the list of fields that will be included in the report result, and Order sets the output order of the result rows. Command panels will be needed by the user to set the values of these fields. Using command bar properties Autocomplete And Action Source, automatic generation of commands based on the type of data contained in each of the table fields was obtained.
The 1C:Enterprise 8 system has a small set of ready-made design layouts for use by the data composition system. They are contained in the object. Layout LibraryDesignsLayoutsData.
Put another inscription with the name Decor and title Decor:, and to the right of it place a selection box with the name ChoiceFieldDecoration(Fig. 168) without a signature.
Rice. 168. Editing the report form
In the properties of the selection field, open the window Picklist Rows and fill it with layout names from the data layout design layout library (see Figure 169).
Rice. 169. Filling out the list of values of the select field
To have the select box change the applied layout system layout, create a handler When it changes selection fields:
ProcedureSelectionFieldDesignOnChange(Element)
OutputParameters = LinkerSettings.Settings.OutputParameters;
ParameterLayoutLayout = OutputParameters.FindParameterValue(New
DataCompositionParameter("DesignLayout"));
ParameterDesignLayout.Use = true;
ParameterDesignLayout.Value = ChoiceFieldDesign;
EndProcedure
With this text for the data composition parameter LayoutDesign you specify the name of the layout with which the report should be formatted, and set the flag for using the layout layout.
Run 1C:Enterprise in debug mode and open the report Universal2.
Add the following fields to the selected fields:
· Master;
· Nomenclature;
· RevenueTurnover.
Set the sort order:
· Master ascending;
· Nomenclature.Type of Nomenclature in descending order;
· Nomenclature in ascending order.
Choose a design, for example Green, and click the " Form". The result will look like this (Fig. 170):
Rice. 170. Result of the report execution
Now change the conditions for generating the report. Select fields Client, Nomenclature And RevenueTurnover. The sort order will be in ascending order of the field value Client, and the design option - Sea. Run the report (Fig. 171).
Rice. 171. Result of the report execution
3.13. Optimization of the document "Provision of Services"
Let's assume that the management of OOO "Master" has made a final decision on the procedure for calculating the cost of materials used in the process of providing services. Namely, the current cost of the material will be determined as a quotient of the total cost of the balance of this material and its remaining quantity in stock.
In addition, 1C:Enterprise 8.1 tools allow you to control the speed of the document posting procedure through the use of the query mechanism.
Thus, document optimization RenderingServices, serves two purposes:
Determining the cost of consumables when conducting a document;
Increasing the speed of the document processing procedure.
Delete in Document RenderingServices tabular part props Price, which is no longer needed. Also remove the corresponding column from the table field located in the document form RenderingServices.
After that completely remove the contents of the event handler Processing in document module RenderingServices and create in it a blank of the procedure. The text of the request executed in the online execution mode (i.e. on current date and time) will be different from the query executed in non-real-time posting (i.e. "backdating"). Therefore, the formation of the request text must be included in the If ... Otherwise ... EndIf condition:
Request = New Request;
If Mode = Document Posting Mode. Operational Then
Request.Text =
Otherwise
Request.Text =
EndIf;
First, create a query that will be executed when the document is posted online. The value of the Request.Text variable will be generated automatically. To do this, place the cursor before the semicolon, call the context menu by pressing the right mouse button, and select the item Request constructor. Agree to create a new request. The Query Builder dialog box will appear on the screen. Open the table List Nomenclature tabular part of the document RenderingServices and select fields from it:
· Nomenclature;
· Quantity;
· Nomenclature.Type of Nomenclature;
These fields will be needed to set the dimension values of the registers and their resources. In addition, the field Type Nomenclature you will need to analyze what the nomenclature specified in the document is: a material or a service (Fig. 172).
Rice. 172. Selected fields
To specify resource values Price registers Cost of materials And Sales you will need to calculate the current cost of the item as the quotient of the remaining cost of this material and its remaining quantity.
Therefore, add two more tables to the list of selected tables (Fig. 173).
Accumulation Register.Remainders of Materials.Remains.
Rice. 173. Selected tables
These virtual tables must have the same settings. First select the virtual table ResiduesMaterialsResidues, call the context menu by pressing the right mouse button and select the item Virtual Table Options. The parameters will include the point in time at which the remainder of these registers should be received, and the condition for receiving the data.
The condition for obtaining data indicates that the balances should be received only for those items of the item that are contained in the posted document (before executing the request, a list of all items of the item contained in the posted document must be passed to the Document Item List parameter) - fig. 174.
Rice. 174. Virtual Table Options
Set the same parameters for the second virtual table Cost of Materials. Next, select the Cost Remaining and Quantity Remaining fields from these virtual tables (Fig. 175).
Rice. 175. Selected fields
Select the accumulation register virtual table again ResiduesMaterialsResidues and rename it to Remaining Materials Remaining In Warehouse(Fig. 176).
Rice. 176. Selected tables
For this virtual table, also specify the Moment of Time parameter, and in the condition write that the material must be in the item list and the warehouse must be equal to the warehouse specified in the document (Fig. 177).
Rice. 177. Table parameters
Now, from this virtual table, select the QuantityRemainder field (Fig. 178).
Rice. 178. Selected fields
This completes the formation of the list of selected fields, and you can proceed to setting the link conditions between the selected tables. To do this, go to the bookmark Connections. Each of the virtual tables must be linked to the document table in such a way that for all records of the document table, the existing records of the virtual table must be selected, and the nomenclature in the document table must be equal to the material from the virtual table (Fig. 179, a-b).
Rice. 179a. Selected tables
Rice. 179b. Relationship conditions between tables
Now go to bookmark Additionally and set the flag For change. Flag For change allows you to block in advance the reading of the specified data (which can be read by a transaction of another connection) already when reading, in order to avoid deadlocks when writing. This clause allows you to specify in the query the tables whose read data is to be modified.
Because you are planning to write the accumulation registers RemainsMaterials And Cost of materials, specify the tables of these registers as tables to change (Fig. 180).
Rice. 180. Specify tables to change
Go to bookmark Conditions and set the condition for selecting from the document table only the lines of the current document (a link to it will be passed to the Link query parameter) - fig. 181. To do this, double-click the left mouse button on the field Link.
Rice. 181. Selection condition from document table
Go to bookmark Unions/Aliases and set the following field aliases: NomenclatureNomenclatureView –> NomenclatureView; QuantityRemaining1 –> QuantityInStock.
Click " OK" and see what query text the constructor generated (the value of the Request.Text variable):
Provision of ServicesList of Nomenclature.Nomenclature.Type of Nomenclature AS Type of Nomenclature,
Cost of Materials Remains. Cost Remains,
Remaining Materials Remaining In Stock. Quantity Remaining AS Quantity In Stock
LEFT JOIN Accumulation Register.MaterialsCost.Remains(&Point in Time, Material In (&Document ItemList)) AS MaterialsCostRemains
Material In (&DocumentNomenclatureList)) AS ResiduesMaterialsResidues
Software Rendering ServicesList of Nomenclature. Nomenclature =
LEFT JOIN
Material In (&DocumentItemList) AND Warehouse = &WarehouseInDocument)
HOW THE REMAINS OF MATERIALS
Software Rendering ServicesList of Nomenclature. Nomenclature =
Remains of Materials Remains in the Warehouse. Material
FOR CHANGE
Accumulation Register. Cost of Materials. Balances,
Accumulation Register.RemaindersMaterials.Remains
The text of the request for the case of non-operational posting of the document will be almost the same, except that it will lack the third left join and, accordingly, the field Quantity in stock, because In this case, there is no need to check the balances. Position the cursor before the semicolon located in the section Otherwise(see page 135), and paste the following query text:
Provision of ServicesList of Nomenclature. Nomenclature,
Provision of ServicesList of Nomenclature. Quantity,
Provision of ServicesNomenclature List.Nomenclature.Nomenclature Type AS
Type Nomenclature,
Provision of ServicesList of Nomenclature. Amount,
ResiduesMaterialsResidues.QuantityRemainder,
CostMaterialsRemainder.CostRemainder
Document.Provision of Services.List of Nomenclature AS Provision of ServicesList of Nomenclature
LEFT JOIN
HOW TO COST MATERIALS
Software Rendering ServicesList of Nomenclature. Nomenclature =
Cost of Materials Residues.Material
LEFT JOIN
Material In (&DocumentNomenclatureList))
AS RemainsMaterialsRemains
Software Rendering ServicesList of Nomenclature. Nomenclature =
ResiduesMaterialsResidues.Material
FOR CHANGE
Accumulation Register.Remains of Materials.Remains,
Accumulation Register.Cost of Materials.Remainders;
Now add the request parameters to the handler text (add only those commands that are in bold to the corresponding lines):
Request = New Request;
Query.SetParameter("WarehouseInDocument", Warehouse);
If Mode = Document Posting Mode. Operational Then
Request.Text =
| Accumulation Register. Cost of Materials. Balances";
EndIf;
Query.SetParameter("MomentTime", MomentTime());
Query.SetParameter("DocumentNomenclatureList",
ItemList.UnloadColumn("Nomenclature"));
Basic methods of working with some objects of the built-in language "1C:Enterprise"
Built-in language of the 1C:Enterprise system
The built-in 1C:Enterprise language allows you to algorithmically determine the behavior of system objects. This allows the user to solve various tasks of bringing software for the specific needs of the enterprise.
The purpose of the work: To study the basic principles of working with objects of the built-in language "query", "table", "reference book".
To work with requests, you need to create function variable"Create Object". Attributes or methods of an object are written with a dot after the variable name. The list of available methods as well as query language operators can be found in help system"1C:Enterprise". See fig. 1.
Fig.1 Help system window
After creating a variable of the "Request" type, you should refer to the method Run. Next, cyclic processing of the generated data set is organized, for this the method is used Grouping. For example, in the following example (Register of Documents Procedure), a request is created, as a result of which a data set is generated containing the following details of the documents "Incoming cash order": document date, document number, document amount, from whom cash for a certain period (variables StartDate, ConDate).
ProcedureDocumentRegister()
Variable Request, Request Text, Tab, nom;
//Create an object of type Request
Request = CreateObject("Request");
RequestText =
"//((REQUEST(Generate)
|Period from StartDate to ConDate;
|Number = Document.IncomingOrder.DocNumber;
|Date1 = Document.IncomingOrder.DateDoc;
|Total = Document.IncomingOrder.Amount;
|From = Document.IncomingOrder.AcceptedFrom;
|Function Sum = Sum(Total);
| Grouping Number;
|"//)) REQUEST
// If there is an error in the request, then exit the procedure
If Request.Execute(QueryText) = 0 Then
Return;
EndIf;
// Prepare to populate output forms with request data
Tab = CreateObject("Table");
Tab.SourceTable("Table");
// Filling in the "Title" fields
Tab.OutputSection("Title");
State("Filling the output table...");
Tab.Options(0, 0, Tab.TableHeight(), 0);
// Output of the completed form
Nom=0;
While Query.Group(1) = 1 Loop
//Fill in the fields
Nom=Nom+1;
Tab.OutputSection("Document");
EndCycle;
Tab.DisplaySection("Total");
Tab.ViewOnly(1);
Tab.Show("Table", "");
EndProcedure
To visually view the request data, a printed form using the table object. The most typical way to populate a spreadsheet document is to include sections in it. For this, the original spreadsheet document is used, which can be located in the same form. In addition, the source table can be located both in the general configuration tables and in external file. The assignment of the source spreadsheet document is performed by the object method "Table" - SourceTable. Method OutputSection allows you to include the selected fragment of the source table in the generated spreadsheet document.

Fig.2. Source table
You can learn more about the spreadsheet editor in the methodological guide.
"Directory" is an aggregate data type, a tool for working with lists of homogeneous elements. Directories can be multi-level. Directory elements can be periodic, i.e. store the value for a specific date. For directories, you can specify subordination to other directories, i.e. form one-to-many relationships.
Accessing attributes, calling directory methods depends on the execution context software module. There may be the following options:
1) we have direct access to the current element of the directory, if, for example, we are in the form of editing the element of the directory. Here we can directly access the attributes of the directory.
F_name = "Petrov"; where F_name is the directory attribute specified in the configurator.
2) the value of the element can be obtained from other sources, for example, as an attribute of some document. To access an attribute, you need to call the method of such a variable with a value of type "Directory".
Number of Children=Doc.Employees.Children;
3) the method of a particular element is called using a variable with a reference to an object of the "Directory" type. An object is created by a function "CreateObject».
Reference methods can also be found in the 1C:Enterprise help system.
Assignment for laboratory work on options
| option number | Working with an object | Exercise |
| Query, table | Display information about transactions with the client (selecting a client in the dialog mode) for incoming and outgoing invoices. | |
| Directory, table | Display information about employees (name, address, number of children) | |
| Directory, table | Display information about employees (full name, address, country, certificate number in the FIU) | |
| Directory, table | Display information from the nomenclature reference book (Product, price, country of origin) | |
| Directory, table | Display information from the nomenclature reference book (Product, unit of measure, VAT rate) | |
| Query, table | Display information on all posted invoices for the period. | |
| Query, table | Display information on the goods (indicate incoming invoices for receipt and outgoing invoices for consumption) |
Literature
1. Documentation for the 1C:Enterprise program
2. Stukalina E.F. -Toolkit. "Basic concepts and terms software environment"1C:Enterprise". Spreadsheet editor»
| | | next lecture ==> | |
THIS_KEYWORD
<Это конструкция языка>,
<Это конструкция
языка>
THIS_FUNCTION(<Это конструкция языка>)
In the rules describing the query language, language constructs are indicated in angle brackets. Keywords and function names are described in capital letters.
Language constructs may contain optional elements - keywords and so on. In the rules describing the query language, optional elements are enclosed in square brackets "[" and "]":
[THIS_OPTIONAL_WORD] [<Это необязательная конструкция>]
In some cases, one of several alternative elements may be used in a language construct. Such elements in the rules are listed through the vertical bar "|":
OR_THIS_WORD | OR_THIS_WORD
<Либо эта конструкция>
| <Либо эта конструкция>
Descriptions of all constructs are accompanied by examples explaining how they are used in the query language.
Comments in the query language
The request text may include comments. A comment is a part of a line that begins with the character sequence // and continues to the end of the line:
// This is a comment.
Comments are ignored when the query is executed.
Bilingual presentation of keywords
One of the essential features of the 1C:Enterprise query language is that, as in the built-in language, all keywords have two spellings: in Russian and English. Further in this chapter, Russian spellings of keywords are indicated. Below is a table that shows the correspondence between Russian and English and spellings of query language keywords...... (omitted)
Main sections of the request body
The request text can be described by the following rule:
<Описание запроса>
[<Объединение запросов>]
[<Упорядочивание
результатов>]
[AUTO ORDER]
[<Описание итогов>]
As you can see from this rule, the request text consists of several parts, or sections:
In section<Упорядочивание результатов>you can define conditions for ordering rows in the query result. Query result ordering is discussed on page 324 .
AUTOORDER allows you to enable automatic ordering of rows in the query result. This mode is described on page 331 .
In section<Описание итогов>you can specify which totals to calculate in the query. This section is described on page 332 .
Request description
As already mentioned, the request text must contain a request description section, which defines:
Fields that will be contained in the query result;
Query data sources - source tables;
Conditions that affect the selection of data in a query;
The order in which query results are grouped.
The request description section consists of several interrelated sentences:
SELECT [VARIOUS] [FIRST<Количество>]
<Список
полей выборки>
[FROM<Список источников>]
[WHERE<Условие отбора>]
[GROUP BY<Поля группировки>]
[HAVING<Условие отбора>]
[FOR CHANGE [<Список таблиц верхнего уровня>]]
Request description begins with a required keyword CHOOSE.
Offer WHERE<Условие отбора> allows you to filter the query result. The result includes only those records for which the specified condition is true. Rules for describing selection conditions are discussed on page 315 .
Offer FOR CHANGE is intended to indicate the need to lock the data read in the transaction.
Offer GROUP allows you to describe how query results are grouped. Grouping is discussed in detail on page 316 .
Offer HAVING allows you to impose conditions on the grouping results. Described on page 318 .
All query examples in this chapter include the query text and query result. It is assumed that the request text is passed as a parameter to the Execute method of the Request object.
Give an example enough a simple request, consisting of a single SELECT statement and a list of selection fields.
//It is necessary to display the list of consignment notes in the report.
Query result:
Use of the word DIFFERENT
In many situations, it is desirable that the same rows not be repeated in the report.
// It is necessary to find out which counterparties
// the goods were shipped for the period.
Select Document.Invoice.Contractor
Query result:
It can be seen that the result of the query has a lot of duplicate rows, which reduces its visibility. To avoid repetition, the keyword DIFFERENT should be specified in the query description.
Select Various Document.Invoice.Contractor
Query result:
Use of the word FIRST
In some cases, it is necessary to display a limited number of rows in a report. To do this, in the description of the request, specify the keyword FIRST, and after it - the required number of lines.
// It is necessary to select the five most expensive goods.
// Sampling should be done in descending order of product price.
Select First 5
Directory. Nomenclature. Name,
Directory.Nomenclature.PurchasePrice
Sort By
Query result:
Description of selection fields
After the mandatory keyword SELECT (and the qualifying words DIFFERENT and FIRST) in the query text, a list of selection fields is specified. These fields will be processed when fetching data in a query. The query result will also have the fieldset defined in this list. Sample fields are described according to the following rules:
<Описание поля>[ [HOW]<Псевдоним поля>]
<Выражение>[.<Группа полей>]
The list of selection fields consists of one or more items separated by commas. Each<Поле выборки>consists of a selection field description and an optional field alias.
Instead of listing fields in the selection list, you can specify an asterisk "*". This will mean that the result of the query must contain all the fields that are in the source tables - the sources of the query data described in the list of sources.
Comment! When specifying an asterisk "*" in the list of selection fields, the result does not include the virtual fields of the source tables.
<Описание поля>determines how the field values should be generated. In the simplest case, the selection field is a link to the source table field. The link can be specified with the indication of the table containing this field, or without indication of the table itself. Field dereferencing is covered at.
In the general case, the selection field can be not only a link to the source table field, but some<Выражение>. Expressions are discussed in detail on page 344.
Query results can be grouped using aggregate functions specified as expressions in the selection fields. Grouping query results is discussed on page 316 . Aggregate functions are described on page 345 .
Each selection field can be assigned an alias. In the future, it can be used for more convenient access to this field. The use of field aliases is discussed below.
<Группа полей>can only be specified when the select field points to a nested table. In this case, you can specify which fields should be processed in the selection for the nested table. If the field group is not specified, all fields of the nested table will be processed in the selection. Accessing nested tables is described in .
Field aliases in the select list
If you assign an alias to a selection field, then in the future you can refer to this field using its alias in the ORDER BY and TOTAL clauses, as well as when working with the query result. Such an appeal may be more convenient and visual, and in some cases the only possible one.
The AS keyword may precede the field alias. This word may not be specified at all, but if it is specified, the visibility and readability of the query text is increased.
Field aliases are defined according to the rules for assigning variable identifiers. Aliases in the request cannot match.
Assigning aliases to fields does not in itself affect the selection of data in a query.
// Must be selected from the product directory
// product names and group names.
Choose
Directory. Nomenclature. Name As Goods,
Directory. Nomenclature.Parent.Name As Group
from
Directory.Nomenclature
Query result:
Note that the fields in the field query result are named "Item" and "Group". If the field aliases were not specified, the fields in the query result would be named "Name" and "Name1" (the names of the fields in the query result cannot be the same, so "1" is automatically added to the name of the second field), which is much less obvious.
Nested tables in the list of selection fields
A field in the select list can refer to a nested table in the query's data source. In this case, the query result field will be of the QueryResult type, that is, it will contain a nested query result generated based on a nested source table.
By default, the nested result includes all fields of the nested table - the data source. It is possible to explicitly define a group of fields that must be contained in a nested query result. The nested result field group is described according to the following rule:
(<Список вложенных полей>) | *
<Вложенное поле [, <Вложенное поле>[, ...] ]
<Список вложенных полей>consists of one or more elements separated by commas. If the list consists of a single element, it does not need to be enclosed in parentheses.
Instead of listing nested fields, you can specify an asterisk "*"; this will mean that the nested query result must contain all the fields that are in the nested table.
<Выражение>[[HOW]<Псевдоним поля>]
<Вложенное поле>may represent some expression. In the simplest case<Выражение>is a reference to a nested table field. Expressions are discussed in detail on page 344.
Each nested field can be assigned an alias. Further<Псевдоним поля>can be used to more conveniently refer to this field, similar to selection list field aliases - see section “Field aliases in the selection list” on
Aliases can be assigned to nested fields whether or not an alias is given to the nested table itself.
//It is necessary to display the specification of consignment notes in the report,
// document itself, nomenclature and quantity.
Choose
Document.Invoice.Composition.(Nomenclature As Goods, Quantity)
Query result:
Link Compound Product Quantity Jeans for women 4 Jeans for women 5 Shirt "Cowgirl" 5 Expenditure invoice 00005 dated February 24, 2002 0:00:00 Jeans for women 1 Jeans for women 1 Moidodyr "Aquarium" 5 Sink "Lily" 8 Mixer "Ultra" 10
Please note that the "Composition" field of the query result is a nested table that has the "Nomenclature" and "Quantity" fields.
//Display all fields of the tabular part of the invoice into the report.
Choose
Document.Invoice.Link,
Document.Invoice.Composition.*
The purpose of the FROM clause is to designate a list of source tables - data sources used in this SELECT statement.
It should be noted that the FROM clause in the query language is optional. It may be omitted if the data sources are fully qualified in the description of the selection field list contained in the SELECT clause. Note that a number of the examples in the previous sections did not contain a FROM clause.
The FROM keyword is followed by a list of sources. In general, the list of sources is described by the following set of rules:
<Источник>[, <Источник>[, ...]]
The query data sources are listed in the list of sources separated by commas. Every<Источник>the list of sources must include a description of the source; in addition, it can be specified<Перечень соединений>- rules for connecting a source to other sources. Connection specifications are described.
<Описание источника> [ <Перечень соединений> ]
If the infobase table is the data source,<Описание источника>contains<Имя таблицы>.
<Таблица>[ [HOW]<Псевдоним источника>]
If the source table is virtual, one can specify<Параметры>its formation. The parameters of virtual tables are described in detail in the "Query Data Sources" section.
<Имя таблицы> [(<Параметры>)] | <Описание запроса>
A subquery can also act as a query data source; in this case, the source description contains<Описание запроса>. The use of nested queries is described at.
In the description of the data source, its alias can also be assigned. Further<Псевдоним источника>can be used for more convenient access to this source. The use of data source aliases is covered in .
Connection specifications
When multiple sources are defined in the source list, for each record from the first source table, a selection is made from the second source table, and so on. Thus, as a result of the query, all possible combinations of all records from all specified sources are formed.
Query result:
counterparty Bank Suppliers JSCB Investment Bank Suppliers JSCB PromStroyBank Knitting factory "Zarya" JSCB Investment Bank Knitting factory "Zarya" JSCB PromStroyBank Jeans Factory JSCB Investment Bank Jeans Factory JSCB PromStroyBank Buyers JSCB Investment Bank Buyers JSCB PromStroyBank Clothing Fair JSCB Investment Bank Clothing Fair JSCB PromStroyBank Trading house "Budenovsky" JSCB Investment Bank Trading house "Budenovsky" JSCB PromStroyBank Pavilion 45 at the wholesale market JSCB Investment Bank Pavilion 45 at the wholesale market JSCB PromStroyBank Bavaria - porcelain JSCB Investment Bank Bavaria - porcelain JSCB PromStroyBank Jeans Factory JSCB Investment Bank Jeans Factory JSCB PromStroyBank JSCB PromStroyBank JSCB Investment Bank JSCB PromStroyBank JSCB PromStroyBank
The query result contains combinations of all counterparties with all banks. As a rule, such a result in itself does not make sense. Usually combinations of records from different source tables need to be limited by some conditions. It is possible in the query language to describe such a combination of sources by specifying the sources themselves and specifying the conditions under which combinations of records from these sources are required to be included in the query result.
Connections are of several types, they are described by the following rules:
<Соединение> [<Перечень соединений>]
In general<Перечень соединений>can contain and describe not only one connection (of two sources), but also several connections of several sources at once.
[INTERNAL] CONNECTION<Описание источника>BY<Условие отбора> |
LEFT [OUTER] JOIN<Описание источника>BY<Условие отбора> |
RIGHT [OUTER] JOIN<Описание источника>BY<Условие отбора> |
FULL (EXTERNAL] JOIN<Описание источника>BY<Условие отбора>
<Условие отбора>contains conditions according to which it is necessary to combine data from source tables - query sources in the selection. Rules for describing conditions in the query language are discussed on page 357 .
The keywords LEFT, RIGHT, and FULL specify the nature of the join. The words INTERNAL or EXTERNAL can be omitted at all, they increase the visibility and readability of the query text.
Joined sources are not equivalent to each other, and in some cases the result depends on which table is listed first, before the JOIN keyword (to the left of it), and which table is listed second (to the right).
[INNER] JOIN means that from both source tables - data sources, only those combinations of records that match the specified condition must be included in the query result. The rest of the entries are not included in the result.
// Need to find out which banks is at the same time
// counterparties (the same names are present
//both in the Counterparties directory and in the Banks directory).
Choose
Banks.Link Like Bank
From
Internal Connection
Handbook.Banks Like Banks
By
Query result:
counterparty Bank JSCB PromStroyBank JSCB PromStroyBank
LEFT [OUTER] JOIN means that the query result should include combinations of records from both source tables that match the specified condition. But, unlike an inner join, the query result must also include records from the first source (specified to the left of the word JOIN) for which no records from the second source matching the condition were found.
Thus, the result of the query will include all records from the first source; they will be merged with records from the second source when the specified condition is met. Query result rows for which no matching records from the second source are found will contain NULL in the fields generated based on records from this source.
//It is necessary to display all counterparties in the report, and for those
// who is also a bank - specify a link to the bank.
Choose
Contractors. Link As a Contractor,
Banks.Link Like Bank
From
Directory. Counterparties As Counterparties
Left Outer Join
Handbook.Banks Like Banks
By
Counterparties.Name = Banks.Name
Query result:
RIGHT [OUTER] JOIN means that the query result should include combinations of records from both source tables that match the specified condition. In addition, the query result should also include records from the second source (specified to the right of the word JOIN) for which no records from the first source matching the condition were found.
Thus, the query result will include all records from the second source; they will be merged with records from the first source when the specified condition is met. Query result rows for which no matching records from the first source are found will contain NULL in the fields generated based on records from that source.
//It is necessary to display all banks in the report, and for those
// who is also a counterparty - specify a link to the counterparty.
CHOOSE
Contractors. Link As a Contractor,
Banks.Link Like Bank
FROM
Directory. Counterparties As Counterparties
Right Outer Join
Handbook.Banks Like Banks
By
Counterparties.Name = Banks.Name
Query result:
counterparty Bank NULL JSCB Investment Bank JSCB PromStroyBank JSCB PromStroyBank
FULL [OUTER] JOIN means that the query result must include combinations of records from both source tables that match the specified condition. In addition, the query result must also include those records from both sources for which no matches were found.
Thus, the result of the query will include all records from both sources; they will be connected to each other when the specified condition is met. Query result rows for which no matching records were found from any source will contain NULL in fields generated based on records from that source.
// It is necessary to display all counterparties and all banks in the report,
// a.those who are both - output in one line.
Choose
Contractors. Link As a Contractor,
Banks.Link Like Bank
From
Directory. Counterparties As Counterparties
Full Outer Join
Handbook.Banks Like Banks
By
Counterparties.Name = Banks.Name
Query result:
Data source aliases
If an alias is assigned to a data source, then in the future it will be possible to access this source using this alias (and it will no longer be possible to access it through specifying the table name). Such an appeal may be more convenient and visual, and in some cases the only possible one.
The alias is set in accordance with the rules for assigning variable identifiers. Aliases in the request cannot match.
The AS keyword may precede the source alias. This word may not be specified at all, but if it is specified, the visibility and readability of the query text is increased.
Assigning aliases to sources does not, by itself, affect the selection of data in a query.
// This example demonstrates the use
// in the list of selection fields of the Goods alias,
// assigned to the source table Reference.Nomenclature
Choose
Product.Description,
Item.Parent
From
Directory.Nomenclature.Product
Nested tables in source list
The list of sources can also include nested tables - tabular parts of directories and documents.
//It is necessary to display the specification of consignment notes in the report -
// show the document itself, nomenclature and quantity.
//The nested table "Composition" is specified in the list of sources -
// tabular part of the invoice.
// The selection is limited to eight records so as not to overload the example.
Select First 8
Reference, Nomenclature, Quantity
From
Document.Invoice.Composition
Query result:
Link Nomenclature Quantity Expenditure invoice 00007 dated February 25, 2002 21:03:21 Jeans for women 4 Expenditure invoice 00006 dated February 25, 2002 0:00:00 Jeans for women 5 Expenditure invoice 00006 dated February 25, 2002 0:00:00 Shirt "Cowgirl" 5 Expenditure invoice 00005 dated 03/01/2002 20:58:28 Jeans for women 1 Expenditure invoice 00004 dated 03/01/2002 20:50:40 Jeans for women 1 Expenditure invoice 00003 dated February 23, 2002 0:00:00 Moidodyr "Aquarium" 5 Expenditure invoice 00003 dated February 23, 2002 0:00:00 Sink "Lily" 8 Expenditure invoice 00003 dated February 23, 2002 0:00:00 Mixer "Ultra" 10
Please note that when specifying a nested table in the list of sources, it is allowed to access both the fields of the nested table itself and the fields of the top-level table (the one that contains the nested table). In this case, the "Link" field of the document itself is accessed.
Subqueries in the source list
A query source list can use a subquery as a source table. In this case, the source description contains the subquery description. The description of a nested query is made in the same way as a regular one: see
Using a nested query as a data source is no different from using an infobase table. All fields described in the list of subquery selection fields are available as fields of such a source.
The result will be exactly the same as in the previous example.
To work with queries, an object of the built-in language is used Request. It allows you to receive information stored in the fields of the database in the form of a selection formed according to specified rules..
The query receives initial information from a set of tables. These tables represent the data of real database tables in a form convenient for analysis. They can be divided into two large groups: real And virtual.
Real tables, in turn, can be object (reference) or non-object (non-reference), fig. 97.
Rice. 97. Query tables
A distinctive feature of real tables is that they contain data from any one real table stored in the database.. For example, the table Directory.Customers, corresponding to the directory Customers, or the Accumulation Register.Remainders of Materials table, corresponding to the accumulation register of Remains of Materials, is real.
Virtual tables are formed primarily from data from multiple database tables. For example, the table Accumulation Register.Remains of Materials.Remains and Turnovers, formed from several tables of the accumulation register Remains of Materials, is virtual.
Sometimes virtual tables can also be formed from one real table (for example, the virtual table Prices. Slice of the Last is formed on the basis of the table of the Price information register). However, what all virtual tables have in common is that they can be given a number of parameters that determine what data will be included in these virtual tables. The set of such parameters may be different for different virtual tables, and is determined by the data stored in the source database tables.
Real tables are divided into object (reference) and non-object (non-reference).
IN object (reference) tables information of reference data types (directories, documents, plans of types of characteristics, etc.) is presented. And in non-objective (non-referential)– all other data types (constants, registers, etc.).
Distinctive feature object (reference) tables is that they include a Link field containing a link to the current entry. In addition, for such tables it is possible getting a custom representation of an object. These tables may be hierarchical, and the fields of such tables may contain nested tables (table sections).
The algorithm by which the data will be selected from the source tables of the query is described in the query text in a special language - query language . The request text consists of several parts:
a description of the request;
Consolidation of requests
ordering of results;
· AUTO-ORDERING;
a description of the results.
The obligatory part of the request is only the first one - the description of the request. All others are present as needed.
The query description defines data sources, selection fields, groupings, etc.
Query aggregation determines how the results of multiple queries will be merged.
The ordering of the results defines the conditions for ordering the query result rows.
AUTOORDER allows you to enable automatic ordering of query result rows.
The description of the totals determines which totals are to be calculated in the query and how the result is grouped.
It should be noted that when a query language is used to describe data sources in a data composition system, the summary section of the query language is not used. This is due to the fact that the data composition system independently calculates the totals based on the settings made by the developer or user.
Data composition system designed to create custom reports in the 1C:Enterprise 8.1 system and consists of several main parts.
The initial data for the layout of the report contains data composition schema are datasets and methods of working with them(Fig. 98).
The developer creates a data composition scheme in which he describes the text of the request, data sets, relationships between them, available fields, parameters for obtaining data, and sets the initial configuration settings - report structure, data design layout, etc.
For example, a layout diagram might contain the following set of data (Figure 99).

Rice. 98. General scheme of work with the data composition system

Rice. 99. An example of a layout schema (a dataset and a query using it)
On fig. Figure 99 shows the data composition schema designer window, which contains the data source, query text, and fields selected by the query.
The data composition system report that the user receives is not just a table of records that match the query. It has a complex hierarchical structure and can consist of various elements such as groupings, tables and charts. At the same time, the user can change the existing or even create a completely new report structure, set up the selection he needs, design the elements of the report structure, get a breakdown for each element, etc.
For example, the following report structure can be set (Fig. 100):

Rice. 100. Structure of a possible report
The generated report may look like this (Fig. 101).
In the presented report, the table will consist of accumulation register entries Sales Turnovers about clients and services provided to them. These records are grouped by the masters who completed the orders. And in the grouping, a list of masters will be displayed.
In general, the data composition system is a collection of several objects. When generating and executing a report, data is sequentially transferred from one object of the data composition system to another, until the final result is obtained - a document shown to the user.
The algorithm for the interaction of these objects is as follows: the developer creates a data composition scheme and default settings. In general, a large number of different reports can be created based on one data composition scheme. Data composition settings - either created by the developer or modified by the user - determine which report will be received in a particular case.

Rice. 101. Sample report
Based on the layout schema and the available settings, the layout builder creates a data layout layout. This is the stage of preparation for the execution of the report. A data composition template is a job already prepared for execution by the composition processor. The layout layout contains the necessary queries, report area layouts, etc.
The data composition processor selects data from the infobase according to the composition layout, aggregates and formats this data.
The result of the layout is processed by the output processor, and as a result, the user receives the resulting spreadsheet document.
The sequence of the layout system can be represented as the following diagram (Fig. 102):

Rice. 102. Scheme of the layout system
3.12.1. Creation of the report "Register of documents Provision of services"
Report Register of documents Provision of services will display a list of existing Services documents in the database in the order of their dates and numbers.
Report. Give it a name RegisterDocumentsProvisionServices. Bookmark Main click " Ready". In the data composition schema constructor, add Dataset - Query Request constructor".
Select the object (reference) document table as the data source for the query RenderingServices. From this table, select the following fields (Fig. 103):
Date of; Number; Stock; Master; Client.

Rice. 103. Selected fields
After that go to bookmark Order and specify that the query result should be first ordered by field value date, and then by field value RenderingServices.Link(Fig. 104).

Rice. 104. Order of query result output
Click " OK" and see what query the query constructor generated.
Go to bookmark Settings and add a new grouping to the report structure (Fig. 105).

Rice. 105. Command panel of the Settings tab
In the grouping field selection window, click the " OK" and on the tab Selected fields set the fields that will be displayed in the report:
Date of; Number; Stock; Master; Client (Fig. 106).

Rice. 106. Customizing the structure of the report
Register of documents provision of services. Click " Form" and look at the result of the report (Fig. 107).

Rice. 107. Report Register of documents providing services
Report. name it Service Rating. Bookmark Main click " Open Data Composition Diagram". In the Layout Designer dialog box that opens, click the " Ready".
In the data composition schema constructor, create Dataset - Query(DataSet1) and click the " Request constructor".
Nomenclature and a virtual table of the accumulation register Sales. Turnovers. To avoid name ambiguity in the query, rename the Nomenclature table to Spr Nomenclature(right-click context menu - Rename table).
Then select from tables fields Spr Nomenclature. Link And SalesTurnover.RevenueTurnover(Fig. 108).

Rice. 108. Selected fields
Go to bookmark Connections and note that the constructor has already created a relationship between the two selected tables - the value of the change in the Nomenclature register must be equal to the reference to the item in the Nomenclature reference book.
The only thing to do is to reset the flag All at the register table and set it at the reference table Spr Nomenclature(Fig. 109).
Setting the flag All for the directory table will mean that all elements will be selected from the directory and these elements will be assigned the value of the revenue turnover from the register. Thus, as a result of the request, all services will be present, and for some of them the revenue turnover will be indicated. For those services that were not provided in the selected period, nothing will be indicated.

Rice. 109. Setting table links
Go to bookmark Conditions and set the conditions for selecting elements from the Nomenclature reference book (Fig. 110). When setting selection conditions, you will need to use query parameters. The first condition must be that the selected element is not a group (to do this, switch to the Arbitrary condition- set flag Arbitrary). Then in the field condition enter the following text:
SprNomenclature.ThisGroup = FALSE
The second condition must be that the selected item is a service (this is simple condition) (Fig. 110).

Rice. 110. Conditions for selecting elements
In the future, before executing the request, in the parameter Type Nomenclature you must pass the corresponding enum value.
Go to bookmark Unions/Aliases and specify that the reference item view will have an alias Service, and the register field will have an alias Revenue(Fig. 111).

Rice. 111. Unions/Aliases
Go to bookmark Order and specify that the query result should be sorted in descending order of the field value Revenue. The creation of the request is finished, click the button " OK". Look at the query text generated by the constructor.
Go to bookmark Resources and click " >> " so that the constructor selects all available resources on which to calculate the totals. In your case, this is the only resource Revenue(Fig. 112).

Rice. 112. Data composition schema resources
Go to bookmark Options(Fig. 113).

Rice. 113. Data Composition Options
On this tab, you will see three options: Beginning of period, EndPeriod And Type Nomenclature. The first parameter is the start of the totals calculation period, the second is the end of the period. As a result, the source table will contain only the turnovers calculated in the transferred period.
For parameter Beginning of period set the title that will be displayed to the user − start date.
Here you should always remember that if you pass a date as these parameters, then the date also contains the time to the nearest second.
Suppose it is known in advance that the user will not be interested in the results of the report in the periods specified with an accuracy of up to a second. In this case, two features should be taken into account.
First, the user must be relieved of the need to specify the time when entering a date. To do this, modify the existing type declaration for the parameter Beginning of period. Double click in a cell Available types, corresponding to the parameter Beginning of period, press select button " … " and at the bottom of the edit data type window, set Date Composition into meaning date(Fig. 114).
Click " OK".
The second feature is that the default time in the date is 00:00:00. Therefore, if the user sets the report period from 10/01/2009 to 10/31/2009, the register totals will be calculated from the beginning of the day 10/01/2009 00:00:00 to the beginning of the day 10/31/2009 00:00:00. Thus, data for the 31st day, other than the beginning of the day, will not be included in the calculation, which will greatly surprise the user. To eliminate this situation, add another parameter in which the user will enter the end date. Parameter value EndPeriod will be calculated automatically so that it indicates the end of the day of the date entered by the user. Therefore, for the parameter EndPeriod set the flag Availability restriction.

Rice. 114. Editing the composition of the date
Using the command bar button, add a new parameter named EndDate (Fig. 115).

Rice. 115. Adding EndDate parameter
For this parameter, the platform will automatically generate a header − expiration date. Leave it unchanged. Set the parameter value type − date. In this case, as for the parameter Beginning of period, specify the composition of the date - date.
Please note that by default the parameter you added is available to the user (the accessibility restriction in the last column is removed).
Go to parameter EndPeriod. For it, the system has set the availability restriction flag. Do not uncheck it, because the value of this parameter will be calculated based on the value set by the user for the parameter Expiration date.
To set the formula by which the parameter value will be calculated EndPeriod, use the data composition system expression language. It contains the function EndPeriod(), which allows you to get the date corresponding to the end of some period, for example, the specified day.
In a cell Expression set the parameter EndPeriod the following expression:
As a result of the above actions, the layout parameters will look like this (Fig. 116):

Rice. 116. Layout system options
Finally, set the parameter Type Nomenclature. Since the report should display the revenue received only from the sale of services, the value of the parameter Type Nomenclature the user should not change. It must be set directly in the layout as . Parameter restriction flag Type Nomenclature the platform has set it by default, so you only need to specify the desired enum value SpeciesNomenclature in a cell Meaning, corresponding to the parameter Type Nomenclature(Fig. 117).

Rice. 117. Setting the value of the Nomenclature Type parameter
Proceed to the formation of the report structure. Bookmark Settings add a grouping and again don't specify the grouping field. Bookmark Selected fields specify the fields Service And Revenue(Fig. 118).

Then go to bookmark Other settings and set the title of the report - Service Rating(Fig. 119).

Rice. 119. Setting the title of the report
Run 1C:Enterprise in debug mode.
Select report Service rating, but before clicking the " Form", open Settings and on the bookmark Data Options set the report period from 03/01/2004 to 04/30/2004 (Fig. 120). If the creation dates of your documents differ from those given in the example, then the report period should be set differently.

Rice. 120. Report settings
Click " OK" and generate a report. The result will look like this (Fig. 121):

Rice. 121. Result of the report execution
Now change the end date to 3/31/2004. Data for March 31 are included in the report (Fig. 122).

Rice. 122. The result of the report execution
3.12.3. Creation of the report "Revenue of masters"
Report Masters revenue will contain information on what revenue was received by Master LLC due to the work of each of the masters, with details for all days in the selected period and a breakdown for clients served on each of the days. Using this report as an example, you will learn how to build multilevel groupings in a query and how to bypass all dates in a selected period.
Create a new config object Report. name it RevenueMasters and run the main data composition schema constructor.
Add Dataset - Query(DataSet1) and click the " Request constructor". Select the virtual table of the accumulation register Sales. Turnovers.
Set one of the options of this virtual table − Periodicity. To do this, go to the field tables and click " Virtual Table Options"(Fig. 123).

Rice. 123. Changing the parameters of a virtual table
In the parameters window that opens, set the parameter value Periodicity - Day(Fig. 124). Press the button " OK".

Rice. 124. Virtual Table Options
Then select the following fields from the table:
· Sales Turnovers. Master;
· Sales Turnovers.Period;
· Sales Turnovers. Client;
· Sales Turnover. Revenue Turnover (Fig. 125).

Rice. 125. Selected fields
Now go to bookmark Unions/Aliases and set an alias Revenue for the field SalesTurnover.RevenueTurnover(Fig. 126).

Rice. 126. Unions/Aliases
Bookmark grouping define that grouping will be done by fields Master, Period And Client, and field values RevenueTurnover will be summed up (Fig. 127).

Rice. 127. Grouping fields
Bookmark Order specify that the query result will be sorted in ascending order of the field value Period. Click " OK". Consider the query text generated by the constructor.
Now move on to editing the data composition schema. Bookmark Resources click " >> " and make sure the constructor has selected the only available resource - Revenue.
Bookmark Options follow the same steps as when creating the previous report.
For parameter Beginning of period set a title start date. In field Available types set the composition of the date - date.
For parameter EndPeriod set an expression:
EndPeriod(&EndDate, "Day")
In field Limitation availability set the availability restriction flag.
Finally add one more parameter − Expiration date, set its type as date, the composition of the date is date.
As a result of the above actions, the data composition parameters will look like this (Fig. 128):

Rice. 128. Data Composition Options
Now we need to create the report structure. Bookmark Settings sequentially create two nested groupings: top-level - by field Master, nested in it - by field Period. Then add another grouping nested within the grouping by field Period, – Detail records(without specifying the grouping field) (Fig. 129).

Rice. 129. Structure of the report
Now, being at the level of the global report, go to the tab Selected fields and add fields to the list Client And Revenue.
Finally, from the global report level, go to the tab Other settings and change the following settings. For parameter set value Separately and only in the results; for parameter set the value Start and for the parameter header set the value Masters revenue(Fig. 130).

Rice. 130. Setting the output of grand totals to the beginning
Run 1C:Enterprise in debug mode and look at the result of the Masters Revenue report for the period from 03/01/2004 to 04/30/2004 (Fig. 131).

Rice. 131. Result of the report execution
If you remember, this report should show data with details for all days in the selected period. Now only those days are displayed for which there are non-zero entries in the accumulation register table. Therefore, now it is necessary to change the report settings in such a way that each date from the period for which the report was generated falls into the report.
To do this, return to the configurator mode and fine-tune the report structure. So far, all the structure settings that you have made have applied to the entire report as a whole. But the data composition system also allows you to customize each element of the structure individually.
You will need to change the grouping setting Period. In order to go to the settings of this particular grouping, in the structure field, place the cursor on this grouping, and then click the " Period" in the command panel (Fig. 132).

Rice. 132. Grouping settings Period
The settings available for this grouping will be displayed at the bottom of the form.
Go to bookmark Grouping fields. For field Period install Add-on Type - Day(Fig. 133).

Rice. 133. Setting the period's complement type
By doing so, you have indicated that for this grouping, existing records with a non-zero resource value will be supplemented with records for each of the days.
After that, you should specify in which period such an addition will be performed. In the fields below, you can enter the start and end dates for this period. But explicitly specifying dates is not suitable, because the user can generate a report for an arbitrary period. It is necessary that the addition of dates is performed not in some fixed period, but in the period that the user has chosen for the entire report.
In order to ensure exactly this work of the report, enter the edit mode of the first field (for example, by double-clicking on it) and click on the "clear" button X". After that, by clicking on the button " T", you will be able to select the type of data displayed in this field. Select Data composition field(Fig. 134).

Rice. 134. Choosing a data type
Click " OK". Now click in the input field the select button " … " and in the field selection window that opens, check the option Beginning of period(Fig. 135). Click " OK".

Rice. 135. Field selection
For the second input field, specify in the same way that the end date of the period will be obtained from the parameter Expiration date(Fig. 136).

Rice. 136. Grouping settings Period
Run 1C:Enterprise in debug mode and run the report Masters revenue for the period from March 20, 2004 to April 20, 2004 (Fig. 137).

Rice. 137. Result of the report execution
3.12.4. Creating a Service Inventory Report
Report Service list will contain information about what services and at what price LLC "Master" provides. On its example, you will get acquainted with the possibility of obtaining the latest values from the periodic register of information and displaying hierarchical directories.
Create a new config object Report. name it Service list and run the Data Composition Schema Designer. Create a new Dataset - Query(DataSet1) and call the query constructor.
Select the object (reference) lookup table Nomenclature and a virtual table of information register Prices.SliceLast. In order to eliminate the ambiguity of names in the query, rename the table Nomenclature to Spr Nomenclature.
Call the dialog for entering parameters of the virtual table PricesSliceLast and indicate that the period will be passed in the parameter Report Date(Fig. 138).

Rice. 138. Virtual Table Options
Then select the following fields from the tables:
· SprNomenclature.Parent;
· PricesSliceLast.Price (Fig. 139).

Rice. 139. Selected fields
Go to bookmark Connections, drop the flag All at the register table and set it at the reference table.
Bookmark Conditions set the condition for selecting dictionary elements Nomenclature– the elements to be selected must correspond to the item type passed in the query parameter Type Nomenclature(Fig. 140).

Rice. 140. Conditions for selecting elements
Bookmark Unions/Aliases indicate that the field Parent will have an alias Service Group, and the field Link - Service(Fig. 141).

Rice. 141. Unions/Aliases
Go to bookmark grouping and indicate that the grouping will be done by the field SprNomenclature.Parent. It is not necessary to set the values of the summarized fields (Fig. 142).

Fig.142. Grouping fields
Click " OK". Look at the text of the request.
Proceed to editing the data composition schema. Bookmark Resources pressing the button " >> " select the only available resource Price.
Bookmark Options set the parameter value Type Nomenclature How Enumeration.Types of Nomenclature.Service. In addition, remove the accessibility restriction for the parameter Report Date and give it a title - Report date. In field Available types set the composition of the date - date. For parameter Period, on the contrary, set the availability restriction (Fig. 143).

Rice. 143. Layout scheme options
Proceed to the formation of the report structure. Go to bookmark Settings and create a group by field Service Group, specifying the type of grouping Hierarchy. Within this grouping, create another grouping without specifying a group field. It will contain detailed report records (Fig. 144).

Rice. 144. Structure and highlighted fields of the report
Go to bookmark Selected fields and specify that the Service and Price fields will be displayed in the report (Fig. 145).

Rice. 145. Structure of the report
And finally, customize the appearance of the report on the tab Other settings. Since the report will be just a list of services provided, in which prices for specific services are of interest, display resource values Price for each of the groupings and for the entire report as a whole does not make sense.
To disable the display of totals in the report, set the parameter Positioning Grand Totals Vertically into meaning No.
Then go to the specific grouping settings − Service Group. For parameter Location of totals this grouping, specify the value No. Return to the settings of the entire report as a whole.
For parameter Location of grouping fields enter a value Separately and only in the results(so the report will be better "read"). Finally, set the title of the report - Service list.
Run 1C:Enterprise in debug mode and first of all open the periodic register Prices.
Add another value to it for the service Diagnostics: the new price of the service as of 01.04.2004 is 350 (Fig. 146). This will test the report.

Rice. 146. Entries of the register "Prices"
Now run the report Service list as of March 31, 2004 (Fig. 147).

Rice. 147. Result of the report execution
Your report correctly reflects the price of the Diagnostics service as of 03/31/2004 - 200 rubles.
Run the report again, but now for a different date - 04/01/2004 (Fig. 148).

Rice. 148. Result of the report execution
As you can see, the new price of the Diagnostics service is shown - 350 rubles.
Report Customer Rating will show what is the income from the provision of services to each of the clients for the entire period of operation of Master LLC. On its example, the possibility of using a chart to display the result of a query will be demonstrated.
Diagram is a control element intended for placement in tables and forms of charts and graphs of various types of the 1C:Enterprise system.
Logically diagram is the collection of points, series, and series values at the point(Fig. 149).
As a rule, moments or objects for which you get the values of characteristics are used as points, and characteristics for which you are interested in values are used as series.
For example, a chart of sales of types of items by months will consist of points - months, series - types of items and values - sales turnover.
The diagram as an object of the built-in language has three areas that allow you to control the design of the diagram: the construction area, the title area and the legend area (Fig. 150).
The chart can be inserted into the report structure as a separate element. When creating a report Customer Rating the chart will be used in the data composition schema settings structure.

Rice. 149. Chart example

Rice. 150. Chart areas
Create a new configuration object in the configurator Report. name it RatingClients, open its main data layout schema.
Create data set - query(DataSet1) and call the query constructor. Select virtual accumulation register table Sales. Turnovers and from it one field - SalesTurnover.Customer.
Then add a new field (icon Add in the command bar above the list of fields) and using the expression builder, define it as the difference between revenue and cost (Fig. 151).

Rice. 151. Custom field expression editor
As a result, the list of selected fields will look like this (Fig. 152):

Rice. 152. Selected fields
Bookmark Unions/Aliases specify that the calculated field will have an alias Income(Fig. 153).

Rice. 153. Unions/Aliases
Bookmark Order indicate that the result rows should be sorted in descending order of the field value Income. Click " OK" and see what text the query constructor generated.
Go to bookmark Resources and add a field Income to the layout resources. Then go to bookmark Settings in order to create the structure of the report.
Unlike all previous reports, the structure of which contained groupings, this time add a diagram to the report structure (Fig. 154).

Rice. 154. Structure of the report
Add grouping by field to chart points Client. Leave the chart series unchanged.
Now go to bookmark Selected fields and select field Income for output to the report. The report structure should take the following form (Fig. 155):

Rice. 155. Report structure and chart settings
Bookmark Other settings set the title of the report - Customer Rating, and also select the chart type − Circular volumetric.
Run 1C:Enterprise in debug mode and open the report Customer Rating(Fig. 156).

Rice. 156. Pie volume chart in the report
Please note that when you hover over a sector of the chart, a tooltip appears.
Open the report settings and change the chart type to Measuring. Generate the report again (Fig. 157).