File preview in windows 10. How to disable the 'Preview' function in browsers
Read also
Outlook for Office 365 Outlook for Office 365 for Mac Outlook 2019 Outlook 2016 Outlook 2013 Outlook 2010 Outlook 2007 Outlook 2016 for Mac Outlook for Mac 2011 Outlook 2019 for Mac Less
The file preview feature allows you to preview attachments in Outlook without opening them in a separate application. To view a file, simply click the attachment icon in the Reading Pane.
What files are available for preview?
By default, files from most of the Microsoft programs Office and Office 365 including Word, PowerPoint, Excel and Visio. You can also preview attachments Email, images and text files in Outlook.
Attachment view
Attached files can be viewed in the reading pane or in the message body without opening other applications.
The Attachment Preview feature in Outlook only works if you have the same version of Word, Excel, or PowerPoint installed as the version of Outlook in which you are viewing the file.
The attachment can appear in the reading pane or in the body of the message. To preview a file or item, click an attachment in the reading pane below the Subject line. Attachments in the body of the message are not available for preview. To view them, open the attachment.
To switch from viewing the attachment to the body of the message and vice versa, click the element Show message or investment.
How to view PDF files?
Outlook does not have a built-in PDF preview feature. To view them, follow the steps below.
Close the Outlook application.
Download and install Adobe Acrobat Reader.
Select Adobe Acrobat Reader as the default program for opening PDF files. To view detailed instructions choose your operating system below.
Restart Outlook. The PDF files will then be available for preview in Outlook.
Is it possible to turn off file previews?
Yes. You can enable or disable the file preview feature in the Trust Center.
In Outlook, select items File > Options > Trust Center > Trust Center Settings, and then - Attachment processing.
Note: In Outlook 2007, select items Tools > Security Control Center > Attachment processing.
To disable all attachment viewers, select the checkbox Disable Attachment View.
To disable a specific viewer, click the button Document and Attachment Viewers, clear the check box for the appropriate tool, and then click OK.
Third Party Attachment Previewers
Third Party Suppliers software may offer viewers that support additional attachment file types. More information about these viewers can be found online. If you have these tools, download and install them so you can view other types of files in Outlook.
11.07.2014As you may have noticed, starting with Windows 7, most modern browsers supports the function of previewing sites already open in the browser, i.e. you can see thumbnails of sites when you hover the mouse over the minimized program icon.
I don’t know about you, but this feature annoys me, it’s much more convenient to expand the browser and select the desired tab, and not look for it among these thumbnails. Therefore, today I will teach you how to disable the " Preview" in modern browsers.
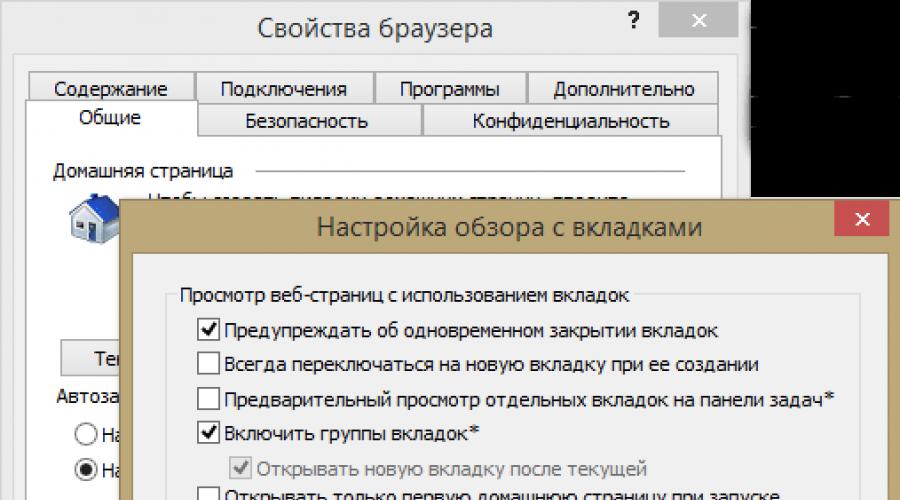
How to turn off the ‘Preview’ feature in Internet Explorer?
In order to disable thumbnails in Internet Explorer, you need to go to its settings (the gear icon in the top bar of the browser) and select the "Internet Options" item there. In the window that opens, click on the ‘Tabs’ button and uncheck the option “Preview individual tabs on the taskbar”. Close both windows by clicking on the ‘OK’ buttons, restart the browser and enjoy the absence of unnecessary thumbnails.

How to turn off the ‘Preview’ feature in Mozilla Firefox?
In the Mozilla Firefox browser, disabling thumbnails also does not take much time. As an example, take the latest version for today Firefox browser 30.0 (although in previous versions there are no differences in this setting, i.e. this instruction valid for all versions).
So, you need to go to the browser settings, for this, click on the icon in the upper right corner and select the ‘Settings’ item. In the window that opens, select the 'Tabs' option and uncheck the 'Show tab thumbnails on the panel Windows tasks'. Close the ‘Settings’ window by pressing the ‘OK’ button and continue working in the browser without thumbnails.

How to disable the 'Preview' feature in Opera?
IN Opera browser disabling the preview is a bit more complicated, because this process is not included default settings. To disable the thumbnails we don't need, you need to write to command line browser (where you enter the address of the site you need) the ‘opera:config’ command (without quotes). In the window that opens, to the line ‘Find’, write ‘Use Windows 7’. A line will appear with the inscription ‘Use Windows 7 Taskbar Thumbnails’, opposite which you need to uncheck and restart the browser.

That's all the settings, as you can see, disabling the ‘Preview’ feature in browsers is very simple and takes very little time. But in this article, you can read in detailed overview Mozilla browser Firefox 29.
File Explorer can show image thumbnails and file and folder icons in Windows 10. In this tutorial, we will show you how to enable or disable thumbnail previews in File Explorer for everyone or a specific user account in Windows 10.
- Method 1. Turn thumbnails on and off in File Explorer Options
- Method 2. Turn thumbnail view on or off in visual effects settings
- Method 3. Enabling and disabling thumbnail viewing using a BAT file
- Method 4. Enable or disable thumbnails in group policy
- Method 5. Enable or disable thumbnail preview using REG file
EXAMPLE: Thumbnail preview enabled and disabled in file explorer


Enable or disable thumbnail previews in Windows 10 File Explorer.
Method 1: Turn thumbnails on and off in File Explorer Options.
Note: This setting only affects your account user, as well as the second and third methods.
1. Open "Explorer Options". Click menu "File" and select .

2. In the opened window "Folders settings" go to tab "View".
Note: default value.
A) On the tab "View" find the option and uncheck the box and click on the button OK.

A) Go to the tab "View", check the box "Always show icons, not thumbnails" and press "OK".

Method 2: Enable or disable thumbnail previews in Windows 10 File Explorer using the Visual Effects setting.
1. Open the "Visual Effects" settings. Press combination Win keys+ R , type or copy and paste into the Run dialog box SystemPropertiesPerformance.exe and press the Enter key.

3. Enable Thumbnail Preview in File Explorer
Note: default value.
A) Check the box next to the item and click the button OK.
4. Disable Thumbnail Preview in File Explorer
A) Uncheck "Show thumbnails instead of icons" click OK.

Method 3: Turn thumbnail view on and off using a BAT file.
The .bat files below will change the DWORD value in the registry key:
HKEY_CURRENT_USER\SOFTWARE\Microsoft\Windows\CurrentVersion\Explorer\AdvancedIconsOnly DWORD
- 0 = Off - show icons
- 1 = On - show thumbnails
2. Enable Thumbnail Preview in File Explorer
Note: default value.
2. On the left panel of the local editor group policy go- . (see screenshot below)

3. In the right pane of the policy, open the section "Conductor" and change the policy setting

5. To enable thumbnail preview in file explorer
A) Select "Not set" or "Disabled" and button OK.
B) Users will now be able to turn on / off thumbnail preview using Ways 1, 2, 3 .
6. Disable thumbnail previews in file explorer.
A) Select "Included" and press OK.

Method 5: Enable or disable thumbnail previews in File Explorer in Windows 10 using a REG file
Note: You must have Administrator rights.
This option does the same as Method 4, but only applies to current user.
This Method will override the previous settings in the Methods. 1, 2, 3 .
Using the reg file below, DWORD values are added and modified in the registry keys:
HKEY_CURRENT_USER\SOFTWARE\Microsoft\Windows\CurrentVersion\Policies\Explorer HKEY_LOCAL_MACHINE\SOFTWARE\Microsoft\Windows\CurrentVersion\Policies\Explorer
DisableThumbnails DWORD
- 0 or delete = Enabled
- 1 = Disabled
2. Enable thumbnail preview in file explorer for all users.
Note: This is the default value.
Windows 7 has a completely redesigned taskbar including many new features, many refer to it as the Superbar. Among the changes in Windows 7 taskbar it is possible to hide the name of the label for the button on the taskbar, after which only the Jump Lists icons and sketch For open windows running programs.
Function preview thumbnails on the taskbar Windows 7 displays small preview thumbnails of open windows hovering the mouse pointer over a program button or taskbar icon. For users who do not look at the window thumbnail, you can disable (and enable later) the thumbnails in the taskbar Windows 7.
How to Enable or Disable Taskbar Thumbnail Preview in Windows 7
- Click on the button Start - Find and type GPEdit.msc Enter .
- Switch to User configuration -> Administrative Templates -> Start Menu and Taskbar on the left side of the Local Group Policy Editor.
- Find and double click on taskbar Turn off thumbnails on the right side of the Local Group Policy Editor window.
- Select button Enabled.
- Click OK for the changes to take effect.
- To re-enable the taskbar preview feature in Windows 7, just set back the value or set not configured .
Alternatively, it can also be done manually install or set registry key to disable taskbar thumbnail feature.
- Click on the button Start - Find and type RegEdit in field quick search text and then click Enter .
- In Registry Editor, navigate to the following registry key:
HKEY_CURRENT_USER\Software\Microsoft\Windows\CurrentVersion\Policies\Explorer
Note: If Explorer shows that the registry subkey does not exist, click right click mouse on policy and click New -> Key, name it "Explorer".
- In the right pane, right click on an empty space and then select New -> DWORD (32 bit).
- Type TaskbarNoThumbnail as the name for the new registry value data.
- Double click on TaskbarNoThumbnail and change to your data value.
- Type 1 and click OK.
- Sign out and sign in again, or restart your computer if necessary.
- To re-enable taskbar thumbnails, simply right-click on TaskbarNoThumbnail and click Delete to remove the entire registry key, or set TaskbarNoThumbnail data to 0.
At manual editing registry can be easily made simple download the following registry registration files, and then double-click them to merge them into the system registry.
To disable the preview thumbnail taskbar run this registry key Disable taskbar-Thumbnails.reg.
To enable Thumbnail Taskbar Preview set this registry key Enable taskbar-Thumbnails.reg.
Note: Unfortunately, the trick to disable and turn off the taskbar opens the thumbnail preview window and may not work, so this setting is only for Windows Vista it all depends on the build. Windows 7. Here are a few other workarounds to disable alternate thumbnails on the taskbar Windows 7.
Method 1 - disable Windows theme Aero
Taskbar Preview Thumbnails only work when you have Windows Aero desktop effects enabled in Windows 7. Thus, when Windows Aero is disabled, the thumbnail taskbar will not be displayed, and will be replaced with a list of open windows rather than text.
To disable Windows Aero, simply select in the Windows theme Aero Control panel personalization, but then you lose a lot of enjoyment of using Windows 7 with this workaround.
Solution 2 - Delay Mouse Over Taskbar Responses
Another solution is to establish a response system The mouse on is very slow when the user hovers the mouse over or over the frame of the taskbar, which makes not only thumbnails appear, but normal list views of open windows. Instead, at this time, the top window will only show a tooltip showing the name
Follow the guide to set key registry values ExtendedUIHoverTime for a longer delay time when hovering the mouse over other objects.
7 Taskbar Tweaker v3.4
Option: Mini remapping via drag and drop.
Enable drag and drop to change grouped apps. If I have three word document Open, I can drag the thumbnail of the open application to set a different order (without using the taskbar)
Options: Left click on combo items -> Open last window if inactive, otherwise open thumbnail.
A tool that allows you to:
- Setting up marking / grouping / merging in Application ID.
- Change the order of elements in a group of tabs (drag'n'drop).
- Close / minimize / etc. several windows at once.
- Change the application ID of the window (that is, group all windows as you wish).
You can open it with the main window tweaker, its menu is in the tray, or optionally double click by clicking on empty place on the taskbar.
Here is a video that demonstrates some of the settings: