Cancel automatic driver installation in windows 10. Search in Windows Update - how to disable? Disabling Driver Updates from Update Center Using the Local Group Policy Editor
Read also
Often, for a variety of reasons, you need to use old version driver, but after installing system updates, you again and again get an unnecessary version of the driver, which, since you are reading this, is probably causing problems. Windows 10 has special parameter, which can be used to modify this behavior. Often the OEM driver is better than the installed drivers. windows update which may create a problem. To continue, you must be logged in with account administrator.
Windows 10 automatically installs drivers for your gadgets, graphics cards, and other hardware. If it is necessary that operating system did not automatically install device drivers, disable this feature. Below are five working methods. Apart from Parameters Windows, let's see how to use: Group Policy for Windows 10 Pro and Registry Editor for Home version. ( The registry method works on any version of Windows.).
In Windows 10, you can disable automatic driver updates. This useful feature, But a large number of users who are not happy with the new driver versions installed using Windows 10 Update.
Note: We must warn you that if you prevent Windows 10 from installing drivers, you will need to check and install new drivers manually for all your hardware devices. You may want to disable automatic driver updates for your graphics card, but this will also affect other drivers, such as the audio driver.
Method 1: Turn off driver updates in Windows 10 using Device Installation Options.
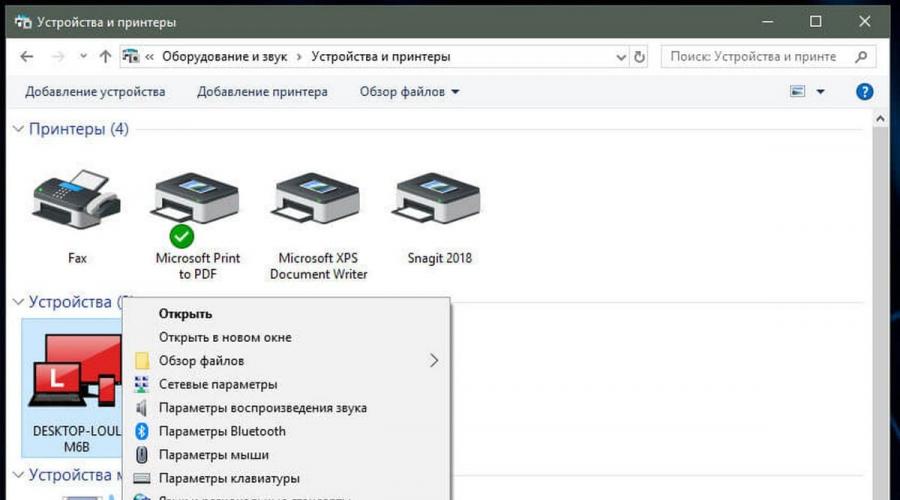
- Open File Explorer, paste in the address bar and press Enter.
Control Panel\Hardware and Sound\Devices and Printers
This will open the Devices and Printers section of the Control Panel.
- Expand Section "Devices". Here you will see a list of all devices ( see picture above) connected to your system and your own system will appear as a device. It will have the same name as your computer and will be represented by a PC icon.
- Right-click on it and select from the context menu "Device installation options".

A dialog box will open asking if you want to automatically download manufacturer apps and custom icons available for your devices. It doesn't say anything about drivers, but this setting is what you need to disable automatic driver loading.
- Choose an option "No" and press the button "Save Changes". You will need administrator rights to save changes.

- Restart your computer.
Method 2: Disable automatic device driver installation using the registry.
- Open .
- Navigate to the next registry key.
- On the right, modify or create new parameter DWORD 32 bits named .

Note: Even if you are using 64-bit Windows, you must still create a 32-bit DWORD value.
- Set value for PreventDeviceMetadataFromNetwork equal 1 , this will disable the function automatic update drivers. Value equal to 0 allows the system to load drivers - automatically (this is the default).
- Restart your computer.
Method 3: Disable automatic driver loading in Windows 10 using the Group Policy Editor
- Open local editor group policy ().
- In the Group Policy Editor, navigate to the following path:
Computer Configurations / Administrative Templates → Windows Components→ Center windows updates
- Find and open the option - Do not include drivers in Windows updates

- The Default Policy setting is not set, it must be Turn on, now Windows 10 will not automatically install drivers using Update Center.

- Reboot the system.
After the reboot, the drivers will be excluded from the update search list.
If you want to enable driver updates again, you can easily do so by resetting the settings to default.
Method 4 - Disable automatic driver updates using group policies.
- Open the Local Group Policy Editor by clicking keyboard shortcut Win+R , we type in the field gpedit.msc click OK.
- In the Group Policy Editor go to:Computer Configuration → Administrative Templates→ System → Installing devices→Device Installation Restrictions→Deny the installation of devices that are not described by other policy settings.
- If this parameter Switched off, then Windows will automatically install the driver for any device.
- Now restart Windows 10, the whole system will not be able to update the drivers on its own.
To set the default parameter, you must set the parameter to Not set or Disabled.
Method 5 - Cancel automatic driver installation using the registry.
For Users Windows 10 Home, there is no Group Policy on this system and you must make these settings in registry.
This also works on Windows 10 Pro.
- Open the registry editor by typing regedit in the window Run. ()
Go to:
HKEY_LOCAL_MACHINE\SOFTWARE\ Policies\Microsoft\Windows\WindowsUpdateNote: If section windows update no, just create it.
- In the new section, Create a new DWORD (32-bit) value with the name and 1.

For those users who use Windows 10 x64 bit version Home or Pro You need to edit one more branch of the registry:
HKEY_LOCAL_MACHINE\SOFTWARE\Wow6432Node\Policies\Microsoft\Windows\WindowsUpdateIf section windows update also no, create it.
Create a new DWORD (32-bit) value named ExcludeWUDriversInQualityUpdate and set its value to 1.
- Restart your computer.
If you want the system to install drivers automatically from Windows Update, set ExcludeWUDriversInQualityUpdate to 0 .
the user is prompted to choose how updates are to be installed (Figure A). At the same time, most likely, first of all come to mind system updates, security updates, and fixes, so most users select the Use Recommended Settings option. However, in addition to the standard set, Microsoft may also provide device driver updates.
Open full size " href="http://www.winblog.ru/uploads/posts/2012-02/1330429842_13031201.jpg">
Figure A When you install Windows 7, you must select one of the options for installing updates.
As is known, has a huge database of drivers and supports almost all known devices. Once a driver is installed, the operating system adds it to a watchlist and can regularly check for new or updated drivers using Windows Update.
Of course, there are two points of view regarding Microsoft-provided drivers. Some people think that getting drivers from Microsoft is a good thing because they have been tested and certified by Microsoft before being added to Windows Update. Others believe that getting drivers from Microsoft is bad because they are essentially stripped down versions of drivers from the device manufacturer.
In addition to these considerations, there are still factors of simplicity and ease of installation. New drivers from Windows Update are detected and installed automatically with little or no user interaction. To update drivers manually, you need to regularly check the device manufacturer's website, download and install them yourself.
So, depending on what point of view you had when installing Windows 7, you could choose the "Use recommended settings" option, which provides for updating drivers along with the rest of the operating system components, or the "Install Important Updates Only" option, not providing automatic driver updates. But suppose your views have changed since then - what to do? Luckily, Windows 7 includes a little-known Device Installation Settings tool that lets you change how you find and install driver updates.
In this article, I will explain what is the advantage of automatically detecting and installing drivers Windows tools 7 and then I will explain how to enable or disable this feature.
Benefits of Automatic Updates
Let's take a look at the benefits of automatic detection and installation drivers devices using Windows 7. This allows the operating system to load not only drivers, but also icons high resolution for devices connected to the computer, as well as detailed information about the equipment.
For example, if I open the Devices and Printers window from the Start menu on my test computer, I can see large icons for all connected devices (Figure B). As you can see, the screenshot shows mouse Optical, and the status bar displays information about it. If you click on the device icon, a window with more detailed information will open (fig. C and D).
Open full size " href="http://www.winblog.ru/uploads/posts/2012-02/1330429813_13031201_02.jpg"> 
Figure B The Devices and Printers window may display large icons for connected devices.
Open full size "href="http://www.winblog.ru/uploads/posts/2012-02/1330429828_13031201_03.jpg"> 
Figure C You can click on the icon to get more detailed information about the device...
Open full size " href="http://www.winblog.ru/uploads/posts/2012-02/1330429859_13031201_04.jpg"> 
Figure D. ...with a link to the manufacturer's website.
Calling the "Device Installation Options" window
Enable or disable automatic search and installing driver updates through Windows Update 7 can be done in the "Device Installation Options" window. To call it, right-click on the computer icon in the "Devices and Printers" window. A context menu will appear with a variety of options, including "Device Installation Options" (Figure E).

Figure E This context menu provides fast access to a range of useful features.
When you select the "Device Installation Options" option from the context menu, the window of the same name opens (Fig. F). To allow Windows to automatically load device drivers and realistic icons, select the Yes, Do This Automatically option. For the No, Let Me Choose What to Do option, as you can see, there are three options available, including Never Install Driver Software from Windows Update. There is also an option "Replace generic device icons with enhanced icons".
Once you've made your selection, click the Save Changes button. In this case, you may need to confirm the operation in the User Account Control window.
Hello friends! Today I will tell you Tohow to disable automatic installation drivers in Windows 10. It may be needed under certain circumstances, one of which happened to me the other day. I'll tell you the details, I'm sure many will come in handy.
A friend of mine complained that after Windows installation 10 system rebooted with . Arriving at the place and analyzing these Blue Screen errors, I realized that the problem arose due to a driver error on sound card. As it turned out, my friend used a discrete sound adapter Creative SB X-Fi Xtreme Audio Sound Card, whileintegrated sound card was disabled in BIOS. It turns out that the blue screen appeared just because of a conflict in the driver of a separate audio card, which the system tried to install automatically. In simple words, the driver for some reason did not fit and the OS crashed with a critical error. I loaded into safe mode and turned offautomatic installation of drivers in the system, then made a normal boot. Unfortunately, on the official website of the manufacturer SB X-Fi Xtreme Audio Sound Card, I did not find firewood for Windows 10 and therefore turned on the integrated audio device in the BIOS, after that The BSoDs have stopped. At then my buddy using official support device manufacturer downloaded required drivers and installed them.
How to disable automatic driver installation
Windows Update contains a global repository of various drivers. After installation, the operating system initializes all devices connected to the computer and installs the drivers automatically. Sometimes it happens that the driver is not suitable. In this case, you need to disable the automatic installation of drivers in the OS and install them manually by downloading latest versions on the official website of the manufacturer.
Opening the "Control Panel"
Select "System and Security"

"System"

« Extra options systems"

On the "Hardware" tab, select "Device installation options"

In the window that appears, check the item "No (the device may not work properly)"


In such a simple way, we have disabled the automatic installation of drivers in Windows 10.
The same can be done in the Group Policy Editor.
Start --> Run. In the input field, write gpedit.msc and click OK.

"Computer Configuration" --> " Administrative Templates» --> « System » --> « Device installation» --> « Device Installation Restriction» .
Sometimes automatic installation of drivers in Windows (in Windows 7, 8, 10) for all the hardware that is on the computer is, of course, good. On the other hand, sometimes there are cases when you need to use the old version of the driver (or just some specific one), and Windows forcibly updates it and does not allow you to use the desired one. We will perform these actions on Windows 10.
In this case, we will disable automatic installation and install the required driver.
Method number 1 - disable auto-installation of drivers in Windows 10
First, press the combination of WIN + R buttons - in the window that opens, you need to enter the gpedit.msc command and then press Enter. If everything is done correctly, the "Local Group Policy Editor" window should open.

In the branch that we opened in the previous step, there should be a parameter " Prevent installation of devices not described by other policy settings". It must be opened, select the option" Enabled"And save the settings, click OK.

Actually, after this, the drivers will no longer be installed on their own.
Now, by the way, if you connect any device to your computer, and then go to the device manager ( Control Panel/Hardware and Sound/Device Manager), then you will see that Windows does not install drivers for new devices, marking them in yellow exclamation points. For if this policy setting is enabled, then Windows system You cannot install or update device drivers that are not specified in the policy settings.

Method number 2 - disabling auto-installation of new devices
You can also prevent Windows from installing new drivers in another way ...
First you need to open the control panel, for this we do, as indicated in the screenshot, then go to the " system and safety", then open the link " System".


It remains only to switch the slider to the parameter " No, the device may not work properly", then save the settings.

Greetings colleagues! In a previous article, I showed you such an action you may need if any driver from the Update Center Windows will not be suitable for your device. In my case, it turned out to be a driver for a discrete sound card. After installation in system unit expansion cards, the system installed drivers on it automatically and received critical error on blue screen. When I turned off automatic driver installation, the system booted up normally and allowed to install on the device official driver developer.
I can’t say that such driver problems in Windows 10 happen often, but to know how to disable automatic installation of drivers in the system won't bother you. Today I will post two more simple ways suggested by our readers.
Disable automatic driver installation in Windows 10
In this article, we will not touch on "Advanced System Settings", but will use the Group Policy Editor.
Start --> Run. In the input field, write gpedit.msc and click OK.

If at this stage you get the error "Unable to find gpedit.msc", then you have Home Windows version, so immediately go to the second method.

If you have a professional version of the OS, then the group policy window will open.
"Computer Configuration" --> "Administrative Templates" --> "Components" --> "Windows Update".
In the right part of the window, select "Do not include drivers in windows updates" and double-click on it with the left mouse button.

Check "Enabled", click "Apply" and "OK".


Now the automatic installation of drivers in the OS is prohibited.
Disable automatic driver installation in Windows 10 using the registry
If you have Windows 10 Home installed (the method is also suitable for Windows 10 Pro), then open registry editor
Start --> Run. Type in the input field regedit


Go to: HKEY_LOCAL_MACHINE\SOFTWARE\Policies\Microsoft\Windows\WindowsUpdate
If there is no WindowsUpdate section, then you need to create it, it is very simple to do this.
Click on the section " Windows" right click and select:
Create-->Section

The created section is called WindowsUpdate.
In the new section WindowsUpdate with create a DWORD value (32-bit)