A way to conveniently encrypt data in the cloud (in-house). How to encrypt data on PC, mobile device and in the cloud Encrypted file storage program
Read also
Dropbox users save a million files every 5 minutes. In total, 25 million people use the service. At the same time, the creators do not guarantee the inviolability of your data, and the authentication system has already failed.
background
On the 19th of June, Dropbox arranged a kind of “day open doors". Within 4 hours, anyone could log into someone else's account using an arbitrary password. The creators of the service might not even have noticed the problem if the information about the vulnerability had not been published by an independent security researcher (pastebin.com/yBKwDY6T). This is not the first time that this is not the first sensitive story related to the security of files that users from all over the world are so willing to trust. cloud storage Dropbox.
Here it should be recalled that from the very beginning of the existence of the service, the developers assured users that they were responsible for data security. So, during synchronization, all files are transferred exclusively over a secure SSL connection, and are stored on the server in encrypted form (AES-256). Having changed recently Terms of use, the same people made it clear that they only restrict access to files for their employees, but if necessary, including at the request of law enforcement, Dropbox will certainly provide access to any user's account. Here is the encryption.
I am not paranoid and I have nothing to hide, in general, but I absolutely do not want to open my personal files to anyone. Also, I've always been unhappy with the fact that the data is in the clear on every computer that is synced with my Dropbox account. It's time to fix this mess.
Raising EncFS
In fairness, it should be said that the service has an official wiki (wiki.dropbox.com) where specific tips for security tuning are given. The ironclad truth is that the data must be encrypted on the local machine, and transferred to the cloud already in encrypted form. In particular, it is proposed to place a TrueCrypt or FreeOTFE container in the Dropbox folder and store all confidential documents inside it. The method is effective - you can’t argue: even if the account is compromised, the attacker will not be able to decrypt the data. And everything would be fine, if not one "but". With this approach, you can forget about rational file synchronization: when any document changes, the entire cryptocontainer will be synchronized, no matter what size it is (for example, 1 GB). In addition, in this case, an important Dropbox option is lost, which allows you to roll back any changes and return to an arbitrary version of the file.
Fortunately, a more elegant solution is offered in the same wiki - use file-by-file encryption, that is, apply cryptography for each of the files separately. EncFS, the virtual cryptographic file system, is perfect for this. When mounting EncFS, the source directory (source directory with encrypted files, which can be located in Dropbox) and the mount point are specified. After mounting, each file in the mount point directory corresponds to a specific file from the encrypted directory. Thus, you work with files in clear text, and EncFS transparently places their encrypted versions inside Dropbox. Because each file is encrypted individually, Dropbox can sync changes incrementally for each file. This is a very good technology that has been used under Linux for a long time and is based on the FUSE (Filesystem in Userspace) technology, which allows programmers to create virtual file systems. Despite its roots, it can now be successfully used under both Mac OS X and Windows. Let's start with the last one.
Windows
After an unpleasant story with the Dropbox authorization system, enterprising German guys quickly released the BoxCryptor utility (www.boxcryptor.com), which creates a virtual cryptographic disk in the system. Each file placed on it is automatically encrypted using the AES-256 standard.
Physically encrypted data is placed in an arbitrary directory, for example, in the Dropbox folder, while on a virtual disk they are in clear text, and they can be easily accessed from any application. The developers acted very wisely and did not reinvent the wheel, but simply implemented the main features of EncFS for use under Windows. And although BoxCryptor does not yet support all the features of the technology, but this is quite enough for reliable protection data.
After installation, the application automatically detects the folder used by Dropbox and offers to place a directory with encrypted files in it. To encrypt data, you need to come up with a passphrase, as well as select a letter for the drive on which the files will be located in open form. If you do not want the data to be in plain text without your knowledge, you can not save the password and enter it every time you mount the disk. By checking the box next to "Advanced Mode", you will get access to some fine tuning BoxCryptor. This may be required in particular if there is a need to use Dropbox's ability to rollback to previous version file.
The fact is that BoxCryptor also encrypts file names by default, turning them into abracadabra, thereby interfering with the versioning system implemented in Dropbox. Therefore, if you need such an opportunity, then file name encryption will have to be disabled.
From now on, you should see the BoxCryptor directory inside your Dropbox, and a virtual disk should appear in the system (I have X:). Now you have a folder in Dropbox where you can store confidential files. There are two important rules to remember here. First - never save files directly to the BoxCryptor directory, this is the place where data is stored in encrypted form (and synchronized with the cloud in the same form). Therefore, it is necessary to work with documents through the same virtual disk. And second, never delete the encfs6.xml file from the BoxCryptor folder. It contains important information for EncFS, which is necessary in order to decrypt the data. IN free version programs, you can create a logical partition with a capacity of no more than two gigabytes, that is, exactly the same partition as Dropbox provides by default. In case this restriction does not suit you, and you don’t want to pay money, there is an open implementation of EncFS for Windows - encfs4win (gitorious.org/encfs4win). In it, of course, there are no restrictions.
The basis, as in the case of BoxCryptor, is the Dokan library (dokandev.net), which is an analogue of FUSE under Windows and is necessary for mounting third-party file systems in the system.
linux
In many Linux distributions everything you need to use EncFS is built in by default, but that doesn't always make things easy. It is important to use the latest development version (>= 1.7), which has a number of bug fixes. And in many distributions, unfortunately, an older release is shipped (most often 1.6). This, for example, concerns Ubuntu 10.10, which is installed on one of my laptops. There is no big problem here. You just need to install the new version of EncFS and, for the convenience of working with it, also the Cryptkeeper GUI utility:
sudo apt-get install encfs cryptkeeper
After the installation is complete, we can launch Cryptkeeper through the Applications - System Tools - Cryptkeeper menu and import the encrypted directory:
- In the notification area, select "Cryptkeeper - Import EncFS folder".
- Next, specify the directory where the encrypted files are located (that is, the BoxCryptor folder).
- And we determine the desired mount point through which we can access the data in the clear.
After that, an item will appear in the Cryptkeeper menu for quick connection EncFS volumes: e.g. "Cryptkeeper > /home/step/Documents/Safe". After entering the password, the volume we need with the decrypted files will appear in the system. It was possible to do without any GUI utilities by simply connecting the EncFS volume in the console:
encfs ~/Dropbox/BoxCryptor/ ~/BoxCryptor
The first parameter specifies the location of the encrypted volume, and the second parameter specifies the clear file mount point.
MacOS X
Installing EncFS under Mac OS X is perhaps the most difficult to implement due to the need to install additional tools. But it still won’t take much time, and the installed tools will still come in handy more than once. The main snag here is that all the distributed EncFS binaries for makosi are hopelessly outdated, so we will have to build everything manually.
The procedure here is:
1. To immediately get a compiler and other necessary tools for building EncFS, it is best to install the developer's package. xcode(developer.apple.com). The free 3rd version is ideal.
2. Next, you need MacFUSE (code.google.com/p/macfuse), a ported version of the FUSE project for Mac OS X, which in turn uses EncFS. Just run the downloaded MacFUSE.pkg and the installer will do everything for you.
ruby -e "$(curl -fsSL https://raw.github.com/gist/323731)"
4. Now we can download the EncFS sources and build them on our computer. Homebrew will do everything for us, loading all the necessary dependencies (we installed it for a reason):
brew install encfs
5. All - EncFS in the system! You can go to the terminal and mount the BoxCryptor directory to the system (most often it is ~/Dropbox/BoxCryptor) to the folder where the files will be located in open form (say, ~/Dropbox/BoxCryptor):
encfs ~/Dropbox/BoxCryptor ~/BoxCryptor
The excellent GUI utility MacFusion (www.macfusionapp.org) with the plug-in for EncFS support (thenakedman.wordpress.com/encfs) will save you from working in the console.
Choosing an alternative
BoxCryptor and EncFS aren't the only ones that offer an extra layer of encryption on top of Dropbox. Similar functionality (with AES-256 encryption) is also offered by SecretSync (getsecretsync.com/ss). Versions for Windows and Linux are now available on the official website of the project, and a release for OS X is promised in the very near future. True, the client is written in Java, and with all due respect to this programming language, I really don’t like any desktop applications implemented with it.
So we can say that BoxCryptor is lucky :). Let's try to look at the problem from the other side. Since the service itself does not fulfill the duties that we expect from it, then maybe just change it to something else? The task, whatever one may say, is not unique - there are a number of projects offering file synchronization between different computers and devices, but with a much greater focus on data security.
One of the most notorious of them is Wuala (www.wuala.com), which is positioned by the creators as "secure online storage". The service has been aggressively developing lately and offers almost all the same features that Dropbox has. Clients are already available for Windows, Linux, Mac, as well as iPhone and Android.
Wuala uses RSA-2048 for authentication and AES-128 for file encryption. Security also adds a distributed service approach to resource storage. The fact is that the service is based on a technology that reduces server costs by using idle resources. When the repository is added new file, it is encrypted and split into a large number of fragments. Guess where these fragments are placed? In the cloud and ... computers of other users. Yes, yes, the service offers users a program to “trade” their capacities. It's fair: if a user shares part of their disk with the Wuala network, they get additional space in the cloud (this requires the computer to be turned on for at least 4 hours a day).
Thus, hard disks Wuala users make up a distributed network that is used by the service to improve file download speeds, accessibility, and reduce its costs. Error correction algorithms and severe redundancy are applied to ensure that data is never lost. At the start, the user is allocated 1 GB for free, but he can upgrade his account through a referral program, attracting other people (just like in Dropbox), as well as “selling” his disk space. To tell the truth, I have not yet decided to completely switch to Wuala.
There are a few little things that still prevent it from doing so. There are several shared folders in my Dropbox folder that we use extensively with other employees to collaborate on documents. This means that everyone will have to switch to Wuala.
The mobile phone application, although it provides access to files in the cloud, is still very limited in its capabilities. And the interface for accessing files through a browser is implemented through a lame Java applet. Therefore, a bunch of Drobox + BoxCryptor is my choice for this moment. Everything works, everything is familiar, everything is safe - in short, I like it.
Access to encrypted files via the web
When using BoxCryptor, you will no longer be able to view protected files via the web. More precisely, you can download them, but only in encrypted form. The Portable version of BoxCryptor can help out, which will help decrypt files downloaded from the cloud. True, if you have not disabled file name encryption, then finding the documents you need can be oh so difficult. Have this in mind. In general, the Portable version of BoxCryptor is intended for use in situations where the user has limited rights in the system. She, by the way, gets along well with Dropbox's relocatable assembly - DropboxPortableAHK (dropportable.ho.am).
Dropbox fail chronicle
April 7- Researcher Derek Newton has blogged (bit.ly/dropbox_fail) some details about Dropbox authorization. It turned out that the program stores all information for authentication in the config.db file. It is located in %APPDATA%Dropbox and is a SQLite database.
Among many other fields, one of them - host_id - is the most interesting. It is determined by the client after the first authorization and does not change over time. And here is the ambush. Its value is not tied to the system in any way. By copying config.db to another machine, an attacker easily gains access to someone else's account data. Without notifying the user! Moreover, even if the user changes his login and password, nothing will change either - the host_id will still remain valid. At the moment the ID is bound to specific device and can be revoked via the web interface.
April 19- Dropbox changes the user agreement, directly stating that if necessary, it can decrypt users' files and provide them for investigation under US law.
26 April- an open Dropship project appears on GitHub (github.com/driverdan/dropship), which allows you to quickly get any file that is in the Dropbox cloud in your account. All that is needed is to know its hash. The author, Vladimir van der Laan, was immediately contacted by the chief technical director of the service and politely asked to remove the source code. Users of the program reacted by creating numerous mirrors of the project on github and on Dropbox itself. Within a short time, they also received a request from a Dropbox representative to delete the project files immediately.
June 19- a release with a serious vulnerability in the authorization system was launched into the service. As a result, any user could log into someone else's account without knowing the password. Dropbox justifies that in the time it took to fix the vulnerability, less than 1% of users were signed in.
If you need to organize an encrypted storage for remote placement of files, there are enough options for solving this problem. And here is another one - in our opinion, the option is reliable and quite convenient.
Architecture
In the case under consideration, we take as a basis the cloud storage system that was installed in OS Debian Linux v7.1 and deployed as a virtual machine under the Proxmox Virtual Environment v3.1 hypervisor.
The cloud storage system is installed on an encrypted Linux disk, access to data is possible only via the HTTPS protocol, for authorization in addition to standard password you must also enter a one-time password (OTP). Regularly carried out backup. There is the possibility of an emergency shutdown and deletion of all ownCloud data.
Hypervisor Proxmox Virtual Environment
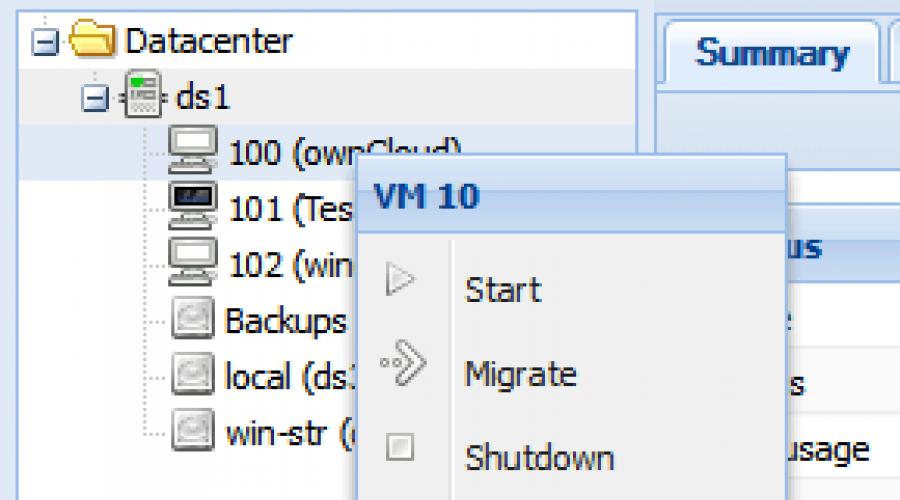
The Proxmox Virtual Environment hypervisor is a specialized distribution of OS Debian Linux v7.1, remote access to the system is possible via the SSH protocol on the standard TCP port 22. However, the main working tool for managing virtual machines is the web interface.
Once a day, a hot copy (snapshot) of the ownCloud virtual machine is generated and exported to NFS servers using the standard features of Proxmox VE.

On the screenshot virtual machine in the Web interface has the ID 100 (ownCloud). Access to its console is possible through the context menu item "Console".
For example, this is how entering the password for an encrypted disk during boot looks like: 
cloud data storage ownCloud
You can learn how to install ownCloud in a good article - it already lists the main features andsome advantages of this platform. However, opinions in our team are divided, and our admins offer an easier way to install ownCloud for the Debian Linux OS distribution and many others than suggested by the author of the article. Ready-made repositories are available: http://software.opensuse.org/download/package?project=isv:ownCloud:community&package=owncloudIn this case, all the necessary dependencies are installed automatically, and you will only be required to adjust the settings to suit your specifics.
So, we have deployed ownCloud based on Debian Linux v7.1 inside a virtual container. Remote access to the storage is possible via the SSH protocol on the standard TCP port 22. The main work with ownCloud is carried out through the Web interface, it is also possible to connect via the WebDAV protocol and use synchronization clients (Sync):

By the way, since ownCloud is accessed via HTTPS, access and error logs are maintained by the Apache server in the files " /var/log/apache2/access.log
" And " /var/log/apache2/error.log
" respectively. Also ownCloud has its own log " /var/www/owncloud/data/owncloud.log
«.
OTP One Time Passwords
To enhance security, access to ownCloud via the Web interface is possible using two-factor authentication: a traditional password and an OTP one-time password. The OTP functionality is implemented using the One Time Password Backend external add-on. ownCloud does not have native OTP support.
The basic OTP settings are configured in the "Admin" section under the administrative account: 
The screenshots show the settings for two-factor authentication and one-time passwords selected for compatibility with FEITIAN OTP c200 hardware generators.
Algorithm: Time-based One Time Password (TOTP)
Number of digits in the password: 6
Password lifetime: 60 seconds 

For two-factor authentication to take effect, you must assign a Token Seed to the user. Up to this point, he can log into ownCloud using only a normal password. Therefore, immediately after creating a user, you must go to the section Personal and enter Token Seed in the field of the same name.


It is not recommended to generate Token Seed using the built-in capabilities of the ownCloud OTP module, since there are problems in its operation algorithm. Input format: Base32 (%32) UPPERCASE. You can convert Token Seed to different formats using the www.darkfader.net/toolbox/convert utility
Specifically for this project, Token Seed was used, sewn into the hardware Token FEITIAN OTP c200. In general, you can use any password generator, and then convert it to the desired format using the converter given in the text.
An example of such an application for Android OS is Google Authenticator: https://play.google.com/store/apps/details?id=com.google.android.apps.authenticator2
The initialized Token Seed looks like this: 
To disable OTP, just remove Token Seed from the settings. If this is not possible (for example, if the OTP generator is lost, so access to personal account there is no user), then disabling OTP is possible only by directly modifying the data in the MySQL database. To do this, you need to run from command line MySQL client:
# mysql -uowncloud -p
Enter password:
Then execute a query similar to the following, changing the value of the "user" field to the required one:
mysql> delete from owncloud.oc_user_otp where `user` = "test";
Due to architectural limitations, OTP only works when accessing ownCloud via the Web interface, not via WebDAV. This shortcoming is compensated by the fact that the list of IP addresses that can use WebDAV is strictly limited. The "Allow from" directives in the Apache server configuration file "/etc/apache2/conf.d/owncloud.conf" are responsible for this. Note that the directives are listed there twice.

IP addresses are listed separated by spaces. You need to make sure that the list necessarily contains the loopback IP 127.0.0.1, as well as the public IP of the ownCloud server itself. Otherwise, WebDAV may fail. After the change Apache settings it needs to be restarted:
service apache2 restart
Brute force protection
In recent versions of ownCloud, a log of failed authorization attempts is kept: " /var/log/owncloud/auth.log ". Content « /var/log/owncloud/auth.log » controls the Fail2ban service. If it detects 5 or more failed authorization attempts from the same IP address within a short time, then this address is blocked by the IPTables packet filter for 10 minutes. If attempts continue after automatic unblocking, then the IP is blocked again forever. You can follow the work of Fail2ban in the log " /var/log/fail2ban.log «.
The list of IP addresses that should not be blocked under any circumstances is specified by the parameter ignoreip in the settings file /etc/fail2ban/jail.conf ". IPs are listed separated by spaces.
After changing the Fail2ban settings, it needs to be restarted:
service fail2ban restart
If you need to manually unblock any IP, you must run a command on the server from the CLI similar to the following, adjusting the address in it:
iptables -D fail2ban-Owncloud -s 187.22.109.14/32 -j DROP
Unfortunately, the developers of cloud services do not really care about data security. Even the most popular of them (Dropbox, Google Drive) cannot boast of "native" encryption. Fortunately, utilities already exist to provide encryption in the cloud, moreover, they work on the client side, thus increasing the security of files during transfer. Probably the most popular cloud encryption tool is Boxcryptor.
Boxcryptor is a data encryption software specially optimized for cloud usage. It allows you to securely transfer and store data in cloud storage. Boxcryptor supports all popular cloud storages: Dropbox, Google Drive, OneDrive, etc.
How Boxcryptor works
Boxcryptor creates a virtual drive on your computer that allows you to encrypt data locally before uploading it to your cloud storage. When a file or folder is added to the vault, its contents are encrypted on the fly during copying. Boxcryptor uses AES-256 and RSA algorithms to keep your information secure.
The disadvantage of such encryption is that data in the cloud becomes inaccessible when downloaded through a browser. But the developers took this into account, and added the ability to cancel encryption for any files added to the cloud in order to provide other (without a key to Boxcryptor) users with access to data. There is also the possibility of securely granting access through user keys.
Tariff plans
There are several tariff plans for Boxcryptor: Free, Unlimited Personal, Unlimited Business. More details can be found on the developer's website (link at the beginning of the article). But the features of the free version for personal use are quite enough.
Supported OS
Boxcryptor supports both desktop and mobile operating systems. There are versions for Windows, Android, iOS, Mac OS X, Linux.
Using Boxcryptor
Installing Boxcryptor
Before installing the program, it is desirable that the cloud storage client (Dropbox, Google Drive, etc.) has already been installed. In this case, Boxcryptor will automatically detect and connect the data folder in the cloud.
Installing Boxcryptor is no different from installing regular program. During the installation process, you will need to select the checkbox to restart the system upon completion of the installation of the program, otherwise the installer will give an error.
You will also need to allow the installation of the virtual device driver.

Setting up Boxcryptor
After installing the program and rebooting, you will see the following window.

Boxcryptor allows you to create both remote and local accounts. In the second case, the security will be even higher, since the key is not transmitted over the network, but only you are responsible for its storage, and if it is lost, the data will not be recoverable.
To create a local account, you need to click on the ellipsis (picture above). Then in the field "Local account" you need to click "Setup account".

Put a tick, thus confirming the responsibility for storing the access key file and click the "Create key file" button.

In the next window, create a password and check the boxes to agree to the terms of use and privacy policy.

Again, we agree with the understanding that the responsibility for storing the password lies with us.

The next window will show the details of the local account. Press the "Next" button, thus confirming these data.

In the next window, select tariff plan. Click on "Free", then on the "Next" button.

The final welcome screen will indicate that the account has been successfully created. Click "OK" and you will see the login form for a local account. Enter the password you created earlier to log in.

A usage guide should appear - "Tutorial" (you can close it immediately) and a window Windows Explorer with cloud storage already connected (Dropbox in my case).
In the explorer window except logical drives, you can still see the virtual drive that contains the folder that refers to the folder in the cloud storage.
To encrypt a file, right-click on it and select "Boxcryptor > Encrypt".

After encryption in a folder virtual disk Boxcryptor can work with the file as usual. But in the storage directory and on the server, it will be encrypted.

Also, when you try to add files to the vault, you will be prompted to encrypt them.

If you have several cloud storage clients installed, they are managed in the settings (Boxcryptor's icon in the Windows tray > Settings) on the "Locations" tab.

Cloud storage services are very popular due to the increased availability of our files and documents. But how can we enhance their privacy and security?
1. Use cloud settings
Cloud storage providers offer separate settings to ensure the privacy of user data. Using these configurations will surely improve the overall security posture. Your first step in protecting your cloud data should be to protect your account itself. To get started, use strong password for your online storage accounts. Then activate ‘two-step verification’. For a broader understanding, two-step verification and two-factor authentication are a way to secure service login processes. For this, it is used mobile phone client as the second requirement to enter the service. In this case, the user must enter special code security along with your username and password when you log in to the required website. This special security code is provided to the user by sending an SMS to pre-specified mobile phone. Code automatically generated and sent every time you try to login. Therefore, even if your username and password are compromised, you still have a mobile phone in your hands. Thus, hackers will not be able to access your cloud storage, as they will not have a security code that is sent to your mobile phone.
In the same way, cloud storage offers several options for file sharing. Use these options before sharing files with others. For example, you can make a file public, which means that everyone has access to such a file. There are also other options restrictions this permissions. You can set access options so that only the person who has a link to the file along with read permission can access the file. Some services offer protect files on the cloud passwords so that those who want to access the files need to enter a password. Find out more about your account settings, so that you can skillfully use such tools to protect privacy and improve security settings.
2. Encrypt files locally
There are a huge number on the Internet encryption tools. Choose only reliable applications to encrypt your files locally before sending them to the cloud. This means that the encryption/decryption key cloud files will be exclusively yours. Therefore, if a third party suddenly gets your files, it will not be able to view them, since the key decryption is only yours. Some of these encryption tools are AES Crypt, MEO Encryption Software, etc.
Personally, I used encryption software AES Crypto on your Windows PC. The program is very easy to use and works quite fast. AES Crypto supports 256-bit encryption. Free program available from this official link. This little program takes a few seconds to load. You will receive a Zip archive from the site. After extracting the archive, you will find the ‘AesCrypt’ folder, which contains the installer software. After installing the AES Crypt program, you will see a special parameter in context menu , with which you can quickly use the application.
In operating system Windows shortcuts AES Crypt is missing on the desktop and in the start menu. You need to use the tool directly from the context menu, or use command line. How to use the latter is described on the application website.
The application can only encrypt compressed/archived folders. This requirement does not apply to single files. To encrypt a file, right click on the file and select the option 'AES Crypto' from the context menu. Provide decryption password and click on the ‘OK’ button.

The encryption process starts instantly. Take into account the fact that you must remember password decryption to decrypt/unlock the file. If you forget password, you can't access to such a file.
If you want to decipher your file double click on it (or click on the right mouse button and select the ‘AES Decrypt’ option from the context menu).

After that, a miniature window will appear containing a field for entering a password.

In this field, you must enter the password for this particular file, and then click on the 'OK' button. This way you will decrypt your file and be able to open it.
3. Use special tools to encrypt cloud data
Exist dedicated and special tools for encrypting data stored on cloud services such as Google Drive, OneDrive, Dropbox, etc. Third Party Applications allow you to encrypt files locally, that is, before they are synchronized with the cloud storage. This will save you time on encrypting and uploading each file to the cloud separately. Some of these tools are: Boxcryptor , Cloudfogger , etc. These tools, like ‘Boxcryptor’, will create special folder on your computer, which will be connected to a local cloud storage folder (eg Dropbox) on the same device. Thus, if you are using Boxcryptor for Dropbox, for example, you just need to transfer the files to the Boxcryptor folder. The application encrypts the files and sends them to the Dropbox folder for further synchronization with the server. IN ultimately encrypted files end up on Dropbox. If any of these files need editing, do so in the Boxcryptor folder. In this case, the edited file will be synchronized automatically. That's all!
I hope this article has helped you improve the privacy and security of your cloud data. Stay with us and you will get even more interesting and advanced tips. Thank you for attention.
Cloudfogger software.
The salvation of the drowning is the work of the drowning themselves (folk wisdom).
You probably already know that a law is coming into force soon, which obliges all Internet companies, including those that provide services for cloud storage files, store personal user data (in our particular case, these are files) on servers located on the territory of the Russian Federation. Motivation, as always good. Allegedly, all foreign services are required to provide data to American intelligence agencies, and, like, it’s not good that the National Security Agency (NSA) owns all the data about users from Russia. Even if they provide such data (which I highly doubt), then ordinary user it should be "purple", because it is under the jurisdiction Russian Federation, not "Pindos" (Pindos- shtatovsky, american) and OUR user needs to be afraid, on the contrary, of those who can “show” something to him (for the data he stores) in OUR country. The logic of the adoption of this law becomes clear when you open the second, recently adopted law number 97. Now, as part of the implementation of law No. 97 "On Amendments to the Federal Law" On Information, information technology and information protection” all Internet companies (including cloud file storages) are required to provide law enforcement agencies with data about users and access to the files they store. The circle is closed. We are under cover.
If there was a guarantee that our data would not be widely available, well, figs with it, let them “have” (in the sense of access), but bearing in mind that in our country, everything is bought and sold ... (remember about sold on the "pink" and "savka" (radio market "Savelovsky") traffic police databases or mobile operators), to become somewhat unsettled. It is quite possible that a “black” market will soon appear on the Internet, where it will be possible to “order” information about any person for a certain amount (including information about what he stores in his cloud file storage). This is one side of the problem. The second side of the problem is even more real. Everyone has been hearing about the recent scandals with the posting of intimate photos of celebrities that they stored in iCloud cloud storage online.

The photos were stolen by one of the hackers. By the way, he received a ridiculous amount from customers for this, he was paid only 120 dollars. The amount is quite lifting for our country ...
I hope I convinced you that it's time to think about how to protect your data (stored in the "clouds") from strangers. by the most effective way, in my opinion, is file encryption.
After all, even if an outsider opens / hacks your file storage, then he will not be able to open / download encrypted files (photos, documents, videos, and so on)!
You can encrypt files on the "clouds" special programs. I recommend one of the best free program called CloudFogger. It provides you with complete privacy with 256-bit AES (Advanced Encryption Standard) encryption of the files you store in your cloud storage. Cloudfogger uses transparent encryption, which makes daily use of files in the sync folder located on your computer hassle-free, you will still have easy access to your files, while all files are securely encrypted when you upload them to the cloud. It is also important that the program is very easy to use, and that there are applications for all popular operating systems(Windows, Mac OS X, Android and iOS). Let's move on to practice.
Installing and using the CloudFogger program.
We go to the website of the developers of the CloudFogger program using the link and download setup file. The site is in English. I recommend you go through Google browser Chrome. This browser has an automatic translation feature.

Launch the CloudFogger installation.

Installation is simple (see below).


CloudFogger is installed. Let's put it to work.

When you first start you need to go through a simple registration process.

Fill out the form and come up with a password (password) to access the program, as shown below.

An email containing a confirmation link will be sent to the email address you provided during registration. We go through it and confirm the registration.


You will learn in detail how to use this program by visiting the Knowledge Base section at the link. Again, the site is in English. Login via browser Google Chrome. This browser has an automatic translation feature.

But let's continue with the settings.
At this stage, you can add a synchronization folder with your cloud storage to the program (or several if you have more than one). This will allow you to automatically encrypt all files.


If you share your cloud file storage with someone, you can give them access to your files. To do this, add the address mailbox in the program window this stage its settings.

In principle, this can be done later.
The program is installed and configured. Ready to go.

Now, on the cloud file storages you added to the program, all files will be encrypted. And no one, even by opening or hacking your "cloud" will be able to get to them!
By the way, it is not necessary to encrypt all data. Can only be done manually certain files. For example, your intimate photos. In this case, when setting up the program, we skip the point with adding cloud file storages to the program.
Manually encrypting files is easy. Open the cloud sync folder. Find the file or folder to be encrypted. We click on the file or folder with the right mouse button and select the item "CloudFogger" in the context menu. Next "Fogg faile(s)".

The file/folder will be encrypted both in the "cloud" and in the sync folder.


I repeat, in the synchronization folder you will have easy and comfortable access to encrypted files. Their decryption is done on the fly.
On the official website of the program developers, download and install applications to access encrypted files from your other devices connected to the cloud storage, for example, install the CloudFogger application on your tablet or smartphone.