How to make a laptop distribute Wi-Fi? How to distribute the Internet via WiFi from a laptop? WiFi router. Equipment setup
Read also
Today we’ll talk about how to distribute the Internet via Wi-Fi from a laptop or from a computer that has an appropriate wireless adapter. Why might this be needed? For example, you purchased a tablet or phone and would like to access the Internet from it at home using any browser, for example Google Chrome(see article Secrets of Google Chrome) without purchasing a router. In this case, you can distribute Wi-Fi from a laptop that is connected to the network either wired or wirelessly. Let's look at how to do this. At the same time, we’ll look at two ways to turn a laptop into a router. Methods for distributing Wi-Fi from a laptop are discussed for Windows 7, Windows 8, they are also suitable for Windows 10. If you prefer non-standard ones, or don’t like to install additional programs- this is a special method for you in which the implementation of distribution via Wi-Fi will be organized using command line Windows.
So let's get started
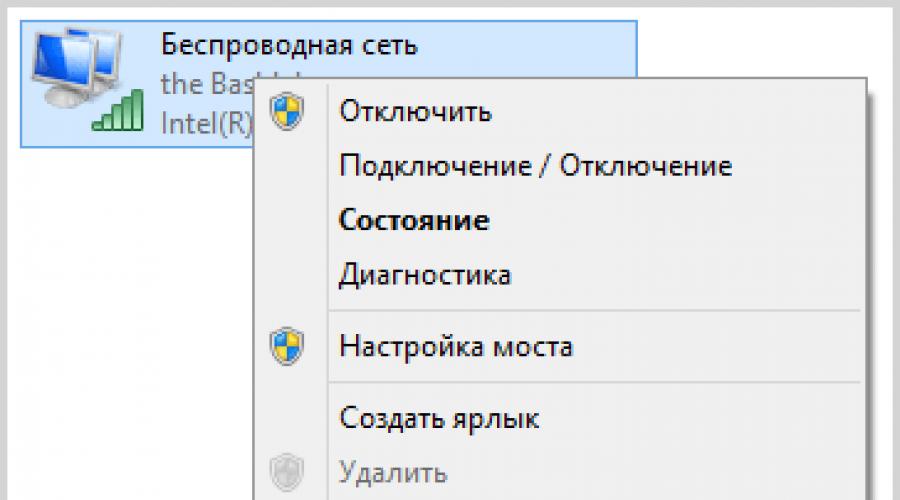
When the list opens network connections, click right click wireless mouse and select Properties

Switch to the “Access” tab, check the box next to “Allow other network users to use the Internet connection” of this computer", then - "Ok".


Run the command netsh wlan show drivers (full list of CMD commands) and see what it says about hosted network support. If it is supported, then you can continue. If not, then most likely you have installed a non-original driver for the Wi-Fi adapter (install from the manufacturer’s website), or a really very old device.

The first command that we need to enter to make a router out of a laptop is as follows (you can change the SSID to your network name, and also set your password, in the example below the password is ParolNaWiFi):
netsh wlan set hostednetwork mode=allow ssid="password" key="Parol"

After entering the command, you should see confirmation that all operations have been completed: wireless access is allowed, the SSID name has been changed, the key wireless network also changed. Enter the following command
Netsh wlan start hostednetwork

After this input, you should see a message stating that “The hosted network has started.” AND last command, which you may need and which will be useful in order to find out the status of your wireless network, the number of connected clients or the Wi-Fi channel:

Ready. Now you can connect via Wi-Fi to your laptop, enter given password and use the Internet. To stop distribution, use the command
Netsh wlan stop hostednetwork
Unfortunately, when using this method, Internet distribution via Wi-Fi stops after each laptop reboot. One solution is to create bat file with all the commands in order - see how to do this in the video under the material (one command per line) and either add it to startup, or launch it yourself when necessary.
Using a computer-to-computer network (Ad-hoc) to distribute the Internet via Wi-Fi from a laptop in Windows 7 without programs
In Windows 7, the method described above can be implemented without resorting to the command line, and it is quite simple. To do this, go to the Network and Sharing Center (you can through the control panel or by clicking on the connection icon in the notification area), and then click “Set up a new connection or network.”

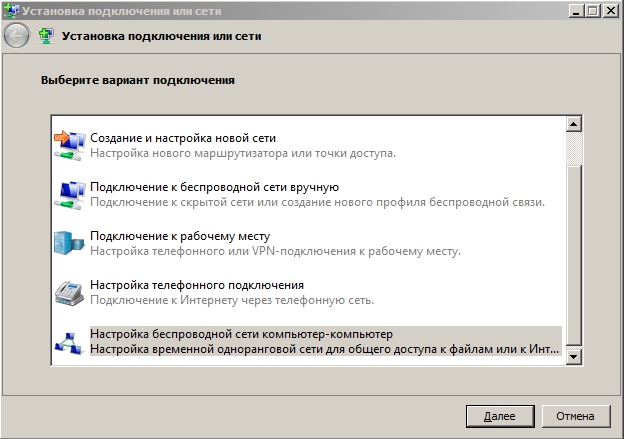
Select the “Set up a wireless computer-to-computer network” option and click “Next.”

The next step will require you to set the network name SSID, security type and security key (Wi-Fi password). To avoid having to configure Wi-Fi distribution again each time, check the “Save settings for this network” option. After clicking the “Next” button, the network will be configured, Wi-Fi will turn off if it was connected, and instead will begin waiting for other devices to connect to this laptop (that is, from now on you can find the created network and connect to it).

In order for the Internet to be available when connected, you will need to share Internet access. To do this, go to the Network and Sharing Center again, and then select “Change adapter settings” in the menu on the left.
Select your Internet connection (important: you must select exactly the connection that directly serves to access the Internet), right-click on it, click “Properties”. After that, on the “Access” tab, enable the checkbox “Allow other network users to use this computer’s Internet connection” - that’s all, now you can connect to Wi-Fi on your laptop and use the Internet.

Note: in my tests, for some reason, only another laptop with Windows 7 saw the created access point, although according to reviews, many phones and tablets work.
To connect several devices to the Internet at once, including wirelessly, most often a classic Wi-Fi router is used. Modern routers do an excellent job of providing a reliable and interference-resistant connection, but a router may not always be at hand. A standard situation - you decided to spend several days at the dacha and took with you only a laptop with a USB modem. It would be nice to be able to connect to the Internet through it not only on your laptop computer, but also on mobile gadgets such as a smartphone or iPod. Those. there is a need to use a laptop as individual point Wi-Fi access, to which, by analogy with a regular router, other devices can be connected. If anyone didn’t know, the functionality for implementing such a task is built into the operational Windows systems 7/10, the main thing is that your laptop is equipped wireless adapter.
So, in this article, in a step-by-step manner, we will consider all the main ways to distribute Wi-Fi from a laptop running under Windows control 7 or Windows 10. We will create an access point both using the system itself and using the most popular third-party programs. The Internet source for the laptop will be a 3G modem from one of the operators mobile communications. However, all the schemes discussed will also work in the case of a regular wired Internet connection.
Creating a virtual Wi-Fi router via the command line
For users who are not familiar with the command line, this method will probably seem quite complicated and tricky. However, if you follow the instructions exactly, then no problems should arise. The most important, this method universal, i.e. works in both Window 7 and Windows 10, and does not require the installation of any additional applications.
First of all, let's launch the command line itself as an administrator. You can do this through the search bar of the Start menu, right-clicking on “Command Prompt” and selecting “Run as administrator.” In Windows 10, simply right-click on the Start menu icon and select “Command Prompt (Admin).”
In the console we immediately execute the command netsh wlan show drivers to make sure that the laptop’s Wi-Fi adapter is currently capable of operating in access point mode. After entering the specified command, press Enter and look for the line “Hosted network support”.
If “Yes” is next to it, then everything is in order and you can move on to the next step, but if it says “No”, then there is no point in continuing, since the adapter is not ready to distribute Wi-Fi. The reasons for the lack of hosted network support can be very different - from incorrectly installed (or old) drivers to incompatibility current version Windows with installed hardware. We have devoted a separate article to ways to solve such a problem (see “”), so now we will not focus on them and will move on.
On at this stage we need to enter a command to initialize what is being created virtual host Wi-Fi. It looks like this:
netsh wlan set hostednetwork mode=allow ssid=InternetNout key=87654321
- InternetNout – name of the wireless network;
- 87654321 – password.
If everything went well, a corresponding message will appear, as in the screenshot.

Now we launch our network with the command netsh wlan start hostednetwork, after which we should see the message “The hosted network has started.”

We need to check if something new has really appeared. wireless connection. Go to the “Network and Sharing Center” and find the network we created InternetNout.

True, its status is “Without network access”, which categorically does not suit us. In order for a virtual Wi-Fi point to be able to distribute the Internet, it must gain access directly to the connection through which the laptop itself receives the Internet. In our case it is Ethernet 3.

Click on it, and then click on the “Properties” button.

Next, go to the “Access” tab and check the box next to “Allow other network users to use this computer’s Internet connection.” In the drop-down list below, select target connection. For us it is “Local Area Network Connection* 14”.

Click “OK” to apply the parameters. Now in the network control center the status InternetNout changed to “Internet”, which is what we wanted.

We pick up the smartphone and in the corresponding settings section we check whether the device sees the created Wi-Fi point. If all the steps described above are completed, the network will certainly be detected. Click on it, enter the password and wait for the connection to occur.

The laptop will start distributing the Internet to our smartphone via Wi-Fi. The command allows you to display information about the network, for example, the number of connected clients netsh wlan show hostednetwork. To disable the access point, run the command netsh wlan stop hostednetwork.

Distributing Wi-Fi using a computer-to-computer wireless network in Windows 7
This method allows you to create an access point without any manipulations with the command line, but the method only works in Windows 7. First, open the “Network and Sharing Center”, and then follow the link “Set up a new connection or network”.

In the window that opens, select the item “Set up a wireless computer-to-computer network,” and then click “Next.”

Fill in the “Network name” and “Security key” fields, then click “Next” again.

A window will appear notifying you that the network is ready to use. At the same stage, you are prompted to enable Internet connection sharing. This must be done by clicking on the appropriate link.

Now all that remains is to wait for the operation to complete.

To see the newly created network, in the “Network and Sharing Center” on the left, you need to click on the “Manage wireless networks” link.

Here you can manage connections - delete, add, change properties, set priority.

Mobile hotspot in Windows 10
In Windows 10, it is possible to very quickly organize an access point for mobile devices through the Settings utility. Launch the application and go to the “Network and Internet” section. In the menu on the left, select “Mobile hotspot”.

If the laptop is connected to the Internet wired or using a USB modem, on the page that opens you can allow sharing Internet connections across multiple devices. That is, the same Wi-Fi access point will appear, through which the Internet will be distributed from the laptop to other devices. To activate the hotspot, move the slider located at the top to the “On” position.

The network name and password to access it will be indicated below (they are generated automatically). The network exists (we call it DESKTOP-EHJUIN4 3118), but does not yet have access to the Internet, as you can verify by going to the network control center.

To open this access, you need to repeat all the same steps that we performed when working with the command line. We go to the Properties of the connection responsible for “supplying” the Internet to the laptop, and on the “Access” tab, put a checkmark next to the corresponding item. Select from the list below required connection, for which we open access to the Internet. Save the changes with the OK button.

We make sure that the network is now connected to the Internet.

We connect to it on a smartphone or any other device.

Popular programs for distributing Wi-Fi from a laptop
If all the above methods do not suit you or if they did not help you distribute the Internet, it makes sense to use third party programs, of which there are a great many. We will look at the two most convenient in our opinion.
MyPublicWiFi
This application has many positive reviews and has a simple interface that allows you to start distributing the Internet via Wi-Fi from your laptop after just a couple of clicks. Download the program from the official website mypublicwifi.com and install it on your laptop. During installation you will need to restart your laptop. Next, launch the utility and set the settings for the virtual access point.

We enter the network name and password, and also indicate the connection through which the Internet will be distributed via Wi-Fi. The virtual network is launched by clicking the “Set up and Start Hotspot” button. The program has minimal settings, so understanding them will not be difficult.

Connectify Hotspot
Another popular program that allows you to easily distribute Wi-Fi from a laptop to anyone portable devices. Download the Russian-language version of the utility at http://www.connectify.me/ru/, install it and restart the computer. Let's launch the program. On the Settings tab we see that the application can operate in several modes. By default, the “Wi-Fi hotspot” mode is selected – this suits us. We set the parameters of the virtual router approximately as in the screenshot below.

Please note that we have created a new wireless point access, receiving the Internet through the same Wi-Fi. The program allows this configuration. Having completed all the settings, launch the point by clicking the button at the bottom of the window. After a few seconds of waiting, the network should appear. We find it on the smartphone and connect after entering the password.

We did not encounter any difficulties - after a successful connection, the Internet distribution from the laptop occurred as if it were a regular router. All users connected to your Wi-Fi will appear in the Clients tab of the Connectify Hotspot app.

Note that to create the access point we used free version a program whose functionality turned out to be quite sufficient. If you need advanced features, you will, of course, have to pay.
This is probably all we wanted to tell you about the topic of distributing Wi-Fi from a laptop using Windows 7/10 or using special programs. If the virtual router does not want to be created, then most likely there are problems with the adapter drivers or it does not support operation in access point mode at all (the latter is unlikely). If the network appears, but after connecting to it the sites do not load, then public access to the Internet is not open or is blocked by a firewall/antivirus. Write about any difficulties you encounter in the comments below, and we will work together to try to help you.
Home wireless networks are very convenient nowadays, since thanks to internal Wi-Fi we can connect any device equipped with a Wi-Fi module to the Internet. What if you don’t have a router at hand? How to configure a laptop to distribute Wi-Fi and use it as an access point?
Preparing the laptop
It’s worth immediately answering a fairly common question that worries more and more laptop users: can a laptop distribute Wi-Fi? The answer is simple: yes, any wireless adapter works to receive and transmit data. This means that the same wireless adapter is capable of receiving and also distributing the Internet via Wi-Fi.
Update network drivers, in particular for the Wi-Fi module, is the first place to start.
Find and download the right one software You can always go to the official website of your laptop manufacturer. In addition, you need to immediately set up sharing. This is done quite simply.
Find the Wi-Fi icon in the area system notifications Windows (the so-called system tray - the area to the right of the clock and date). Click on this icon and go to the network control center.
A window will open. Here you need to go to the “Edit” section Extra options public access."
Thus, we have opened a menu in which you can configure sharing for remote devices. Now all that remains is to enable sharing in all points. Here we cancel password-protected sharing. Click “Apply”.
That's it, now you can proceed directly to setting up Internet distribution via Wi-Fi from your laptop. There are three ways to do this:
- Via the command line.
- Create a wireless computer-to-computer connection.
- Through the Virtual Router Plus program - you need to download and install it.
Each of the options proposed above has its own advantages and disadvantages. Moreover, depending on what goals you are pursuing, you should choose the method of organizing the distribution.
For example, the second option allows you to create a wireless network only for computers; smartphones and tablets will not be able to connect to it. This network is intended only for laptops and netbooks, as well as desktop computers with installed Wi-Fi modules. So, let's take a closer look at all these options.
Setting up distribution on the command line
Customizable Wi-Fi distribution only on a command line run as administrator (has full access to the system). In Windows 7, launching it is very simple: open the Start menu (you can just click Windows key or click on the corresponding icon at the bottom left of the desktop). Next, write CMD in the search bar. Above you will see the search results. Find in the list of options provided CMD line. This is the command line. Click on it with the mouse and select “Run as administrator”.
In Windows 8, running Command Prompt as an administrator is even easier. To do this, you can use the key combination +[X]. A pop-up menu will open. Select “Command Prompt (Administrator)”.
Now you need to enter two simple commands:
- The command for organizing distribution is netsh wlan set hostednetwork mode=allow ssid=My_virtual_Wi-Fi key=12345678 keyUsage=persistent. After writing, press “Enter”. Here SSID=My_Virtual_Wi-Fi is the network name. Instead of “My_Virtual_Wi-Fi” you can write any other name. In this case, you can only use letters of the English alphabet. KEY-12345678 is the password. Instead of the numbers 12345678, you can write any other password. It may consist of letters of the English alphabet (including capital ones) or numbers.
- For start virtual distribution enter – netsh wlan start hostednetwork and press “Enter”.
The connection has been created. Now you can group any devices - smartphones, tablets, other computers and laptops, TV, printer, and so on. But for now you do not have access to the Internet.
To open access to global network, you need to make some settings on the distributing computer. This is configured in the Network Control Center. Open the tool and go to the “Change adapter settings” section.
Find your internet connection here. It may be a wireless or cable connection, or a USB modem. Right-click on the Internet connection method and select “Properties”.
Go to the "Access" tab. Here you need to set the marker in the line “Allow to use the Internet connection of this computer.”
Now go to the “Connection” item home group" Here you should select our created network (usually it is called “Wireless network connection 2"). If there is no such line, then simply check the box and click “Ok”. That's it, a Wi-Fi access point on the laptop has been created, and all connected users will have access to the Internet.
How to create a Wi-Fi hotspot in Windows 8 from the command line: Video
Creating a computer-to-computer connection
As mentioned above, this distribution method will only work for laptops and other computers equipped with Wi-Fi adapter. So, launch Network and Sharing Center. In the “Change network settings” section, select the first item, which is called “Set up a new connection or network.”
In the “Network name” line we write the name of the virtual connection. You need to come up with it yourself. But it is always worth remembering that the name can only include English letters and some symbols, such as underscores or hyphens.
Security type – “WPA2-Personal”. This is the most secure type of encryption. Below, in the “Security Key” line, enter the password (come up with it yourself). After this, select the checkbox in the “Save network settings” line and click “Next”.
After that, we set up general access and allow Internet connection. How to do this is described above. Remember that the distributing computer itself must be connected to the virtual network. Otherwise, other devices simply will not find it.
The disadvantage of this method is that only computers can connect to such a network. Moreover, you will not be able to receive the Internet via Wi-Fi. That is, in order for users of such a virtual network to be able to access the Internet, you will need cable connection or USB modem.
Distributing Wi-Fi from a computer without a router: Video
Using Virtual Router Plus
This distribution method is the second way to distribute Wi-Fi from a laptop to a phone. Its advantage is that users do not need to configure anything. However, you will have to find the utility on the Internet and download it, and then install it on your computer.
After the first launch of the program, you just need to enter the name of the virtual network and the password for it (come up with it yourself). After this, indicate your Internet connection or simply click the “Update” button in the form of two opposite arrows.
That's it, after this the network will be created and you will be able to fully use it. Essentially, this program uses built-in tools, just like the command line. But the application is much easier to set up.
Now you know how to make your laptop a Wi-Fi hotspot. Moreover, you know three different ways. Be careful when setting up sharing and distribution, and you will succeed.
Installing and configuring Virtual Router Plus: Video
I work as a private computer technician. I have been repairing computers professionally for over 12 years, as an amateur since the 90s.
Worked as a manager for two years service center, specializing in connecting subscribers to the Internet and computer assistance.
Despite the fact that now the simplest wireless router You can buy it for only about 1000 rubles, but still not everyone can afford it yet. And some people simply don’t want to spend money on it. But there are emergency cases when you urgently need to organize a Wi-Fi network, but there is no router or access point for it. For example, you bought modern TV Smart TV and want to use it to watch videos on YouTube. What should I do? The solution is simple - we will use the means at hand to distribute WiFi without a router. I will give several working examples, and you can decide which one is more convenient for you.
How to share the Internet from a laptop on Windows 10
In modern operating systems from Microsoft, which are installed on most computers in Russia, it is possible to organize virtual point access and make a router out of a laptop. The only limitation is that this computer must be connected to the Internet either through a wired Ethernet adapter or through a 3G/4G modem. The fact is that using one adapter, the laptop will not be able to distribute the Internet via Wi-Fi and receive it. The second limitation has now practically disappeared. The fact is that the wireless adapter or its driver must also support this function. On modern supported computers, problems are very rare.
So, in order to use your laptop as a router and distribute the Internet in Windows 10, you need to enable the Wi-Fi adapter on it, and also make sure that it works and there are no problems with installed driver. After this, there are two ways - to activate the function manually or use the program. Consider both options.
Method 1: netsh wlan hostednetwork commands and ICS sharing
In order to independently configure a Windows virtual router and enable shared access to it using the built-in ICS mechanism, do the following.
Right-click on the "Start" button in the lower left corner of the screen. The following menu will appear:

Select the “Command Prompt” item in it or, if you are not working with Administrator rights, then the “Command Prompt (Administrator)” item. A black window will appear into which you must enter commands - the so-called “Windows console”. The first command is to configure the parameters of the wireless network that we will launch. Here's an example:
netsh wlan set hostednetwork mode="allow" ssid="moi-wifi" key="wifipassword" keyUsage=persistent
This is what it looks like on the command line:

Let's take a closer look. Parameter SSID- this is the name of the Wi-Fi network that you are creating and will distribute. Parameter Key is the security key or, in other words, the password for connecting to this WiFi. Settings entered using this command are saved in the registry and will retain the entered values until you change them to others.
The second command is:
netsh wlan start hostednetwork
It starts the wireless network configured above.

In fact, this is how you force the computer’s wireless adapter to distribute WiFi without a router, that is, on its own. Unfortunately, so far you have only been able to make an access point from a laptop, which cannot distribute the Internet.
In order to now distribute the Internet on Windows 10, you need to make one more setting. Press the Win+R key combination and enter the open command in the line ncpa.cpl. Press the Enter button on the keyboard and a window will open for you about the network connections that are available in operating system.

Please note that you must have two wireless connections while network adapter one. This is fine! Secondly, in my example this “Local Area Network Connection *2” is the Wi-Fi that the computer distributes. But what we need now is not that, but the connection through which your PC accesses the Internet. I have this The local network. Right-click on this icon:

Note: If you use a PPPoE connection to your provider, then you need to select a High-speed connection. If you are connected via L2TP or PPTP tunnel, then you need to select a VPN connection.
In the window that appears, open the “Access” tab:

Check the box "Allow other network users to use this computer's Internet connection." After this, a list of “Connect to home network". Here you need to select the created wireless network, which I already mentioned above. That’s it, click OK to apply the settings.
Well, that’s basically it, now the laptop distributes the Internet via WiFi and without a router, independently performing their functions.
Advice:
Every time you turn on your computer to start a virtual access point, you will have to enter this command:
To automate this process a little, you can create on your desktop text file this is the content:

After that, save the file and rename it to change the extension from *.txt to *.bat. This will make the file executable. Now it needs to be placed in Autoload. This will force the laptop to distribute WiFi automatically as soon as Windows 10 boots up.
On previous versions OS - Windows 7 and Windows 8, everything is done exactly the same as on Windows 10. Here is a video instruction:
Possible problems: If, when you try to start a virtual access point in the command line, you receive the error “The hosted network could not be started. The group or resources are not in the required state to perform the required operation,” then first check whether the Wi-Fi adapter is turned on on the laptop. If it is definitely enabled, then run this command:
netsh wlan set hostednetwork mode=disallow
After that, try starting the virtual router again. Everything should work!
Method 2. Programs for distributing the Internet from a laptop via WiFi
This is an easier way to distribute Wi-Fi, which does not require any “extra steps” at all. Typically, all you need to do is launch the application. In some cases, he needs to manually indicate through which network adapter the laptop accesses the Internet. The most popular program for distributing WiFi is, of course, the utility Connectify Hotspot:

In my opinion, despite its popularity, it is not the most the best option. There are analogues that are simpler, more convenient and, most importantly, provide the same functions as Connectify Pro absolutely free.
One such example is the program mHotspot:

This is great free program for distributing the Internet via a wireless network. There are only a few fields in the main application window. "Hotspot Name" is the name WiFi networks or so called SSID. The "Password" field is the Wi-Fi password. In the "Share From" list, you must manually specify the network connection through which the PC accesses the Internet. We don’t touch anything else and press the “Start” button. Well, let’s enjoy the delights of wireless Internet!
In general, as I noted above, there is a sea of similar software, but personally, I liked the Chinese utility the most of all of them Ostoto Hotspot. It is distributed freely, there are no built-in advertisements yet, it works and is not buggy! What else is needed for happiness?!

This free program for distributing Wi-Fi from a laptop has the bare minimum of settings and works right out of the box. Even a schoolboy can figure it out. To change the SSID or password for the connection, simply click on the “Edit” icon and enter your parameters in the fields that appear. Don't forget to save your changes by clicking the "Save" button.
How to distribute the Internet from a phone or tablet
Many users prefer for various reasons mobile access to cable Internet, because it is always at hand - not only at home, but wherever you are. The main thing is to have a confident reception cellular communications. But again, if you need to connect another device, difficulties immediately arise. Fortunately, operating system developers Android systems and iOS for mobile devices have built in the ability to organize a Wi-Fi router via a phone or tablet. Let's look at how this is done in more detail.
How to set up an access point on Android
Click on the gear icon and open your smartphone Settings:

In the "Wireless Networks" section, find the "More" button and click it. In the next menu we find the item “Modem mode”:

And then you need to select the item "Point Wi-Fi access". The following menu will appear:

Here you need to move the slider to the “On” position.
With this, you have already launched a virtual router, which allows you to distribute Wi-Fi on Android.
To see what the password is for connecting to this wireless network or to change it, click on the line “Setting up an access point”:

If necessary, here you can change the SSID, the type of encryption standard used, and the security key.
To disable the virtual router, simply move the switch to the "Off" position.
How to distribute Internet from iPhone
Fortunately, not only Android has such a function; Apple's iOS also allows you to turn on the hotspot on your iPhone and iPad with just a few swipes of your finger. This is done as follows. Open the settings of your iPhone and find the “Cellular” item:

Scroll down to “Modem Mode” and select it:

The following menu will appear:

Here you need to turn on the modem mode with the slider, after which your iPhone will start distributing the connected 3G/4G Internet via Wi-Fi. The password for connecting to this wireless network can be viewed and even changed in the “WiFi Password” field.
To turn off the wireless access point on iPhone and iPad, simply turn off tethering mode.
You don't have to buy a router to have WiFi in your home. A laptop connected to an Ethernet cable can also distribute the Internet throughout an apartment. There are plenty of instructions online on how to do this on Windows 7 and older, but if you have XP, don’t rush to do it complete reinstallation operating system.
Laptop as a router on an old OS
On any operating system from Microsoft, Internet distribution via WiFi can be organized using both built-in tools and third-party utilities. But why litter HDD unnecessary programs? On Windows XP, follow these steps step by step:
- Open “Start” and go to “My Computer”.
- In the left pane, select “Network Places”.
- Next, go to the “Show network connections” section.
- Click on the “ Wireless connections” right-click and open “Properties”.

- Next, go to “Wireless Networks” - “Advanced”.
- Here, select the “Computer to Computer” option and confirm your choice.
- Click “Add” and enter data the network being created(name, password, encryption method) and confirm.
- Next, open the “General” tab and highlight the IPv4 item, click on the “Properties” button.
- In this window, set the indicator to “Use the following IP...” and enter the following data:
IP - 192.168.1.1
Subnet mask - 255.255.255.0
The distribution has been created, all that remains is to enable the ability to connect to it from other devices within the range of the wireless network. To do this, return to the network connections window and right-click on the local connection and open its properties. You need to put an indicator next to the “Allow other network users...” item.

Now WiFi distribution should be fully functional.
Settings on the current OS
Similar actions can be done with Windows 7. In order for Wi-Fi to be distributed from a computer or laptop, you can, as in the previous example, step by step create a new virtual network. The only difference is in some steps.
- You need to look at the “Network and Sharing Center”.
- Run “Set up a new connection...”.

- Then go to “Setting up a wireless network “Computer-Computer” and click the “Next” button.
As you can see, the actions are similar. In the new window, enter the network name, encryption type and password. Save the changes and click “Next”. Here all that remains is to apply the “Enable sharing...” setting.

But that is not all. To be able to connect to WiFi from other devices, return to the “Network and Sharing Center” and on the left side of the window, find the line “Change advanced settings...”.

After opening this menu, make active the items highlighted in the screenshot:

Ready! But Windows 7 offers another, more advanced and simpler way to organize WiFi distribution from a computer or laptop equipped with a wireless adapter. This is using the command line. Find her in the list of all Windows programs and open with administrator rights (right-click on the shortcut and select the appropriate item).
In the window that opens, enter a command like this:
netsh wlan set hostednetwork mode=allow ssid=”new network name (at least 8 characters)” key=”password”
and press Enter. This quick creation distribution, and to start distributing the Internet from the laptop, use the command:
netsh wlan start hostednetwork
All that remains is to go to “Network and Sharing Center...” - Properties Local connection(the same one that is the wire through which the Internet “gets” into the apartment). Open the “Access” tab and check both boxes. WiFi distribution is now working.
(Visited 21,556 times, 2 visits today)