Reinstall win 8 on laptop. Reinstall Windows without disk and flash drive
Read also
Any operating system can be subject to virus attacks, or various problems caused by inept user actions: when installing drivers and utilities, when removing some Windows components, intentionally or accidentally. In some cases, correct the situation in the usual way, such as cleaning the computer for viruses, or system recovery functions, fails. And you have to resort to methods such as reinstalling Windows 8 on a computer or laptop.
There are several options on how to reinstall Windows 8 on a laptop. The first, and probably more correct, is clean install systems with full formatting, from bootable media. Or, as it is also called, installing Windows through BIOS, although this is not a very correct name.
And the second option is to reinstall Windows 8 using the built-in Recovery function. Where is it possible to Restore Windows to its original state, with the removal of all files and applications. And also save all user files, but reinstall Windows, to the state at the time of the first launch. This option will work if Windows boots, but, for some reason, you need to reinstall it.
Reinstall Windows 8 without boot disk
So let's get started.
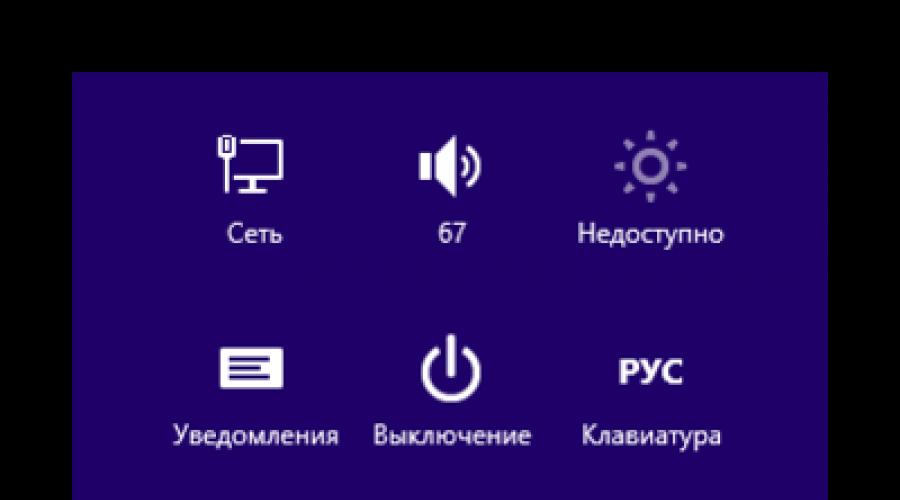
- We go to the system settings menu, for this you need to move the mouse cursor to the lower right corner of the monitor so that the toolbar appears. Click on the settings icon. Here we are interested in the point " Changing computer settings».

- Next, switch to the tab " Update and recovery».
- And the next item is Recovery».
- Here we can see several categories - "Restore your computer while keeping all personal files" - (all programs, utilities and applications will be deleted, user-installed for the entire period of using the computer). AND Option to delete all information and return the computer to the initial state, at the time of installation.
- Select the second item and click the " Begin". Why second? Because in this way we will fulfill full reset settings and restore the system to its original state.

- Next, a warning will appear that all files and applications will be deleted - confirm.

- Next, you need to choose the option, completely clean the disk or reinstall Windows, select the first item.

- Click " Continue”, then the computer will restart and the process of restoring Windows 8 to its original state will begin. This may take about half an hour or a little more.

- At the final stages, as in the usual Windows installation 8, you need to make settings, language and regional settings, security settings, and others.

- Further, the final stages of the installation will be accompanied by messages about the installation progress on a background that changes brightness. (The pleasure, shall we say, is not quick, although the messages say that it's about to, soon, everything will happen). Until the desktop loads.

Clean reinstall of Windows
The preferred way, of course, is to reinstall Windows 8 on a laptop or computer using installation media. In this case, you can format system disk and install a completely clean OS. But for this method it is necessary to write Windows image 8 on bootable media. For licensed operating system owners Windows systems 8 you can use the utility MediaCreationTool, which you can download on the official website of Microsoft
You can learn more about how to create here. And also, here you can read - how to perform on a computer or laptop. Try, experiment, in fact, everything is much simpler than it seems.
@
How to reinstall Windows 8 on a laptop. Hello admin, my problem is the following. Bought a laptop installed Windows 8 for one language (Windows 8 Single Language), which I safely demolished and installed Windows 7. I used your article for instructions. Now I’ve changed my mind and I want to install Windows 8 again, but I don’t want to install the version that was preinstalled on the Windows 8 Single Language laptop. I have a licensed disk in a Windows 8 Professional 64-bit Rus (OEM) box with a key, I bought it in a store, that is, everything is as it should be. But, when trying to install this Windows version 8 Professional 64-bit Rus (OEM) on the laptop, the message “The product key entered does not match any of the Windows images” appears.
The second option to reinstall Windows 8 on a laptop
Let's install a different edition of Windows 8 on our laptop, namely, we will use the existing Windows disk 8 Professional 64-bit Rus (OEM).
Why do I get the error "The product key you entered does not match any of the Windows images" when installing a different edition of Windows 8 on a laptop? ? Because the manufacturer's information Windows laptop 8 Single Language and its key is stored in the UEFI BIOS.
But all professionals know that there is such a file ( EI.cfg ) and a product identifier file ( PID.txt ) is additional files configurations that can be used during the Windows setup process to specify the product key and edition of Windows!
Attention friends! In simple words, program windows installer 8 during installation, first of all, it refers to the EI.cfg configuration file (it contains the edition of the installed Windows 8) and the PID.txt file (it contains the key of the Windows 8 to be installed). If these files are not present, Windows 8 reads information about the system version and its key in the UEFI BIOS of your laptop, and this key is from the installed Windows manufacturer 8 Single Language (for one language), this is the error that comes out. So friends, we will independently create these two files (EI.cfg) and the product identifier (PID.txt) and indicate in them information about the Windows 8 Professional 64-bit Rus (OEM) we are installing, then place them in the sources folder distribution of Windows 8, that's all.
How to do it?
1) For example, I have a licensed disk with Windows 8 Professional 64-bit Rus (OEM) or its image in ISO format. So it's easiest for me to create a bootable Windows 8 USB flash drive.
- Attention! If you reinstall Windows 8 with UEFI BIOS enabled, then bootable Windows flash drive 8 should be UEFI, respectively, how to create it and how to configure the UEFI BIOS itself to reinstall Windows 8, we read in our article, this way involves the creation bootable flash drive by using command line. Know that with the help of such a flash drive you can reinstall Windows 8 on a laptop with a simple BIOS. So, we have created a flash drive, now we create two system installation configuration files (EI.cfg) and (PID.txt) and add them to the "sources" folder of the Windows 8 distribution.
- Note: Windows 8, 8.1 can also be installed using a simple ISO image, but then you need to add the above files (EI.cfg) and (PID.txt) to it, sometimes it will even be enough to add just one pid.txt file to the sources folder with Windows key. How can you add files to installation disk or Windows image 8, 8.1 You can learn from our article
Today, you can find quite a lot of users who at one time installed the eighth version of Windows instead of the popular "seven", which Windows 8 for some reason does not suit. It is they who begin to wonder how to install Windows 7 instead of Windows 8, believing that there will be no problems with the reverse transition. Alas, not everything is so simple here.
How to install Windows 7 instead of Windows 8: main problems
Unfortunately, problems begin to appear already at the very first stages of an attempt to replace the existing "eight" with a lower version (in our case, Windows 7). They are connected, first of all, with the fact that these systems have different types boot areas.
In Windows 7, the boot record is MBR, and in G8 it is GPT. In addition, new BIOS versions related to the UEFI class. It would seem that the most logical solution suggests itself: simply format the disk partition on which you want to install the "seven", and that's it. But even here, not everything is as cloudless as it might seem at first glance.
Without changing the boot record standard, formatting will not be possible. In a sense, this situation can be compared with attempts to change file system, such as NTFS to FAT32. As is known, in a standard way FAT32 is not installed over NTFS. But if here, when formatting, you can return to an outdated system, then in the case of boot records, this will not work. Yes, and talk about what can be produced Windows recovery 8 to Windows 7 is also not necessary, because the files old system when installing a fresh version, they are automatically deleted (this possibility appeared only in the "top ten", and then on the condition that the installation data of the previous OS were not deleted from the hard drive). Therefore, just in case, it is better to record in advance the image of the system (“eight”) and all data stored on disks or in logical partitions, but more on that later.
Configuring Boot Modes in the BIOS
However, not everything is so bad. Indeed, you can install Windows 7 instead of 8, but first use some specific settings so that no failure occurs during the replacement of the “OS”.
To begin with, we go into the BIOS settings at the very beginning of loading a computer terminal or laptop. Usually, the keys Del, F2, F12, and so on are used for such purposes (it all depends on the model of the computer and laptop, as well as on the manufacturer and BIOS version).

Now we need to go to the Security menu (sometimes Boot) and disable the Secure Boot mode (set the parameter to Disable). By the way, it is this mode that is responsible for checking the bootloader certificate.

Further preliminary Windows setup-Installation cannot do without entering the advanced settings section (Advanced), where you need to find the System Configuration line, and then set the Boot Mode boot mode parameter to CSM Boot or CMS OS instead of the initial UEFI OS (UEFI Boot) parameter. As it is already clear, this directly concerns new BIOS versions.
Don't forget to set as priority boot device either a flash drive or a CD/DVD-ROM. Save the changes (by pressing F10).
Starting the installation of Windows 7
Now a few words about the beginning of the process of installing the "seven". First, if the installation is performed from a flash drive, it must be inserted into the USB port before the computer terminal starts loading. Secondly, you only need to use USB 2.0 connectors. This is due only to the fact that the "seven" does not support working with USB interface 3.0.

We boot from the media with the distribution kit, select the initial language options, currency and time formats, as well as the language layout, after which we activate the process of starting the installation by pressing the corresponding button.

In the window that appears, from the installation type section, select the full installation. Now the main difficulties begin.
Problems with hard disk partitions
So, we continue to consider the problem of how to install Windows 7 instead of Windows 8. At the next stage, the installer will prompt you to select the partition into which our “OS” will be installed. Their number will be greater than in the standard form (such was the specifics of the G8 boot record).

In this case, we use the disk settings line and delete all partitions without fail. If this is not done, the installer will simply not work further. Can also be used command line, called through the combination Shift + F10, where you need to enter the following commands in sequence:
Now you can set disk partitioning or install Windows 7 in an unallocated area (as you prefer). In principle, if you install the system in an unallocated area, the conversion to MBR will happen automatically (that is, no additional conversion commands are required).
Basic installation process
After all the above procedures (if they are performed correctly and in full), the standard installation of the "seven" is activated. Here you should pay attention to the fact that all information previously found on the hard drive or in the virtual partition will be destroyed.
Depending on the configuration of the computer or laptop, the period from full installation to the first start may take different time. Nevertheless, the process itself, as practice shows, will end successfully, and errors should not occur.
Completing the installation and checking partitions
Upon completion of the installation, the user receives a "clean" system. As a rule, Windows setup at this stage in terms of configuring the main components occurs automatically.

For now, we are interested in checking the system for changes in boot parameters. To do this, use the standard computer management menu, click right click on the section of interest to us and select the property line. In the new window there is a “Volumes” tab, where the type of master boot record (MBR) will be presented in the basic information.
Driver installation
There should be no problems with drivers either, because almost any Windows 7 driver file with and initial setup installed automatically for most devices.
IN last resort for unsupported hardware, you can always use the special driver disk that comes with the purchase of a computer unit or laptop. At worst, you can go to the official website of the manufacturer of non-standard equipment and find a suitable driver there latest version, designed specifically for Windows 7. You can download it either from another computer connected to the Internet, or after establishing a connection and configuring the basic settings on your own terminal.

You can identify non-working or incorrectly functioning devices, as usual, in the Device Manager, where they are marked in yellow.
Using system update
It goes without saying that, most likely, a completely clean system will be installed without any updates or additional service packs.

By default, in the "seven", as well as in all other systems, windows update has activated auto mode. Thus, as soon as a computer terminal or laptop is connected to the Internet, the search for available updates and their installation will be performed immediately.
If for some reason this did not happen, you just need to go to the Windows Update service and set their search in manual mode, then confirm the integration into the system, again, when the Windows update is installed automatically without user intervention.
System Restore to Windows 8
As for how to restore Windows to the G8 that was previously present, you will need to use a pre-created copy of the system in the form of an image, and if necessary, first reinstall Windows 8, after which from the same image file hard drive transfer all the necessary data to the installed system.

You can create such an image initially using standard means"eight". This, for example, can be a backup and restore tool, an additional utility like Recovery Media Creator. If you don't like your own Windows programs, no problem - you can use the universal utility Acronis True Image.
Yes, and more. If the "seven" is incorrectly installed, re- Windows installation 8 can also lead to the fact that, so to speak, the "eight" windows password 7 will block even if you disable the boot options in the BIOS or even purchase a new licensed version of the "eight" (there will simply be nowhere to enter the key, and the system will write that it does not match any image). So be careful.
Conclusion
Here, in fact, the main points are considered regarding how to install Windows 7 instead of Windows 8. Although the matter is complicated, nevertheless, if you show maximum attention and be patient, you can make such a transition without any problems, the main thing is to do everything preliminary actions so that there are no problems later.
It remains to add that now the answer to the question of which system can be characterized as " best Windows”, is difficult to voice, since each user has their own views and preferences. Some are so accustomed to the "seven" that they do not want to change it to new operating systems. Others are trying to follow new developments and are already moving to the top ten. It's how anyone likes it.
Hello dear readers of my blog!
I decided yesterday to update the OS, and wondered how to reinstall Windows 8 on a laptop. Previously, I always set the "seven" and there were no problems, but this OS is a little more complicated. This is exactly what I wanted to tell you in this article!
Preparatory actions
First you need to stock up on a clean disc or flash drive. It doesn’t matter what kind of laptop you have, let it be at least acep, it’s important what bit depth of the system you choose. For simplicity, I can advise you to proceed from the following parameters. If your PC has 2 or more gigabytes random access memory, then you need Windows 8 64 bits. You can download it by torrent from here.
Next, you need to write the downloaded image to media. If you install the OS from a USB flash drive, then you will need Windows program 7 USB DVD Download Tool, download from here and install.
I already wrote above that without a disk or flash drive, you will not be able to install. Therefore, you need to decide on the type of media.
So, let's say you choose to install from disk. Insert it into the drive and open the program. You will see the following window.
Then press the button " Browse» and select your downloaded image. Then click on the button Next and you will see the interface of the second stage, where you need to select the media. For example, you will install Windows from a USB flash drive. Then in the program you choose it. It is better to format it in advance.


Then you should see a window like this.

As soon as the process is completed, then everything is ready.
Whatever laptop you have, Lenovo or HP, any operating system from Microsoft arranges files on the hard drive in the same way. If you still have the necessary pictures, photos, music, you need to copy it all to some medium. All files on drive C will be deleted. Now you can proceed with the installation. From myself, I would also advise you to rewrite passwords from the Internet and social networks. This is the only way to complete the installation without losing data.
Installation
So, now I will describe to you the installation process itself. It will go through the BIOS, or rather, with its settings. You can enter it by pressing certain keys or combinations. All laptops, Asus or any other brand, have their own buttons for this. I will give you a table of these combinations.

Restart your laptop and immediately press the desired buttons. If you did everything right, then you will see this picture.

Do not be afraid, BIOS is an important thing, of course, but following my instructions, it is quite safe. Now you need to go to the tab Boot and in the first line, select boot from a USB flash drive or disk, depending on what you have. Next click F10 and the laptop will reboot.
If a black screen appears, asking you to press any key, which you need to do, then everything is going as it should. Then the boot starts from the media with the image of Windows. This window will appear.


In the figure below, you will see two installation options. Update and full installation. You need to select the bottom option. I read about the difference in these concepts, and professionals say that it is better to install the operating system from scratch.

I can advise you to drink tea during this time, the process is quite long. Once it is completed, you can move on to the next step.
Personalization and customization
Now the easiest step. The system will prompt you to select the color of the interface, enter a username, set a password and connect to the network. Everything, the installation is actually completed. Now you need to install all drivers. To do this, you need a software called Driver Booster Free. I provide you with a link to a site where it can be download.
It works with all laptops, even with MSI on an SSD hard drive. Just install it, run it, and it will do everything you need by itself. You will only have to restart your computer.
By the way, I suggest you watch the video first. In it, the author tells each step in detail and shows with his own example how to install the operating system.
In the future, you will need to check for system updates. She will download the necessary service packs and patches. This is done so that your OS does not slow down, and also to increase the level of security.
Conclusion
That's all, my dear readers. Now you can install the operating system yourself. Remember that you need to be sure working flash drives and disks. Completely correct! Otherwise, it may happen that the installation starts and then stops abruptly. You will be without your old system, and without a new one. And it will be impossible to restore the files back. Therefore, you will have to look for either an already recorded image, or run to your friends and record yourself.
By the way, always read the comments before downloading images of operating systems. If the files are broken, then users will immediately write about it. Also, keep an eye on the bit depth. Remember, if you have more than 2 gigs of RAM in your laptop, then you need a 64-bit OS. Otherwise, you simply will not use all the slats of the operative. As well as processor cores, if there are more than two.
Also don't forget to make breakpoints. The system will offer to do them by itself, especially after installing any large programs.
On this I say goodbye to you, my dear readers! Share the link to the article with friends and acquaintances in your in social networks! Subscribe to blog updates! See you soon in my useful articles!
To fulfill Windows installation 8 (or reinstall it), first of all you need a distribution kit operating system. It can be placed on a DVD disc, as well as any UCB\SD drive. There are several ways to get a new OS.
Any owner of Windows 8 or Windows 8 Pro can be upgraded to Windows 8.1\Windows 8.1 Pro free of charge via the worldwide web using Microsoft's dedicated page. If you only have Win 7, you will have to pay an extra $15 to get updates. On the other hand, given the official cost of "Windows" of several hundred, this is not a very big price. For full-fledged work, the programs will need:- processor more powerful than 1 GHz;
- 2 GB of RAM;
- 20 GB free space on the hard drive;
- support for DirectX 9;
- screen with a resolution of 1024 × 768;
- Microsoft account.
If there are any problems during the upgrade to Windows 8.1 or Pro version, you always have the opportunity to restore the OS to a previous stable state. To do this, use the disk from which the process was performed again, contact Microsoft technical support, or try to “roll back” the system yourself using safe mode and recovery environment.