What does the white list mean in the phone. Setting up a blacklist on Android smartphones: how to get rid of unwanted contacts
Read also
White list for android or how to protect yourself from unwanted contacts
For quite a long time, modern phones and smartphones have such a built-in function as the "Black List" - the ability to add contacts or numbers to the list of those with whom you do not want to communicate. However, sometimes you need to protect yourself from everyone - except for the elect. This list has its own name - "White List".
Not all phones have the ability to create whitelists by default, this also applies to gadgets with android OS. What are the ways to solve this problem? First, try to use the services of your operator cellular communication(we have a phone, don't you forget?). For example, a megaphone has a "white list", the service is called that. You can add up to a hundred of any numbers to this list, if they call from another not included in the list, they will receive a message about an erroneous call. Everything seems to be fine, but there is one thing - the service is paid. And not everyone has a megaphone. So let's try another way.
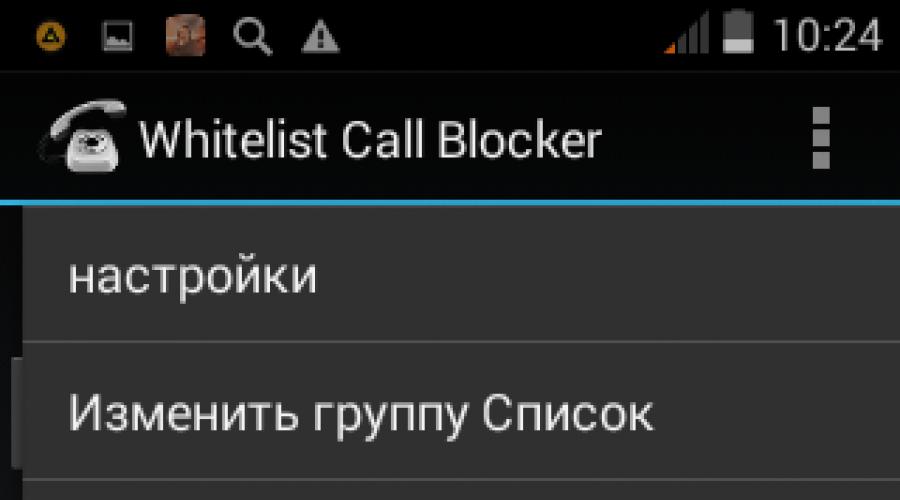
The android OS provides its users with the opportunity to install a great variety of applications, is there really not the right one among them? There will be! Whitelist Call Blocker is a program designed just for this (and the name already hints at it).
So, download it for free from the play market and install it on your device. Now such a new icon with an old telephone set will appear on the screen of your gadget.
However, we will not start it yet - we need to reboot the device. After the reboot, we look at the menu. And here there is a pleasant surprise - it is in Russian; the translation is true, not very good, but the main thing for us is the functionality, right?

So, let's look at the menu items:
- Settings:
- Enable notification icon;
- Show their subscribers in the subscriber's history;
- Enable timer;
- Enable Logging (for support only).
- Edit group list (please select the groups you would like to give permission to call you):
- My contacts;
- Starred in Android;
- friends;
- family;
- Coworkes.
- Edit individual contacts (Please select the contacts you would like to give permission to call you): And here you can already specifically mark who can call - and not the entire phone book.
- Schedule.
P.S. Phone number incoming call(as it is received by the device) must be exactly as written in the phone book - otherwise, an incorrect definition is possible. For example, you need exactly "+7" and not "8" at the beginning of the number.
UPD: An error has occurred in the application
It should be noted that the program may not work correctly on all phone models. For example, we have ZTE phone blade a5 pro. If you install the Whitelist Call Blocker application on it, make certain numbers to the white list and enable, then when calling from a number not included in this list, the program gives an error, and the call goes through:

If this error is also displayed on your phone, then you can try to look for a replacement. For example, call blocker. After installation, go to settings:


Now everyone who wants to call you from any other number that is not included in the allowed numbers will not be able to do this. Works great against collectors, for example.

The author of this material is I - Yuriy Pakholkov. I provide services for writing programs in Java, C ++, C # (as well as consulting on them) and creating websites. I work with sites on CMS OpenCart, WordPress, ModX and self-written. In addition, I work directly with JavaScript, PHP, CSS, HTML - that is, I can finalize your site or help with web programming.
Administrators can manage enterprise applications on users' Android devices without affecting their personal data. You can do the following:
- create whitelists of recommended applications that will be available for installation;
- automatically install the required set of applications for work;
- manage system applications on corporate devices.
How the white list works
You choose applications from Google Play in the Google Admin Console and whitelist them as users see them on their devices.
Installed apps from the white list are managed by the organization, so when an employee leaves, these apps are removed from his device along with the corporate account. They can also be removed if the device is lost or stolen. Some mobile applications Google like Gmail and Google Drive are already whitelisted.
How to separate personal and corporate applications
Step 1Open the whitelist of Android apps
Step 2Create a whitelist
How to add an applicationThe app will be whitelisted almost immediately, but users will only be able to install it from corporate Google Play or the To Work tab in the Play Store after the next sync with Google's endpoint management system. Apps not installed from corporate Google Play or from the Work tab cannot be managed.
How to uninstall an appOnce an application is removed from the whitelist, it will no longer be available to users in the corporate Google Play store and the "For work" tab in the Play Store. If the user has already installed the app, it will no longer be managed but will not be removed from the device. Users who have not yet installed a whitelisted app can still download it from Play Store, but in this case it will not be controllable.
You will receive confirmation that the selected application has been removed from the whitelist.
Note. It is not possible to remove Google Apps Device Policy from the whitelist.
Step 3Manage whitelisted apps
How to manage application settingsNote.
How to confirm new permissionsBy whitelisting an Android app, you can control its access to data on behalf of users in your organization by granting it specific permissions. For example, an app might need to access contacts or the location of a device. Users can change the permissions you grant after installing the app on their device.
After updating a whitelisted app, it may need new permissions. Applications for which permissions need to be updated are marked with the icon in the Admin Console. To approve a permission update request:
How to manage dynamic permissionsSome applications for Android devices prompt the user for permissions at run time. For example, an application might request access to a device's calendar or location. You can specify how individual application requests for these permissions will be handled. These settings take precedence over the device's dynamic permission settings.
How to create managed configurationsVersion comparison
With managed configurations, you can automatically configure applications for an organizational unit or group of users. You can create multiple managed configurations for a single application and apply them to different groups and divisions. To create a managed configuration, follow these steps:
Step 4: Provide Apps to Specific Users
How to add users to the app's distribution listThis feature is available in G Suite Business and G Suite Enterprise. Version comparison
Note. You won't be able to install apps on a user's personal devices if the user has registered the device, listed themselves as the owner, and hasn't created a work profile. This setting mode (device administrator mode) is only available on devices running Android 9.0 or later. early version and is no longer supported.
- Open the Android app whitelist (if you haven't already).
- Select the app you want to make available.
The Distribute Applications screen shows the departments and groups of users to whom the application is available.
Advice. To see a list of applications available only to a specific user or group, select an organizational unit, group, or specific person from the filter settings on the left side of the page. You can also filter out only public or only private apps. - To make it available to other groups, click .
- Choose one of the options below.
- To share the application with an organizational unit, click on the left side of the screen Organizational unit and select the department name from the list.
- To share the app with a group, tap on the left side of the screen Group and start typing its name, and then select it from the list.
- Set application preferences for the organizational unit or group and click Save.
You can:- Immediately automatically install the application on users' devices.
- Prevent users from uninstalling the app.
- Allow users to add app widgets (if any) to the home screen.
Click Continue.
Note. Changes on users' devices usually take a few minutes to take effect, but sometimes it can take up to 24 hours. If you don't specify an organizational unit or group, the app becomes available to all users in the top-level organization.
How to remove users from the app's distribution listThis feature is available in G Suite Business and G Suite Enterprise. Version comparison
Note. Changes on users' devices usually take a few minutes to take effect, but sometimes it can take up to 24 hours. If you don't specify an organizational unit or group, the app will be unavailable to all users in the top-level organization.
How to prevent users from installing non-whitelisted apps
Users can download apps from the Play Store. At the same time, applications added to the white list are available on the "For work" tab. To prevent users from installing applications that are not on this list:
Note. Changes on users' devices usually take a few minutes to take effect, but sometimes it can take up to 24 hours.
If someone calls you on the phone very often, you can stop answering the call, turn off the sound, but the call will still interfere. You can solve the problem using the function built into smartphones - the Black List. Thus, the contact will be blocked, and the person will not be able to reach you.
What is the "Black List" and what is it used for
The black list is additional function, which is equipped with all modern phones. With the help of the Black List, owners of smartphones based on operating system Androids can protect themselves from calls from hooligans and unpleasant people with whom they try not to communicate, block calls from various advertising agencies, and their mailings.
You can block a contact through your carrier. Unlike blocking via phone, the function is paid, but it provides more options. For example, in addition to incoming calls, you will not receive notifications about the calls of the specified subscriber, his messages.
Adding a contact to the black list using the built-in function does not provide such opportunities, but it is completely free. In this case, calls from the selected subscriber will be blocked, but the system will automatically send you a notification about this call, as well as all messages sent by the subscriber.
How to add a contact / phone number to the Black List on Android
In different versions of mobile devices based on the Android operating system, the way to add a contact to the black list is slightly different. The main differences in settings exist between versions of Android below 4.0 and, accordingly, new versions above 4.0.
Adding to the "Blacklist" on Android below 4.0
On Android versions below 4.0, the number of the subscriber that you want to block must be in the contacts list on your phone. In older versions of the operating system, you will first have to activate the Black List function and only then add a contact:
- We go to the "Settings" menu.
- Open the "Calls" parameter and find the item "Call Rejection".
- Click on the "Black List" and turn it on using the button of the same name.
Open the contact list. Hold your finger until the screen displays context menu. The list will have the option "Add to blacklist", which we need. We indicate the subscriber whom we no longer want to hear.
In order to return everything to its place, we again go to the "Black List" menu through the "Settings" and uncheck the box that was previously set.
Adding to the "Blacklist" on Android above 4.0
Adding a number to the blacklist on smartphones with Android above 4.0 will be slightly different:
- Open the list of contacts and calls.
- Select the number you want to block. In the right upper corner contact is the settings menu, shown as three bold dots arranged horizontally. After clicking, a list will be displayed.
- There can be two variants of the same option: "Lock incoming call" or "Only voice mail” (varies depending on the OS version). In both cases, we need to check the box next to the inscription, after which the contact will be automatically blocked.
To return everything back, just uncheck the box "Incoming call blocking" ("Voice mail only").
Please note that in all cases, after blocking a subscriber, you will no longer receive calls from him. However, every time after a call from a blocked subscriber, an SMS notification will be received about the time and date of the call, and the subscriber will also be able to send messages to your smartphone on his own. If you are regularly bothered by an unknown number, for example, an advertising agency, then add it to your contacts and blacklist, then it will not be able to get through.
Video: how to add to the Black List on an Android phone
Setting up the "Black List"
You can return a contact to the whitelist different ways. Most often, it is enough to follow the same procedure as when adding, only you need to uncheck the box next to the “Enable black list” item (the wording will differ on different models phones). Unfortunately, standard means smartphones do not allow you to change other settings, such as specifying specific date, when you cannot be reached by phone, but this can be done using additional programs.
Additional programs for blocking
With the software, everything is a little simpler, and all owners of smartphones based on Android can use it, and it does not matter what version of the phone you have. IN Play market You can't find an app called Blacklist. Key Feature application is that it allows you to block not only calls from subscribers, but also SMS messages.
To do this, you will need to make the following settings:
The application allows you to block even non-numeric numbers, which will be relevant in cases where you get bored advertising companies. You can always view the history of blocked calls and messages in the "History" tab and even read the contents of SMS. You can unblock a subscriber by highlighting the number and clicking on the bucket icon located in the upper right corner.
Video: working with the Blacklist program ("Black List")
Another unique way also allows you to block incoming calls and messages from subscribers. Download Avast!Mobile Security antivirus from the app store (not all antiviruses have the ability to add contacts to the black list).

Whatever method you use, each blocked subscriber will hear that the number is busy. The messages he sends will not be displayed on the screen, but you can still view them.
The advanced blacklist setting functionality is available only for additional software. With their help, you can not only block the calls themselves, but also incoming messages, view their content, the date they were received, and in the case of an antivirus, even set the date when these functions are turned off.
All of these applications are distributed free of charge (there are paid versions with great features), so any user can download them and if the phone parameters and system requirements install programs on your smartphone.
Video: Blocking unwanted calls with Avast!Mobile Security
Possible problems and solutions
The main thing when you download and install the program, do it only with the help of official or trusted sources (Play Market or AppStore). Otherwise, you run the risk of "catching" malware on your phone. software. With it, attackers can easily figure out the contacts of the people you communicate with, your personal number phone and steal a huge amount of confidential data (especially if you often correspond via SMS messages). If you still use unverified sources, for example, forums where “flashed” versions of programs are posted, then install antivirus software in advance.
When using the black list, one serious problem can arise - after adding a person to the black list, you can miss some important event. If you used an additional utility, then the person will not be able to let you know about him at all, because incoming messages will also be blocked. Also, be careful when dialing a number when adding a contact to the black list so that another person does not accidentally get there. No one usually has any other serious troubles when working with blacklists (especially built-in ones).
Each owner of a smartphone on the Android operating system can quickly block an unwanted contact. This will help both the traditional means of the operating system itself, and additional applications. If it doesn’t matter whether SMS will come from a blocked subscriber and you don’t need to set a specific time and date, then use the standard features. In all other cases, a variety of applications will come to the rescue. After blocking, neither calls from the blocked subscriber nor SMS messages will bother you.
We continue to review for Android. In the previous article, we talked about the Warez My Software utility, which showed us how Call Blocker should not look, Phone app Warrior, which left us with mixed feelings, as well as Whoscall, a program that completely satisfied us, and therefore pushed us to look for an alternative.
advertising
This time, one of the participants will be the Black List, developed by Vlad Lee. The domestic solution attracts with a full range of functions, free of charge, as well as the fact that it does not consume system resources, which has yet to be verified. The second will be the call blocker of the Green Banana studio. Based on the description, there is nothing special about it, but Google users Play are satisfied, the question is why? And the third will go to Call Blocker - Blacklist App, which promises to block SMS on all Android versions, which is already interesting, since this does not always happen on KitKat and Lollipop. At least on Android 4.4.2, it was not possible to block SMS in the last review. So let's go...
The test equipment was a DEXP Ursus 8EV2 3G tablet (Android 4.4.2, MT8382 processor, 4 x 1300 MHz, 1 GB RAM).
Blacklist (Vlad Lee)

advertising
Acquaintance
The Vlad Lee program traditionally offers blocking unwanted calls and SMS, as well as blacklist management. According to the developer, the application does not consume unnecessary memory and processor resources at all mobile device while being very light. At the same time, numbers are blocked quietly and without any signs of a call, which is good, since Whoscall cannot do this. It remains only to check all this.
*In our case, version 2.10.41 of 6.47 MB was installed.
Main functions:
- Black list of numbers (blocking incoming calls and SMS);
- Whitelist (numbers that are never blocked);
- Log of blocked calls and SMS;
- Blocking hidden numbers;
- Blocking unknown numbers;
- Number blocking by first digits;
- Blocking all incoming calls;
- Blocking all incoming SMS;
- Notifications about blocked calls and SMS (can be disabled in the application settings);
- Turning the lock on and off in one click;
- Saving the black list to a file;
Permissions:
Identification data:
- Search for accounts on the device.
Contacts:
- View contacts;
- Change contacts.
- View SMS and MMS;
- Change SMS and MMS;
- SMS reception;
- Sending SMS messages.
- Changing the call log;
- Making phone calls;
- View call history.
Photo/Multimedia/Files:
- Change/delete data on the USB drive;
- View data on a USB storage device.
Device ID and call data:
- Getting information about the status of the phone.
- Creating accounts and setting passwords;
- Launch when the device is turned on;
- Prevent device from switching to sleep mode;
- View network connections;
- Unlimited Internet access.
First impression
The first thing that meets us is a small window that explains that in order to block SMS, you need to make the application the default for receiving messages. In general, they found the same to remove restrictions for Android 4.4 and higher. Well, Hangouts, move over. 

And here it is the main window of the program. The interface is simple but understandable. There are only three tabs: black list, log and SMS + "gear" settings and the classic "three dots" that allow you to save the log to a file or delete all entries. All this is located in the top sidebar. At the bottom - the ability to upgrade to the pro version. 

advertising
The latter costs a little - only 79 rubles and adds a number of features, for example, password protection. However, all restrictions free version the test will show, but it is already obvious that there will be no advertising.

Okay, let's try to delve into the settings in order to first understand the possibilities of the "Black List". The first line is the general disabling of the blocking, that is, the blocker can be deactivated if necessary. It seems to be something like this, but it’s very convenient, that is, constant filtering may not occur. It is necessary - turned on, not necessary - turned off.

Below you can block hidden and unknown numbers, as well as generally all calls. The same can be done with SMS. There is a whitelist, as well as password protection, which is available for 79 rubles.
advertising
As for notifications, they just are. By the way, you can activate them on the status bar. Completes the settings with the ability to hide the text of blocked messages. User support is also provided.


advertising

In general, the first impression is neutral, that is, we have a classic blocker with clear settings, convenient controls and a relaxed interface built on its own engine, which pleases. Now let's try to check all this in action.
Testing
The resource consumption was not surprising, since Whoscall had the same figure, that is, 68.7 MB with zero load on the processor. As for permissions, everything is in order - nothing that the blocker would not need. Moreover, each permission can be explained by the functionality of the program.

advertising
So, open the "Blacklist" tab. To add an "enemy number" just tap on the "+" in the top sidebar. You can block "numbers" from the call list, contact list, from the message list, manually, "starts with" and download from backup made earlier. In general, a complete soup-set. It remains to check how it works.

As a result, one call still passes, and then it is simply reset. When blocking by the first digits - the same song, but you can also drive in an alphanumeric number. By the way, Whoscall did not have the last option.


advertising

The unwanted call log is displayed correctly, that is, the number and time of the call. As for SMS, you can select the subscriber right there, but this is only if the blocker is set by default to work with messages.
The messages themselves are blocked without problems, that is, they are not visually displayed anywhere, but come immediately to the log of unwanted calls. In this case, the text of the latter can indeed be hidden. Well, bravo, the Black List worked without problems. 

advertising

As for system resources, their consumption increased to 86 MB, the processor strained to 1.6%. Whoscall had a lower figure - 0-0.4% / 65-71 MB. In the case of traffic - only 400 Kb for 15 minutes of use, that is, only for advertising, since the application does not provide an online subscriber database.
According to DU Battery Saver, battery consumption in 15 minutes was - 1.4%. For comparison, the basic Android launcher has eaten 1.5% since the launch of the monitor. In general, a small indicator, but the battery still does not save.


advertising

conclusions
Blacklist (Vlad Lee) is a great alternative to Whoscall. There is no identification of the subscriber ID, but there is a problem-free blocking of SMS. In addition, in Russia the first option is still poorly implemented.
With the consumption of resources and traffic, everything is in order. Advertising? Yes, a disadvantage, but you can also support a domestic manufacturer with 79 rubles. Otherwise, an excellent blocker that misses one call, but completely blocks any SMS.
Description
The subscriber gets the opportunity to restrict incoming local and long distance calls from telephone numbers that were previously entered in one or another list.
The service can operate in two different modes (simultaneous use is not possible):
1) Blacklist: the system does not allow incoming calls to the mobile phone from numbers included in the blacklist; If this service mode is activated, incoming calls from numbers that are included in the "black list" will not go through to the phone.
2) Whitelist: The system only allows incoming calls to the mobile phone from those numbers that are included in the whitelist. The phone accepts incoming calls only from those numbers that are listed in your "white list".
Find out which mode is active on your phone this moment You can call the short number 0580.
Connection
To activate or deactivate the "Black/White List" service, you need to dial the short number 0580 on your mobile phone (the call is free).
You can use the Black/White List service in one of the following ways:
1) if after the conclusion of the contract and provision of access to the network, you have ordered the periodic service "Black/White List";
2) by contacting the Subscriber Department and ordering the service there on the basis of an application;
3) order this service by contacting "System 555" (subsystem Adding/Cancelling services);
4) Contact the Internet service "SkyPoint" and order the service there;
Price
A subscription fee is charged for the "Black/White List" service, depending on the tariff you choose. While roaming, you will not be able to use this service.