What does it mean to back up files. How to backup an Android device before flashing
Anyone can suffer such a misfortune: at some point, the HDD, the malware will delete the files or they will be lost due to some unexpected system error. If not create backups, then you can lose your files forever.
Creating a backup copy (backup) is a completely simple process. There are the most different ways backup, and this article will help you figure out which method is right for you and which files really need a backup.
What to copy first
Of course, personal files. If something goes wrong, you can always reinstall the operating system and download again desired programs, but personal data cannot be restored. Must run regularly backup documents, photos, videos and any other private information stored on your computer. If you have spent a lot of time transferring information and files from CD or DVD media, then you can also make a backup for such files so as not to do the same painstaking work again.
You can also back up your operating system, programs, system settings. It is absolutely not necessary to make a backup of these files, but this will make your life much easier if your hard drive suddenly “flies”. But a full backup of the entire system is necessary if you like to change system files, edit system registry and update equipment regularly. There are a variety of ways to back up data, ranging from using an external drive to remote server. Of course, each method has its pros and cons.
Backup to external storage
if you have external USB disk, then a backup can be made directly to it using the built-in backup functions. To do this, use "File History" in Windows 10 and 8. In Windows 7, look for "Windows Backup". On Mac devices, use " time machine". Just reconnect periodically. external drive to your computer and run the backup tool.
pros: quickly and angrily.
Minuses: If something happens to the external drive, the copy will also be lost.
Internet backup
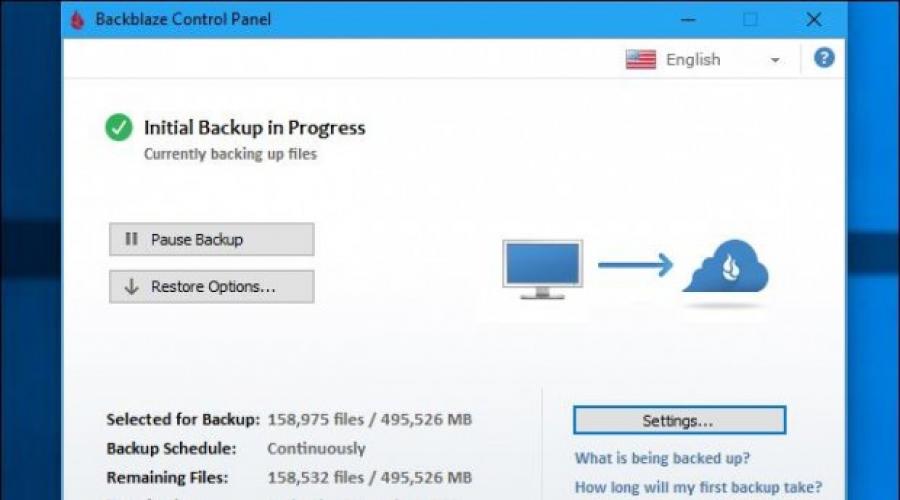
If you want to be sure that your files are safe, you can back them up with a service like Backblaze. This is an online backup service. In addition to Backblaze, there are also Carbonite and MozyHome. For a small monthly fee (about $5 per month), these programs automatically back up your files to the service's web storage while running in the background on your PC. If the files are suddenly lost, they can always be returned.
pros A: Online backup protects users from any problems that may occur with files.
Minuses A: These services are usually not free. Also, the first copy can take much longer than with an external drive, especially if you have a lot of files.

Using the cloud service
Some will say that cloud technologies technically they are not backup services, but many people use them for this very purpose. Instead of storing files on your computer's hard drive, you can upload them to a service like Dropbox, Google Drive, Microsoft OneDrive, or whatever. If something happens, then you will have copies of your files in this service and on all paired devices.
pros: it is simple, fast and in most cases free method. Keeping your data online allows you to protect it from almost any negative options.
Minuses: Most cloud services only provide a few gigabytes of storage, so this method only works if you don't have too many files to back up, or if you're willing to pay for extra bed for storage.

Although backup programs (the same Backblaze, for example) and cloud services are used in almost the same way, they work in completely different ways. Dropbox is for syncing files between PCs, while Backblaze and similar services are for backups a large number files. Backblaze will keep multiple copies of different versions of files, so you can restore a file in the same way you roll back your system to a specific restore point.
Cloud services are free for only a small number of files, while Backblaze allows you to back up as much data as you want for a relatively small fee. But Backblaze and Carbonite have a significant limitation to keep in mind. If you delete a file on your computer, it will be deleted from your online backups after 30 days. That is, after this 30-day period, you will not be able to restore remote file or his previous version. Therefore, be careful.

So what to choose? Ideally, of course, it would be nice to use at least two of the methods presented. Great solution will store data both locally and online. Local storage of data (onsite backup) literally means storing data in the same geographical and physical location where you are. That is, this is the option when you create a backup on an external drive and store it at home, where your computer is also located.
Online storage (offsite backup) is the creation of a backup copy on an online server like Backblaze or Dropbox, which is stored in some other place. This option is not necessarily paid, but may take a little longer than in the case of local backup. However, the level of reliability is much higher.
You can store your files in Dropbox, Google Drive, or OneDrive and back up regularly to external drive. Or you can use Backblaze for online backup and "History Windows files' to create a local backup. There are enough ways to use these options in tandem, and it's up to you to decide how to arrange it all. Just make sure your data protection strategy is strong and includes both online and local data storage.
Process Automation
This may seem complicated at first glance. The more automated the process of creating backups, the more often the backup procedure will occur. That is why, instead of manually copying files, it is more reasonable to use an automated tool that is enough to run and configure once. This is the advantage of programs like Backblaze.
If you set up an online backup, the program will automatically perform it every day. If you copy manually to an external drive, then you may soon get tired of making backups. Therefore, in this case, the automation of the process is worth the effort spent on it.

If you do not want to pay and rely primarily on local backups, then at least try using a file synchronization service in addition: Dropbox, Google Drive, Microsoft OneDrive, or any other. That way, if you ever lose your local backup, at least you'll have a version of your files saved online.
This article will discuss the process of setting up a backup of the files and entire folders you need (so as not to permanently lose them in the event of a hard drive failure or in any other cases) using a convenient backup tool in Windows 8 and Windows 10 called File History ". This will allow you to always have a backup copy of the files and folders you need on another hard drive, as they will be backed up automatically and at the regularity you set.
More information about what backup is, what it is and by what means it can be performed is described in a separate article -
It should be understood that saving a copy of only the necessary files and folders will not save the Windows system itself in the event of a failure. In simple words, if something happens to Windows itself and it stops starting, then with the help of a saved backup copy of your files, you will not be able to restore the work of Windows itself, you will only have a copy of your files! Windows will have to be restored using a special recovery copy or reinstalled from scratch.
In order for you to be able to restore Windows itself from a backup, you need to back up the hard disk partition where it is installed with all the files necessary for it to work. For this, a special Windows tool called "Archiving" is used, which is described
The file history saving feature is only available in latest versions Windows: Windows 8 and Windows 10. In Windows 7, file history is only saved using restore points, which is much less convenient. Moreover, you will not have direct access to copies of files saved in this way.
Enabling the regular backup feature and setting it up in Windows 10
First of all, before you start backing up files and folders, make sure that another separate hard drive is connected to your computer.
It makes no sense to back up data to the same hard drive (just to a different folder or partition) from where you want to back up this same data. In this case, if the hard drive fails, you will lose both the originals of your files and what was saved in the copy, because it was all stored on the same drive! Always use a separate hard drive.
The file and folder backup feature in Windows 10 is called Backup Service and can be accessed via Start > Settings > Updates & Security > Backup Service.
However, the easiest way to open this tool is via Windows search.
How to use search in different Windows versions told
Open search and type "Backup Options". You can shorten and enter, for example, "Reserve". The link "Backup Options" will appear, which leads to exactly the right tool.
You will be taken directly to the "Archiving Service" section (1). On the right, click "Add disk" (2) and in the window that appears, select a separate hard disk (3), which has enough free space to accommodate copies of all those files that you want to back up.
For example, I have a separate 500 GB hard drive. (Writable 465 GB.), and important information on the computer, which I constantly need to back up, is stored in a volume of about 300 GB. This means that the hard drive is 500 GB. quite suitable.
The backup will start automatically as soon as you select the drive where your backups will be stored.
At the very top of the window, you need to select:
Backup frequency (1). Here you choose how often your files will be backed up and updated. There are options, for example, every 10 minutes, every few hours, daily.
If you work a lot at the computer and during the day many of your files change and update a lot, then you can set a period, for example, every hour. This will further reduce the risk of data loss. But even daily copying will be enough.
How long to keep your backups. Here it is better to leave the "Always" parameter set initially. This means that the storage time of your copies will be unlimited. Or you can choose the "Until you need free space" mode. In this case, old copies will be kept as long as there is enough space on your hard drive for them. As soon as there is not enough space, the copies will be deleted and newer versions of the files will take their place.
Below there will be a list of folders that are automatically included in the backup list by default. You can remove unnecessary folders or add some of your own. In order to add your folders, the files in which you want to back up, click "Add Folder".
A window will open Windows Explorer, where you will need to select the folder you want to back up.
To delete a folder, select it from the list and click "Delete".
When the backup is completed, at the top of the options you will see information about when it was last completed, as well as the amount of hard disk space for storing copies and the total size of the backup.
You can always start the backup manually again, without waiting for automatic triggering, by clicking the "Backup data now" button.
If you suddenly decide to change the disk for storing backups, then click the "End disk use" button at the bottom.
You can then add another drive to which your backups will continue to be stored.
Restoring files and folders from a backup
If something happened to your original files, you can always restore them using a backup copy. To do this, in the same place in the settings of the archiving service, follow the link below "Restore files from the current backup".
A recovery window will open, where in the central window all the folders that you configured to back up will be visible:
To restore a file or folder, select it (it) and press the button with the arrow at the bottom (1). If you want to move to previous folder, i.e. the main one, then press the up arrow (2) at the top left. You can move between different versions your files using the forward and backward buttons (3). For example, a copy was created today at 20:00 and even earlier at 16:00. You are not satisfied with the file changes that were saved as a result of the last backup and you want to revert the changes made after 16:00. Therefore, you need to choose more early version and restore desired file.
However, what if you no longer have access to Windows 10 with its backup options... I.e. you will not be able to recover files through the tool described above. Then there is another option - the usual copying of the necessary files from the disk where you store backups. Go to desired disk and you will see the "FileHistory" folder there.
It will already have a folder with the name of the drive(s) from where you made the backup. Select the desired drive and then you will see all the folders that you backed up and the files in them. All that is left is to open the desired folder and copy from it the desired file, the backup copy of which you are looking for. date and time last change file will be indicated in brackets:
Backup features in Windows 8
In this operating system, the functionality of automatic regular backup of files and folders lags behind what is in Windows 10, I would say - it has not been finalized.
The main difference is that in Windows 8 you cannot select any folders for backup, since it is possible to make copies of only the following folders and files in them: "Documents", "Music", "Pictures", "Videos", "Desktop" . Those. If you store something on some other partition of the hard disk or, for example, directly in the root folder of drive C, then these files will not be backed up, because they are not included in the list of backed up folders listed above. Based on this, in order to use backup in Windows 8 and not lose important data at the same time, store them in the above folders and this will be enough. That is, for example, all the pictures are in the "Images" folder, videos in the "Video" folder, all other files in the "Documents".
The functionality for creating backups on this system can be accessed by going to Control Panel > System and Security > File History.
However, it is easier to open the Windows search, type the query "History" there (1) and a link to the desired tool "File History" (2) will appear.
In the window that opens, click "Change Disk".
From the list of available hard drives(1) select the one you want to back up files to and click "OK" (2).
The backup function will automatically launch and the backup process will begin.
You can configure the frequency of backups, as well as the duration of their storage, by going to the "Advanced options" section.
Work with file recovery was discussed above, on Windows example 10. See
Conclusion
Backup in the form of file history in Windows 10 is implemented very conveniently, so I recommend that all users of this system use it! In Windows 8, everything is very similar, but with one drawback - you cannot add any folders for backup, that is, only those that are set by the system. In principle, this is not so bad, you can easily adapt to store all your files in the right folders (videos, images, documents, music, desktop), at the same time there will be order :)
Always back up your data on a regular basis, otherwise you run the risk of losing everything at once and not recovering!
Have a nice day and good mood! ;)
Folder backup allows you to save data separate files, but in the form of entire directories, and, together with a backup of files, forms the basis of a backup. Handy Backup allows you to automatically copy folders on a schedule.
In this short tutorial, we will show you how to backup folders on a local machine using the Computer plugin.
- Call Handy Backup, create a new task using the menu or the button on the panel.
- Select in Step 1 backup, in Step 2 - plugin computer.
- Click on the Computer plugin name.
- In the data list that opens, select with " ticks" desired folders.

- In the advanced mode of the New Task Wizard, you can select alternative way searching folders for backup. To do this, click on " File filters" and configure the dialog to search for folders by name and attributes.

- In Step 7 you can set up the launch external programs before or after a task.
- Finally, give the task a name and exit the task wizard.
Download
Buy!

Version 8.1.1 dated December 16, 2019 . 106MB
Backup program Handy Backup. 1200 RUB for a license
The Standard solution provides all the necessary functions for backing up folders on a computer and restoring backed up folders from a backup.
How to make a folder backup accessible and convenient?
Keeping the original file format in a folder
By default (unless the encryption option is selected), Handy Backup saves all backup data in its original formats. This opens up the possibility for the user to directly use files and folders from backups:
- View and modify files in copies of the folder by conventional means;
- Restore folders from copies using any file manager;
- Backing up folders to easily replicate original content.
Advice: you can use the backup folders to save, reproduce (replicate), copy, clone or mirror the original content in a "hot" mode!
In this article I will tell you how to back up data: work files, multimedia and operating system (make an image of it). Backup (data archiving) is essential, because as a result of a breakdown hard drive, or a virus, you can lose important documents, photo archives, works created in various programs. Maybe you just want to reinstall a clean copy of the OS with all the programs. When this happens, this situation will be easy to correct.
The most common case for users is the failure of the operating system. In order to restore the previous state of the computer (programs, settings, etc.), you need to spend from several hours to several days to install and configure Windows, but installation takes the most time. additional software. Often, inexperienced users store their data on the system drive without thinking about transferring information to other sections of the hard disk, not to mention external HDD.
Backup (archiving) and recovery methods
Windows 7: built-in backup and restore tool
It is quite easy to use and even allows you to perform this procedure automatically on a schedule. Location on the system of the backup tool: «Start | All programs | Service | Archiving and Restoration». Menu in the column on the left - "Create System Recovery Disc" And "Creating a system image".
Create a system image. You must specify the location of the future archive: select another disk partition, external HDD or optical disk (DVD, Blue Ray). There is also an option to save a backup to network drive. It is not practical to use optical media, so use logical drive with enough storage space or external HDD. Select a location and click the "Archive" button. The entire system partition will be archived. This procedure can be carried out on a schedule, while Windows updates the previously recorded system image without creating it again, which saves time.
If you select the "Archive" tool, you can set up regular backups of important user data. To do this, select "Set up backup", specify which drive will be saved to, click "Next", in the next window select "Give me a choice" and then mark the objects for archiving. To restore the contents of a backup, select one of the three suggested actions: "Restore my files from this backup", "Restore files for all users on this computer” or “Manage the disk space occupied by this backup”.
To restore the system, in case it does not boot or gives an error that you are not able to fix, you may need a rescue disk. To create it, select "Create a system recovery disk" from the menu on the left and specify on which media it will be organized. Unfortunately only supported laser discs, which is not suitable for owners of laptops without an optical drive.
This built-in tool in Windows is not without drawbacks, such as a long time to create an archive and the lack of a compression function. However, there are other, more functional products.
Backup and recovery using Acronis True Image Home 2013
For Windows XP users, where there is no built-in backup tool, as well as users with higher requirements for the functionality of the backup program, I recommend using Acronis True Image Home 2013.
Acronis True Image Home uses 3 backup methods.
 Full image - archiving absolutely all data, including MBR (if the partition is bootable).
Differential - only the data that has changed since the backup was created by the first (full) method is included in the backup.
Incremental method - allows you to supplement the backup with files that have changed since the last backup procedure.
backup system partition easy to do: in the main window of the program, select the first option - "Backing up disks and partitions", then specify a partition or drive, specify a location for saving the archive and, if necessary, change the archiving parameters (for example, set the archive compression level on the tab "Performance" or protect the archive with a password). At the end of the process, a file with the extension *.tib. Acronis True Image Home 2013 allows you to mount a backup as a logical drive and work with the data you need. In this way, you can extract the desired file from a pre-created archive that you accidentally completely deleted from your hard drive.
In addition to backing up partitions and disks, you can back up (including on a schedule) individual directories and files, as well as the Windows Address Book, contact list and correspondence Microsoft Outlook. To recover in the most severe cases, you can use the bootable version of the program (boot disk or boot disk), and it is possible to create such a solution both on optical and USB media.
It happens that when experimenting with installing several operating systems the master boot record (Master Boot Record) turned out to be corrupted, you can try to “revive” it by ticking the “MBR” box when restoring from the image. Also, Acronis True Image Home 2011 can convert backups from its "native" format to VHD format (these are backups created by the system Windows tools 7, and at the same time images virtual disks, that is, they can be connected to almost any virtual machines) and back.
In most cases, recovery comes down to selecting the desired archive and partition, in which the contents of the backup will be deployed. Worth noting is the extremely long setup time and low speed Acronis works True Image Home in Windows XP.
Paragon Backup & Recovery Professional: Advanced Backup

About the Paragon Backup & Recovery Professional program, which provides file backup and restore I told in, however, with the aim of transferring Windows to another PC. Unlike the Acronis product, in addition to archiving operations, it also allows you to perform some actions with partitions - for example, changing the label, formatting, hiding, and deleting. However, to do this, you will need to switch to the "Mode for experienced users».
Before backing up, it is recommended to create a rescue disk to restore data from the image. To do this, go to the "Utilities" section and select "Create a rescue disk". Here you can also select either optical or external hard disk or USB flash drive.
To create a backup copy of your data, go to the section "Data protection and recovery | Intelligent archiving”, without forgetting to prepare a reliable storage before that. You can choose what to back up: "Disks or partitions", e-mail ( emails, Accounts And address books Outlook, Outlook Express and Windows Mail), Media Files and Documents (texts, photos, videos and music stored in the My Documents directory) or Other Files or Folders.
Next, you can make Extra options copying - selection of the degree of image compression, password protection and sector-by-sector copying mode (all sectors of the disk are processed "as is", including unused ones). You can also assign an FTP server as an archive storage, if you have one. If you prefer optical media, the program will warn you that it will be impossible to save the master boot record of the disk.
For advanced users, Backup & Recovery has a professional tool for working with Virtual PC virtual machine images, VMware Workstation and VMware Fusion. Thanks to it, you can convert an image of a real hard disk, such as a system partition, and then open it along with all the data and programs in virtual machine even on a different computer.
 Good day!
Unfortunately, many users do not think about the safety of their data at all, even sometimes when they work on some document for days and weeks! But even a simple viral infection (or a failure in file system disk) - and files may be lost...
I hope that you came to this article not when everything was already gone, but prematurely in order to do it in time backup (in English - backup (backup)) your important data.
In the article, I will show, using the example of one fairly convenient and functional program, how you can easily and quickly backup your folders, files, and even an entire disk. Moreover, you can configure it so that it is created automatically, without your participation!
In general, a timely backup keeps a bunch of nerve cells in place, saves time, and makes you more calm ☺.
So, let's begin...
Tip: by the way, if we are talking about ordinary files - then as a backup it is enough even just to copy them to a third-party medium. This, of course, has its inconvenience - but it's already something!
What you need for work
1) Spec. program(s)
EaseUS Todo Backup Free
![]() Official site:
Official site:
Free and very handy program, which allows you to easily create backups of everything and everything (documents, folders, disks, etc.). The program captivates with its simplicity and reliability: in just a few clicks of the mouse, you can arrange everything (below, in the article, I will show with examples how all this is done).
Additional features: disk cloning (including the system one), the ability to set up schedules, create an emergency flash drive (if suddenly Windows cannot boot), view and select files that you will restore from backup.
Among the shortcomings: there is no support for the Russian language yet (although the developers are expanding the language environment, our turn will soon come ☺).
2) Flash drive or external hard drive
It is most reasonable to make a backup on some external media (which will quietly lie away from the computer / laptop, and will help out if something happens). Just imagine for yourself - if you make a backup copy on the same disk that you use - then in case of a breakdown (for example) - this backup will not help you in any way.

A flash drive or external drive (which is even better) - should be large enough to fit all your documents and files that you want to save. Let's say if you have a 60 GB system disk and you want to backup it, then you need a flash drive (disk) of at least 80-90 GB!
Making a disk backup
The first thing to do is to click the "System Backup" button, located in top menu programs (see screenshot below).

EaseUS Todo Backup: backing up your system drive
- select your system disk (number 1 on the screen below);
- specify the location where you will save (number 2 on the screen below. Personally, I recommended and recommend always saving to third-party media, I have an external hard drive);
- Plan name: the name of your backup is set here: it can be anything, as long as you yourself remember what you have saved there, for example, in a month or two;
- Description: description of your backup (similar to the previous one, can be anything);
- Schedule (schedule): if you need to backup regularly, you can set it once, and then the program will do it automatically. By the way, a screenshot of the schedule settings is given below;
- Proceed - button to start the operation.

System Backup - settings (description, see screenshot)
As for the schedule: it is done quite well in the program. You can set everything in 2-3 mouse clicks: specify how hours you need to do it (daily, weekly, monthly), then select the days and select the time. In general, everything seems to be simple ...

Schedule (for those who want to backup regularly)
After setting the basic parameters, in the next step, the program will ask you to specify the drive (and folder) where the backup will be saved (by the way, it will be a regular file).

After that, the program will start creating a backup copy. Pay attention to "Estimated time remaining" - this is the remaining time of work. In my case, for a disk of ~60 GB, the program took about 16-17 minutes of time. Pretty fast.
Note: The external drive has been connected to a USB 3.0 port.

The disk backup is ready: the name of your backup will now be displayed in the main window of the program, opposite it is the Recover button (see screenshot below).

EaseUS Todo Backup - system disk backup is ready!
Backup folders and files
It is performed, in principle, in the same way as creating a copy of the disk (which was done in the previous step). To get started, run the utility and click the button File Backup .

- Select the file or folder: folders (or even entire drives) that you want to back up. For example, I selected the folder "My Documents" (my documents);
- Destination: where to save the backup (preferably on a third-party medium);
- You can set the name and description to any ( Plan name, Description);
- Schedule (schedule): if necessary - set (I usually never specify - when I decided to make a backup, I do everything manually ☺);
- Proceed- the beginning of the operation.

In general, the program quickly created a backup of my documents. By the way, the backup file itself can later be written to another medium (or even uploaded, for example, to Yandex disk, somewhere in the cloud).
Reference!
Cloud storage: what, how, why? How to connect a cloud drive to Windows, Android - secure storage of files in the cloud, available anytime, anywhere -

Recovery example (and overview of files in the backup)
And so, you lost some file (or even a folder), and you decided to restore this data from a backup.
Launch the EaseUS Todo Backup program and click on the button "Browse to Recover"(view backup).

EaseUS Todo Backup - see what's in the backup

Browse to Recover - select the backup you want to open
Then you can view your backup: folders, files, everything is shown in a tree view (clear and simple). It remains for you to tick off which folders you want to restore (number 1 on the screen below), select the folder where you will restore the selected data from the copy (numbers 2, 3 on the screen below), and, in fact, start the process by clicking on the button "Proceed" .

After a while - folders and files will be restored. Convenient and fast...

Well, the last thing I wanted to dwell on in this article. I recommend that you create one more thing: an emergency flash drive, in case your Windows suddenly fails to boot. After all, something needs to be loaded, where you press the button and the system disk will be restored ☺!
In this case, EaseUS Todo Backup provides for the creation of an emergency disk / flash drive. The whole process is very simple and does not take much time (in my case it took about 10 minutes).
Click tool "Tools", and select "Create Emergency Disk"(create a rescue disk).

- select create WinPE disk (Linux compatibility bootloader versions are much worse: your mouse may not work, USB ports will not be visible when you boot from this emergency flash drive);
- specify the correct letter of the flash drive (see the screen below);
- press the "Proceed" button (start recording).

By the way, the program will automatically download the desired disk image from the official Microsoft website and write it to you on a USB flash drive. Comfortable enough.

The flash drive has been written successfully!
How to boot from this flash drive and work with the EaseUS Todo Backup program
Well, in general, in most cases it is enough to call the so-called boot menu, in which you can select the device from which to boot. As another option, you can configure the BIOS accordingly (which takes longer and creates some difficulties for beginners).
Reference!
The topic of BIOS setup and calling the Boot Menu is quite extensive. Most often, it is enough to press the F2, or Esc, or F10 button (these are the most popular) immediately after turning on the laptop / computer. But the cherished menu does not always appear ...
Therefore, in order not to repeat myself here, below are a few articles that will help you!
How to configure the BIOS to boot from a USB flash drive or disk (CD / DVD / USB) -
How to enter BIOS (BIOS) on a computer / laptop e -
Hot keys to enter BIOS menu, Boot Menu, recovery from hidden partition -
Depending on the device: the call can take place in different ways: on my laptop there is a special button for this - you turn on the laptop by pressing it, and the desired menu appears. Comfortable!

An emergency flash drive (which we created a little earlier in the article) should appear in the boot menu. Select it and continue downloading.

If the flash drive has been correctly written, with BIOS settings no problems - then you should see approximately the same window EaseUS programs Todo Backup as if you were running it from under Windows. To get started, click the button "Browse to Recover" .

Browse to Recover - Browse connected drives and view available backups

Actually, it remains only to start the restoration (an example is below in the screenshot).

To start recovery, click the "Next" button.
It is worth noting that if we are talking about a backup copy of some folder (files), then you can also view the contents of the backup, and restore not everything in its entirety, but only certain data (example below).

View files in a backup - can only be restored selectively!
Actually, that's all I wanted to tell today ☺.
PS: all users are divided into two types: those who have not yet made backups, and those who have already started doing them...