Convenient storage of shortcuts from the desktop! How easy it is to keep your desktop in order and instantly find the files you need Programs to organize icons on your desktop.
Read also
A program for sorting icons on the desktop of a computer into any category. Allows you to arrange the icons if there are too many of them.
Screenshot gallery
Windows 8 showed us that the PC workspace can have a tiled interface that may not be quite familiar, but convenient. However, not everyone appreciated this innovation and were able to abandon the familiar desktop.
And why? The desktop is quite convenient, roomy, and its functional component can be expanded with a variety of widgets. And it will be no worse than in the notorious G8.
However, the Desktop has one bad property - over time, heaps of shortcuts accumulate on it, which we do not always use, or use very rarely ...
But, fortunately, this trouble is not so terrible :). If you are determined to once and for all put things in order in the icons on the desktop, then the program can help you with this. sTabLauncher.
Comparison with a paid analogue
At its core, sTabLauncher is a kind of dock-bar, so the popular ObjectDock can be called its closest paid counterpart:
sTabLauncher may not be as functional as its paid counterpart, but, nevertheless, it performs its duties well. And in terms of customization, it even overtakes ObjectDock, because it allows you to customize literally all interface elements!
Program installation
Before installation, make sure that you have at least the second version of the .NET Framework libraries installed. If anything, then you can download them from the official Microsoft website.
If everything is in order with the libraries, then you can run the program installer from the downloaded archive. Next, click the "Next" button until we reach the following window:

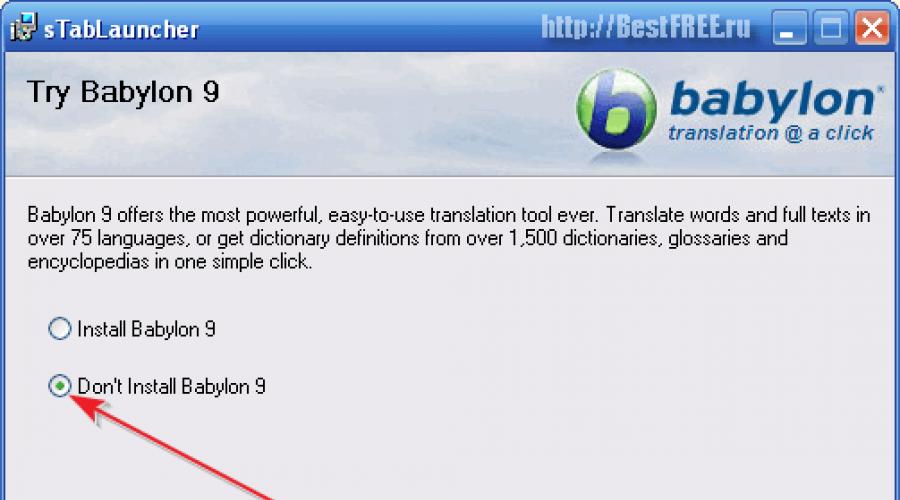
Here we will be prompted to install the popular translator Babylon, basic version which is free, but additional functions activated by subscription only. I advise you to abandon the extra software "ballast" by checking the box "Don't Install Babylon 9". Next, we complete the installation in the usual way for us, without changing anything.
Getting started with the program
After installation, sTabLauncher will not start by itself, as other programs usually do, so to get started, we need to launch the utility using a shortcut on the desktop. When you first start the application will ask us to select the interface language. Naturally, we select "Russian" (if we skip this step, we will get the English version):

After selecting the language, click "Ok" and a translucent menu for launching sTabLauncher programs will appear in front of us at the top of the screen:

If you hover over one of the tabs of this menu, then it will expand, and we will see shortcuts to applications placed there by default:

Any shortcuts can be replaced or removed altogether, and by sorting the icons we need into different tabs, we can achieve a complete cleaning of the Desktop from unnecessary icons. Moreover, the advantage of this organization of labels is the possibility quick access to them from any application!
That is, if earlier, in order to get to the Desktop, we had to minimize open windows, now we just need to move the cursor to the top of the screen. This has its drawbacks, but they and their elimination will be discussed a little lower.
Program menu
The main menu of the program is called by right-clicking on a free area of the main panel with shortcuts:

Here we have access to the program settings, quick addition of labels and separators, as well as pinning pop-up menu items. The last block of functions needs more explanation:
- "Pin icons" means to disable the ability to move them within the tab.
- "Lock Tabs" (pin tabs) - prevents moving the positions of the main menu tabs.
- "Dock the panel" means to block the function of changing the position of the pop-up menu.
Accordingly, if none of the above options is activated, then we can use drag and drop to change the structure of the program launch menu as we please!
Ways to add new shortcuts to the sTabLauncher panel
There are two ways to add a new shortcut to sTabLauncher. The easiest is to drag the desired icon to the panel directly from the Desktop or from any folder. In this case, the new icon automatically changes its size in accordance with the tab settings, and also receives a caption from the label name.
After adding an icon to the launcher, the original desktop shortcut can be deleted - we don't need it anymore.
If you want to change an existing icon in the menu quick launch or add a new and unique one, then the corresponding context menu items will come in handy - "Settings" (for existing shortcuts) and "Add item" (for new ones):

In the screenshot above you can see the result of adding a new shortcut for my working folder with articles and programs. If we look at the Icon Properties window, we can conditionally divide it into four parts:
- "Image". This is the first section, which is located in the upper left part of the window. It allows you to superimpose arbitrary text on the selected icon, which is specified in the "Title" field. For the created inscription, you can set any font, size, color and position.
- "Application". This section (top right) allows you to set the address of the application, folder or website that should open when clicking on the icon. The "Title" field here is responsible for displaying the signature that pops up when hovering over the label, and the "Application" contains the address of the resource being opened. For programs, launch functions with parameters and keys are also available here. In addition, this section contains three more tabs that allow you to add and configure the separator, player and plugins (unfortunately, none of them could be launched on my PC :().
- "Current Image". Contains preview ready icons with all the effects applied to it.
- "Available Images". Here we display options for the icons of the selected program. If the program (or folder) does not have an icon, then we can either select any image as the last one (the "Add" button or by simple drag and drop), or specify one of the standard icons (the "System" button).
After completing the work on adding the element, it will be enough for us to click the “Ok” button and it (the element) will appear in the place we specified.
Program settings
So far, we have only figured out how to manage the contents of the sTabLauncher panel. Now we will learn how to control the behavior and appearance of the program! To do this, we call the main context menu and click on "Settings":

The settings window consists of seven sections, each of which contains its own parameters. By default, the "General" tab opens in front of us. Here we can choose:
- the position where the launch menu appears (if you select “Bottom”, you will either have to change the menu position settings, or hide the standard panel Windows tasks, since it will just close the sTabLauncher panel);
- autostart of the program (although, even if you do not activate it, the program will start with the system;
- language (if you forgot to change it when you first started the program);
- settings import and export functions.
Launchpad Appearance Settings
What impresses me in sTabLauncher is the possibility fine tuning the appearance of its tabs. To do this, use the settings section "Tabs":

From this window we can "Add" new tabs or "Remove" or change the currently selected tab. For each section of the panel, we can set the description parameters (title, its appearance and position), as well as the style.
The latter consists of settings for edges, background, tab tab, as well as background color. In addition, we can add a PNG icon to any tab. To do this, click the "Browse" button in the "Icon" section and select one of the standard or your own picture.
If standard themes are not enough for you, you can download additional skins from a special section of the official website.
Also, you can add a special type of tab - a music tab:

To do this, click the "Add Music Tab" button in the "Quick Setup" section. It is a plugin that allows you to play playlists and online radio stations without a large number of which, you will find on the tab, after its activation.
Other program settings
Among other settings, we can mention the ability to customize all the icons on the sTabLauncher tabs (the "Icons" section), the animation of the appearance of the menu and its behavior (the corresponding settings tabs). Separately, I would like to dwell on one nuance, which I mentioned at the beginning of the article.
The fact is that in the open position, the program panel covers a part of the workspace in the upper (or lower) part of the screen. This is very "annoying" when working in full screen mode (for example, with a web browser).
So that the launch menu does not block the workspace, you can simply hide it using the settings:

To do this, go to the "Advanced" tab and activate the item "Hide sTabLauncher completely when docked to screen borders".
We have achieved a complete hiding of the menu, but when you move the cursor to the top of the screen, it still leaves. To minimize the percentage of false positives, we need to remove the "Distance to start moving the panel" slider to a minimum. You can also increase the delay to bring up the menu. You can do this in the "Behavior" tab in the "Open sTabLauncher" section.
The last thing I would like to mention is the ability of sTabLauncher to work in portable mode. That is, we can store all the settings in a special file in the program folder, which will allow us to transfer our launch menu without changes, for example, after reinstalling the system!
To do this, in the "Advanced" tab, activate the item "Keep the configuration file on the application's directory".
Advantages and disadvantages of the program
- the ability to work with tabs;
- the ability to hide the launcher;
- extensive options for customizing the appearance of the program;
- support for Internet shortcuts;
- the ability to add separators.
- there is no function for grouping shortcuts into nested submenus;
- no tab scrolling feature;
- required additional settings to display the menu at the bottom of the screen.
conclusions
sTabLauncher is a completely modern and functional dock bar that can work on everyone Windows versions. Personally, I liked it for its customization options. Unlike its counterparts, this program allows you to configure the launcher in such a way that it is completely hidden, thereby not blocking the workspace!
Therefore, if you want to reduce the number of icons on your desktop and have access to the most frequently used programs, folders, documents and even sites, then sTabLauncher may be your choice!
P.S. It is allowed to freely copy and quote this article, provided that an open active link to the source is indicated and the authorship of Ruslan Tertyshny is preserved.
It is much better when the desktop is clean, beautiful wallpapers are set and at the same time there is quick access to all shortcuts that were once on the desktop. How to do this, I will tell in this post ...
Tidy up your desktop!
To put things in order on the desktop, we will be helped by the wonderful FreeLaunch program.
FreeLaunch is designed for convenient storage shortcuts from the Desktop, you can also store folders, documents and much more in it.
What I liked the most about this program is that you can create up to eight tabs, that is, it is possible to group shortcuts into categories - Programs, Games, etc.
The program is able to accommodate 600 elements.
Judge for yourself, you can fit 75 elements on one tab, and 8 tabs, it turns out 75 * 8 = 600. An excellent result, it's even a lot!
How shortcuts are quickly accessed.
The program sits quietly and does not interfere with the work in the system tray (This is where the clock is). One click on the icon allows you to expand the program and get access to the shortcuts, while you do not need to minimize all the windows that are open in the system and look on the desktop, in a bunch of shortcuts for the application you need ...
Program settings
The setup is pretty simple. By default, after the first launch appearance programs like this:
In order to place a shortcut in the program, you just need to drag it from the Workbench into one of the free cells of the program, and the shortcut itself can already be deleted from the Workbench.
App supports Russian language, but the default is set to English.
To install the Russian language, go to the settings. In the system tray, RMB (Right mouse button) click on the program icon, and select " Settings»
The program settings window will open, select the Russian language and click the "ok" button
Now the program is completely in Russian and it's good!
So, the Russian language is installed, you can continue to easily disassemble the program settings.
As you may have already noticed, there are not many settings, and there is nothing complicated, but briefly about the main thing.
Field " tabs» Here the user is given the opportunity to specify how many tabs he needs to have in the program, as I said above, you can put up to 8 tabs. To rename a contribution, right-click on it and select rename:
Field " Rows» This specifies how many rows of cells will be displayed horizontally. The default is only 2 rows, the largest number of rows is 5.
Field " Buttons» By default, 10 buttons are displayed - these are the very cells where you need to drag labels. You can specify up to 15 pieces.
Field " Gap» This opportunity. Most likely useful for visually impaired people. With this feature, you can specify the distance between cells from 1 to 5 pixels.
Of the other settings, you should pay attention Startups And concealment programs after system startup.
If you forbid the program to start with the system, then after the start, you will have to manually launch the program in order to gain access to the shortcuts. I recommend leaving autorun.
As for hiding at startup, then here, as it is convenient for anyone. I checked the "Hide at startup" box so that after launch, I first of all need a browser, and it is pinned to the taskbar, and only then the rest of the applications ....
(To be honest, I even forgot the last time I turned off my PC.).
Title, tab view, icon size - here at your discretion, as you like, I left everything as it is!!!
Now thanks to free launch"I have a clean desktop, and my wife keeps asking why I deleted all the shortcuts from the desktop :)
Perhaps this is the time to end the post, it seems that I didn’t forget anything important and said everything I wanted to.
A program for sorting icons on the desktop of a computer into any category. Allows you to arrange the icons if there are too many of them.
Despite the fact that new versions of Windows are trying to find new approaches to organizing the workspace, the familiar desktop is still clearly not going to give up its positions. After all, you must admit that it is very convenient to have all the most necessary shortcuts, folders and documents always in front of your eyes ...
The only problem is that over time, piles of icons begin to accumulate on our desktop, without which we “well, we just can’t do it” :). I also, to be honest, suffer from the "mania" of storing icons, and before my monitor was so clogged with them that there was no free space left.
But one day, while conducting another "cleansing", I decided to look for how others deal with this problem. The result of my search was the program, which will be discussed in today's article.
How the program works
Fences is one of the few applications that allows you to quickly create partitions on your desktop to group your shortcuts, folders and files. The principle of the program is that you create special areas on your desktop - fence(from the English "fence"), and enclose an unlimited number of icons with them (vertical scrolling appears when the "fence" is filled).
Thus, you can shove an almost unlimited number of icons into one section, thereby freeing up space on your desktop!
Comparison of Fences FREE with the paid version of Fences PRO
The Fences program exists in two versions: free and paid. Therefore, I propose to compare the functionality of both editions:
In fact, all the benefits paid version are reduced to additional beauty and do not affect the functionality of the program in general. The only thing that, in my opinion, is really missing is the ability to use auto sorting :(. But, as they say, every barrel of honey is a fly in the ointment :)
Installing Fences
To get started with the program, the first thing we need to do is install it on our PC. To do this, as always, download the archive with the installer and run the file from it fences_public.exe.
After launching it, the program installation wizard will appear, which, despite the English-language interface, is very simple and understandable - all the work, in fact, consists in constantly pressing the "Next" button.
After the installation is completed, the following window will appear in front of you:
![]()
Here we are offered to either choose a ready-made layout for placing partitions on the desktop, or create our own partitions. If you want, of course, you can click on the first button and use the standard options, but I suggest clicking on the second and "Create fences yourself"!
Creating a new section for icons
After pressing the second button, the program settings window will appear in front of you (we will work with it in the future) on the “Fences” tab:

Here is a miniature of the desktop with the partitions placed on it. Since we have not created a single “fence”, nothing is displayed on the thumbnail either. But it's not for long :).
In order to learn how to manually create your sections, you can click the "Create fence" link under the thumbnail and read the text that appears, or you can read our article further;)
So, everything is extremely simple! To create a new partition, just hold down the right mouse button on a free space on the desktop and, while holding it, drag a little to the side (as if selecting files).
After that, a selection will actually appear, and on the side of it (after releasing the mouse) the “Create new fence here” button. Click on the button and get the opportunity to set a name for our section:

For example, let's create a "fence" "My Computer" and put standard labels in it, such as My Computer, Network Places, My Documents, etc. To do this, simply select the desired icons and drag the mouse to the section we created. All is ready! :)
Fences settings
After creating your first "fence", you can basically leave the program alone and "fence" the following sections. However, we can play around a bit and change the look of our icon areas a bit.
If there is such a desire, then you need to move the mouse over the newly created section and call its context menu by clicking right click:

In the menu, in addition to the standard set of commands for the desktop, we will see four items related to the operation of Fences. The items "Delete" and "Rename", I think, do not need additional explanations.
The item "Hide desktop icons" allows, oddly enough, to completely hide all shortcuts, leaving a bare desktop :). Such a function may appeal to radical users who want to see a beautiful background image or try to play a trick on friends :).
After the first activation of this function, a soothing window will appear, which explains to us where everything has disappeared:

As you can see from the explanation, the labels will be hidden by double click left mouse button on a free space on the desktop. Repeated double click will return everything as it was :). In order not to observe the above window every time, it is enough to check the box “Do not show this message again”.
However, now we are most interested in the item "Configure Fences". After activating it, we will see the already somewhat familiar program settings window. However, this time we will need to go to the second section "View":

Here, as you can see from the screenshot, you can set the mode for displaying section names (I advise you to set "Always", but here for an amateur :)), style and background color, as well as the color of the section name and a few additional parameters.
By using the railings, you can customize any shade of your “fences” and achieve their maximum harmony with your desktop wallpaper.
Additional program options
In the program settings window, we examined the first two tabs, however, if you like to thoroughly understand all the intricacies of how applications work, then you definitely need to look at least with one eye into the third section - “Service”:

On the first page of the "Service" tab, you will find two options. The first one concerns hiding desktop icons by double clicking. This function you can either turn it off completely or specify exceptions: icons that will always be displayed.
The second function concerns taking screenshots of the desktop, which fixes the position of the created partitions. You can take several screenshots with different arrangement of "fences", and using the function of restoring the position of partitions, quickly change their location:

However, these two features are not all... At the bottom you can see the link " Extra options”, by clicking which you can go to the second page of the “Service” tab:

Here we get access to two more functions. The first concerns maintaining the proportions of the created sections when changing the screen resolution. If you sometimes have to change the screen size, then this feature will be very useful.
The second function - "Auto Layout" - allows you to sort all your desktop icons into standard categories with one click. However, this approach to sorting is very doubtful, therefore, it’s better to spend a little time and manually put everything in its place than to look for where the automation hid the desired document :)
Finally, the last checkbox allows you to enable/disable Fences.
Since the "Help" and "About" tabs will not give us any new information, our acquaintance with Fences can be considered over :). It's time to look at the results of our efforts:

In my opinion, it looks pretty nice :) Dozens of shortcuts, folders and files that used to occupy the entire desktop are quite compactly located in just four columns. In addition, we created the categories ourselves, which means that we can easily and quickly find the necessary data!
Advantages and disadvantages of the Fences program
- compact placement of many icons on the desktop;
- creating your own categories for sorting;
- the ability to customize the appearance of areas with icons;
- the ability to quickly hide all icons;
- integration into explorer.exe to save system resources.
- longer Windows boot(if you have an old PC);
- there is no way to sort icons within sections;
- sometimes after exiting full-screen applications (for example, games), the position of the icons spontaneously changes.
conclusions
In conclusion, I would like to say that it is still preferable to periodically clean your desktop and store a minimum amount of information on it. However, most often you have to observe a picture when there is absolutely no order on the desktop, and icons and folders sometimes occupy almost the entire space.
Therefore, if you really don’t want to completely abandon a bunch of icons, then you can, at least visually, put things in order in your workspace by installing the Fences program.
P.S. It is allowed to freely copy and quote this article, provided that an open active link to the source is indicated and the authorship of Ruslan Tertyshny is preserved.
Any person actively working at a computer has a lot of program icons, various documents, folders, links, etc. accumulated on the "Desktop". Over time, finding something in this dump of tens and hundreds of icons becomes more and more difficult.
It would seem that solving this issue is quite simple: group the icons directly on the Desktop according to their purpose, or according to some other criteria of yours. But, unfortunately, this solution is not durable... The arrangement of icons quite often spontaneously goes astray and after that they have to be arranged again.
Icons on the desktop will definitely go wrong when changing the display resolution settings. For example, I often connect a large external monitor to my laptop, which has a screen resolution that is not at all the same as that of a laptop. And, of course, each such connection breaks the grouping of icons on the desktop.
IN computer world So - if there is a problem, then for sure they have already come up with some kind of solution! So in this case... Previously, I used Enterra Icon Keeper to solve this problem, which was created specifically for this. But, firstly, it does not always do its job, it is morally outdated, you need to manually switch icon sets, and you also need to remember to save new configuration after adding each new icon.
Lately I have been using a much more convenient, elegant and functional program - Fences You can download it from here.
This program allows you to collect desktop icons into separate groups, each of which has its own name and looks like a shaded translucent window. Actually, such a group is called the word " fence", which can be translated as "fencing" or "fence". 
This is what my main desktop looks like now (click to enlarge).
You can create these groups very easily and simply, drag the necessary icons into them, adjust their size, appearance, position on the desktop, etc. It is very convenient that when switching the screen resolution, the sizes of these groupsautomatically adjustto the new screen resolution. Now I no longer have to make multiple settings configurations for different screen resolutions and switch those configurations manually!
After installing the Fences program, it will create three groups on the desktop: "Programs", "Folders" and "Files and Documents". To add a new group, you just need to right-click in an empty area of the screen and drag the cursor a little on the screen while holding down the mouse button. As a result, a shaded window will appear on the screen. new group and a menu of two items will appear:
- Create Fence here(Create a group here)
- Create Folder Portal here(Create group here from folder)
What other useful "chips" does the Fences program have ...
As I already said, the "windows" of the groups themselves are translucent, and therefore, in principle, your wonderful desktop picture is visible through them, which you probably spent a lot of time selecting. But it is not very visible, especially if there are a lot of icons on the screen. Therefore, sometimes it is very convenient to quickly clear the Desktop of all icons and groups. This is done very simply: by double-clicking the left mouse button in any place on the screen free from icons. All this economy is returned to the screen by the same double click of the mouse on the screen.
IN latest version programs ( Fences 2.0) added new wonderful features that bring the convenience of working at a computer to a new level.
Now you can automatically sort your files and program icons into the appropriate groups using the function Auto Organizer(auto-order). This function allows you to set rules: which files will fall into which group. This is useful if you frequently add new files.
Function Folder Portals(Folder Portals) allows you to create a group (in the sense of a fence) from any folder for quick access to its contents right on the Desktop.
To make such a group, you need to drag the folder to an empty space while holding down Alt key. Alternatively, right-click on the folder and select " Show this folder on the desktop" (Show this folder on the desktop). After that, you can resize the group simply by "stretching" it from the edges, as well as customize the look of the files in it and arrange them the way you like.
If you actively use the Folder Portal (groups of folders), you will quickly find that there is no longer enough space on one screen for everything that you would like to have at hand. And this is where another function of the program comes in handy: Screen Pages(screen pages). It allows you to have multiple "virtual screens" and quickly switch between them.
There are several ways to switch between Screen Pages:
- click the left mouse button with the left or right side screen and drag the mouse along the screen without releasing the mouse button (like on a smartphone);
- click anywhere on the desktop and then simultaneously press the Alt key and the Right or Left key.
But when I first tried to switch screens, nothing worked for me. It turned out that you first need to drag something to the second screen: an icon or a group. This operation is also very simple (like everything in this program)... Left-click on the icon or group header, "drag" this object to the left or right border of the screen, and hold it there for a second. After that, the next "Screen Page" appears, on which we "throw" the dragged object.
I note that Folder Portals(Folder portals) and Screen Pages(Screen Pages) only work under Windows 7 and above.
The latest version of Fences is no longer free ($9.99). There is a trial period (within 30 days) that allows you to evaluate its capabilities in practice and feel the benefits of it.
I find Fences to be perhaps the most useful of the numerous class of desktop programs. I think that it will appeal to people who love order in everything, or just work a lot at the computer.
Sergey Gundorov, Software from PSoft:
Windows is the most popular in the world operating system, and currently under its management, according to the resource Net Applications.com (http://marketshare.hitslink.com/), approximately 92% of personal computers. Such an impressive figure clearly indicates that the developers of this OS really managed to create a reliable and easy-to-use system. However, as you know, the ideal is always unattainable, and therefore, with all the advantages of Windows, it can be made even more convenient by connecting a number of utilities from third-party manufacturers. It is these programs that will be discussed in this article.
Tidying up your Windows desktop
Chaos reigns on the PC desktop for many users: shortcuts, files, folders, images and web links are scattered around them, often without any logic. In the end, the simplest fast way gaining access to data and launching applications - that is, from the desktop - in practice, it turns out to be not at all so fast, because finding the right one among the host of shortcuts most often does not work right away. For the convenience of organizing shortcuts, folders, files and links on the desktop, you can set wallpapers with multi-colored fragments and distribute shortcuts and other elements present on the table among them. In the future, this will help to significantly save search time.
However, there is an even better way - use the free for non-commercial use Fences utility (http://www.stardock.com/products/fences/; 9.03 MB; $19.95). With its help, it is easy to instantly put things in order on the desktop, conveniently distributing randomly scattered shortcuts into thematic blocks (Fig. 1). These blocks are highlighted on the desktop and, of course, demarcated, which allows you to quickly find the items you need. The easiest way to carry out such a reorganization of the desktop is to choose one of the ready-made Fences layouts, as a result of which icons and other elements are automatically grouped depending on their category (programs, files and documents, folders, etc.). After that, it will be possible to manually correct the position and size of the blocks, their name, transparency level and color, as well as a number of other parameters. If none of the built-in layouts appealed to you, then the developers also provide alternative way reorganizing the desktop by designing your own layout. For such a layout, all blocks are created manually, and desktop elements are also manually distributed over them.
Rice. 1. The result of desktop organization using Fences
Along with shortcuts chaotically scattered across the desktop, clutter creates no less problems when working. open windows, switching between which in practice is not so easy if the taskbar already contains more than five to ten (ten, of course, only in the case of a widescreen monitor) window buttons. And it also takes a lot of time to arrange windows on the screen so that they do not overlap each other. It is not difficult to deal with these problems if you connect such free utilities like WinSplit Revolution and GhostWin.
Using the WinSplit Revolution utility (http://www.winsplit-revolution.com/ ; 1.49 MB), you can quickly adjust the position and size of windows in the visible space of the screen for more productive work with them. The screen can be automatically divided into several parts (from two to six), in each of which windows selected by the user will be displayed (Fig. 2). Thus, you no longer have to spend time dragging windows around the screen, and the working space of the screen will be used more efficiently. Obviously, users working on modern widescreen monitors with high resolution, since the screen sizes of such monitors allow you to easily place several windows, giving each of them its own piece of workspace. Controlling the placement of windows with WinSplit Revolution is not difficult: you can arrange the desired windows in the desired way by pressing certain keyboard shortcuts (Ctrl + Alt + 1, Ctrl + Alt + 2, etc.) or by clicking on the buttons of the pop-up panel called by clicking on icon in the system tray. The good news is that after restarting the computer, there is no need to restore the location of windows, since the program (with appropriate settings) remembers the coordinates and sizes of windows on the desktop and restores them in exactly the same form after reboot.

Rice. 2. Possible option for quick placement of working windows
using WinSplit Revolution