Create a Microsoft account (Microsoft). Sign in to apps with a single Microsoft account Microsoft sign in

Read also
Address Email and phone number. You may need this information for a more secure two-factor authentication when performing actions related to changing key parameters account.
What is 2-Step Verification?
Why does Microsoft offer additional addresses and phone numbers?
In this case, you will receive a code for the second stage of authentication, even if you find yourself without a phone and / or forget the password to one of the email addresses.
In other words, providing additional data reduces the risk of account suspension. You can contribute to account up to 10 email addresses and/or phone numbers.
A zip code is not accepted when creating a Microsoft account. What index to enter?
Before entering an index, enter the desired email address and make sure it is free.
- Make sure you select your country.
- Enter your postcode. If it doesn't work, enter any zip code of your country's capital or largest city. For example:
- 121087 (Moscow)
- 194100 (Peter)
- 01001 (Kyiv)
- 200400 (Minsk)
What are Microsoft's requirements for account password complexity?
The password must contain at least eight characters. You can also set your account settings on the Microsoft website to require you to change your password every 72 days.
![]()
What should I do when I can't sign in to my account?
What should I do if my account is blocked?
If these steps did not help you regain access to your account, create a temporary account and contact Microsoft free technical support
Trusted PCs
Strictly speaking, the concept of a trusted PC is not new, as it relates more to aspects of account management. Microsoft records than to Windows. However, Windows 8 introduced features that only work on trusted PCs.
Why Make Your PC Trusted?
The main purpose of a trusted PC is to simplify a number of actions related to changing and synchronizing confidential data.
On the one hand, only between trusted Windows PCs can you sync credentials. In Windows 8, you had to manually make the PC trusted, and in Windows 10, only the first time you used a specific Microsoft account on this PC. In other words, in Windows 10, after reinstalling the system and logging in with the same Microsoft account, you no longer need to make the PC trusted.
On the other hand, from a trusted PC, you can change a number of account settings without additional authentication, although in some cases it may still be necessary.
Which PCs should be made trusted?
Obviously, this must be your personal PC. Do not trust a public or work computer.
How to make your PC trusted?
On Windows 10, go to Settings - Accounts - Your details. If you don't see the option shown in the picture, your PC is already trusted.

You can also do this on the Microsoft account settings website by signing in from this PC. Instructions.
How to remove a trusted PC?
You can only delete all trusted devices at once. Go to this page (login required).
Working with a Microsoft account on Windows
Windows 8 was the first Microsoft OS where you can create a Microsoft account and switch between it and a regular account without losing your familiar environment.
How is a Microsoft account different from a regular local account in Windows?
The Microsoft account in Windows is the most common local account that you sign in with Microsoft data. She has exactly the same profile (%UserProfile%), she can also be a member of any groups (for example, Users and Administrators), etc. You can always link any local account to a Microsoft account, or unlink it.
After system installation
On Windows 10 go to Options — Accounts and switch to a Microsoft account.

How do I switch from using a Microsoft account to a regular account?
On Windows 10 go to Options — Accounts and switch to a regular account.
Can I sign in with a Microsoft account without an internet connection?
Certainly! An internet connection is required only when you create a Microsoft account or switch to a local account.
Credentials are cached locally, just like when running in a domain environment, so an Internet connection is not required at the time of signing in.
Can I sign in to Windows without a password when using a Microsoft account?
Sync settings and apps in Windows
In my opinion, synchronization is one of the most useful Windows features, although it may be fraught with surprises.

Which applications are covered by settings sync?
Only for shops. This also applies to automatic sign-in to Microsoft applications with a company account (Mail, Skype, etc.).
Traditional Microsoft apps are not able to pull their settings from the cloud and automatically recognize that you are working with a Microsoft account (OneDrive is rather an exception).
Can sync be disabled for certain apps?
No, you can disable only groups, see the picture above
How to disable sync completely?
Use the very first switch in the picture above
Problem Diagnosis
If you're having trouble switching to or using a Microsoft account, follow these troubleshooting steps in sequence:
- Make sure you can sign in with your Microsoft account at https://account.live.com/
- Run the Microsoft Accounts troubleshooter
- IN command line running as administrator, run sfc /scannow
If you receive a message about the impossibility to restore the files, zip the \Windows\Logs\CBS\CBS.log file into an archive.
- Remove third-party firewall and antivirus.
If the problem persists, please post a report of your actions, CBS.log, and the result of the Microsoft Accounts troubleshooter in this forum thread.
Archive (outdated information)
The information in this section of the article has become outdated over time and due to numerous changes to Skype.
I decided to dedicate a separate section to Skype, because I am sure that many blog readers use it.

Versions of Skype
There are two versions of the application:
How do Skype and Microsoft accounts work together?
You can:
- link both accounts
- sign in to Skype with either of the two accounts, regardless of whether they are linked
What are the benefits of merging accounts?
You will be able to sign in to Skype with your Microsoft account. A traditional app doesn't need to remember another password, and a modern app doesn't require you to enter any credentials at all.
The general contact list will be displayed in traditional and modern applications Skype, allowing you to chat with contacts from Windows Live messenger. On the other hand, the same picture will be in the People application, which will extend all its capabilities to Skype contacts.
However, Skype cannot completely replace WLM in a number of ways. So, it is impossible to transfer files from Skype to WLM and vice versa, and group chats do not work. Also, it is not possible to link Skype and WLM contacts.
How to link a Microsoft account to a Skype account
Communication can be done in both traditional and modern applications.
Traditional Skype
The feature is available in versions 6 and above. Sign in with your Microsoft account (if you sign in to Skype automatically, sign out to see this option). You will see the window shown below.
Attention! Do not select the "Register" option if you have has already Skype account. Otherwise, your Microsoft account will be immediately linked to your new Skype account.
Modern Skype
Immediately after installation, you will be offered exactly the same choice as in the traditional application. Therefore read bold red warning above.
How to unlink a Microsoft account from a Skype account
I hope I answered all the questions that you asked in the comments to the previous post. If you have new questions, feel free to ask them so that I can complete this article. However, this offer does not mean that I undertake to resolve any issues you may have. Problems. With them you can contact Microsoft free technical support, creating a temporary account if necessary.
Good day!
There are two types of accounts in the new Windows 10 OS: local and Microsoft (the latter is highly recommended by the developers). I think you've noticed this many times before...
In general, a reasonable question that many will ask: "But why is it needed at all, why is it better than local accounting. Records?" . Below are the main advantages Microsoft account that will clear up this "fog":
- opportunity to work with your documents, address book, files, settings etc. from any computer (with Windows 10) connected to the Internet (mega-convenient!);
- possibility of using many applications: skype (network chat program), (cloud drive) , Office 365 (editor of text, tables, etc.), etc.;
- opportunity to create child accounts, and limit the time of work and consumed content (more on this);
- possibility of using app store(Microsoft Store);
- access to email from any PC and mobile gadgets connected to the Internet;
- after reinstalling the system on the computer - you can return everything to working order much faster (just enter your account information);
- if you change any parameters of your account, they will automatically change on all your PCs (and other devices) using this account (those. full synchronization over the Internet).
In general, it is very convenient?! In my opinion, Microsoft is on the path to a "personal ID/entry/profile" that can be used both on home devices and at work. Probably soon they will tie it to some bank card, and to work with your data, it will be enough to present it to any PC...
And so, okay, enough of the lyrics, let's get down to business ...
How to create a Microsoft account
In the article, I will assume that you do not have an account and never have (that is, you have not registered before in various services from Microsoft). Just part of the steps below, you may be able to skip (if, say, during registration, Microsoft reports that the profile has already been created and you can use it) ...
STEP 1
Microsoft official site:
First you need to go to the official Microsoft website and click on the "Sign in" link in the corner of the screen (it doesn't matter if you have an account or not).
Note: You can create an account from any computer! It is not necessary to sit behind the one for which you want to use it later.

Sign in (screenshot of the official website of Microsoft)
Then enter your email address (a confirmation code will be sent to it later) and click "Next".
Note! If you don't have a work email, I recommend creating one:

- if your mail has already been used in some services from Microsoft, then perhaps the service will tell you that your account has already been created earlier, and you can use it;
- if the mail has not been used anywhere, the service will offer to create a new account (as in my case on the screen below). We press the button.

STEP 3
Enter your password (this will be used to access your account), your date of birth, first name and last name. I recommend entering reliable information, because. after starting work (if there is a problem with the entrance) - you may have to confirm your data.
The three screenshots below are examples.


STEP 4
Next, you need to open your mail (which you used during registration), find an email from Microsoft and enter the code from it into the registration form. By the way, the letter will come in Russian, in general, everything is clear in it, so I won’t comment on it separately ...
An example is shown below.

STEP 5
Confirm that the registration is carried out by a person: just enter the letters and numbers presented in the small picture (captcha).

STEP 6
After creating an account, try to log in to the site. If you managed to log in (the blue circle "lit up" in the corner, as in the screenshot below), your account is ready for further use.

STEP 7
Now on the computer on which you want to work with this account, you need to open Windows settings and add it to the allowed list.
You will need administrator rights.
To do this, press the combination of buttons Win + i, open the section "Accounts -> Family & other people" , press the button (see screenshot below).


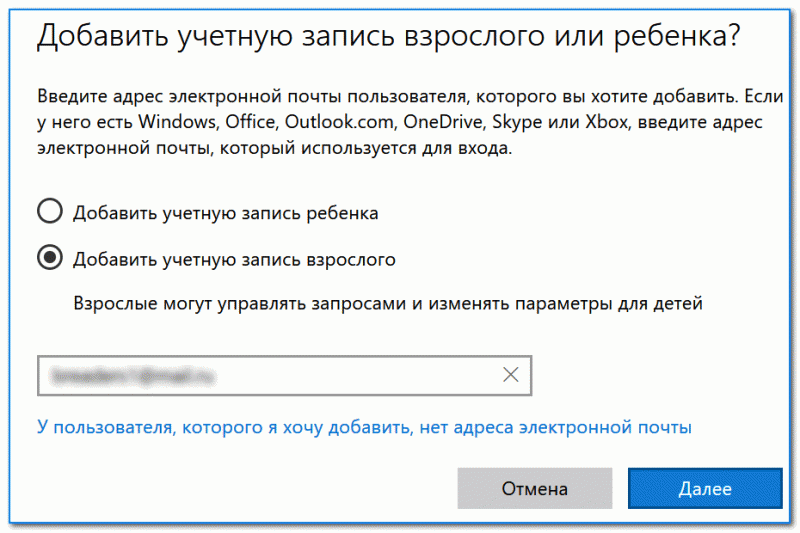
In the next step, specify the type of account: adult or child (note: restrictions may apply for a child).
After that, a message will be sent to the mail (e-mail) of the account (which we are adding) that "such and such" user can join the work (you just need to agree with the offer).
Actually, after that, under this account, you can log in on this PC and work. How to do this - I'll tell you in a couple of lines below.
STEP 8
In order to start working under a different account in Windows 10, first log out. In Windows 10, this can be done by clicking right click mouse on the START menu (see example below).

Alternative option: You can press the key combination Win+L .
STEP 9
Next, a welcome window will appear (which you always see when Windows boot). Several users will be presented in the lower left corner (depending on how many accounts you add). In general, to work with one of them - just select it and click the "Login" button (Please note that you will also need a password to enter!) .

If this is your first login with this account, you will have to wait a few minutes while the basic settings are configured and configured.

In general, after that you will see the most common desktop (as in the photo below) - you can start working!

That's all for now.
Criticism is welcome...
For security purposes, when several people use a computer, or when working at an enterprise, it would be advisable for each user to create a separate account so that everyone has access to their documents, browser settings and desktop. Such a distinction would be very useful.
Even on the same computer, several user accounts form an ordered picture for work, since by selecting the user you need when entering the OS, you will receive completely differentiated and separate privileges, files and other user objects, and when working under your account, you can immediately log out of your account and switch to another account if the user so needs. Today I will talk about how to create a Microsoft account on a PC under Windows control 10 how to change and delete it.
In the Windows 10 operating environment, there are two types of accounts: local and Microsoft. A local account is valid only on the computer on which you created it, and you can enter it without a password. A Microsoft account has advanced rights and capabilities; under it, you can log in from any computer to Windows base 10, and get access to the same applications and programs with which you worked (meaning, only Microsoft programs - Skype, OneDrive, Outlook, etc.).
To sign in to a Microsoft account, you usually need to enter your username or phone number. In this article, I will only touch on the Microsoft account, how to work with it, and how to change and delete it. Read how to create a local account.
Create a Microsoft account
Method 1 - using a form Windows settings 10
Click start button"Start" and select "Settings" from the pop-up menu.


A prerequisite for creating a Microsoft account is to first log into your account with a Microsoft account, respectively (such a pun came out, do not blame me). If you are logged in with a local account, the system will assume you are also a local user and the tools to create a new Microsoft account will not be available.
So, suppose you did just that, signed in with a Microsoft account and went to the PC settings in the desired section. Here you see two sections: "Your family" and "Other people". In the first section (namely, Your family), you can create a Microsoft account for another member of your family. They will be synchronized with Microsoft and for each of them you can set the parental control function.
The "Other people" section is for third-party accounts that do not belong to your family. They will also be controlled by Microsoft, and may be either local or online.
First, let's use the first case when you want to add an account for another member of your family. Click on the "Add family member" button.

Choose for whom you want to add an account: for a child or for an adult and enter the Email of the new user. When everything is ready, proceed further by clicking "Next".

Confirm your choice by clicking the "Confirm" button in the next window that opens.

After confirmation, an invitation will be sent to the email of the added user, which must also be confirmed. We will do this by logging into the email and agreeing to accept the invitation.
What opportunities will be available to us after being invited as a new child PC user?
- firstly, you will be able to transfer some amounts of money to your child so that they can make purchases in the Xbox and Windows stores without a credit card;
- secondly, you will be able to see what activities the children performed on the device, what applications they bought and what search terms compiled in a search engine;
- another feature that cannot be overestimated is the installation age restrictions for assessed content - TV shows, movies, videos, games and applications;
- a similar function is to set limits on the duration of work on active device for children;
- Finally, the last, but by no means less important feature is finding the child on the map if they use a smartphone based on the “tens”.
So, after the joining of the child is confirmed, the data on his account and the ability to log in will appear in the account settings menu.

Now let's add a user that doesn't belong to your family members. For it, both a local account and Microsoft account. Click on the "Add a user for this PC" button in the "Other people" section.
To add a Microsoft account, you will need to enter email address the user under which you would like to log in to the system. If this person does not have an e-mail, a mailbox will have to be created. Otherwise, all we can count on is a local account with no sync capability.
So, let's assume that we have created an e-mail (on the same Outlook.com). Enter his name on the next opened form.

Well, everything is ready! We have created the user, as evidenced by the following active form.

Now you can log into the system under his account and freely use Win 10 from the same device.
By default, when creating a new account, its powers are limited. To turn a user into an administrator, click on his name on the parameters form - the button "Change account type" will appear. Use it and change the current type to administrator.


You can log in as a new user by selecting an account from the list of active users in the Start menu and clicking on its name.

Another option is to shut down and log in with a new user and password in the login window.
Method 2 - using the control userpasswords2 command
Using a keyboard shortcut

The "User Accounts" form will open, which shows all user accounts available in the system (both local and online or, in other words, Microsoft). Let's use the "Add" button. 
As a result, an input window will appear. e-mail box new user. We saw an absolutely similar form, but made in a different design, earlier, using the first method indicated in this article.
If an account for a new user has already been created, enter the name of the corresponding e-mail box in the proposed field. If there is none at the time of registration, select the button to create a new email account.

The further procedure is not particularly original - we have already seen all this earlier, in the settings of the Windows OS, so we will not have the opportunity to meet anything new here.
How to delete a Microsoft account?
Let's use the same control userpasswords2 command described in the mechanics of creating a user account. Select the account that we want to remove and click the "Delete" button located under the list of controlled accounts.

How do I reset my Microsoft account password?
After logging in with your account, go to the new system settings menu in the "top ten", select the "Accounts" section and enter the "Login Options" subcategory in it. Click on the "Change account password" button in the middle of the form and then follow the wizard's prompts.

A Microsoft account works in all programs and services of the Redmond software giant: starting from the Xbox Live account used to sign in exclusive service game Xbox console, and ending mobile version Windows 10 installed on smartphones and mobile gadgets from Microsoft.
Now you can use all your devices that use the same authentication algorithm with the same settings and options by connecting to your Microsoft account from any of your Windows 10 gadgets or accessories. If you just don't need these features, use instead a regular local Microsoft account, without a password and synchronization.
Excel for Office 365 Word for Office 365 Outlook for Office 365 PowerPoint for Office 365 Publisher for Office 365 Access for Office 365 Excel for Office 365 for Mac Word for Office 365 for Mac Outlook for Office 365 for Mac PowerPoint for Office 365 for Mac Office 2019 for Mac Excel for the web Visio Plan 2 Word for the web Visio Professional 2019 PowerPoint for the web Visio Standard 2019 Visio Professional 2016 Visio Standard 2016 Visio Professional 2013 Visio 2013 Excel 2019 Word 2019 Outlook 2019 PowerPoint 2019 OneNote 2016 Publisher 2019 Access 2019 OneNote 2013 Project Professional 2019 Excel 2016 Excel 2019 for Mac OneNote for Mac PowerPoint 2019 for Mac Word 2019 for Mac Word 2016 Outlook 2016 PowerPoint 2016 Publisher 2016 Access 2016 Project Professional 2016 Excel 2013 Office for Business Office 365 Admin Word 2013 Outlook 2013 Office 365 Home Office 365 Small Business PowerPoint 2013 Office 365 Small Business - Admin Publisher 2013 Access 2013 PowerPoint 2016 for Mac OneNote for the web Project Online Office 2013 Office 365 for Mac Office.com Outlook 2019 for Mac Project Online Desktop Client Project Professional 2013 Project Standard 2013 Project Standard 2016 Project Standard 2019 Less
Signing in to Office allows you to create and edit files and share general access to them. After signing in, you are automatically signed in to online services such as Office Online or OneDrive. Account or password recovery
Office for PC
If you haven't opened the file yet or office document, launch any application such as Word or Excel and open an existing file or create a new one.
Select File > Account(or Office account in Outlook). Click the button To come in if you are not already signed in.
Office for Mac
Open any Office application, for example Word, and press Entrance. If you are already editing the file, click File > Create from Template... > Entrance.
Note: If you're using OneNote, select OneNote from the menu above and press the button To come in.
In the sign in window, enter your Office email address and password. This can be a personal Microsoft account associated with Office, or a work or school account.

office online

Office mobile apps
For iPhone and iPad:
Open the Office application. On the screen Account select item Entrance.
In the sign in window, enter your Office email address and password. This can be a personal Microsoft account associated with Office, or a work or school account.

You can use your Microsoft account with almost any service or device using the same set of credentials, which is represented by your email address, profile information you choose, and billing information that you can use to make payments.
In addition, any account is supported by privacy settings, which are represented by a unique password that only the author can use.
The account will allow its owner to use various programs (for example, Skype), subscriptions (Office 365), buy interesting games, download your favorite music, edit selected photos and videos, and enjoy the benefits of OneDrive online storage.
The main advantage of such an application is that you can edit individual settings, as well as view address book and documents from any device, since it is unified for any gadgets.
This is what a Microsoft account looks like.
Create a Microsoft account
In order to create a Microsoft account, just follow the step-by-step illustrated instructions.
Microsoft account windows registration 8 is represented by an algorithm for sequential actions of a PC user and a global network.
- Initially, you need to activate the panel for changing computer settings. You will see a window like this:
- After clicking on the selected area, you will see the following image in which you need to select the top row.
- During account creation, the user will also be offered a local account, although for most consumers the first option is more acceptable.
It allows you to work normally with the updated operating system, sync your Windows 8 settings, and use the Windows Live suite of web apps that was originally provided software from the creators of the product.
Unfortunately, a local account does not support such options. An account is your profile in the system, thanks to which you can operate any interconnected applications.
Application for free and free communication with family and friends
One of the most acceptable ways to store files in the SkyDrive cloud service:
Receive or send messages using the Hotmail mail system:
Take advantage of MSN's largest information portal, Xbox Live online game service, store various applications for windows phone:
The benefits of an account are clear.
So, we have selected the line "ADD USER".
- After that, the user needs to enter a name, their email address or the address of an additional mailbox, which was previously created specifically for this purpose.
After these simple manipulations, a captcha is entered, which confirms that the actions are performed by a person, and not by a robot, and the "APPLY" button is pressed. Visually, the process itself looks like this.
- Next, a window pops up with the following message, in which you need to confirm that the selected email address belongs to you. To do this, go to your mailbox, in the "INCOMING MESSAGES" folder.
- In this folder you will see a letter confirming your account, in which you need to enter a code, sent via SMS to your phone number.
After pressing the "CONFIRM" button, you will be informed about the successful completion of the first stage of the Microsoft account registration operation, after which you can proceed to the settings of the account and computer interface parameters.
Note! On his PC, the user should go to the "SETTINGS" tab and select the "CHANGE COMPUTER SETTINGS" option to configure the interface of his account, use accessibility, sync settings, create a homegroup, upload a pre-selected profile photo, and activate the available updates center, which will later optimize the application experience.
So, we got acquainted with step by step instructions how to create a microsoft account.
Each user must take certain security measures that will protect you from the fraudulent activities of homegrown hackers.
You need to fill in the fields with confidential data on the electronic form, with which you confirm yourself as the copyright holder. As a rule, a password is used for this, it is represented by an eight-digit set of letters and numbers.
In addition, the system will analyze the level of complexity of the password and offer you to replace it with a more complex one. The user also needs to answer a security question.
As a rule, the questions in this case are the same as in various accounts. social networks(mother's maiden name, pet's name, etc.). After that, the user enters his current phone number and the address of the functioning mailbox, which is used most often, into the line.
These precautions will not only protect you from illegal actions of intruders, but also help you recover your password if it is lost. For example, you forgot your password and you urgently need to log in to a system that is not accessible.
The program will prompt you to enter your phone number or mailbox address, which in a few seconds will receive a code to unlock your account. The security and privacy settings look like this:
How to create a microsoft account
How to create a Microsoft account (Microsoft) - detailed instructions