Windows 10 problems and solutions. Checking your computer for viruses
Read also
Our article will tell you about a critical error when loading Windows 10 - “Your PC has encountered a problem and needs to restart.” You will learn about the main causes of this problem, as well as all possible ways to solve this problem.
In the Windows 10 operating system, Microsoft has updated the critical error screen (Blue Screen of Death). Now the PC does not reboot a second after the error message is displayed, but asks the user for permission to perform the corresponding operation and indicates a specific error code. Thanks to this, the PC user can get acquainted with the cause of the problem and even quickly find a method to fix the problem.
Blue Screen of Death in Windows 10
What is this error?
"Your PC has encountered a problem and needs to restart" is a message that a user receives due to critical failures in Windows 10. The error occurs for various reasons and can be a single bug or a permanent problem.
Unlike previous versions Windows 10 also displays a QR code on the blue screen, which includes a direct link to a page on the Microsoft website containing a description of the problem and possible solutions. Thanks to this, if a person who is faced with a corresponding problem has a modern smartphone, he can quickly find out about the malfunction that has arisen on his computer and solve it.
How to fix the problem
In most cases from blue screen Death can be eliminated by simply restarting the computer. This can be done in several ways:
- press the “Reset” button on the system unit (suitable for desktops);
- the hard way is to pull out the cord (for desktops);
- hold the Power button for 3-5 seconds (for desktops and laptops);
- The hard way is to remove the battery (for laptops).
If the system booted successfully and after a day of use the critical error no longer appeared, then most likely this was an isolated case and no other measures need to be taken.
What to do if the blue screen of death occurs again
There can be many reasons for the critical error “There is a problem with your PC.” Its appearance may be associated with both technical malfunctions of the hardware and the software part of the OS.
If you have errors like "Critical process died"(failure of a service important for the functioning of the system) or "KERNEL_SECURITY_CHECK_FILURE"(error when checking the security/integrity of the OS kernel) is software, then fixing them in most cases is not difficult. These are the two most common bugs.
To do this, first of all, you should check the system antivirus. You can use the one built into Windows 10 or install another one, but first disable the first one.
Step two: launch System Restore to the last points. To return the OS to an earlier state:
- click on “Win+S”;
- enter “System Restore” and launch the application;
- follow the instructions that the program offers;
- from the table, select the date as of which no errors were noticed.
- Another variant: restore system files with help special utility. To do this, you need to launch the command line as an administrator and run the command “ sfc /scannow". If the utility asks you anything during the verification process, you must agree.
- You can also try update drivers devices. Checking and updating is done through the “Device Manager”. You can also use targeted utilities such as DriverPack Solution.
- If errors still occur after following these steps, then it is most likely a hardware problem. First you need to check the integrity file system, for which we enter “ chkdsk /f" in the command line and agree to everything that the utility suggests.
- If that doesn't help either, there's probably a problem with RAM. She needs to be checked Memtest86, which can be downloaded without problems from the official resource. The user will need to create bootable USB flash drive with this program and check the RAM for read/write errors. There are a lot of instructions on how to do this on the Internet. If the RAM is damaged, you will have to buy new modules.
Conclusion
The problem with the notification “Your PC has encountered a problem and needs to be restarted” is in most cases isolated, but it doesn’t hurt to check the integrity of your system files. To avoid errors Critical process died or KERNEL_SECURITY_CHECK_FILURE, you should always use new ones Windows updates 10 and follow current versions antivirus.
Sometimes it happens that users' computers experience problems after last update Windows 10. The operating system has performed a so-called “major” update to Windows 10. After loading the system, the user discovers that as a result of installing the update, some functionality of the system has changed, some components do not function as usual.
I encountered some problems on my computer after updating operating system to Windows 10 1803 (Windows 10 April 2018 Update). So I decided to write this article to tell you how you can fix some of the problems. These situations may not occur on all computers, and you may not have to do anything.
Immediately after the official release of the big Windows updates 10, I performed the update on my computers. About different ways to install the update to the new one Windows versions 10 read more. The installation of the system update went without any problems.
As a result of applying updates, Microsoft adds or removes some functionality in the OS and changes settings. In this article we will look at some situations that I encountered on my computer.
We will touch on ways to solve problems that arose after the last system update:
- The hidden recovery partition gets a drive letter in File Explorer.
- The microphone does not work in applications.
- The camera does not work in applications.
A recovery section has appeared in Explorer
Immediately after updating the computer, I opened Explorer and saw that there was new disk 450 MB in size. The disk properties indicate that it is an "Original Equipment Manufacturer (OEM) Partition".
It is strange that this partition appeared on the desktop PC, but on my two laptops the additional partition did not appear. A similar section on desktop computer, unlike a laptop (which would be logical), in principle there should not be, since system unit was assembled from individual parts rather than purchased assembled from a PC manufacturer.
After opening Disk Management, I realized that this is a recovery partition that is created on the hard drive with a partition table during the installation of the operating system. After updating Windows 10, the system for some reason assigned a letter to this partition, made the disk open, and named it “Original Equipment Manufacturer (OEM) Partition.”
This is a service hidden partition, so it would be correct to hide the disk partition in Explorer, because it is completely unnecessary there. In the article I have already described in detail how you can hide a disk partition different ways. Please note that you cannot remove the letter of the problematic drive from the Disk Management snap-in.
I’ll duplicate the working method here:
- Run Command Prompt as Administrator. Read how to start Command Prompt on Windows
- Enter the commands sequentially (after entering each command, press the “Enter” key):
- The command line interpreter window will display all the drives connected to this computer. To select the right drive, refer to the drive letter and drive size that are displayed in Explorer.
- Enter the command (volume number is the disk number displayed in the command line, opposite the drive letter):
- Select the drive letter assigned to the recovery partition on your computer. In this case, the letter “D” is selected, you may have another letter. Run the command:
Close the command prompt. Open File Explorer and make sure that the recovery partition has disappeared from the Devices and Drives section.
The microphone does not work in installed programs on the computer
The next problem was the microphone not working. This problem was discovered by accident. I installed it on my wife's smartphone Skype program. Then I decided to demonstrate how the application works: I called from another room from Skype on my computer to Skype on my mobile phone.
It turned out that they couldn’t hear me, but I could hear everything. Before the Windows 10 update, the microphone in Skype program worked normally.
During the conversation, a message in Skype indicated that the program could not detect the sound card. I checked sound settings in the system and in the program: everything is configured as expected. The microphone indicator works, I can hear myself through the speakers, but nothing in the program works.
First I ran the system one, but the tool did not identify any problems with the sound. Then I reinstalled the audio driver, but that didn't help. An Internet search turned up nothing. I was once again convinced that on the computer and in the program correct settings. In Windows Settings, in the “Sound” section, the microphone works normally, but for some reason Skype cannot detect the sound card.
To test the microphone in another program, I launched the program Camtasia Studio and tried to record a short video. The program immediately warned that there were problems with sound on the computer. It turns out that third party applications nothing to do with it, the problem arose in the operating system. Meanwhile, the microphone in Windows works.
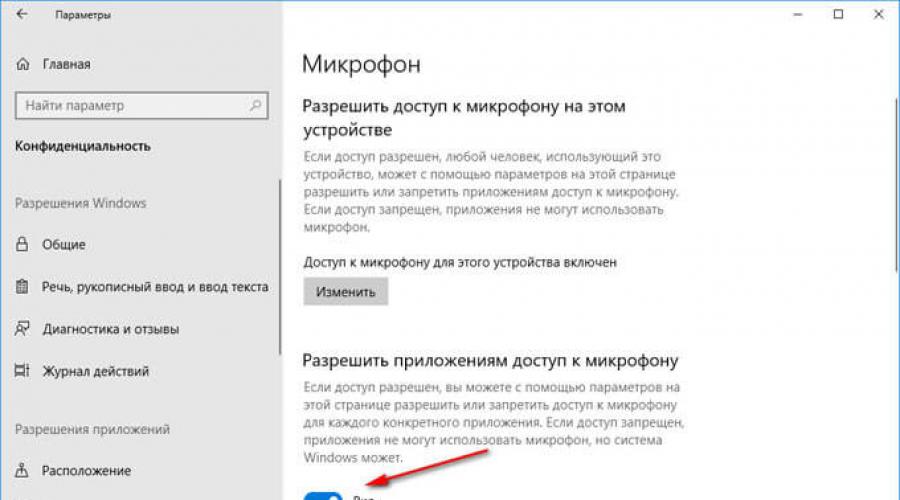
I started looking at all the settings Windows Settings 10. The key to solving the problem lay in the “Confidentiality” section.
Under Privacy, under Application Permissions, select Microphone, and then change some settings:
- Check the Allow microphone access on this device option to ensure microphone access is enabled.
- In the “Allow microphone access” setting, you need to move the switch to the “On” position.

- In the “Select apps that can access your microphone” section, find Skype (or another program) and slide the switch to the “On” position.

After this, the problem of the microphone not working in programs installed on the computer was solved. It turns out that the operating system, after updating to a new version, disabled access to the microphone for programs in order to protect privacy.
The camera does not work in programs on the computer
If a problem with the camera's operation arose after updating the system, you can solve it using the method described above.
Follow these steps:
- From the Start menu, enter the Settings app.
- Open the “Privacy” section, in the “Application Permissions” setting, open the “Camera” setting.
- Make sure camera access is enabled on this computer. In the Allow apps to access the camera option, slide the switch to the On position.
- In the “Select applications that can access the camera” setting, allow the necessary programs to access the camera.

Conclusions of the article
If problems occur after the latest Windows 10 update, the user can change some system settings. In particular, you can hide the recovery partition from Explorer and solve the problem of non-working devices: microphone and camera.
This article contains the most common mistakes when Windows startup 10, as well as ways to eliminate them. We hope this information will make life a little easier for those who have switched to new version system and suddenly found himself between a rock and a hard place.
1. Windows 10: “The computer is not starting correctly”
The first common problem when starting Windows 10 is that the system reports a certain critical error (CRITICAL_PROCESS_DIED, INACCESSIBLE_BOOT_DEVICE), and then displays a blue screen " Automatic recovery» with text .
 Automatic recovery: the computer did not start correctly
 The cause of this error, in most cases, is damage and removal system files or entries in the register. This may be caused by installing and uninstalling programs, or by antivirus programs or Windows registry cleaning utilities.
The solution to the problem is to repair files and registry entries that are damaged:
- Click on the button Extra options on blue screen, select Troubleshooting> Extra options > Boot Options.
- Click Reboot.
- In the window Boot Options press the F6 key or the number 6 on numeric keypad to launch safe mode with command line support.
- The computer will reboot into safe mode, and the command prompt will automatically open. In it enter:
The computer will restart and after that Windows will start in normal mode.
2. Windows 10 does not load beyond the logo
Another known problem is that the system boots all the way to the Windows logo, after which the computer randomly shuts down. The reason for this error is also damage to system files, however, unlike the first case, the damage is so serious that the system cannot start the recovery itself.
In this case, you will have to create a rescue disk Windows recovery on another Windows 10 PC:
- In the panel Windows management 10 find and select Recovery > Creating a recovery disc.
- In the window that appears, set the parameter Execute backup system files to recovery disk and press Dalley.
- Connect an empty USB drive to your computer. Select it in the recovery disk creation window and click Next > Create.Wait until the files are copied and press Ready.
- Remove the USB drive from your computer, connect it to the one that won't run Windows 10, and enable booting from it in the BIOS.
- The Windows Recovery Environment will launch. You need to select Restoring a system image, or point Command line , and then enter the commands from the instructions for solving the first problem.
 Windows Recovery Environment
 You can also run the system recovery environment from the disk you installed Windows from. To do this, you need to boot from the installation disk, in the bootloader instead Install press System Restore. In the menu that appears, select Troubleshooting> Extra options. The same options window above will open.
After recovery, the computer will restart. Reset the BIOS to boot from hard drive, and the system should start correctly.
3. Errors “Boot Failure” and “An operating system wasn’t found”
In some cases, when starting Windows 10, instead of loading the operating system, a black screen appears with one of two errors:
- Boot failure. Reboot and Select Proper Boot device or insert boot media in selected boot device.
- An operating system wasn’t found. Try disconnecting any drives that don’t contain an operating system. Press Ctrl+Alt+Del to restart.
There can also be two reasons for this error:
- Incorrect boot device order in BIOS or UEFI. Make sure you are booting from the exact drive where Windows 10 is installed.
- Damage to the system bootloader. In this case you will also need installation disk or a Windows 10 emergency recovery disk. After booting from it, in the recovery environment you need to select Startup Recovery and let the bootloader files be overwritten.
The problem may also be hardware related. damage to the hard the disk from which you are loading.
 Error Boot Failure
4. Windows 10 won't start: black screen
A common error when starting Windows 10 is a black screen with no signs of loading the desktop, with or without the cursor frozen on the screen. This often happens as a result of incorrect installation of any drivers: after rebooting, the computer works, but the OS does not load.

In most cases, the solution to the problem lies in a system rollback. To do this, you will also need an installation disk or a Windows 10 emergency recovery disk. After booting from it, in the recovery environment you can try selecting System Restore.
This will roll back the system to the state before the problem occurred. The system will prompt you to select a restore point to which to rollback, and after confirmation it will perform it. As a rule, after a reboot the black screen disappears.

5. Windows 10 takes a long time to load when turned on
There is a situation when Windows 10 does not load, the waiting icon is spinning, and that’s it. In fact, most likely, nothing bad is happening - the system is simply installing the updates that it downloaded the last time you used the computer.
In this situation, the best thing to do is just wait. This condition may last for several hours depending on the number and volume of downloaded updates. It is recommended not to turn off the computer, but to leave it in the boot state for 1-2 hours.
To prevent this error from happening again when starting Windows 10, you can set your computer to update on a schedule, and the system will not download updates without your knowledge. Read about how to edit update policies in our.
Looks like it came out just recently new Windows 10, which is why problems still arise with it. Naturally, no matter what site you open, they praise the operating system in every possible way. But in fact, it still needs to be finished and finished. Not for nothing. Incoming information is analyzed in every possible way for possible errors. This is not a quick task, because while you are organizing the flow of random desktop images, it will take a lot of effort. So we still need to draw conclusions based on these systematized data.
However, any operating system has certain problems, only in Windows 10 they are the most glaring, since it is on everyone’s lips.
Activation
Since many people have decided to upgrade, typical problems with . In such situations, notifications are received:
- This product key does not work.
- There is a problem with the network.
- A security error has occurred.
Licensing service software reported that an error occurred while checking the license.

In this case, it helps to overcome the problems:
- Open the Start menu.
- Select Options.
- Then enable Update and Security.
- Go to the Activation item.
- Subsequent selection Go to store.
Why do you need to go to the store? To check if there is a license available there for of this computer. I wonder if such a license is not there. So, you'll have to buy it. Also, problems can be caused by the Windows 10 firewall, which simply does not allow activation to complete.
Chrome
Chrome on Windows 10 is also disappointing with its performance. Various slowdowns and freezes were detected when watching streaming video. The program requires so many resources, what? having accepted them, he cannot cope with them. This results in numerous crashes and freezes. Naturally, few people like this, because no one particularly likes to read. But watching videos is everything for us. But we must believe in the best that Google employees will adapt this application to the new development from Microsoft.

Favorites are missing
The new product from Windows 10 called Edge works much better than the one everyone is used to and unfortunate Internet Explorer. Everything is very good, you can even leave your notes directly on the pages. But the user will not find Favorites. To do this, you will need to go into the settings or install another browser. The Favorites menu contains pages that the user visits very often. This solution helps you avoid wasting time typing the same characters in a search engine. It is very convenient to go to the place you need with a couple of mouse clicks. Unfortunately, Edge's access to this useful option difficult. With what it can be connected? Experiments, experiments and more experiments on users.
Folders in mail
It's good when you receive one letter a week. But what if there is a whole stream of them from different senders? Of course, we need to systematize all this so that we can easily find the ends later. But you can’t do this in Windows 10. Yes, you can't make folders within folders. After all, the easiest way is to dump correspondence from one sender into the appropriate folder. After this, it is easy to find the letter at least by sender type. Now this opportunity is lost, so you will have to suffer.

Lost wifi
So, with the latest updates, wifi began to disappear chronically. Rumor has it that this is due to network sharing. Sometimes a reboot helps, but it’s better to completely disable this ill-fated general access so that the Internet stops suddenly disappearing. After all, it is very problematic when the computer periodically falls off the network. It's good if you don't need Internet access. But if you watch a video, it may freeze at the most interesting place, and there is no limit to the irritation that will be experienced.

Incompatibility
The most surprising and unpleasant thing about Windows 10 is its exceptional newness. That is, the operating system is so new that it does not have all the drivers for normal operation of the equipment. For example, owners NVidia video cards may notice extremely unpleasant flickering on the monitor. To resolve this disgusting situation, you need to roll back to previous versions of the drivers when everything worked fine.
Of course, it’s sad to hear all this, but there is always a possibility
Many users experience some malfunctions and malfunctions in their computer device after updating Windows 10. The main ones are the following:
- Windows 10 does not boot for a long time.
- The system does not want to start and work.
- Black screen.
- A blue screen with errors appears.
To eliminate them, it is necessary to understand the sources of operational failures and possible ways getting rid of these sources.
If the system does not start after the latest Windows 10 update, remember how it behaved before shutting down or rebooting. Perhaps some program was downloaded, or the error appeared after connecting a new device and virus software. In the process of troubleshooting such problems, the system may improve or deteriorate its performance. Therefore, it is necessary to be prepared to restore it and return it to its original, working condition.
The system does not start or takes a very long time to load
The system takes a long time to boot or does not boot at all - this problem occurs at startup large quantity additional programs or malicious software connecting to the process. Therefore, you immediately need to check your computer for viruses and prepare electronic media with installation Windows files 10.
To solve the problem, take the following steps:
- Using the media, we boot the device in safe mode. In the menu, select the source from which the system modules and drivers needed for your computer will be loaded.
- Open Task Manager. This can be done using the Ctrl + Shift + Esc keys. Find the Startup tab.
- Startup contains the entire list of applications that can be loaded when the system starts. It is necessary to select from among them the minimum that is needed for normal operation of the computer, and disable the rest.
These simple steps will help reduce system boot time and improve system startup.
Working with safe mode is useful when removing viruses, unnecessary programs, fixing driver errors, activating an administrator account.
In addition, you can optimize and defragment the disk:
- Click on Start.
- Select the Computer tab, drive C.
- In the window that opens, find the Properties item and click the Optimize button.
Taking advantage CCleaner program, you can remove all junk files from the disk and erroneous keys from the registry.
If Windows 10 does not work after updating, restore the system to an earlier working state. This method is only suitable if the computer creates system rollback points or restore points. To do this, you need to carry out the following procedure:
- Reboot your system. Once it turns on, press F8.
- The recovery menu appears.
- Go to Diagnostics, then Advanced Settings.
- Find the Recovery tab.
- Follow the instructions and select from available list Restore point to the rollback state.
- Restart your computer. Current version the operating system is removed.
Blue screen appears
CRITICAL_PROCESS_DIED. The error code is accompanied by the warning “The computer did not start correctly” or “Windows did not boot correctly.”
In such cases, a regular reboot helps.
INACCESSIBLE_BOOT_DEVICE. The error may appear after updating to Windows 10 or BIOS motherboard, when restarting the computer after a system rollback, partitioning of the hard drive, if files are damaged.

The easiest way to resolve this error is:
- In the Automatic Repair window, select Advanced options.
- Among the list of parameters, you need to find Boot options - Restart.
- After the system restarts, press the F6 button to reboot into Safe Mode using the Command Prompt.
- Enter the command phrases one by one:
- sfc /scannow;
- dism /Online /Cleanup-Image /RestoreHealth;
- shutdown-r.
System files will be scanned and restored if they were damaged.
Black screen appears
There are malfunctions in which it does not turn on computer device, and the screen after the update is black. This problem occurs when video card drivers are installed incorrectly, exiting sleep mode, removing a virus, or downloading updates.
The screen can have 2 types:
- With a mouse cursor.
- No cursor, solid black display.
In the first case, the screen can have not only a mouse cursor, but also a rotating wheel. What does this mean and what to do in such cases?
Software glitch
This happens when the system booted only for the first time before Windows 10, when you turned off and then turned on again or rebooted the computer. Software glitch occurs as a result of an update.
To restore the system, you need to update it again.
System conflict with primary drivers
Previously installed drivers may create a conflict with the system, so to resolve this issue, do the following:
- Find Start - Control Panel. Under Power Options, click System Settings.
- In Shutdown Options, uncheck the Enable box quick start(recommended).
- Save your settings.
- Click on Start. Find the Computer tab.
- Right-click Properties and do the following: Hardware - Device Manager - Video Adapters.
- Find your video card and Update drivers. Drivers are installed either in automatic mode from the Internet, or from special software.
In the second case, when the screen is only black without a cursor, start the system in safe mode:
- Press and hold on your keyboard Shift key, continuously click on the F8 button to open Safe Mode. This system launch is simple, but does not always work.
- In the window that opens, find the following sections: Diagnostics - Additional parameters - Command line.
- Type bcdedit /set (globalsettings) advancedoptions true.
- Click the Enter button.
- In the newly opened window, click Continue. The download continues.
- In the new window, select Enable Safe Mode.
- Press Enter.

Correcting virus activity
If the computer does not boot, the screen is solid black, then most likely the system has been damaged by malicious virus software. Try the simplest method.
Boot Windows 10 in safe mode, scan with an antivirus application and delete infected files.
If viruses have damaged the explorer.exe file, which is responsible for the operation of the graphical interface, you can perform the following operation:
- Press Ctrl+Alt+Del keys simultaneously or open the Start menu.
- Go to Task Manager, then Run new task.
- Write explorer.exe in the line and run the task.
- Through the Run line, pressing the Win + R buttons, enter the regedit command.
- Expand the HKLM branch.
- Go to the Software section.
- Next, click the Microsoft - Windows NT - Current Version tabs individually.
- Open the Winlogon folder, then Shell and double click.
- Change the value to explorer.exe.
- Save your settings.
Getting rid of system malfunctions after upgrading to Windows 10 is not particularly difficult and does not require technical knowledge and skills from the user. After completing one of the operational procedures, the system will boot without delays or failures. Your computer will work better.