How to enter Windows 7 system restore. One of the reasons why system restore does not work

Good day!
Whatever it was reliable Windows- sometimes you still have to face that the system refuses to boot (for example, the same one pops up), slows down, buggy (note: all sorts of errors pop up) etc.
Many users solve such problems by simply reinstalling Windows (the method is reliable, but rather long and problematic) ... Meanwhile, in most cases, you can quickly fix the system using Windows recovery(It's good that such a function is in the OS itself)!
In this article I want to consider several options for restoring Windows 7.
Note! The article does not address issues related to computer hardware problems. For example, if after turning on the PC nothing happens at all (note: not one LED is on, the sound of the cooler is not heard, etc.), then this article will not help you ...
1. How to roll back the system to its previous state (if Windows has booted)
If Windows has booted up, then this is already half the battle :).
1.1. With the help of special recovery wizard
By default, Windows has system checkpointing enabled. For example, you install new driver or some program (which can affect the operation of the system as a whole) - then "smart" Windows creates a point (that is, it remembers all system settings, saves drivers, a copy of the registry, etc.). And if after installing new software (note: or during a virus attack) problems arise, then you can always return everything back!
To start recovery mode - open the START menu and enter “recovery” in the search bar, then you will see the desired link (see screenshot 1). Or in the START menu there is an alternative link (option): Start/Standard/Utilities/System Restore.

Screenshot 1. Starting Windows 7 recovery
Note! OS recovery does not affect documents, pictures, personal files, etc. Recently installed drivers and programs can be removed. The registration and activation of some software may also “fly off” (at least for the one that was activated, installed after creating a checkpoint, with which the PC will be restored).

Then comes the most crucial moment: you need to choose a point to which we will roll back the system. You need to choose the point at which your Windows worked as expected, without errors and failures (it is most convenient to navigate by dates).
Note! Also check the box " Show other restore points". For each restore point, you can see which programs it will affect - for this there is a button " Finding affected programs«.
When you select a restore point - just click "Next".

After that, you will only have the last thing left - to confirm the restoration of the OS (as in screenshot 4). By the way, when restoring the system, the computer will be restarted, so save all the data that you are currently working with!

After restarting the PC, Windows will "roll back" to the desired restore point. In many cases, thanks to such a simple procedure, many problems can be avoided: various screen locks, problems with drivers, viruses, etc.
1.2. Using the AVZ utility
An excellent program that does not even need to be installed: just extract from the archive and run the executable file. It can not only scan your PC for viruses, but also restore many settings and settings in Windows. By the way, the utility works in all popular Windows: 7, 8, 10 (32/64 bits).

Screen 4.1. AVZ: file/restore.
By the way, the list of recoverable settings and parameters is quite large (see the screenshot below):
- restore launch parameters of exe, com, pif files;
- reset Internet Explorer protocol settings;
- recovery start page Internet browser explorer;
- reset Internet Explorer search settings;
- remove all restrictions for the current user;
- restore explorer settings;
- removal of system process debuggers;
- unlocking: task manager, system registry;
- cleaning hosts file(responsible for network settings);
- removing static routes, etc.

2. How to repair Windows 7 if it won't boot
The case is difficult, but we will fix it :).
Most often, the problem of loading Windows 7 is associated with damage to the OS loader, disruption of the MBR. To return the system to normal operation - you need to restore them. More on that below...
2.1. Computer Troubleshooting / Last Known Good Configuration
Windows 7 is quite a "smart" system (at least compared to previous Windows). If you have not deleted hidden sections (and many do not even look and do not see them) and your system is not “Start” or “Initial” (in which these functions are often not available), then if you press several times when turning on the computer F8 key, you will see additional download options .
The bottom line is that among the boot options there are two that will help restore the system:
- first of all try the item " Last Known Good Configuration". Windows 7 remembers and saves data about the last time the computer was turned on, when everything worked as expected and the system was booted;
- if the previous option did not help - try running " Troubleshooting your computer«.

2.2. Recovery using a bootable flash drive
If nothing happened and the system still does not work- then to further restore Windows we will need an installation flash drive or disk with Windows 7 (with which, for example, this OS was installed). If it is not there, I recommend this note, it tells how to create it:
To boot from this bootable flash drive(disk) - it is necessary to configure the BIOS accordingly (details on BIOS setup- ), or when turning on the laptop (PC), select boot device. Also, how to boot from a USB flash drive (and how to create it) is described in detail in the article about installing Windows 7 - (especially since the first step during recovery is similar to the installation one :)).
Window Windows installation 7 appeared ... What's next?

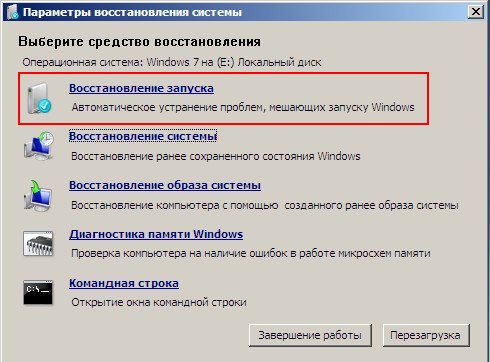
In the next step, we choose not to install Windows, but to restore! This link is located in the lower left corner of the window (as in screenshot 7).

After you follow this link, the computer will search for the OS that was previously installed for some time. After that, you will see a list of Windows 7 OS that you can try to restore (usually there is one system). Choose desired system and click " Further"(See screen 8).

- Launch Recovery- boot recovery Windows records(MBR). In many cases, if the problem was with the bootloader, after the work of such a wizard, the system starts to boot normally;
- System Restore- rollback of the system using checkpoints (discussed in the first part of the article). By the way, such points can be created not only by the system itself in auto mode, but also manually by the user;
- Restoring a system image- this feature will help restore Windows from a disk image (if you have one, of course :));
- Memory diagnostics- testing and verification random access memory (useful option, but not within the scope of this article);
- Command line- will help to carry out manual recovery(for advanced users. By the way, we will also partially touch on it in this article).

Consider the steps in order to help return the OS to its previous state ...
2.2.1. Launch Recovery
See Screen 9
This is the first thing I recommend to start with. After starting this wizard, you will see a window for searching for problems (as in screenshot 10). After a certain time, the wizard will report whether problems are found and fixed. If your problem is not resolved, move on to the next recovery option.

2.2.2. Restoring a Previously Saved Windows State
See Screen 9
Those. rollback of the system to a restore point, as in the first part of the article. Only there we ran this wizard in Windows itself, and now using a bootable USB flash drive.
In principle, after choosing the bottom option, all actions will be standard, as if you launched the wizard in Windows itself (the only thing is that the graphics will be in the classic Windows style).
The first point - just agree with the wizard and click "Next".

Screen 11. Recovery Wizard (1)

Screen 12. Recovery point selected - Recovery Wizard (2)
Then confirm your intention to restore the system and wait. After restarting the computer (laptop) - check the system to see if it boots.

Screen 13. Warning - Recovery Wizard (3)
If the restore points did not help - the last thing left is to rely on command line:).
2.2.3. Recovery via command line
![]()
See Screen 9
Command line- there is a command line, there is not much to comment on here. After the “black window” appears, enter the two commands below in sequence.
To restore the MBR: you need to enter the command Bootrec.exe /FixMbr and press ENTER.
To restore the bootloader: you need to enter the command Bootrec.exe /FixBoot and press ENTER.
By the way, note that on the command line, after executing your command, the answer is reported. So, for both commands above, the answer should be: “ Operation completed successfully". If you have a different answer from this, then the bootloader was not restored ...
PS
If you do not have restore points - do not despair, sometimes you can restore the system like this:.
That's all for me, good luck to everyone and a speedy recovery!For additions on the topic - thanks in advance.
class="eliadunit">
Record ID: 32 does not exist!
How to recover Windows system 7 on a laptop, a black screen comes out on boot, the recovery environment does not work, I deleted all hidden partitions, there is no original disk with Windows 7. I spent a lot of time, tell me what to do now or at least how to insure myself against such situations in the future, preferably without using paid programs Reserve copy data. Ilya.
How to restore the Windows 7 system
Windows 7 has in its arsenal a fairly powerful and good tool-> recovery environment, which is created automatically during installation Windows 7 in a hidden section and contains five other tools that solve numerous malfunctions and problems.
- Note: If you learn how to use Windows 7 recovery tools correctly, and this is not difficult, then in principle you can do without additional and paid data backup programs.
You can start the recovery tool by pressing the F-8 button on the keyboard immediately after starting the computer. After that, a menu of Additional boot options will open in front of you: Troubleshoot your computer, then Safe mode, Safe Mode with Boot network drivers etc.
Let's choose the first-> Troubleshooting your computer,


Required digression: When installing Windows 7 Professional and Windows 7 Ultimate, the recovery environment partition is created automatically and is located in a separate, hidden partition of the hard drive, it has only 100 MB of capacity, and it is also used to encrypt the drive using the BitLocker function. You can see it My Computer-> Management-> Disk Management. In no case can you delete this partition, otherwise you will not be able to boot the System Recovery Environment.

What to do if you do not have a partition with the recovery environment and when you press the F-8 button, in the Advanced boot options menu, the Troubleshoot your computer item does not appear? How then to restore the Windows 7 system? The installation disk with the Windows 7 operating system can save here. You can start the recovery tool by booting from the original installation disk Windows 7 by selecting the item at the very beginning System Restore,

If you don’t have a Windows 7 installation disc, Windows 7 Recovery Disc will help, read on to learn how to create one.
Note: On the screenshot, you can see another hidden partition, with a capacity of 9.02 GB, this is a hidden recovery partition with the factory settings of my laptop, you can have it more or less. It is also better not to delete it, if necessary, you can always restore Windows 7 from it.

So we are in the System Restore Options menu, select the first one:
Launch Recovery-> there will be an analysis of faults that interfere with the normal loading of Windows 7 and their further correction for normal loading and functioning operating system. In the process, we may be warned that problems have been found in the boot options, click Fix and restart.


System Restore-> using this function, we can select a previously created system restore point, if we have it enabled, and roll back to the time when our Windows 7 worked fine and loaded, everything is simple here.


-> this is the tool I personally use, with skillful use it can be replaced paid programs on data backup, if interested, read on.

Why is he good? It will help when you don't have the original Windows 7 installation disc and you have deleted the hidden partition with the factory settings of your laptop, but that's not all.
Sometimes there are situations when, for various reasons or due to the actions of a virus, you will not be able to load the operating system at all, or many people ask How to restore Windows 7 system, even if the menu with Additional boot options is also unavailable. Reinstall the operating system again?
Therefore, immediately after installing Windows 7 on your laptop or computer, we create using this function-> Restoring a system image, archive image of our Windows 7 on the hard drive, save it. It is mandatory to create a Windows 7 Recovery Disc (read below), it will help you use the System Image if the Advanced Boot Options menu does not load.
Let's go to Start->Control Panel->Archiving computer data.

Choose Creating a system image

then choose local disk, on which we will store the archive of the system. In my case, the Local Disk (E :), if you have system block some hard drives, then of course it is better to place the backup on the hard drive where the operating system is not installed.


Note: You may notice that I have two operating systems installed on my laptop, so the backup program selected two Local drives.

Click Archive and the process of creating an archive with our Windows 7 will begin.
Created, it will look like this.

Now, you can deploy the archive with Windows 7 to your computer, if necessary, in 20-30 minutes. It would be better if you copy the archive with the system additionally to a portable HDD, this way you will protect yourself doubly.
Let's pretend that we can't start Windows 7 and deploy the backup we created, let's do it together.
We launch Windows 7 Recovery Tool, at the push of a button F-8 on the keyboard immediately after starting the computer. The Advanced Boot Options menu opens, select Troubleshoot your computer.

Restoring a system image


Use the latest available system image


of course all our data on local disk, where the operating system is now being restored, will be deleted, so you can pre-boot from any Live CD and copy what you need.
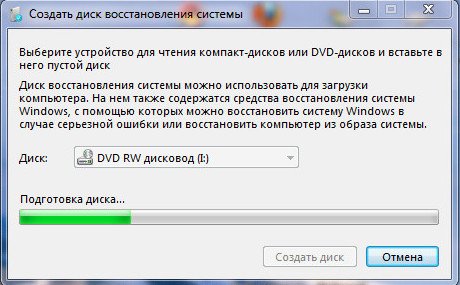
How else can you restore your Windows 7 system? Of course, using the Windows 7 Recovery Disk. Let's create Recovery disk, which can be used to boot the computer, it will contain recovery tools with which you can repair Windows 7 boot problems, as well as restore the operating system from a backup copy that we created in advance.
Important: For a recovery disk, the bitness of the system is important, you can use a 32-bit recovery disk for any 32-bit Windows 7, and a 64-bit recovery disk for any 64-bit Windows 7.
Let's go again Archiving computer data
Create System Recovery Disc, insert the DVD into the drive, press

Create disc


When the Windows 7 Recovery Disk is ready, put it in a safe place.
To restore Windows 7 from the Recovery Disk, you do not need, in principle, any operating system at all. You will only need to change the boot priority to the drive in the BIOS of your computer, insert the recovery disk into it and restore your Windows 7 using the archive. Many here can draw an analogy with data backup programs, and rightly so, they work on the same principle, only Here is the functionality they have of course more comfortable.
Computer or laptop started to glitch badly? Or does it not turn on at all? First of all, try Windows 7 System Restore. The operation takes 10-15 minutes, but it can really help. Indeed, in this case, the Windows 7 system is rolled back a couple of days ago, when the PC or laptop was still working fine.
This is an operation during which all parameters are restored and system files from the created Windows Backup copies. That is, if you accidentally deleted important files or changed settings (for example, installed a new driver), and after that the computer started to slow down (or does not turn on at all), then this can be fixed. At least it's worth trying.
Restoring a previous version of Windows is carried out from checkpoints that are created every week, as well as after making any changes (installing or removing programs). Typically, this feature is enabled automatically. Plus you can create breakpoints manually.
There are at least 3 ways:
- Windows means;
- through safe mode;
- using a flash drive with Windows 7.
Let's consider each of them in more detail.
At rollback Windows 7 all your personal files will remain in place. So you don't have to worry about this.
But there is one nuance here. When restoring, files recorded between today and the day you decide to roll back to may disappear. Therefore, if you have recently (today, yesterday, the day before yesterday, etc.) uploaded important documents to your PC, it is better to save them to a USB flash drive. Just in case.
How to return the system back using Windows 7?
The first way to roll back the Windows 7 system back is by means of the OS itself. But it is only suitable if your PC or laptop turns on. It does not matter if it is buggy or freezes, the main thing is that you can load the desktop.
So, do the following:
After that, the rollback of the Windows 7 system will begin. When the operation is completed, the computer or laptop will restart, and you will see a message that everything was successful.
If that doesn't help, try enabling Windows 7 recovery by selecting a different checkpoint. But in this case, you will need to check the box "Select another point" and click "Next". And after that, the already familiar window from point 4 will open.

OS recovery through safe mode
If the PC or laptop does not turn on at all, then you can try recovery Windows startup 7 in safe mode. To do this, when turning on (or rebooting) the PC, repeatedly press the F8 key until the menu appears. Next, select "Safe Mode" and press Enter.
However, there are some nuances associated with different Windows versions. Therefore, in order to avoid difficulties, I recommend that you read -?
Wait until the computer or laptop turns on, and then follow all the same steps as in the previous version. That is, to roll back the Windows 7 system, follow the steps 1 to 7 described above.
And the third way: recovery from a flash drive (or disk) with installation files
The downside of this option is that you need to write Windows to a USB flash drive that is on a computer or laptop. And the plus is that in this way you can try to return the Windows 7 system, even when the PC does not turn on and safe mode does not start. So this is your last chance.
If you did everything correctly, the window with the installation of Windows 7 will start.


Wait for the procedure to be completed and click on "Reboot". Then immediately pull out the flash drive from the connector (or the disk from the drive), after which the PC should turn on in the usual way.
By the way, restoring Windows on a laptop and a computer is carried out in the same way. So you can try any way you like.
That's all. Now you know how to roll back the Windows 7 system. I hope one of the 3 methods will work and you will be able to restore the PC or laptop to working order.
How to restore the Windows 7 system on a laptop, when loading, a black screen comes out, the recovery environment does not work, I deleted the hidden partitions, there is no original disk. I spent a lot of time, tell me what to do now, or at least how to insure myself against such situations in the future, preferably without using paid data backup programs. Ilya.
How to restore the Windows 7 system
Unfortunately, there are enough reasons for this trouble, ranging from incorrectly written drivers, the harmful effects of a virus, errors file system and ending with our erroneous actions when working with a computer, you don’t need to be afraid of such problems, you need to learn how to deal with them effectively.
Let's think how to restore windows 7 system, as well as insure ourselves for the future from possible troubles with the help of backup and recovery tools built into the operating system. We will learn how to restore Windows 7 without using third party programs for backup even when System Recovery Options does not load and the F-8 button is useless.
- Friends, if our article does not help you, then check out others on this topic, for example:, in it you will learn how to restore an unbootable system using various command line utilities, the first is Bootrec.exe with the /FixMbr and /FixBoot commands or the utility bootsect /NT60 SYS, as well as Bootrec.exe with the /RebuildBcd parameter, these utilities can be run from the recovery environment or from the Windows 7 recovery disk. The article will show you how to restore the operating system when system restore is disabled and much more.
- If Windows 7 freezes at boot or suddenly restarts, or suddenly may show blue screen with an error, then perhaps all these problems are due to numerous file system errors. How to fix the situation, even when the operating system does not boot due to these errors, is written in this article.
- Well, eight articles from the section will give you a detailed idea of \u200b\u200ball the built-in recovery tools in Windows 7: restore points, previous versions files, creating a system image and a recovery disk, and so on. So, let's begin.
Windows 7 has in its arsenal a fairly powerful and good tool-> recovery environment, which is created automatically when installing Windows 7 in a hidden partition and contains five other tools that solve numerous malfunctions and problems.
- Note: If you learn how to use Windows 7 recovery tools correctly, and this is not difficult, then you can do without additional and paid data backup programs.
You can start the recovery tool by pressing the F-8 button on the keyboard immediately after starting the computer. After that, a menu of Additional boot options will open in front of you: Troubleshoot your computer, then Safe mode, Safe mode with loading network drivers, etc.

First thing to do is apply Launch Recovery(Automatically fix problems that prevent Windows from starting)
Required digression: After pressing the F-8 button when the computer boots up, you may not have a > item, but only Safe Mode and so on, the question arises why.
When installing Windows 7, a recovery environment partition is created automatically and is located at the root of the drive (C:) in the Recovery folder. You can also see in the Disk Management window - a separate, hidden partition of the hard drive, its volume is only 100 MB, it is used for storage boot files boot configuration (BCD) and system boot loader (bootmgr file).
You can see it Computer-> Management-> Disk Management. In no case should you delete this partition (many people delete it out of ignorance), otherwise you will not start the recovery environment, that is, the item Troubleshooting your computer you will not, and in more severe cases, you simply will not boot the system.

On the bottom screenshot, you can see another hidden partition, with a capacity of 9.02 GB, this is a hidden recovery partition with the factory settings of my laptop, you can have it more or less. It is also better not to delete it, if necessary, you can always restore Windows 7 from it.

What to do if you do not have a partition with the recovery environment and when you press the F-8 button, in the Advanced boot options menu, the Troubleshoot your computer item does not appear? How then to restore the Windows 7 system?
The installation disk with the Windows 7 operating system can save here. You can start the recovery tool by booting from the original installation Windows disk 7 by selecting the item at the very beginning System Restore. If you do not have an installation disk with you, then you can use (you can make one in any running Windows 7) in five minutes, then you can also boot from it and do the same.


So, we still got into the System Recovery Options, either using the F-8 button and the Troubleshooting item, or the Windows 7 installation disc or the Windows 7 Recovery Disc.
In the System Restore Options menu, select the first one:
Launch Recovery-> there will be an analysis of faults that interfere with the normal loading of Windows 7 and their further correction for the normal loading and operation of the operating system. In the process, we may be warned that problems have been found in the boot options, click Fix and restart.


System Restore-> with the help of this function, if we have it enabled, we can roll back to the time when our Windows 7 worked fine and loaded, everything is simple here.


-> I personally use this tool, with skillful use it can replace paid data backup programs, if you are interested, read on.

Why is he good? It will help when you don't have the original Windows 7 installation disc and you have deleted the hidden partition with the factory settings of your laptop, but that's not all.
Sometimes there are situations when, for various reasons or due to the actions of a virus, you will not be able to load the operating system at all, or many people ask How to restore Windows 7 system, even if the menu with Additional boot options is also unavailable. Reinstall the operating system again?
Therefore, immediately after installing Windows 7 on your laptop or computer, we create using this function-> Restoring a system image, archive image of our Windows 7 on the hard drive, save it. Be sure to create a Windows 7 Recovery Disc (read below), it will help you use the System Image if the Advanced Boot Options menu does not load.
Go to Start -> Control Panel->Archiving computer data.

Choose Creating a system image

then select Local disk, on which we will store the system archive. In my case, the Local Disk (E :), if you have several hard drives in the system unit, then of course it is better to place the backup on the hard drive where the operating system is not installed.


Note: You may notice that I have two operating systems installed on my laptop, so the backup program selected two Local drives.

Click Archive and the process of creating an archive with our Windows 7 will begin.
Created, it will look like this.

Now, you can deploy the archive with Windows 7 to your computer, if necessary, in 20-30 minutes. It would be better if you copy the archive with the system additionally to a portable hard drive, this will double your safety.
Let's pretend that we can't start Windows 7 and deploy the backup we created, let's do it together.
We launch Windows 7 Recovery Tool by pressing the F-8 button on the keyboard immediately after starting the computer. The Advanced Boot Options menu opens, select Troubleshoot your computer.

Restoring a system image


Use the latest available system image


Of course, all our data on the Local Disk, where the operating system is now being restored, will be deleted, so you can pre-boot from any Live CD and copy what you need.
How else can you restore your Windows 7 system? Of course, using the Windows 7 Recovery Disk. Let's create Recovery disk, which can be used to boot the computer, it will contain recovery tools with which you can repair Windows 7 boot problems, as well as restore the operating system from a backup copy that we created in advance.
Important: For a recovery disk, the bitness of the system is important, you can use a 32-bit recovery disk for any 32-bit Windows 7, and a 64-bit recovery disk for any 64-bit Windows 7.
Let's go again Archiving computer data
Create System Recovery Disc, insert the DVD into the drive, press

Create disc

When the Windows 7 Recovery Disk is ready, put it in a safe place.
In order to restore Windows 7 from the Recovery Disk, in principle, no operating system is needed at all. You will only need to change the boot priority to the drive in the BIOS of your computer, insert the recovery disk into it and restore your Windows 7 using the archive. Many here can draw an analogy with data backup programs, and rightly so, they work on the same principle, only Here is the functionality they have of course more comfortable.
- If you do not know how to change the boot priority in the BIOS, read our articles and
Restoring Windows 7 from the Recovery Disk. I show you how to do it. Suppose we are in trouble, we cannot start Windows 7, when we press F-8 on the keyboard, nothing happens immediately after starting the computer. We cannot get into the menu with Additional boot options and an error message is displayed. In this case, the system archive on the hard disk is not available to us. It was precisely such a nuisance that happened to our reader Ilya, who wrote us a letter asking for help.
In this scenario, many reinstall Windows 7 from scratch, but not you and me, because we have System recovery disc.
We insert it into the drive and reboot, set the BIOS to boot from the drive, as I said the disk is bootable, the System Recovery Options program starts.
Press Enter until the offer to boot from disk is gone.
Friends, many of you have had problems loading the operating system more than once and you asked the question how to restore Windows boot 7 and make the operating system boot normally. In this article, we will look at the most common ways to restore the Windows 7 bootloader, which help in most cases.
1. Repair Windows 7 Boot Using Repair Tool
Boot from your Windows version 7. The main thing is that the bitness of the system should match (32-bit or 64-bit). Also, it is desirable that the release coincides (Home, Professional, Ultimate).
Instead of installing, choose System Restore.

Go to the "System Recovery Options" window and select the "Startup Repair" restore tool.

After that, the recovery program will search for errors in the boot sector and boot Windows section 7 and will try to fix them if found. After that, you will need to reboot the system and perhaps Windows 7 will boot normally.
If the first time it was not possible to restore the boot using the Windows 7 recovery tool, then try repeating this process 1-2 more times. This often helps, as the repair tool can't always fix multiple issues in one pass.
2. Repair Windows 7 Boot Using Command Prompt
If you were unable to restore your Windows 7 boot using the automatic repair tool, then try to do it using the command line. Boot with your version of Windows 7 and choose "System Restore" instead of installing.
Go to the "System Recovery Options" window and select the "Command Prompt" recovery tool.

After that, a window with a black background will appear in which you will need to write several commands.

Enter the following commands in turn:
| bootrec /fixmbr |
| bootrec /fixboot |
| bootsect /nt60 ALL /force /mbr |
| exit |
Switching the language is done by pressing Alt+Shift. After entering each command (line), you need to press the "Enter" key.
Then restart your computer.

After that, in most cases, problems associated with the boot sector and bootloader of Windows 7 will disappear and the operating system will boot normally.
If after using the command line, Windows 7 still does not boot, then try again using the automatic boot repair tool, as we discussed above.
3. Recovery boot Windows 7 with reinstallation of the system
If you were unable to restore the boot of the operating system using the methods described above, then most likely you will have to delete partitions.
Before reinstalling Windows 7, copy all the files that are important to you from hard drive on or . This can be done with any boot disk LiveCD. Please note that external drive or a flash drive must be connected to the PC before booting from the LiveCD, otherwise they may not be detected.
If, due to boot errors, you are unable to reinstall Windows 7, then delete all partitions from the disk using a third-party utility, such as a boot disk Acronis Disk Director. After that, try again with the creation of new partitions.

If at reinstalling Windows 7 at the disk setup stage (creating partitions, selecting a partition for installation) or when you restart the computer during the installation process, you will encounter the same boot errors, then launch the command line and run the commands that we discussed above.
In order to prevent problems with loading in the future, you need to determine what exactly led to the problem and not repeat these errors. If you are unable to restore Windows boot, other errors occur with the installation and operation of the system, refer to the site http://esate.ru where you will find instructions for solving various problems with the operating system.
ASP900S3 75E120BW F120GBLSB
SSDSC2BW240H601 75E250BW SSDSC2BW240A4K5 7KE256BW