How to make your account. How to create another Google account
Read also
Hello, dear readers of the blog site! Creating a Google account makes it possible to use all the numerous features of this search giant in full. This is very convenient for ordinary users, many of whom use it for their own needs, for example,. I'm not talking about webmasters or Internet entrepreneurs, for whom having a Google account is vital.
The Google account system is built in such a way that once you register, you get access to all services at once, purchasing Mailbox on GMail, which I myself use and which I consider the most optimal and reliable in every sense. Moreover, Google does not regulate the number of accounts that you can create.
That is, if you have one account, then at any time you can add several more to it, each time registering a new mail. By the way, exactly the same mechanism operates when registering with Yandex. Below we will analyze all the necessary details for obtaining a Google profile in detail so that there are no dark spots left if possible.
How to create a Google account for your needs
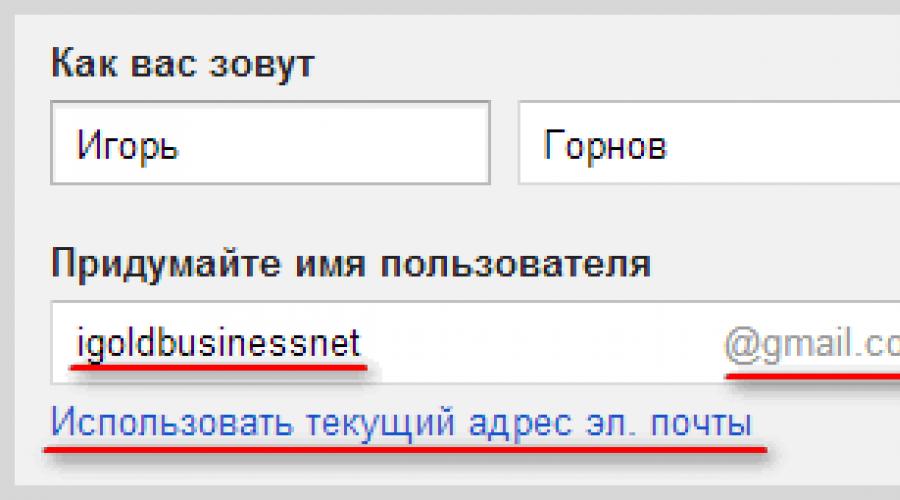
So, we begin the operation to get a Google account. Registration is carried out on a special page, where you must fill out the form provided there, in the first part of which you must enter your name, surname and login as part of Email:

Naturally, your mailbox will be located on the Gmail server, this service is part of Google applications. However, of course, there must always be an alternative, as users will not understand the lack of choice. In this case, if you do not want to create your mail on GMail, then you need to click on the link “Use current email address. mail". Then the form will take a slightly different look and you will be able to enter your email, which will later serve as a login for authorization:

It must be borne in mind that in this case, during registration, you will have to confirm the address of such an email. An email will be sent to the specified mailbox containing a link that you must follow to confirm. But, again, such additional gestures need to be done only if you do not want to register mail on GMail.
However, in my opinion, created Account Google assumes there is mail account Gmail, if only because it is much more convenient when using a variety of Google applications and services. In addition, the interface and settings are constantly being upgraded here and, most importantly, Google Post service very reliable in terms of security, which I will talk about in more detail.
So, if, after switching to entering the current email, you suddenly change your mind and decide to still use mail from Google, nothing prevents you from simply clicking on the link “Create new address GMail. Go ahead and in the next block of the registration form, enter the password twice, as well as your date of birth and gender:

I note that the date of birth will not be publicly available without your consent. Of particular note is the need to complicate the password as much as possible, since this directly affects the security of the future account. For my part, I dare to advise Kipas in this regard, which I have been successfully using for quite some time now. But let's continue filling out the Google registration form:

First you need to enter a number mobile phone and, preferably, an additional email. This information will not be superfluous in terms of increasing the level of security. For example, if you forget your password or somehow it is lost, then via SMS you will receive the data necessary to restore access to your account. google records. The alternate email address also contributes to the security of your account and can also be used to receive notifications.
Next, enter the captcha in the appropriate line “Enter text” and proceed to the final part of the registration form, where you need to select the country (the one in which you live will be automatically indicated), and also tick your agreement with the terms of use of Google services and the privacy policy:


However, this proposal is this stage you can easily ignore and upload the photo later. You can do this at any time using the appropriate options in your profile. Therefore, you can immediately click on the "Next" button. The result of this action will be the realization that you managed to create a Google account:

After clicking "Next", you will find yourself on a web page from where you can access all applications, services, settings and other necessary services:

Perhaps for some it will be easier to learn information from the video. Therefore, I provide a video on the topic of creating a Google account:
Well, given the level modern technologies not superfluous, I think there will be a video telling about creating a Google account for mobile devices android based:
Google account login and basic settings
So, in the example above, we have determined how to register a Google account. You can enter your OZ right there by clicking on the silhouette in the right upper corner and then clicking on the appropriate link (in the future, you can log in from the authorization page):

As you know, Google allows you to create as many profiles as you like, corresponding to different GMail mailboxes. If you receive several UZs, then it is possible to carry out multiple logins by logging in to them at the same time and switching between different accounts, which is very convenient when working:
After logging into your account, you can go to the settings, thereby determining your preferences. By the way, I really like the interface both in terms of ease of perception and in terms of the breadth of opportunities that are provided. Therefore, I, perhaps, will not describe in detail all the possible options, everything is intuitively clear here, I will tell you in general terms and dwell only in more detail on those points that seem to me the most important.
IN section "Personal data" the first step is to add a photo if you didn't do it during the registration process:

All possible editing on the left side of this section is connected in one way or another with the settings of the options of the profile automatically created for you in, which is gaining wild popularity, which is not surprising, given whose powerful wing it is under. But we will talk about this in more detail in a separate article, since there are many nuances there.
On the right side Basic data, which were specified during the registration process (e-mail address and phone number). To change this information, you just need to click the "Edit" button and edit what you need on the newly opened page.
In the "Language" tab choose the main interface language, as well as languages that should be excluded from translation when working with text. Here you can define the way keyboard input. Press the appropriate buttons and immediately get the result, nothing complicated.
How to keep your Google account as secure as possible
I think everyone will agree with me if I say that the most important aspect of any closed systems is their reliable protection from outside encroachment. Therefore, now I will tell you in more detail about the measures that can be taken to increase the security of your account and preserve confidential data.
First of all, go to the "Security" section of your account settings. In the first block, one of the options allows you to change your account login password at any time. To do this, simply click the "Change Password" button:

A serious step towards strengthening security is the inclusion of two-step authentication, which is disabled by default. Click "Settings" and go to the web page for starting the activation of this option, where the pictures show its advantages:

As you probably understood, in a nutshell this method is that when you log into your Google account, in addition to the password itself, you will also have to enter a code that will be sent to your mobile phone. So, click on the "Proceed to setup" button and, as a first step, indicate your cell phone number:

You can also choose the method of receiving the code (voice or via SMS). Then ask for a verification code. Once received, enter it in the appropriate line:

Then make a "Confirm" request. In the third step, you will be asked to count this computer reliable. This is necessary so that the next time you log into your account from this google computer did not send a confirmation code every time anymore:

The last step is dedicated to the final activation of protection in the form of two-step authentication:

After this action, a page will open where further suggestions for optimizing the security system will be given. I advise you to carefully study them, since these settings not only allow you to increase the level of protection, but also make it possible to always have a fallback option in case of unforeseen difficulties.

Let's see what else can be done to obtain optimal security and prevent unwanted situations:
- Generate codes in the app - when you try to sign in to your Google account from another computer, phone or tablet, you will be asked for a verification code, which you can get using Google programs Authenticator. If there are any difficulties, then there is still an alternative to order the code by SMS or voice message. This application can be downloaded from the official Google Play page;
- Add a phone number - if the main phone is unavailable for some reason (breakdown, theft, etc.), then you can use the fallback option in the form of another mobile phone, to which the code will be sent. The more additional numbers will be added by you, the more you insure yourself against force majeure. For each phone number a confirmation operation similar to the one described above will be carried out as part of two-step authentication;
- Print or download backup codes - this option is for those who are away for a long time and cannot at some point use google app Authenticator or phone. To begin with, 10 codes are given, the used codes cannot be used further, in the future it is possible to generate additional code numbers. All this is on the page that you will be taken to if you click on the link "Show backup codes".
In the same section "Security" there is a settings block "Account Access". If you click on the "All list" link, you will be taken to a page where a list of all web resources and applications that somehow have access to the account will be given:

If you have bad suspicions about their account, then you can easily and simply block their ability to use your UZ data by selecting an object on the left side and clicking on the "Deny access" button on the right.
Further. If in the section "Recent Activities" click on the "All list" link, you will receive all the necessary information about all actions related to the security of the account (attempts to enter or change the password). If some action seems suspicious, for example, logging in from a browser that you have never used or a time when you could not complete such an operation in any way, you can draw the appropriate conclusions and take the necessary steps to correct the situation. Say, in this case, it is desirable to immediately change the password.
Another subsection "Recovery and Alerts" you can configure receiving notifications about suspicious activity. Click on the link "Change" opposite the inscription "Send reminders to phone":

We tick off the notification types, as a result of which you will receive SMS messages from Google to your mobile phone if suspicious actions are detected by third parties in relation to your UZ.
How to manage data, delete and restore your Google account
Tab "Data management" allows you to make a variety of settings that you need. For example, the subsection "Storage space" gives comprehensive information about the amount of stored files (on Google Drive, on GMail and on Google+ Photos).
The free plan allows you to use up to 15 GB of disk space. Agree for ordinary user it's a lot. Well, if you want to add free space for a specific purpose, you will have to switch to a paid option by clicking on the “Change Tariff” link.

In the same tab there is such an interesting option as "Google just in case". In fact, this is a testament in the truest sense of the term. After all, anything can happen in our life, so you can make a list of people who will receive all your “property” in the form of photos, files and other data if the account is inactive for a certain period of time, which should be set in the settings.

So, to begin with, we set up the period of inactivity, then we add trusted persons who will receive all the account data according to your will. Click on the appropriate link and perform all the steps according to the instructions, which are very clear for perception.
I note that it is possible to set up an auto-responder for this GMail mail, which will send the specified message to all recipients who will write to you after the inactivity period has expired. If, after a specified period, the UZ should be liquidated, left-click an empty cell opposite the “Delete account” option, and then click “Enable”.
In the subsection of the same name of the “Data Management” tab, there is a link “Delete account and data”. After clicking on it, carefully read the warning, since deleting an account is a responsible decision.

So, we looked at how to delete a Google account, now it's time to understand what steps need to be taken to restore it. I mentioned this possibility above in the text during the description of registration. This may be necessary if an unpleasant situation suddenly arises associated with the loss of a password or, more than aspirations, with the capture of an account and loss of access to it.
Google cares about the safety and security of its users' data, therefore, it will be possible to restore an account only when it is one hundred percent sure that you are the owner. That's why when registering, we specify the recovery options, which in this case are an additional e-mail and phone number.
You can restore access to your Google account. If you cannot figure something out, then you will receive answers to your questions and options for action in a given situation at this And this help pages.
All Google apps and services
Google has a whole bunch of a wide variety of services and services, as they say, for all occasions. Almost every user will find in this list necessary application to solve a particular problem. Therefore, talking about creating an account, I can’t ignore this aspect. I suspect that on this moment, the most complete list of services is located on one of the pages of Wikipedia.
Now let's go to our account and click on the icon, which will call up the default set of icons, each of which represents a specific Google service or application:

By clicking on the selected icon, you will be taken to the page of the service indicated by this picture. If you click on the "More" link, you will get a couple of additional icons:

A new link “More offers from Google” will also appear here, by clicking on which you can move to a new web page, where there is an extended list, which, however, is also far from complete (you will get a more voluminous one if you visit the Wikipedia page using the link provided above):

In order to add this or that application to the initial registry for convenience, which appears when you click on the icon in your account, you need to go to the page of this service after logging into your account:

Now in your UZ you should click on the inscription "Add label", as a result of which the icon of this Google service will be present in the collection along with other pictures.
Even unregistered visitors can watch videos and use YouTube services, but if you want to become a part of largest community in the world, then you need your own account……
In this article, we will learn the easiest way to register a YouTube account, as well as what benefits it will give you. ↓↓↓
Benefits of own account
View videos, organize and $$$ — YouTube opens up unlimited possibilities for you………
To get started, you must- register on the service and log in. This will take you no more than 5 minutes. and the process itself is completely free.

Let's find out which advantages will open before you after registration: ↓ ↓ ↓
- Create your channel. All registered users can run own project, where videos will be published, which can later be monetized. You can also conduct online broadcasts, communicate with subscribers and much more.
- Save the most interesting videos . Thanks to the built-in functionality, you can create playlists, save your favorite videos, and much more.
- Comment and rate. After registration, you will be able to express your opinion about the video, as well as influence its rating and position in the internal search. You can give negative (dislikes) or positive (likes) ratings.
- Subscribe and chat. After registration, you can watch the most interesting projects and for this it is enough to subscribe. Get notifications about new videos, communicate with other users - all this is possible on YouTube.
- Customize YouTube for you. On home page fresh selections will appear regularly, based on your interests. You can easily delete a video or channel that you don't like.
How to register?: all methods
Since YouTube came under the auspices of Google, the service has improved markedly. A simple registration procedure, integration into other services, as well as the ability to earn through $$$
1) Sign up with Google to login to YouTube
If you already have a Google account, you can sign in to YouTube using this information.

After that, you need to specify the registration data in Russian: ⇓
- name and surname;
- login (will be used to log in);
- password;
- date of birth and gender;
- mobile phone;
- confirm the data.
After you register, you should go to YouTube and click on the "Login" button. 
Login can happen automatically or you will need to enter basic data (login and password).
Attention!
There are many questions about how to register on YouTube as simply as possible ( it is desirable to create your own account without Google ) . Indeed, before every user had to register on YouTube without fail. Unfortunately, this feature is currently disabled and you definitely need to have a Google account. !!!
2) Create new channel onYouTubeabsolutely free
If you want to contribute to the development of YouTube, acquire an army of fans and earn good money, then for these purposes you will need your own channel.
With it, you can organize broadcasts, publish various videos ↓ ↓ ↓
To create such a project, follow these steps: ⇓
- log in to your account and select "Create a channel" in the panel on the right;
- you can also click on the "Upload video" item and the system will prompt you to create a channel;
- fill out the form and confirm the creation.
You can create almost any number of channels within one or more Google Accounts.
If you already have one YouTube channel, then the registration procedure looks like this: ↓ ↓ ↓

Answers to popular questions:
In this section, we will discuss the most popular questions regarding YouTube channel registration. Here you can get a clear and meaningful answer ↓ ↓ ↓
Question 1 - Is it possible to create a YouTube account for a child ???
Unfortunately, you cannot create a separate account for a child, but YouTube is currently developing a separate service for children.
As an output, you can set preferences on YouTube: ↓
- clear the list of unwanted projects
- And set safe mode.
Question 2 - How to register an account on YouTube through Yandex ???
There is no such function on YouTube either, since Google and Yandex are at least competitors. !!!
At the moment, Yandex services are not integrated into YouTube, so there is no point in further discussion.
Question 3 - Username error ???
→ If an error occurs in the process of filling in the registration data, then most often this is due to the fact that a user with such data is already on the service.
You just need to change your username
Question 4 - Why enter your date of birth ???
At the moment, the service cannot be used by persons under 13 years old, and if you are under 18 years old, then you will not be able to monetize your project !!!
Hello, dear readers of the site. This review will focus on YouTube, the most popular video service on the Internet. In particular, we will discuss in detail the registration process on this video hosting.
YouTube was launched in 2005 and is by far the largest video storage site in the world. global network. Millions of people use this resource every day.
Some of them watch videos to have fun, laugh and just relax. Others seek to find on YouTube useful information to expand your horizons or solve a problem with its help. Still others are making money on YouTube.
To be active in YouTube user You need to register for this service.
We will analyze the registration procedure step by step. It is not difficult and takes a few minutes.
How to create a YouTube account in 5 easy steps
Step #1. Enter the site
Go to the official resource page https://www.youtube.com. When you are on the site, find the button in the upper right corner "To come in" and click on it.
A form for entering an email address will open. Scroll down and click on the link "Create an account".

Step #2. Create a Google Account
You will see a page for registering an account in front of your eyes. Google system. But what about Google?
The fact is that since 2006, the rights to YouTube video hosting have been owned by Google. Thus, YouTube is one of the services of a well-known search holding. Access to all Google services carried out through a single account (mailbox).
If you already have mail from Google, then enter its address in the appropriate field. You must also indicate your first name, last name, come up with and write a password twice. After these steps, click on the button "Further".
If you have not registered a Google account before or have lost your authorization data, then click on the link "Create a Gmail Account".

In field "Username" enter your nickname in lowercase Latin letters and click on the button "Further".

Step #3. Phone number verification
In the next window, you need to verify your mobile phone number. For this in the field "Phone number" enter your number starting with +7 (For Russia). Then click on the button "Further".

On specified number within a few seconds, a message with a 6-digit numeric code will be received. This sequence must be entered in the field "confirmation code" and click "Confirm".

Step number 4. Filling in the data
On the next page, you must check the entered data and provide additional personal information.
The screenshot below shows an example of filling in the required fields. Some of them are already automatically entered data.

The first field displays your email address (1) Google. The phone number is shown below. (2) , which you entered and confirmed earlier.
Pay attention to the explanation under the number. It informs you that your phone number is hidden from other users of the system. This information is only needed by Google to protect your account.
Phone number information can be useful, for example, if you lose access to your account.
Next field (3) is for entering a backup email address (optional). An additional mailbox, as well as a cell number, may be needed to restore your account.
In field (4) you must specify the date of birth in the format D.M.Y., and in the following (5) - expose the floor.
After completing all the above steps, click on the button "Further".
You will see an offer from Google to use your phone number in all of its services. To add a number click on the button "Add number".

If you don't want to do this, then click "Skip" and proceed to the next registration step.
Step number 5. Agreement with the rules
Please read the Google Account privacy and terms information carefully. To accept these rules and complete registration, click on the button "I accept".
All modern smartphones are linked to a specific account. For example, Android gadgets are registered with Google. The account helps both to identify the user (and protect his phone from intruders), and to synchronize data between several devices (for example, an old and a new gadget). In addition, it opens up a wide range of possibilities for the owner of the gadget. How to create an account on the phone, we will analyze in detail in the article.
What gives you an account on a smartphone?
Many users find it superfluous to bother with registering their device in the Google system. But in vain. A Google account on your phone gives you the following:
- Synchronization of all recorded contacts with Google cloud.
- Saving the settings of the applications you have downloaded.
- Move contacts and other data to new smartphone and other Android devices.
- Saving both history and browser bookmarks.
- Identification in the whole variety of Google services: the social network Google+, YouTube, Google Drive, Play Music, Play Press, Play Movies, and so on.
- Identification of a player in "Play Games" - with your account you will be transferred to a new device with the preservation of all your achievements.
- Cloud access and storage various information- photo, audio, video.
How to create an account on the phone?
The procedure will be quite simple. So, how to create an account on the phone:
- Connect your gadget to the internet.
- Go to "Settings".
- Find "Accounts".
- Click on "Add account" or something similar.
- The device can offer several systems, in addition to "Google", - "Samsung", "Microsoft", "Dropbox" and so on. Choose the one you need.
- Then click on "Create...".
- How to set up an account on the phone? First, enter your first and last name.
- Click on the "Next" arrow.
- In the next window, the password is a unique combination of numbers 0-9 and letters of the Latin alphabet of various registers (lowercase and uppercase). As for the password, you can use a number of special characters: number, %, dash, underscore, exclamation and question marks, dot, comma, etc.
- A password is considered strong if it contains at least 12 characters. It must be entered twice at this stage to confirm.
- How do I set up an account on my phone? In the next window, you must enter your mobile phone number. It is he who will help you recover your username and password if you forget them.
- A message will be sent to the specified number special code, the characters from which you want to enter in the box on the next window.
- Then you will be presented with the terms of use of the account. Only by accepting them, you will be able to use your account in the system.
- Then a window will appear with your username and password - click "Next".
- If you want to receive news from Google to your email, then check the box.
- Click on "Next". Account created!

Create an account using a PC
We figured out how to create an account on the phone. If this method is not convenient for you, then you can turn to the help of a computer or laptop. This is done as follows:
- Open the Google home page in your browser.
- Click on "Login", select "Register".
- Here, during the registration process, you will need to provide similar information - login and password (you need to remember this information - you will enter it on your smartphone to link it to your account), last name, first name, gender, date of birth, your country, mobile phone number, alternate email address.
- As soon as the procedure is completed, go to the "Settings" of the gadget, then to "Accounts", and link it to your account by entering your username and password in the Google system. How to do it - read on.

How to log into an account on a gadget?
We continue to figure out how to set up an account on your phone. We have dealt with you registration - booking a unique address in the Google system or any other. And logging into your account is linking your smartphone to a previously created account, the login and password of which you know.
It is done like this:
- Connect your phone to the internet.
- Go to "Settings".
- Select "Accounts".
- Click on "Add..."
- Select from the proposed list the system in which you have already registered. For example, Google.
- Enter login - email address. Click on "Next".
- Then enter the password.
- The next step is an agreement with
- Enable/Disable backup at will.
- That's all - you have linked your smartphone to your account.
Account deleting
If your phone is already linked to any one, then to register it in a new one, you first need to delete the old one. It is done like this:
- Connect your device to the internet.
- Go to "Settings".
- Then - "Accounts".
- Select the account you want to delete.
- Then go to its options or menu.
- Find in the list
- The system will prompt you to enter your password to confirm the action.
- Click on "Delete" again.

How to unlock an account on a phone?
Many users are faced with the following problem: after a "hard" smartphone asks you to enter their Google account details, to which the gadget was linked before the reset. If you forgot your username and password, it will become impossible to use the phone before entering this correct information.
There are many ways to bypass such blocking on the Internet. We will offer you the easiest:
- Insert the SIM card into the device and turn it on.
- As soon as the operator icon appears, call from another phone to the blocked one.
- During a call, you need to go to the icon for adding a new call, after which it (the call) is dropped.
- On the dialing screen enter this: *#*#4636#*#*
- You will find yourself in advanced options - click on the "Back" arrow.
- This will return you to the default settings.
- Go to "Reset and restore": disable the link to your Google account backup. You can delete credentials in "Security".
- After that, reset the settings again.

Now you know how to create an account on your phone. We also introduced other ways to customize it.
In today's article, we will talk about how to register on YouTube. Video on the Internet is becoming more and more popular, thanks to which video hosting services increase their audience every day. Among all video services, Youtube is in the first place, and registering an account in it gives certain bonuses not only to channel authors, but also to ordinary viewers.
In my opinion, if people couldn't write, the whole Internet would look like Youtube. In order to view all the information that is now contained there, a lifetime is not enough.
By the way, in order to watch the video, it is not necessary to create an account for yourself. If you visit this site from time to time, then you can not get carried away too much, you will find everything you need without a personal account.
Why do I need to register on YouTube?
But, there are advantages to registering on Youtube. They become available only to those who have their own account. These pluses can make the use of the service more convenient, in addition, they provide access to functions that are not available to a third-party visitor.
What are these benefits:
- The most important plus is that in addition to watching videos, you have the opportunity to upload your own.
- You have the opportunity to subscribe to the channels of other Youtube authors. This will help you not to miss the release of new interesting and useful stories created by them.
- You also have the opportunity to leave viewing for later, to make a so-called bookmark. You can return to these videos at any time and you won't have to look for them again.
- You have the opportunity to discuss, comment and leave your feedback under the clips you have watched.
- You have the opportunity to directly influence the popularity of certain videos by marking them with the "like" and "dislike" buttons. Thanks to you good videos will become more popular, and the crap will disappear from the field of view of the YouTube audience.
- Also, registered users can write letters to each other, without any reference to videos, like regular email messages.
How to register on youtube
We discussed why we need an account, now let's move on to the procedure itself.
Youtube is part of a group of services owned by . And, like all other services of this company, a YouTube account is linked to an email account. Gmail. This means that registration on YouTube begins with the creation of a gmail email account.
If you have Gmail
In this case, registering will be very simple, you need to enter the Youtube.com website, click the login button in the upper right corner and enter the username and password from your gmail account. This will complete the procedure. I will show pictures of how this is done below.
If you don't have Gmail
We start the process from the same step as in the previous version - open the youtube.com page and click on the "Login" button.
We open a login panel through which we would register an account if we had a Google email, but we don’t have it, therefore, we find the “Create an account” link and follow it.
First, a small form will open, which, after clicking on the "Create a new Gmail address" link, will turn into a long questionnaire. Here is the short form:
And this is how the full application will look like:
In it you will need to fill in almost all the fields. Particular attention should be paid to the following:
"Date of Birth"- I myself have not come across, but I heard that there are age restrictions and people under either 18 or 14 years old can be refused. Therefore, if you are young, then it is better to play it safe.
"Mobile phone"- sometimes, the service asks to confirm the data via SMS (not always), so the specified phone number must be real. However, this is also extra security for you.
"Alternate email address"- this field can be left empty, or you can specify your other email box for security purposes, if anything, you can recover the password.
When you fill in all the fields, including the captcha and the checkmark confirming acceptance of the Google policy, click "Next".
After that, your account will already be created and on the next page you will be prompted to add a photo and link it to social network Google+. You can do this if you want, but it will be faster to click "No".
In the next step, you will see a congratulations from Google, confirmation of registration and an offer to return to Youtube to continue registration. There is only one button, so we return to video hosting.
Your return site youtube.com will mark a small change. A circle symbolizing your account will appear in the upper right corner, and a panel with additional features will appear on the left.
This completes registration on YouTube, and you can start enjoying all the benefits that were described at the beginning of the article.
Setting up a Youtube account
After you have completed creating an account, in order to make the service even more enjoyable for you, you can make certain settings.
Click on your profile icon in the upper right corner and in the pop-up window, click on the gear - these are profile settings.
In the settings, I will highlight some important, in my opinion, items (their list will appear on the left side of the site).
"Linked Accounts"- you can add your Twitter account (link Twitter and YouTube) and check the boxes next to those events, the update of which should automatically appear in the microblog.
"Confidentiality"- here you can open or close information about your preferences for other youtube users.
"Alerts"- if you want to receive notifications about certain events in your account, then indicate this.
"Playback"- here you can set the quality of the video with which it will be shown to you by default. If you have a slow Internet, then you should focus on speed, if everything is in order with the Internet, then select the maximum quality.
How to use the new features
After registering on Youtube, you can use previously unavailable features. Some of them open on the pages of specific videos - this is a subscription to the channel, the "like" and "dislike" buttons, the "watch later" icon.
The other part is available on the main Youtube page in the left menu as bookmarks.
"View Later"- there are all the videos that you marked with the corresponding icon.
"Viewed"- all videos that you watched while being authorized under your account are stored here.
"My Subscriptions"- there is a list of all YouTube channels to which you have subscribed.