Network installation of Windows 7. Self-installation of Windows over a network
Read also
How to install Windows 8.1 on your computer. Which one to choose Windows version 8.1 and where to download Windows 8.1. Before reading this article, I recommend that you read the article on what to do before reinstalling Windows
So, to begin with, we must already have bootable USB flash drive with windows 8 or ISO image Windows 8 which you burn to disk and then set to boot from Cd-rom in the BIOS)
We boot from a flash drive or disk, after which a screen appears with the inscription Loading Files, wait a couple of minutes...
When Install Windows and Developer Preview appears, select the keyboard language (if you want) press Next And install Now

Now we wait 1-10 minutes until the license agreement appears, mark it with a checkmark and click next
Choose Custom(advanced)
From the list click on disk, on which we want to install Windows 8 and click Drive option (advanced)
Attention:
All files on this section will be deleted after the step below!!!
Click Format -> Ok -> Next

We wait 5-10 minutes before rebooting (don’t touch anything) After the computer reboots itself, if you are installing Windows 8 from a flash drive, remove it from the computer or go into bios and remove the boot from usb drive. This important point for those who install Windows from a flash drive! If you are installing from disk then you don't have to do anything, just wait and don't click anything.
In 15-30 minutes, Licens terms will appear, check the box license agreement and press Accept
Write the name of the computer in the window and click on Next
Mark the item Use express settings
Click on Don`t want to log…
Click on local account, enter the name (For example: Sergey) and click Next

Ready! Windows 8 installed successfully!
From time to time, our computers begin to lag, performance drops, applications consume too much memory or processor resources, etc. Very often this involves viruses and other crap that infects your computer, but what if this is not the case? What to do if you are using best antivirus with the most up-to-date antivirus database, including other tools computer protection, but still continue to encounter PC slowness and unstable operation operating system?
Operating systems tend to accumulate many various information that can cause your computer to slow down are offline files, temporary data, registry keys that are no longer valid, and so on. This is especially true for cars under Windows control. For this very reason, Microsoft decided to include in its OS all kinds of utilities to keep the computer in an optimized state - disk defragmentation, disk cleanup, etc. So if you actively use your computer, sooner or later you will have to use such utilities, no matter whether they are built-in or third-party.
In terms of performance and stability, Windows 8 has moved forward, even compared to Windows 7, which also has something to brag about in this regard. However, the Windows 8 operating system is still the same software and, therefore, it is subject to the same troubles that we encountered when using previous versions. However, we must admit that this operating system is great for portable devices(this is exactly what it was developed for in the first place), so the Redmond giant decided to equip it with simple capabilities that allow you to return your computer/tablet to its original/factory state. Windows 8 has two settings that can easily return your computer (without affecting your personal data) to its original state, or completely reinstall Windows 8, depending on what you need.

Both functions are found in the Change PC settings menu, not in the regular Control Panel as you might think. To access them, you need to open the Charms bar, either by moving your mouse cursor to the top or bottom right corners of the screen, or using a combination Win keys+ C. When the Charms bar appears, click Options.

In the Settings panel, click the Change PC settings button.

In the PC Settings window, go to the General tab. There you will find two options, one is called “Recover your PC without deleting files” and the other is called “Remove all data and reinstall Windows”.
The "Restore PC without deleting files" feature will allow you to return the system back to its default settings. You won't lose your personal photos, videos, music, or personalization settings. The applications that you installed will also remain in place, however, those programs that you installed from disks or from the Internet will be deleted. To begin the recovery process, first click on the “Start” button and then on the “Next” button and follow the instructions on the screen. It should be noted that the function will work if your computer has an active partition for Windows recovery 8. Otherwise, you will need installation disk Windows 8

The second function, "Erase all data and reinstall Windows", is more like complete reinstallation Windows 8, since absolutely everything will be deleted. The function comes in handy when you are selling a computer or laptop, for example.

Before emergence of Windows 8, the process of “refreshing” the computer was a real hassle, so most users preferred to avoid it, simply because of the possible difficulties. With this version of Windows, Microsoft has definitely taken a step in the right direction.
Have a great day!
Reinstalling Windows 8 on Windows 7 is quite simple. To do this, you do not need to have any special skills or abilities.
The computer itself, as well as the distribution kit with the operating system, is enough. Installation can be performed from various media: hard drive, CD or USB flash drives. This feature makes the process in question particularly simple.
Why is reinstallation necessary?
Sooner or later there comes a time when it becomes necessary to reinstall the operating system. Reasons to exercise of this action there is a great variety.
But most often this needs to be done in the following situations:
- as a result rash actions a virus or Trojan was introduced onto the personal computer, killing the OS;
- for some reason a newer version of the OS is needed;
- the disk is heavily fragmented, accumulated a large number of fatal errors;
- The OS is unofficial.
Most often, a new installation is required if the personal computer begins to work very slowly and it is not possible to cope with this problem by cleaning the OS using specialized utilities. It is also not uncommon for any application or program to have an updated or new version operating system.
BIOS setup
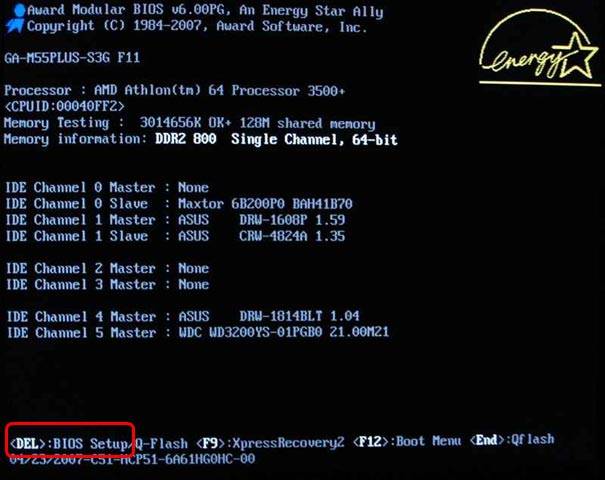
One of the most important stages Windows installations is the BIOS setting. It is required when installation is performed from a disk or flash drive. In order to start the installation, you must first go into the BIOS itself. There is no universal method, allowing you to perform this operation. It all depends on the specific BIOS manufacturer or laptop model.
Most often, modern PCs have BIOS installed from the following manufacturers:
- ALR (Advanced Logic Research) – F2, Ctrl-Alt-Esc;
- AMD (Advanced Micro Devices) – F1;
- AMI (American Megatrends) – DELET, F2;
- Award – DELET;
- Phoenix – Ctrl-Alt-Esc, Ctrl-Alt-S.
Determine which specific Bios is under the cover system unit, quite simple: after turning on the power of the PC, a logo and a corresponding inscription are usually displayed on the screen. Each manufacturer has it individually. Having entered the special boot settings menu through BIOS, you need to set the first device to be the one used for booting.
Each Bios menu is individual:

After selecting the required device, you need to restart the PC. The changes are saved immediately, after which you can safely proceed with the installation.
The process of reinstalling Windows 8 to 7
In some cases, a new operating system is not a good thing. Since not all PCs have sufficient performance for comfortable work. It is in such cases that it is necessary to reinstall Windows 8 to a similar OS, but version 7.
A very important feature of OS version 8 is the need to disable it to perform various manipulations with it. special system protection.
This can be done through BIOS by going to the corresponding menu item:

- go to Bios;
- find the item called “SecureBoot”;
- set the value to “Disabled”.
You also need to replace the value of the “BootMode:

- go to the “Advanced” -> “System Configuration” section;
- Change the “Boot Mode” parameter from “UEFI Boot” to “CMS Boot”.
Without performing this operation, it will be impossible to launch version 7.
After the protection is disabled, you can proceed directly to the installation. It is done as follows:
- a special, pre-prepared flash drive is inserted into USB2.0;
- the computer restarts and the initial boot window opens, where you can select the language, layout, and time format;
- After clicking the button, you can then proceed directly to the installation process - just click on “Install”;
- in the window that opens, select the installation method - full installation or update;
- When choosing, you need to choose the device that has sufficient unallocated space.
Video: Installing Windows 7
Partitioning the hard drive
After completing all the steps listed above, Windows7 will automatic conversion to standard MBR. You can also perform this conversion in manual mode. To do this, press the key combination Shift+F10. This transformation performed via a special command line.
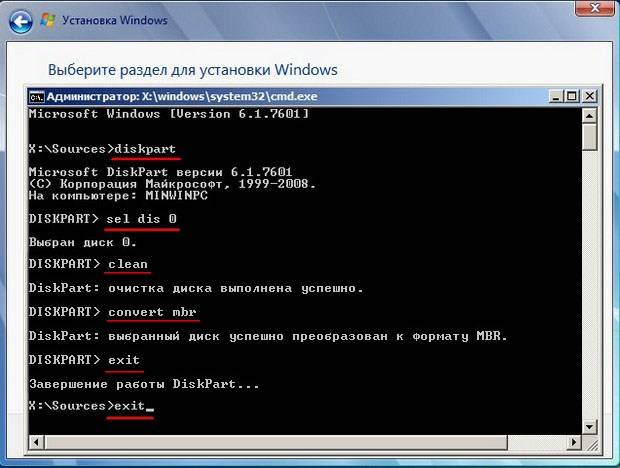
You must enter the following commands:
- diskpart;
- seldis 0;
- clean;
- convert mbr;
- exit;
- exit.
After the above operation is completed, you need to click the “update” button. A new section will appear in the corresponding window.

The second method of creating a partition is standard.
To implement it, you must perform the following steps:

Operating system in automatic mode will carry out all necessary operations. This method is the simplest and fastest. Not very useful experienced users who do not know how to use a special console. The only drawback is the inability to save a second operating system.
There are some features associated with MBR - they impose some restrictions on the use of equipment and the ability to implement certain actions.
To the very important features should include:
- the boot record is located in the first sector - 512 bytes;
- After the boot sector there is information about the main partitions (placed according to the LBA scheme).
It is in LBA that the most important problem lies - this scheme does not allow to be used hard disks larger than 2 TB. Which is a big problem today, since many PCs (even portable ones) are equipped with similar hard drives.

Please keep this limitation in mind.
Another limitation associated with MBR is the inability to use more than 4 partitions at the same time. But such a nuisance can be dealt with quite simply; it’s enough to make “extra” “placeholders” - extended sections. But this method of solving the problem can lead to some inconveniences precisely in the case of installing several operating systems. Very often, when using MBR, data integrity problems arise. Since the information is placed in a single array. And availability bad sectors
leads to the inability to access all other information.
When all the above operations are completed, the standard Windows installation begins.
It includes the following steps:
- copying files;
- unpacking;
- installation of components;
- installing updates;
- installation complete.
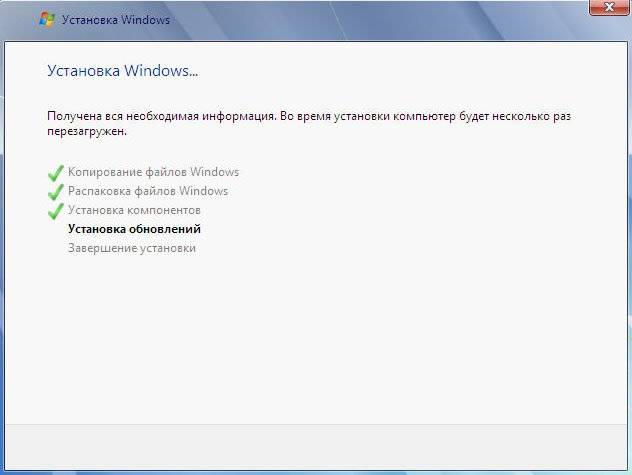
The completion of each stage is displayed on the computer screen as a percentage. This allows you to estimate the total amount of time that will be spent on completing the operation. When the installation is complete, you will need to reboot personal computer for the changes to take effect.
After the reboot, you will need to enter in the newly appeared window:
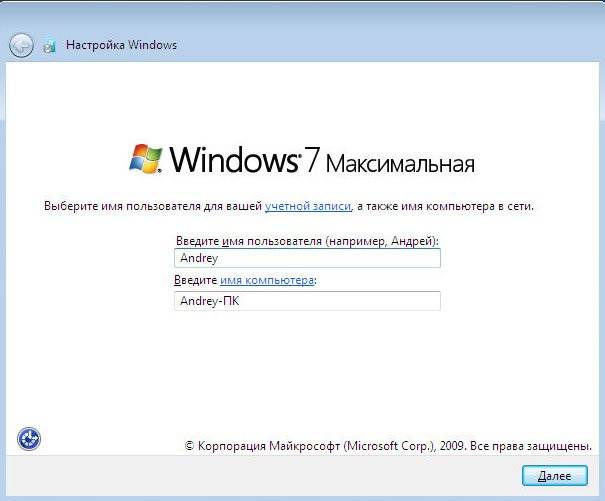
- Username;
- computer name.
When all the required fields are filled in, click the “next” button. A window will open in which you can set a password for account administrator, as well as a hint for given password. It is recommended that you set a password, which will make it possible to protect your PC as much as possible from use by unauthorized persons.
The next step is to enter the registration key. It is usually found on the bottom of the disc box containing the operating system.

If you don’t have a key, you can simply not enter it, and Windows will start in test mode. It has no restrictions on functionality, but its validity period is only 30 days, after which it will be necessary to activate it.
By clicking on “Next”, the user will see a window for setting up the protection of their personal computer. The system recommends choosing the first item, but if you have some experience, it is still recommended to postpone the decision. Since some default settings are not entirely convenient. They somewhat limit the capabilities of the computer.

The penultimate step is setting the date and time. Using special tools you can choose: All operating systems, regardless of version, have both their advantages and disadvantages. That is why it is often necessary to reinstall a later version to an earlier one. U this process
There are a very large number of different nuances. For the most part, they are all related to dividing disks into separate partitions, as well as other features of various kinds.
>This article will talk about reinstalling Windows 8, which were purchased bundled with the OS. Previously, the serial key was indicated on the bottom cover of the laptop case.
The key to the new version is stitched into the BIOS of a specific device.
From this it follows:
- Reinstalling OS of other versions is not possible. That is new system will be the same version as the old one;
- It becomes possible to receive automatic system version updates;
- The operating system activation process occurs online, that is, when reinstalling, a network connection is required.
It turns out that there are two options for reinstalling Windows 8: to a version identical to the pre-installed one, and reinstalling to an OS of a different version, which will be discussed further.
Important:On the hard drive of laptops with a pre-installed OS there is a special hidden partition with system files. It allows you to quickly return the device to the state in which it left the assembly line. If this partition is damaged or deleted, you will have to use the second method.
Reinstalling earlier versions of the OS
If it happens that the laptop does not work correctly and you need to reinstall the operating system, then you will need to buy a disk with it or download the image for free on the official Microsoft website and create an installation flash media.
Important:Maintain version compliance. The new OS version must be identical to the previous one. Otherwise, the reinstallation process will be much more difficult.
Step 1: Adjusting BIOS settings
With the installation media ready, you can begin the installation process.
First you need to slightly adjust the BIOS settings. To open it, you need to turn on the laptop and, before the OS starts loading, press F2.
In it you will need to go to the “Security” section. The string “Secure boot”, which needs to be set to .
There is no need to make any other settings. You just need to make sure that the “Boot mode” line (section “System configuration”) has the value .

Step 2. Installing the OS from media
One caveat: if the laptop previously had Windows 7 or another OS, then installing Windows 8 on the laptop will require reformatting file system in GPT.
To do this, in the installation manager (stage “Where do you want to install Windows?”), you need to delete all logical partitions of the disk and install the system in unpartitioned space.

If you complete all the steps correctly, you won't even need to enter your product serial key. The successful completion of the installation is indicated by a message with the OS version in the lower right corner of the screen.

Step 3. OS activation
Now it’s a matter of small things – activation. First of all, you will need to install the network card driver and configure your network connection.
Then you will need the “Computer Properties” window, or rather the link at the bottom of it, “More information about activating Windows.”

In the window that opens, click “Activate”.

After a short wait the result will be:

Actually, this completes the reinstallation process, the system is activated and ready for use.

Reinstalling to another version of Windows 8
When reinstalling Windows 8 of a different modification, there is a possibility of getting the following “surprise”:

Why is this happening? Because the type of preinstalled OS in the key to it is rigidly fixed in the device BIOS.
The first thing the installer does is read the software version and key information that is stored on the installation media.
If they are not specified, then information about the modification and key is read from the BIOS.
The process is given as an example of reinstalling from Windows 8 Single Language to another version, more precisely, Windows 8 Professional 64-bit Rus (OEM).
On the installation media, this data is stored in the EI.cfg files, which contains information about the software version and PID.txt, which contains the key.
Simple adjustments will make the installation process possible. This requires a bootable Windows flash drive 8.
– //EditorialOS, MaybebeCore orProfessional//
- //Distribution method//

The second PID.txt file is even easier to create. The form to fill out is as follows:
Value=XXXXX-XXXXX-XXXXX-XXXXX-
Where the X's are the modification key for Windows 8 that will be installed. You just need to save it in “txt” format.

The finished files must be placed on a bootable USB flash drive in the “sources” folder.

To do this, you need to open the BIOS (using the method specified in the previous section) and, in the “Boot option menu”, determine the priority of devices to boot.
In this case, “USB HDD” must be moved to the very top line of the list.

After exiting the BIOS and saving the settings, the normal installation process will begin, which can be completed by following the installer's instructions.

Once the installation process is complete, you will need to activate the operating system. The process is no different from that described in the previous section.
It may only require you to enter your product key.

Once activation is complete, the system is completely ready for use.
With the above information the installation process and Windows reinstallation 8 will no longer be a hassle.
Installing Windows 8 from a USB flash drive to a computer or laptop
Reinstalling Windows 8 on a laptop: where to start?
\
Somehow I needed to install Windows 7 on my netbook.
The power supply on the sata-to-usb adapter burned out,
I had to look for alternative options,
I decided to google and found a very good manual for installing windows 7 over the network.
Everything started up without unnecessary manipulations.
So what do we need:
1. Distribution with Windows 7 of the edition you need
2. Set automatic installation Windows® (AIK) for Windows® 7
3. DHCP and TFTP servers. We use tftpd32
4. Computer with installed:
Windows Server 2003 with Service Pack 2
Windows Vista SP1
Windows Server 2008 family
Windows 7 family
Windows Server 2008 R2 family
A program like Daemon Tools Lite
5. Straight arms and 20 minutes of time. Go!!!
First, let's install "Windows® Automated Installation Kit (AIK) for Windows® 7", to do this you will have to mount the installation image into a virtual drive (DaemonTools, Alcohol, UltraIso, Nero...) or unpack it into separate folder and run StartCD.exe from there
In the disk autorun menu, select Windows installation AIK - Next...-Next-Done.
Now in the start menu we look for Microsoft Windows AIK and launch Deployment Tools Command Line from there. Now the fun begins :)
Creating a Windows PE image
IN open console enter commands
copype.cmd x86 d:\winpe
imagex /mountrw winpe.wim 1 mount.
Now in the d:\winpe\mount directory we have a mounted winpe.wim image.
While loading the current Windows image PE a prompt will appear on the screen command line. In order not to connect network drive and don't run setup program You need to manually edit the startnet.cmd file in the d:\winpe\mount\windows\system32 directory, bringing it to next view.
wpeinit
net use y: \\192.168.1.1\seven /user:install install
if exist y:\sources\setup.exe (
y:
cd\sources
setup.exe
)
Please note that the drive is connected using the install user rights with the same password. Therefore, it is important to create on a machine that will act as a server for the user install. For example, you can do this using the command:
net user install install /add /passwordchg:no
If you have an exotic LAN card- read the ADDENDUM at the end of the article.
After all work with the image is completed, you need to unmount it. You can do this using the command:
imagex.exe /unmount /commit mount
Now the image is ready.
Creating directories for downloading over the network
Create a root directory for downloading, for example D:\Seven\ . In it we create a boot directory - in which we will store boot files. Now copy the sources c directory DVD disc Windows 7 to the Seven folder. You can also drop the autounattend.xml file into the sources directory with settings for automatic installation, but it will work without it.
Now let's fill the boot directory.
We mount the winpe.wim image again in order to copy the files necessary for uploading over the network. You can do this using the command
imagex /mount d:\winpe\winpe.wim 1 d:\winpe\mount.
Using commands
xcopy /ey d:\winpe\mount\windows\boot\pxe d:\seven
xcopy /iy d:\winpe\mount\windows\boot\fonts d:\seven\boot\fonts
copy /y d:\winpe\ISO\boot\boot.sdi d:\seven\boot
copy the necessary files to the d:\seven directory for downloading over the network.
After all the work is completed, you need to unmount the used image with the command:
imagex.exe /unmount d:\winpe\mount
The WinPE image used must also be copied to the d:\seven\boot directory with the command:
copy /y d:\winpe\winpe.wim d:\seven\boot
You also need to make general access (share) to the D:\Seven folder for all users or specifically for the install user.
Now let's create a BCD file - boot configuration data (boot parameters storage)
To do this, we need a script d:\winpe\createbcd.cmd with the following content:
FOR RUSSIAN DISTRIBUTION
bcdedit -createstore %1\BCD
for /F "tokens=2" %%i in ("bcdedit -store %1\BCD -create /d "MyWinPE Boot Image" /application osloader") do set guid=%%i
FOR ENGLISH DISTRIBUTION
bcdedit -createstore %1\BCD
bcdedit -store %1\BCD -create (ramdiskoptions) /d "Ramdisk options"
bcdedit -store %1\BCD -set (ramdiskoptions) ramdisksdidevice boot
bcdedit -store %1\BCD -set (ramdiskoptions) ramdisksdipath \boot\boot.sdi
for /F "tokens=3" %%i in ("bcdedit -store %1\BCD -create /d "MyWinPE Boot Image" /application osloader") do set guid=%%i
bcdedit -store %1\BCD -set %guid% systemroot \Windows
bcdedit -store %1\BCD -set %guid% detecthal Yes
bcdedit -store %1\BCD -set %guid% winpe Yes
bcdedit -store %1\BCD -set %guid% osdevice ramdisk=\Boot\winpe.wim,(ramdiskop tions)
bcdedit -store %1\BCD -set %guid% device ramdisk=\Boot\winpe.wim,(ramdiskoptions)
bcdedit -store %1\BCD -create (bootmgr) /d " Windows VISTA"BootManager"
bcdedit -store %1\BCD -set (bootmgr) timeout 30
bcdedit -store %1\BCD -set (bootmgr) displayorder %guid%
Now in our console we run the command:
createbcd.cmd d:\seven\boot
Setting up the TFTPD32 program
Launch tftpd32.exe, go to the DHCP tab and set everything as in the screenshot
Now click Settings, set it as in the screenshot, restart the server.
ALL IS READY!
Now you need to connect the patient to this server via the network and enable booting from the network card in the BIOS. After this, an IP address will be obtained via DHCP and pxeboot.n12 will be executed - which will launch WinPE from the winpe.wim file. Immediately after loading WinPE, the Seven directory will be automatically mounted and the installation will start from there. Next, the installation proceeds in the same way as from a DVD.
ADDITION
If you have an exotic network card whose drivers are not included in the Windows Seven distribution, you can add them yourself at the stage of creating a WinPE image. To do this, take the *.cat,*.inf, *.sys files from the driver and copy them to the d:\landrv directory.
Now you can start installing these drivers in the mounted image, in the mount directory. You can do this using the command:
peimg.exe /inf= d:\landrv\ (DRIVERNAME) mount\windows