How to update Windows XP after the end of support (video). How to update Windows XP? Tips for novice users
Read also
There is a special version of Windows XP - Windows Embedded POSReady 2009, which is based on the most common Windows XP Service Pack 3. Windows Embedded POSReady 2009 runs numerous terminals, ATMs, information stands, self-service systems, payment kiosks and other similar devices. But the main charm is that support for Windows Embedded POSReady 2009 will last right up to April 9, 2019, that is, updates will be released before this date. I myself have come across Windows Embedded POSReady many times at work, and as a software developer, and for all the time I have not found any fundamental differences from Windows XP. Therefore, if you install updates intended for POSReady on Windows XP, then there will be no problems. Of course, updates will not be installed on your computer just like that, for this you will have to disguise your Windows XP as operating system for terminals.
The cunning Germans on one of the forums found a very simple way, thanks to which the system will be identified not as Windows XP, but as Windows Embedded POSReady 2009. It all comes down to the fact that you need to add only one key to the registry:
Windows Registry Editor Version 5.00
"Installed"=dword:00000001
Save the above code in a file with any name and extension .reg, then double click on it and add changes to the registry. You can download the finished reg file from the link below:
WinXP.to.POSReady.zip (245 bytes)
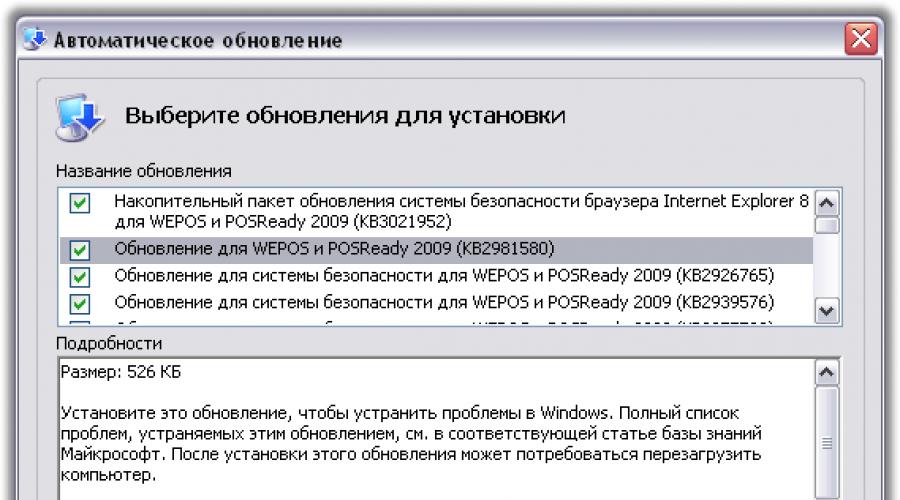
After making changes, you must restart your computer. Now you can start the service windows update, and if everything is done correctly, then with the first check, several dozen updates will become available. They are labeled as updates for WEPOS and POSReady 2009, as they should be.

Thus, XP users will be able to receive updates over the coming years, unless, of course, Microsoft somehow blocks this possibility. An interesting official reaction from Microsoft representatives to the possibility of updating Windows XP after the end of support:
We recently became aware of a hack that would supposedly allow Windows XP users to receive security updates. These security updates that may be installed are for Windows Embedded and Windows Server 2003 and do not fully protect Windows XP. Windows users XP is still putting their machines at serious risk by installing these updates that have not been tested for Windows XP. the best way protect your systems is to upgrade to more new version e.g. up to Windows 7 or Windows 8.1
Again, I'm familiar with Windows Embedded POSReady firsthand and have no idea what more "testing" upgrades on Windows XP require. This statement is nothing more than a veiled disclaimer.
What could threaten such a change in the system? On the technical side, nothing. IN last resort you can delete the key from the registry, restart the computer and the system will again turn into the most ordinary Windows XP. But on the legal side, you are violating the license in the most flagrant way. If on home computers such nonsense can be put with a parting, then on working machines, in the event of a check, unnecessary questions may arise.
Most manufacturers of software products, which include the world-famous Microsoft Corporation, are systematically working to improve their software to achieve maximum results in the performance of user PCs. Particular attention is paid to this direction by Microsoft in the field of its operating system of the Windows family.
New installation Microsoft package Windows XP Service Pack 3 for the Windows XP operating system includes the entire volume of previously developed updates plus a number of additional improvements that can significantly increase the performance of the OS, as well as allow software developers to simplify the already complex and painstaking work.
We draw your attention to the fact that it makes sense to download this file if it is already installed system(this is not the OS itself, but only an addition to it).
Microsoft specialists offer the user this executable file as a separate installation package (not an ISO image, as is commonly believed). It can be copied to a USB flash drive or other USB drive from which to install updates for windows xp.
Attention: download windows xp sp3 torrent with free of charge on our website at the link at the bottom of the article.
The presented SP3 update package is designed for windows xp, which contains all the latest developments in the field of improving the stability and quality of the OS kernel. Microsoft regularly provides similar products to its users. As a rule, such packages consist of a number of improvements for the operating system, bug fixes identified as a result of monitoring the operation of the system, and other changes important for the quality and fast work PC in general.

And despite the fact that the company officially stopped releasing service packs for windows xp, this system remains quite popular due to its simplicity and undemanding to system resources. Many more users and even organizations work with programs that run under this shell.
Regarding updates, as a rule, they are released due to constant monitoring of the operation of the operating system, which is carried out in real time, from the moment it is first launched. Note that the main sources of information about various failures and shortcomings of the OS are reports sent by individual users and Microsoft partner companies. Undoubtedly, a certain amount of fixes and bug fixes, is introduced into the OS at the request of the user and in accordance with the PC settings.
But over time, they all merge into separate file, which is an independent software, V this moment- This Service Pack 3 for Windows XP.
We strongly recommend that you print this manual before starting the installation. The installation process will require you to restart your computer, so the printed copy will help you take the necessary steps in case you cannot return to this web page.
Introduction
Since Windows XP does not offer the update option for Windows installation 7, you should use the Full installation option.
The full installation option is more complex and in some cases may take a couple of hours to complete. This guide, which includes five steps in the description, will help you complete the entire process.
If you need to install Windows 7 on a netbook, purchasing Windows 7 using a partition is the easiest way to accomplish this task. For more information, see Installing Windows 7 on a netbook.
Important! Read this before you start.
A full installation will not save your programs, files, and settings. For this reason, such an installation is sometimes referred to as a clean installation.
This means that two very important conditions should be taken into account before starting work.
Before you start installing Windows 7, you will need to transfer your files from your computer. To facilitate this task, it is recommended to download the transfer tool for free Windows Data and use external HDD. They are sold in electronics stores or Supplies for the office and provide easy way adding more storage space.
After the installation, you will also need to manually reinstall the programs that you used before. This requires the original installation discs or installation files for all the programs you need in Windows 7. Check the compatibility of the programs you need with Windows 7 on the .
32-bit or 64-bit: which version of Windows 7 should I install?
IN Windows package 7 includes installation discs with 32-bit and 64-bit versions. 64-bit operating systems can handle large amounts of memory (typically 4 gigabytes (GB) random access memory(RAM) and more) is more efficient than 32-bit operating systems. However, not all computers support 64-bit systems.
To find out which installation disk Windows 7 can be used, click the Start button, select My Computer right click mouse, and then Properties.
If "x64 Edition" is not listed in the details list, your computer is running a 32-bit version of Windows XP. Next, you will learn how to use the Windows 7 Upgrade Advisor. This program will let you know if your computer can run the 64-bit version of the Windows 7 operating system.
If "x64 edition" is listed under System, your computer is running Windows XP 64-bit and supports Windows 7 64-bit.
Step 1: Check if your computer is ready for Windows 7.
To check if your computer is ready for Windows 7, download the free Windows 7 Upgrade Advisor. It finds possible problems about hardware, devices, and programs on your computer that can affect your installation of Windows 7, and provides guidance on how to resolve them.
The report lists all the steps required to prepare your computer for Windows 7.
Click the Download button, and then save the setup file to your computer.
Double click the setup file.
Windows 7 Upgrade Advisor requires the .NET Framework 2.0. If it is not on your computer, follow these steps: If you don't see a prompt to install .NET 2.0, you can skip these instructions and go to step 5.
-
Click Finish.
If you agree to the licensing terms, click Install.
Click Close.
When a checkbox is displayed, clicking the Close button will launch the Windows 7 Upgrade Advisor.
To accept the default account mapping, click Submit.
To change how accounts are matched Windows records XP in Windows 7, click Advanced Options.
Select Previous installations of Windows, as well as any other categories of files that you want to remove.
Microsoft Academic Open License- license for organizations licensed for educational activities, as well as for privileged institutions (such as museums, libraries, etc.). This group presents all possible options for purchasing an operating room Microsoft systems Windows at discounted prices, public and private institutions of higher education, training centers and all institutions licensed for educational activities. Microsoft Windows 10 Professional is a state-of-the-art operating system with tons of new features and functionality. When you decide to buy Windows, you will receive a completely new OS from Microsoft, suitable not only for personal, but also for tablet computers.
Program Microsoft Open License Government enables state and municipal organizations of almost any size to acquire corporate licenses for Microsoft products on special terms, which include: More low prices compared to standard Microsoft Volume License pricing. Microsoft Windows 10 Professional is a state-of-the-art operating system with tons of new features and functionality. By deciding to buy Windows, you will receive a completely new operating system from Microsoft, suitable not only for personal computers, but also for tablet computers. In this group state organizations can buy the following licenses and products Windows Solutions for legalization Windows Professional Windows Enterprise Windows Professional 10 Upgrade
- You need to check your computer for updates to the Toolkit sharing" and "Multi-Language Interface Pack" and, if present, remove them. To do this, in the "Control Panel" open the "Add or Remove Programs" application, check the "Show updates" box, view the previously specified updates in the list and remove them if found .
- Also check the status of antiviruses - they must be disabled, otherwise problems may arise when updating the XP version.
- It doesn't hurt to create a restore point. If you do this, then in case of failures in the new version of the OS, you can "roll back" back to the stable SP2.
- Run the update installer file downloaded from Yandex.Disk.
- The unpacking of the installer files to a temporary folder will begin. Wait for this process to finish.
- In the welcome window that will open after that, you need to click "Next".
- The text of the license agreement will appear. You must review and accept the update to continue installing the update. To do this, check the box next to "Accept" and click "Next".
- The process of installing all update files on the computer will start. By the way, this process does not take long.
- After its completion, the last installer window will appear. It will tell you that you need to restart your computer to complete the installation. You can do this right now by clicking the "Finish" button. Otherwise, check "Delay restart" and click "Finish" - the installer window will be closed, and you can finish all the work on the computer.
- But you still need to restart your computer. After that, the message "Please wait" will appear during the loading of the operating system - at this time, the update installation process is being completed.
- As a result, a window for subscribing to automatic updates will appear. Select the desired answer and click "Next".
- Paste Windows disk XP into the drive and move all the files that are stored on it to any folder convenient for you, but make sure that there are no Russian letters on the path to it.
- Open the nLite application and in the first window select the Russian language from the list and click "Next".
- Click "Browse" and in the window that appears, select the folder where the files were copied from the disk.
- Click next.
- In the next window, also click "Next".
- From the task list, select "Service Pack" and " boot image ISO", then click "Next".
- At this stage, click "Select", and in the window that appears, "Yes".
- Click "OK" in another window.
- In the window that appears, specify the file downloaded from Yandex.Disk.
- After waiting for the completion of adding this file, click "OK", then "Next".
- Click "Create ISO" and select the folder where the image will be placed.
- Wait for the image creation process to finish and close the application.
If the Windows 7 Upgrade Advisor is not running, double-click Windows shortcut 7 Upgrade Advisor on desktop.
In the security warning dialog box, click Yes.
Click the Start check button.
Read the report carefully and make a note of any issues that the transition advisor found, as well as the recommended actions to resolve them.
Step 2: Transfer files and settings, and get software discs
Windows Easy Transfer is a free, downloadable program that helps you move your files and settings to another location before you install Windows 7, and then return them to your computer after you finish installing Windows 7.

Windows Easy Transfer makes it easy to transfer files and settings.
Windows Easy Transfer creates a single file that contains files and settings. The file may have quite big size, which depends on the amount of data saved on the computer, so it is recommended to use external hard disk.
When preparing to transfer files from your computer to an external storage device, consider the following conditions.
Windows Easy Transfer does not transfer programs, only files and settings. After installing Windows 7, you will need to manually reinstall the programs on your computer. Windows Easy Transfer will provide a list of programs currently in use in Windows XP.
Windows Easy Transfer does not support transferring files from a 64-bit version of Windows to a 32-bit version of Windows. This means that if your computer is running a 64-bit version of Windows XP and you plan to install a 32-bit version of Windows 7, you won't be able to use Windows Easy Transfer to transfer files and settings.
This procedure also requires Windows XP Service Pack 2 (SP2) or later. To check the version of the operating system running on your computer, click the Start button, right-click My Computer, and select Properties. If Service Pack 2 ("Service Pack 2") or Service Pack 3 ("Service Pack 3") is listed under System, you can use Windows Easy Transfer. If Service Pack 2 (SP2) or SP3 is not installed, go to the Windows XP Service Packs page to update your computer.
On the Get important updates page, we recommend that you obtain Latest updates to ensure successful installation and protect your computer from security threats. Your computer must be connected to the Internet to receive updates during Windows 7 setup.
If you accept the terms license agreement on the Review the license terms page, click I accept the license terms, and then click Next.
On the Select Installation Type page. click Custom.
Select the partition containing Windows XP (this is often local disk Computer C:), and then click Next. (Do not select external drives for installation.)
In the Windows.old dialog box, click OK.
To complete the installation of Windows 7, follow the instructions below, including renaming the computer and setting the original account user. You can use the names used in Windows XP or choose new ones.
Step 4: Transfer files and settings back to your computer
After you install Windows 7, you will need to restart Windows Easy Transfer and transfer your files and settings back to your computer.
Run Windows Easy Transfer before you reinstall programs. This is because Windows Easy Transfer transfers files to directories that will be used by reinstalled programs.
 User accounts from Windows XP migrate to Windows 7.
Transfer files and settings back with Windows Easy Transfer
Check the connection to the external computer hard drive or other storage device containing the Windows Easy Transfer migration file.
Click the Start button, select Computer and under Hard disks double click the storage device.
Navigate to the directory where you saved the Easy Easy file called Windows Easy Transfer Old PC Data and double-click to open it.
If the file was given a different name when it was created, navigate to and double-click the desired file.
If you specified a password when you created the Easy Transfer file, enter it, and then click Next.
Note.
If you receive an error message that there is not enough disk space to transfer files back to your computer using Windows Easy Transfer, you can use Disk Cleanup to remove temporary files left after installing Windows 7 and thus free up disk space. For information on how to complete this procedure, go to the "Post-Installation Cleanup (Optional)" section at the end of Step 5: Reinstall software and update drivers.
On the Choose what to transfer to this computer page, you can choose how user accounts are migrated from Windows XP to Windows 7.
On the Migration Complete page, select View Migrated Items to view a list of files and user accounts that have been migrated from Windows XP to Windows 7. Select View a list of programs that can be installed on the new computer to view components that were previously installed in Windows XP.
Click the Close button. If you are prompted to restart your computer, click Restart.
If you are migrating multiple user accounts, you may be prompted to change your password when you log in next time. If similar request is displayed, click OK, and in the dialog box that appears, do one of the following:
If you want to assign a password to the user account (recommended), specify New Password, confirm it, and then press Enter. You do not need to specify the old password from Windows XP.
If you do not want to assign a password to the user account, leave the fields blank and press Enter.
Step 5: Reinstall programs and update drivers
After you run Windows Easy Transfer and add files and settings to your computer, you can reinstall programs and check for new or updated drivers.
Windows Easy Transfer provides a report on programs used in Windows XP that may need to be reinstalled. To reinstall programs, you must have the installation discs or installation files you obtained earlier.
 The report lists programs that may require reinstallation.
The report may contain programs that have never been used before or were rarely used. When reinstalling programs, start with those that you know and use regularly, especially new anti-virus applications for your computer. If the computer is under Windows control 7 new antivirus software is not available, you can check for it on the Windows 7 Compatibility Center website.
Note.
Some programs, such as Windows Mail, are not included with Windows 7. If you have used Windows Mail or Outlook Express as your email programs, you must install new program of this type to read stored messages and send and receive email. Available similar programs other manufacturers or download from the Windows Live Mail website.
Driver update
A driver is a program that allows Windows 7 to communicate with computer hardware or various external devices. Without drivers, the connected equipment, such as a video adapter or printer, cannot function properly.
In most cases, drivers are included with Windows. They can also be found using Windows Update and by checking for updates. Click the Start button, select All Programs, and then click Windows Update.
A driver missing from Windows is usually found on a disc that came with your hardware or device, or on the manufacturer's website. You can find more information in Update a driver for hardware that is not working properly.
Netbooks and drivers
Some netbooks and laptops running Windows XP may not have certain Windows 7 drivers for components such as function keys. If the driver is not available on Windows Update, go to your computer manufacturer's website, download page, or support page for information about drivers for your PC.
You can try installing a driver created for Windows XP on a computer running Windows 7. If windows driver XP cannot be installed, run the Program Compatibility Troubleshooter to find and fix the problem.
Download or copy the driver installation file to your computer.
Right-click the file and select Fix Compatibility Issues.
Follow the Program Compatibility Troubleshooter to change driver compatibility settings.
Cleaning the hard drive after installation
If the disk partition was not formatted during the installation of Windows 7, the files used in Windows XP are saved in the Windows.old folder. This folder will save all the files that you used while working on WindowsXP. This is done so that not a single file is lost during the installation of Windows 7. The type of files in this folder depends on the computer.
If during the first few weeks after starting Windows usage 7, you can see that all the files are there and you can find all your data, you can delete the Windows.old folder to clean up space on your hard drive.
Warning
Before using Disk Cleanup, make sure all files and settings are migrated to Windows 7 correctly and saved in the correct locations. It is not possible to recover a deleted Windows.old folder.
Click the Start button and in the search box type Disk Cleanup. In the list of results, select the Disk Cleanup component.
If you are prompted to specify a drive, select the drive where the Windows 7 operating system is installed, and then click OK.
Select the Clear command system files. Enter the administrator password or password confirmation if prompted.
If you are prompted to specify a drive again, select the drive where Windows 7 is installed, and then click OK.
The operating system, beloved by millions of users, has consistently helped solve various problems for many years. Over time, she began to become morally obsolete, but, nevertheless, she kept her rating at a height for a long time, until she was born, and the famous unchanged one quickly won the minds and hearts. But even now, in some circles, XP is popular when, having already spread its wings, it walks around the planet and slowly but surely wins its positions. Now often on old and weak, by today's standards, computers you will find Windows XP. This is understandable, the system itself is quite economical in terms of resources, and 512 MB of memory is enough for stable operation, unlike voracious fashionable modern operating systems for which soon 4 GB will not be enough.
That's just one major drawback in XP. Not in the system itself, it is in a sense ideal. Microsoft has completely ended support for XP. And, accordingly, neither security updates, nor, in fact, security confidence. Since updates for Windows XP no longer come in automatic mode, and have not been released since 2014, the system has been hit by hacker attacks and malware threats.
Upgrade Windows XP to Windows 10
Microsoft developers are constantly creating new Windows versions, improve, refine, and make the transition from one version to the next as simple and comfortable as possible. You can upgrade from XP to a higher version. Unfortunately, simple and fast transition with saving all user data, does not exist on Windows 10. You will either have to update the computer several times, from XP to, then to, and only then to. This is a long and not entirely rational way. The easiest way is to execute it on a computer, provided, of course, that the resources of the computer allow, or rather, system requirements Windows 10. 
Windows XP upgrade to SP3
Windows XP SP3 was the final update for the XP line. Actually, the innovations and changes in this update made such a splash on users. The system really was the best, and now it can be considered as such, taking into account that time and the experience of programmers and developers.
@
Despite the fact that such versions of Windows as the eighth or tenth have been released for quite some time, XP still remains popular for many users. Unfortunately, Microsoft has stopped its support, but it is possible that someone does not have the latest version of the OS installed anyway.
This article will show you how to upgrade from Windows XP SP2 to SP3. This procedure is not at all complicated, and with our instructions it will take a little time at all. Also at the end of the article we will talk about how to upgrade XP to Windows 7.
Preparatory activities
Before you upgrade from Windows XP SP2 to SP3, you should prepare your computer and set it up yourself. First, download the update package itself. Unfortunately, it can no longer be found on the official website of the company, but there is a corresponding archive on Yandex.Disk.
Having downloaded the package, it is still too early to move on to Windows update XP to SP3, you still need to prepare the system.

Having prepared the system, you can go directly to the story of how to upgrade Windows XP SP2 to SP3.
Installation inside the operating system
As stated at the beginning of the article, there are two ways to upgrade. The first one implies installation inside the operating system, which is what we will talk about now, while the second one requires the installer to be launched through the BIOS, which will be discussed a little later.
Before upgrading from Windows XP SP2 to SP3, I would like to say that this process is similar to installing any other software, so that for most users it will be clear, but for the rest below is detailed instructions:
This is the first way to upgrade Windows XP SP2 to SP3, now let's move on to the second.
Installation via BIOS
Installing an update through the "BIOS" involves using the nLite program, so first download and install it on your computer, and then proceed to the instructions.

Windows Image XP SP3 is created, all you have to do is burn it to a USB flash drive and boot the computer from it, then install the OS.
Upgrading to later versions of Windows
Many users, when thinking about upgrading Windows XP to a newer version, want to install the seventh or eighth. Unfortunately, this will not be possible, since the presented editions must be downloaded separately. Therefore, you can upgrade Windows XP to Windows 8 only by purchasing a disk with this OS or by downloading an image from the site.

Conclusion
As a result, you know two ways to upgrade from Windows XP SP2 to SP3, each of them has its own distinctive features, but they all equally achieve the desired result.