1C offers the EnterpriseData format for exchanging business data. Exchange via universal format Universal exchange format 1s
Read also
In some cases (for example, with a large workflow or with complex accounting), it is much more convenient for the end user to distribute accounting between several applications, exchanging data between them from time to time. Before the release of the 1C platform version 8.3, standard data exchange occurred solely at the request of the user through uploading and downloading information using files XML format. Recently, the data synchronization mechanism in 1C has been increasingly used.
There are several reasons for the popularity of synchronization:
- There is no need to separately launch the processes of loading and unloading data;
- The automatic exchange of information does not preclude manual exchange;
- Ease of setup (for standard configurations, you don’t even need to create exchange rules;
- It is enough to create synchronization once and announce the schedule for its execution.
Conditions of our task
At the input, we have two standard database configurations:
- Payroll and personnel management (version 3.1.3);
- Accounting of an agricultural enterprise (version 3.0.52).
Both bases are in file mode. Synchronization can be configured from any database.
If synchronization will be configured from "Accounting" to "ZUP", the "Synchronization" checkbox must be activated and vice versa.
Where are the settings
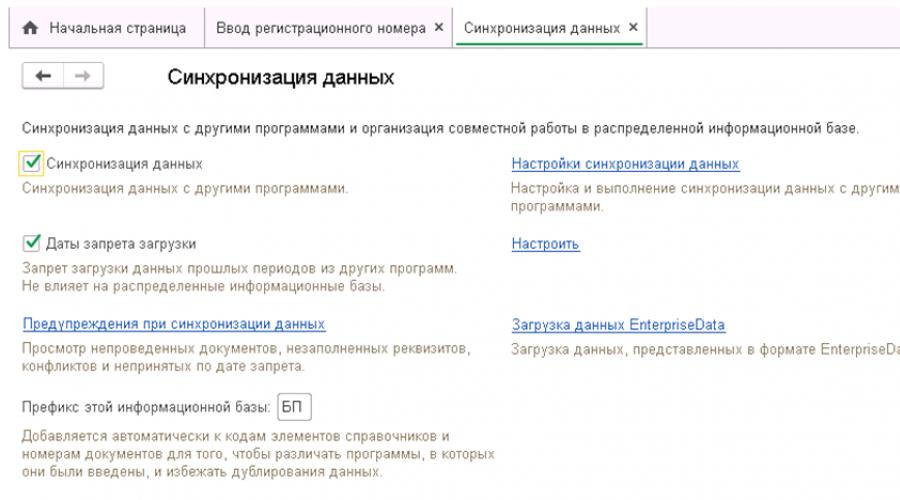
In "Accounting" we go to the "Administration" subsystem, in the "Settings" menu and find the item "Data synchronization" (Fig. 1)
The synchronization settings window will open (Fig. 2)
 Rice. 2
Here we can:
- Enable or disable synchronization;
- Prohibit downloading of irrelevant data;
- Set a prefix to identify the transferred data;
- Go to other sync settings.
By starting the synchronization by checking the appropriate checkbox and defining the prefix, we can close the accounting department. Further work will be made in the "Salary".
The data synchronization settings window is shown in Fig. 3
 Rice. 3
Let's consider it in more detail.
Synchronization settings window
Let's start in order:

Separately, I would like to draw the reader's attention to the "Registration of changes" window (Fig. 5). In the upper part of which there are numbers of sent and received messages, after a successful exchange, the numbers in the source base and the receiver base must match. In some cases (synchronization occurred with a copy of the database, failures in operation), the numbering in the databases is violated. You can correct this situation by simply clicking on the hyperlink with numbers. This action allows you to manually set the current sent and incoming messages(Fig. 6)
 Rice. 6
Synchronization settings
There are two commands on the Data Sync Settings tab:
- Tune;
- Download rules.
Launching the "Load Rules" command opens the form (Fig. 7)
 Rice. 7
Here we can choose if we are going to use model rules exchange supplied in the configuration, or we will perform synchronization according to our own rules stored in the archive file.
The rest of the settings are made by clicking on the "Settings" button (Fig. 8).
 Rice. 8
In the first window that opens, you can:
- Open the form for setting up the synchronization script;
- View events for sending and receiving information;
- Determine the date from which the exchange will take place;
- If accounting is maintained for several organizations, you can specify which of them will participate in the exchange;
- Define the parameters for unloading salary transactions: with or without employee details (summary).
The "Load rule set" command is similar to the same command in the previous settings window.
It is worth dwelling in more detail on the connection parameters (Fig. 9)
 Rice. 9
In our case, the destination database and the source database are located on the same computer and work in file mode, so synchronization between them occurs through direct connection.
We have to:
- Determine the path to the destination base;
- Set authorization parameters (a user with administrator rights must be created in the receiving database);
- After checking the connection, we can assume that our setup is complete.
If the exchange occurs through other connection types, you need to configure their settings on the corresponding tabs.
Schedule settings
And at the end, a few words about the synchronization schedule settings, it is performed in the corresponding tab of the window (Fig. 3) and does not differ in any way from the corresponding form for setting the schedule for other scheduled tasks.
- Video - 21 hours
- Methodological materials in PDF - 117 A4 pages
- 16 practice tasks with teacher solutions
Course format, support
Materials are available immediately after payment for the order - you download them from the site and study at any convenient time.
Support is provided through the Master Group on the website.
Full access to the Master group must be activated no later than 100 days after purchase.
Relevance of the course
The course materials are relevant for BSP version 2.3.2.73.
If you plan to use older versions of the BSP, then please note that the mechanisms of operation of the BSP subsystem “Data Exchange” have changed, and the interfaces have also changed.
A new course for the latest BSP versions is under development and will be released in a few months. But for BSP versions 2.3.2.73 and younger, the current rate will be relevant.
Course fee
9 700 rubles
Guarantee
We have been training since 2008, we are confident in the quality of our courses and give our standard 60 day warranty.
This means that if you started taking our course, but suddenly changed your mind (or, say, do not have the opportunity), then you have a 60-day period to make a decision - and if you make a return, we will refund 100% of the payment.
Installment payment
Our courses can be paid in instalments or in installments, even without interest. Wherein you get access to the materials immediately.
This is possible when paying individuals in the amount of 3,000 rubles. up to 150,000 rubles.
All you need to do is select the payment method "Payment via Yandex.Checkout". More on site payment system choose “Pay in installments”, indicate the term and amount of payments, fill out a short questionnaire - and in a couple of minutes you will receive a decision.
Payment Options
We accept all major forms of payment.
From individuals- payments from cards, payments with electronic money (WebMoney, YandexMoney), payments through Internet banking, payments through communication stores, and so on. It is also possible to pay for the order in parts (in installments), including without additional interest.
Start placing an order - and in the second step you will be able to choose your preferred payment method.
From organizations and individual entrepreneurs– non-cash payment, delivery documents are provided. You enter an order - and you can immediately print an invoice for payment.
Multi-employee training
Our courses are designed for individual training. Group training on one set is illegal distribution.
If a company needs to train multiple employees, we usually offer “add-on kits” that are 40% cheaper.
To place an order for an “additional kit” select 2 or more course sets in the form starting from the second set the cost of the course will be 40% cheaper.
There are three conditions for using additional kits:
- you cannot purchase only an additional set if at least one regular set has not been purchased before (or together with it).
- there are no other discounts for additional sets (they are already discounted, it would have turned out to be a “discount on a discount”)
- promotions (for example, compensation of 7,000 rubles) do not apply to additional sets for the same reason
Print (Ctrl+P)
Exchange via universal format
The "Data Exchange" subsystem of the library of standard subsystems contains 4 options (technologies) for information exchange between various information bases:
- distributed information bases (RIB);
- data exchange through a universal format;
- data exchange according to exchange rules (exchange rules are created using the Data Conversion configuration, edition 2.1);
- data exchange without exchange rules.
This article discusses the technology of data exchange through universal EnterpriseData format. This technology available in the "Library of Standard Subsystems", starting from version 2.3.1.62. released in early 2016. At the moment, the latest version of BSP 2.3 (for use with the 1C:Enterprise 8.3 platform, version 8.3.8.1652 or later with disabled compatibility mode) has release 2.3.6.17.
Rice. 1 Latest releases of BSP 2.3
Among the files for the delivery of applied solutions 1C there is text file“Library versions”, where it is written on the basis of which version of the BSP the application was developed, for example, based on the applied solution UT 11.3.3.231, BSP 2.3.5.65 was laid down.
Note that for use with the “1C:Enterprise 8.3” platform, at least version 8.3.10.2168 with compatibility mode disabled, a revision is released BSP 2.4.
Description of the EnterpriseData format
What is the EnterpriseData format?
This is a format that allows you to describe an infobase object (counterparty, invoice, etc.) or report the deletion of this object. It is expected that the configuration that received the file in the EnterpriseData format will react accordingly - it will create new objects for itself and delete those that are marked as deleted in the file. It is intended for information exchange between UT, RT, UNF, BP configurations. Also, the format can be used to exchange information with any other information systems: it does not depend on the characteristics of its own software or infobase structures that participate in the exchange and do not contain explicit usage restrictions.
EnterpriseData format version
The format data is stored in XDTO packages in the general database configuration branch, as shown in Fig. 2
 Fig. 2 XDTO - EnterpriseData data format packages
 On fig. 2 shows that there are several XDTO packages. This different versions format. The format version number consists of X.Y.Z, where X.Y is the version and Z is the Minor version. The Minor version is increased in case of bug fixes and other changes, in which: the data conversion logic based on previous version format (maintaining backward compatibility of current data transfer algorithms through the format); support for new format features for the conversion logic is voluntary. An example of such changes can be fixing an error, changing the properties of format objects, adding properties that are not required when converting data. In other cases, when changing the format, the Major version increases: X - in the case of a global restructuring, Y - in other cases.
The format describes the representation of objects (documents or directory elements) in the form of XML files. Version 1.0.1 contains descriptions of 94 objects from various areas(finance, production, purchases and sales, warehouse operations). The names of the types, as a rule, are well understood and do not need additional explanations: for example, "Document. Certificate of Completion of Works" or "Directory. Counterparties". As you can see, the description of document types begins with the prefix "Document.", the reference element - with the prefix "Reference." For a detailed description of the format, see
The latest version is 1.3, however, the most commonly used version is 1.0. There is not much difference between the versions. Format EnterpriseDataExchange_1_0_1_1
used when exchanging via a web service.
Note that together with the EnterpriseData data format package, the package is used ExchangeMessage when creating conversion rules. It is this package that contains the object type additional info,which can have any value type and is used when creating a conversion rule between configuration objects. which are not in the data format. Precisely, thanks to additional info,you can adapt and customize the exchange rules without changing the format data in the XDTO packets.
 Rice. 3 Structure of the ExchangeMessage XDTO package
 How to exchange data in EnterpriseData format?
The exchange of data in the EnterpriseData format with a configuration is an exchange of files. In response to a file received from an external application, the configuration will process it and create a response file. File sharing can take place:
- through a dedicated file directory,
- via FTP directory,
- through a web service deployed on the side of the infobase. The data file is passed as a parameter to the web methods.
Note. For two-way data exchange between a third-party application and the infobase-side configuration, a number of settings must be made - the third-party application must be registered in information base, an exchange channel must be defined for it (via a file or FTP directory), etc. But for cases of simple integration, when it is enough only to transfer information from third party application to the infobase and back transfer of data from the infobase to a third-party application is not required (for example, the integration of an online store that transmits sales information to 1C: Accounting), there is a simplified version of working through a web service that does not require settings on the side.
When exchanging using configuration exchange plans, only information about changes that have occurred since the last synchronization is transmitted during synchronization (to minimize the amount of information transferred). On the first sync, the configuration will dump all objects in EnterpriseData format into an XML file (because they are all "new" to the third party application).
The next step for a third-party application is to process the information from the XML file and place it in the section during the next synchronization session.

Upon receipt of the acknowledgment message, the configuration marks all changes submitted in the previous message as synced successfully. Only unsynchronized changes in objects (creation of new ones, modification and deletion of existing ones) will be sent to the external application during the next synchronization session.
When data is transferred from an external application to the configuration, the picture is reversed. The application must complete the section
The configuration, after processing the file, will generate an XML file that will contain a receipt message and new data for synchronization from the configuration side (if any since the last synchronization session).

For more information about data exchange with application solutions on the 1C:Enterprise platform in the EnterpriseData format, see
The general module of the “interchange manager through the universal format”.
Procedures and functions that fully describe the rules for uploading data from the infobase to the exchange format and the rules for loading data from the exchange format to the infobase are developed in a common module - the exchange manager module through the universal format.
 Rice. 4 The structure of the exchange manager module through a universal format
 The module is created automatically using the Data Conversion configuration, edition 3.0, based on the configured exchange rules, or manually in the configurator.
The module consists of several large sections, each of which contains its own group of procedures and functions.
- A comment. The first line of the module contains a comment with the name of the conversion. This string is needed to identify the module when using the command in the program "Data Conversion", edition 3.0., for example. // Conversion UP2.2.3 from 06/01/2017 19:51:50
- Conversion procedures. Contains predefined procedures that are performed at different stages of data synchronization: before conversion, after conversion, before delayed filling.
- Data Processing Rules (DPR). Contains procedures and functions that describe the rules for processing data.
- Object Conversion Rules (FCR). Contains procedures and functions that describe the rules for converting objects, as well as the rules for converting the properties of these objects.
- Predefined Data Conversion Rules (PPDC). Contains a procedure that fills in the rules for converting predefined data.
- Algorithms. Contains arbitrary algorithms that are called from other rules (sub or FSP).
- Options. Contains the logic for filling in the conversion parameters.
- general purpose. Contains procedures and functions that are widely used in rules and algorithms.
The parameters of procedures and functions that are used in several types of procedures of the manager module are described below.
Exchange Components. Type - Structure. Contains exchange parameters and rules initialized as part of an exchange session.
Direction of the exchange. Type - String. Either Send or Receive.
DataIB. Type - DirectoryObject or DocumentObject.
Procedures related to conversion events
There are three predefined procedures that are called during the conversion process:
- BeforeConversion. Called before data synchronization is performed. Typically, this procedure contains the logic for initializing various conversion parameters, filling in default values, etc. Parameters: Exchange Components.
- AfterConversion. Called after data synchronization has completed, but before lazy seeding has completed. Options: Exchange Components.
- BeforeDeferredFilling. Called before lazy seeding is performed. The logic for sorting or adjusting the table of objects subject to lazy filling can be located here. Options: Exchange Components.
AML procedures
Fill in the Data Processing Rules. An export procedure that contains the logic for filling in data processing rules. Contains calls to other procedures that add a rule for processing a specific object to the rules table (see procedures below Add POD). Options: DirectionExchange, Data Processing Rules
Add UNDER_<ИмяПОД>. A set of procedures that fill the POD table with rules for specific objects. The number of such procedures corresponds to the number of AML provided for this conversion in the program "Data Conversion", version 3.0. Options: Data Processing Rules(table of values initialized as part of the execution of the exchange session).
UNDER_<ИмяПОД>_WhenProcessing. The procedure contains the text of the handler WhenProcessing for a specific POD. The handler is designed to implement the conversion logic at the object level. For example, assign a specific FSP to a specific object, depending on the contents of the object. Options:
- InformationIB or DataXDTO(depending on the direction of exchange):
- when sending - object ( DirectoryObject,DocumentObject);
- when received, a structure with a description of the XDTO object.
- Use of PSP. Type - Structure. The key contains a string with the name of the PCO, and the value of the type boolean (True- PKO is used, Lie– PKO is not used).
- Exchange Components.
UNDER_<ИмяПОД>_DataFetch. The function contains the text of the handler When unloading. The handler is designed to implement an arbitrary algorithm for selecting objects to be unloaded. Return value: array of objects to be unloaded. The array can contain both links to infobase objects and a structure with data to be unloaded. Options: Exchange Components.
PKO procedures
Fill in the Object Conversion Rules. An export procedure that contains the logic for filling in object conversion rules. Contains calls to other procedures that add a specific object conversion rule to the rules table (see below procedures Add PKO). Options: DirectionExchange, RulesConversion(table of values initialized as part of the execution of the exchange session).
AddPKO_<ИмяПКО>. A set of procedures that populate the CSP table with rules for specific objects. The number of such procedures corresponds to the number of FSPs provided for this conversion in the "Data Conversion" program, version 3.0. Options: RulesConversion(table of values initialized as part of the execution of the exchange session).
PKO_<ИмяПКО>_When Sending Data. The procedure contains the text of the handler OnShipping for a specific PCP. The handler is used when unloading data. Designed to implement the logic of converting the data contained in the infobase object into the description of the XDTO object. Options:
- InformationIB. Type - DirectoryObject, DocumentObject. Infobase object being processed.
- DataXDTO. Type - Structure. Designed to access the data of the XDTO object.
- Exchange Components.
- StackUnloads. Type - array. Contains links to unloaded objects, including nesting.
PKO_<ИмяПКО>_WhenConvertingXDTOData. The procedure contains the text of the handler WhenConvertingXDTOData for a specific PCP. The handler is used when loading data. Designed to implement arbitrary XDTO data conversion logic. Options:
- DataXDTO. Type - Structure. XDTO object properties that have been pre-processed for ease of access.
- ReceivedData. Type - DirectoryObject, DocumentObject. An infobase object formed by converting XDTO data. Not recorded in the infobase.
- Exchange Components.
PKO_<ИмяПКО>_Before WritingReceivedData. The procedure contains the text of the handler Before Writing Received Data for a specific PCP. The handler is used when loading data. Designed to implement additional logic that must be performed before writing an object to the infobase. For example, whether changes should be uploaded to existing IS data or whether they should be uploaded as new data. Options:
- ReceivedData. Type - DirectoryObject, DocumentObject. A data element formed by converting XDTO data.
Recorded if this data is new for the infobase (parameter InformationIB contains a value Undefined).
Otherwise ReceivedData replace InformationIB(all properties from ReceivedData transferred to InformationIB).
If the standard replacement of IS data with the received data is not required, you should write your own transfer logic, and then set the parameter ReceivedData meaning Undefined:
- InformationIB. Type - DirectoryObject, DocumentObject. Infobase data element corresponding to the received data. If no matching data is found, contains Undefined.
- Property Conversion. Type - Table of values. Contains the rules for converting the properties of the current object, initialized as part of the exchange session.
- Exchange Components.
Procedures for PDPC
Fill PredefinedData Conversion Rules. An export procedure that contains the logic for filling in the rules for converting predefined data. Options: DirectionExchange, RulesConversion(table of values initialized as part of the execution of the exchange session).
Algorithms
In the program "Data Conversion", edition 3.0, it is possible to create arbitrary algorithms that are called from the handlers for AML and PDCP. The name, parameters and content of the algorithms are determined during the development of the rules.
Options
Fill in the Conversion Options. Export procedure in which the structure is filled with conversion parameters. Options: OptionsConversion(type - Structure).
General Procedures and Functions
Execute the ManagerModuleProcedure. Options: ProcedureName(line), Options(structure). An export procedure that is designed to call a non-export module procedure, the name and parameters of which are received as input. Allows you to call a procedure or function on a string without using a method Run.
ExecuteModuleManagerFunction. Options: ProcedureName(line), Options(structure). Function, purpose similar ExecuteProcedureModuleManager. The difference is that it calls a function and returns its value.
1C presented the first version of the new EnterpriseData business data exchange format, which is based on XML and, as conceived by its authors, is designed not only to unify the interaction of application solutions and their individual components created by the company itself, but also to be used as a universal information integration mechanism any business applications on any software platforms, including, of course, 1C:Enterprise.
The company has long been practicing the creation and use of open standards for the information interaction of its applications with third-party software, but so far this has only concerned certain specialized subject areas. This is exactly what the CommerceML format created almost fifteen years ago is for solving the problem of e-commerce, as well as "Client Bank" and DirectBank for communicating "1C" applications with external banking systems. EnterpriseData, on the other hand, is a universal mechanism that can cover all areas of the enterprise - finance, production, purchases and sales, warehouse operations, etc. The first version of the format includes a description of 94 types of documents from various business areas. 1C plans to add new documents to it and detail the existing ones.
As representatives of 1C explain, the emergence of EnterpriseData is explained by the need not only to integrate the company's applications into the software of other developers, but also - perhaps even in the first place - to create a unified mechanism for information communication within the 1C:Enterprise software family. Until recently, a wide range of solutions have been used to solve these problems, often created for each specific case. The transfer of 1C products to EnterpriseData has already begun, it is used in all latest versions its key applications ("1C: ERP Enterprise Management 2.0", "1C: Accounting 8" 3.0, "1C: Accounting 8 CORP" 3.0, "1C: Retail" 2.0, "1C: Trade Management" 11). At the same time, the replacement of already used standards (CommerceML, work with banks) with EnterpriseData is not expected, since time-tested specialized algorithms work more efficiently than universal tools.
1C believes that the new format will find wide application among independent developers creating applications on the 1C:Enterprise platform, ready-made software components as part of the Library of Standard Subsystems (something like an SDK for 1C:Enterprise).
When using the EnterpriseData standard, data is transferred between applications in the form of an XML file using the appropriate XML schemas, while the physical transfer of information can be performed using various mechanisms: web services, file exchange through a directory, FTP, and Email. An important point is that the interaction algorithm implies the possibility for the recipient to confirm the fact of receiving and processing the data sent to him. The XML file itself is physically transmitted in a compressed form (ZIP), which often reduces the amount of information traffic by several times.
1C promises further development of the EnterpriseData format and its support in all more their applications. This standard will be managed by the company itself, and its creators do not yet have any plans to transform it into an independent industry standard.
Let's look at a simple real life example. Let's say we have a company that is engaged in wholesale and retail trade, and in this company, like in any other, accounting is kept. The company has two standard databases, these are UT (trade management) and BP (enterprise accounting), respectively, each of the databases has its own accounting, in UT management to reflect all operations related to trade, in BP accounting. In order not to do double work, i.e. do not create the same documents in two databases (after all, the movements must be according to the managerial and accounting) we will just set up synchronization between these databases.
We will set up one-way data exchange, from UT ---> BP. It is also possible to set up a two-way exchange, but in practice this is not often required, so we will not consider it in our example.
Preparatory steps for setting up an exchange in a BP
Let's start setting up synchronization, first we go to the 1C "Enterprise Accounting 3.0" database (receiver), we need to check if synchronization is enabled for this database, in order to do this we need to first go to the database. As soon as the database opens, go to the tab "Administration" ---> "Data sync settings"

opens before us new inset, it must be filled in the same way as in the screenshot below, except for the infobase prefix. The prefix must consist of two letters, you can set any, but according to the 1C standard, it is better to set the prefix by the name of the configuration, that is, for "Enterprise Accounting" the prefix will be like "BP". If you set up complex exchanges and there are several accounting databases, then the prefixes should clearly differ from each other, here you can use the first two letters of the organization name as an abbreviation.
We continue setting up data synchronization in UT

After we have done all the necessary actions in the receiver database (BP 3.0), in order to continue setting up data exchange, we need to open the source database (UT 11.1). We go to the "Administration" tab, on the left in the menu we select the item "Data synchronization settings". If synchronization is not enabled, then enable it using the checkbox, and do not forget to specify the source base prefix. Once we have completed all points 1-4 as shown in the image below, you must click on the "Data synchronization" hyperlink (point 5).

In the new window that appears, you need to click on the green plus sign (Set up data synchronization), in the drop-down menu, select the item "Enterprise Accounting 3.0".
Setting up important points in data exchange between UT and BP

Now we see a window with the data synchronization setting in 1C, select the "Specify settings manually" item and click "Next".

We continue to configure data exchange in 1C, on the next tab we need to select the connection option to the receiver infobase (direct connection to the program), connection parameters (on this computer or in local network), the directory where the receiver base is located, as well as the necessary authentication data (username and password in the database).

On the next page, we must fill in the rules for sending and receiving data from the BP 3.0 (receiver) configuration. Click "Change Data Upload Rules".

The "Data sending rules" window has opened in front of us, in it we set the following parameters:
- Which NSI will be sent (in our example, we are only interested in documents and the NSI used in them, so we chose the appropriate item, if you select the first item "Send all", then all directories will be reloaded along with the documents, often if the information is not used in the documents, then it is useless for the receiver, because it does not affect accounting in any way)
- From what date to send all the information (we will not consider manual synchronization in this article)
- For which or which organizations to send data (in our example, we chose one organization, IP "Entrepreneur")
- Rules for the formation of contracts
- Generalized warehouse
- Whether to collapse documents by warehouse
After we have made the settings, click "Record and close".

Since in our example we set up and use a one-way exchange, from UT to BP, then the settings for the rules for obtaining data from "Enterprise Accounting 3.0" do not interest us, so click "Next".

In a new window, we are asked to set up rules for the receiver base (RP). In paragraph 1, we call our base somehow, give it a prefix. The PREFIX must be the same as we set it in the BP database itself at the beginning of this article, if the prefixes differ, data synchronization in the 1C program will not work. After that, click point 2, and then point 3.

In paragraph 3, we need to allow documents to be processed when they are loaded into the database. Click "Save and Close".

Now the window should look something like the one shown below, click "Next".

This window contains reference information about the created synchronization in 1C. Just click the "Next" button. If the program displayed an error when setting up data synchronization, then you need to contact us so that our 1C specialist can help you right now!

On the next step the program will offer to perform synchronization immediately after creating the data exchange settings. Agree with this and click "Finish".
You will see a window in which you will see information about how the synchronization is going. If the destination base is not empty, i.e. accounting was already kept in it, then the user in the 1C program will be prompted to manually compare objects. Comparison of objects in 1C during data synchronization is a comparison of identical receiver objects with identical objects in the source.
Let's look at an example, let's say in UT there is a counterparty with the name "PharmGroup LLC" and TIN 1234567, and in the BP there is also a counterparty with TIN 1234567, but with the name "PharmGroup", if we do not compare these two objects when comparing data at the synchronization stage, then after synchronization in the receiver (Enterprise Accounting 3.0), we will have two counterparties with TIN 1234567 and two names "PharmGroup LLC" and "PharmGroup", respectively. In order to avoid such situations, a mechanism for matching objects was invented.

In our example, the receiver base is empty, and therefore the object matching window did not open for us. But after performing some operations, the system will prompt the user to add some additional data and display the following window. We do not need to transfer any additional data, we have already configured everything we need before, so at this step we select "Do not add documents to send." Click "Next".
The final stage of data exchange between 1C

At the final stage, the program will display the following window, in which the user will be informed that the synchronization was successful, click "Finish". This completes the synchronization between databases in a one-way exchange from "Trade Management 11.1" (UT) to "Enterprise Accounting 3.0" (BP).