iPhone 3gs recovery after unsuccessful firmware. Step by Step Iphone Recovery
Today we have to figure out how to restore iPhone through iTunes. Such a task is not so difficult. Especially if the process is done correctly. Each owner of an "apple" device will be able to return certain data to a mobile device in a few minutes. This is quite normal.
Recovery methods
When thinking about restoring an iPhone, the user must take into account that there are several options for the development of events. And first you have to make a backup copy of the information. Without this, it will not be possible to bring the idea to life.
In general, among the methods of recovery through iTunes, there are:
- return to factory settings;
- user data recovery.
In fact, everything is easier than it seems. But if a person has created a copy of their data using iCloud, then iTunes will not help restore them. This is a completely normal phenomenon, which is important to take into account before starting action.
About iTunes
Let's start by creating an iOS recovery document. Without it, as already mentioned, the task will not be realized.

First of all, a person must install iTunes on a computer. It is desirable that the version of the application is the latest. Old builds of the program are no longer supported. Accordingly, the owner of the device will not be able to implement the task.
You can only restore licensed iOS. And the absence backup user data 100% resets the settings to factory defaults. And since then, there is no way to return the information. Only if there is a copy in iCloud.
Making a copy
How to restore iPhone through iTunes? First of all, as already mentioned, you will need to make a copy of the data for recovery. It is worth considering that all information will be saved on the PC in the BackUp folder. And the operation is possible only when connected to a computer.
To create a recovery copy, you must:
- Download the latest version of iTunes on your computer and install it.
- Connect an "apple" device with USB help to a PC or laptop.
- Launch the application under study.
- Wait for the devices to sync.
- Sign in with AppleID. Typically, the corresponding requirement is put forward immediately after the launch of iTunes.
- Open the "General" tab in the left menu of the program.
- In the right part of the window, click on the "Create a copy" button.
- Wait a few minutes.
As soon as the user does all the above steps, a copy with iPhone data will appear on the computer. And now you can start restoring the OS.

To factory settings
But first, a little about that, Sometimes this operation is vital for the normal operation of an "apple" smartphone. Under such circumstances, there full reset data to factory. No user settings are saved.
The iTunes application really allows you to return the devices to the initial settings. And to do this is not so difficult. Easier than restoring user information.
The guide will look something like this:
- Turn on your computer and launch iTunes.
- Connect to the PC "apple" device. It is important that the connection is made using a USB cable.
- Run the program.
- Wait for the synchronization of the computer with the mobile phone.
- Go to the "General" tab.
- In the right part of the window, select the "Restore iPhone" button and click on it.
- If the system asks, go through authorization using AppleID.
- Carefully study the consequences of actions and agree with the operation.
After the above steps, the iOS rollback process will begin. It usually takes 5 to 30 minutes. After the operation is completed, the device will reboot and recover. All data will be erased and the settings will return to factory settings.

Restoring data
Once iTunes has been installed and backed up with it, you can iOS recovery. It's pretty simple operation which will only take a few minutes.
How to restore iPhone through iTunes? The following instruction will help:
- Enable iTunes.
- Connect your smartphone via USB cable to the computer.
- Launch the application mentioned earlier.
- Select the connected device in the "Devices" menu. To do this, click on the name of the device.
- Go to the menu item "File" - "Devices".
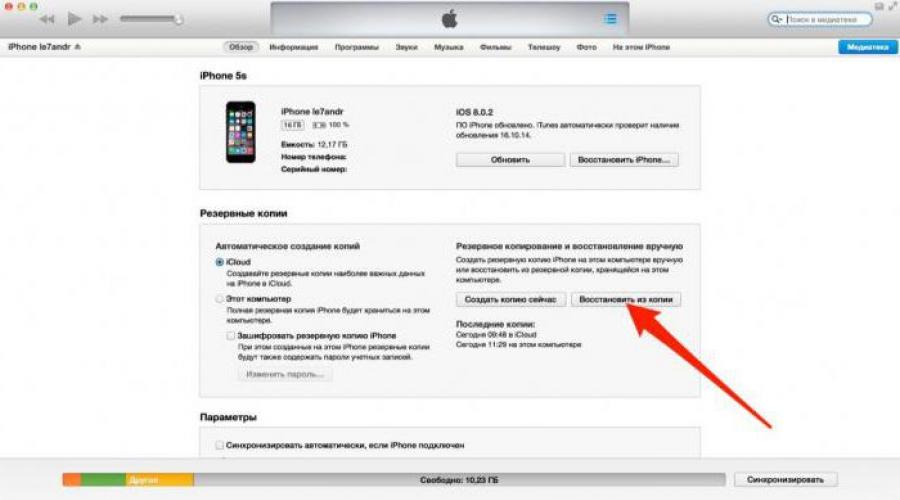
- Select "Restore from backup...".
- In the field that appears, mark the line with the desired copy of the data. There may be several. All copies are signed with the date of their creation.
- Confirm the operation and wait a bit.
The operating system recovery process will start. After a while, iOS will be restored and the device will reboot. You cannot turn off your smartphone or work with it. Otherwise, the data will not be recovered.
Results
From now on, it is clear how to restore iPhone through iTunes. All of the above methods work on all "apple" devices. Therefore, operations can be carried out on tablets. There is nothing difficult or incomprehensible in this. All actions will be the same.

ITunes - free service that everyone should be able to use iPhone owner. It helps not only to create backup copies of data, but also restores device settings. In addition, this program can come in handy when downloading music and photos to iPhone.
Sometimes to recover information on mobile devices use the iMazing app. This free program, which is somewhat reminiscent of iTunes. It can be used to create a backup copy of data that is recognized by the application under study. But such a technique is rarely used in practice. Therefore, to restore information on the phone, it is better to follow one of the instructions previously offered to your attention. How to restore iPhone through iTunes? The task will no longer cause trouble!
What is iPhone recovery and how it differs from updating should be known to every owner of an iOS device, whether it be a novice user or a geek. Moreover, all this is quite simple, to say the least - elementary.
For those who are not “in the know”, within the framework of today's instructions, we will get acquainted with what an iPhone flashing is, what options and methods for flashing exist, how restoring an iOS device differs from updating, and how to flash an iPhone.
Why do we claim that skills iPhone firmware or should every device owner have an iPad? It is not good for the owner of such an expensive and exclusive device to run in service center whenever at the software level there were difficulties in the operation of an iOS device or Apple presented new version mobile operating room iOS systems. Moreover, the process itself takes no more than 10 minutes and the user, in most cases, requires a minimum of effort.
The subject of today's instruction we will consider on iPhone example, so it will be easier for us, and for you, dear readers.
What is iPhone Firmware?
If we are talking about the firmware of an iOS device as a software component, the iPhone firmware is its software or operating system. IN Apple software for the iPhone, iPod Touch and iPad is called iOS for short, which means iPhone Operation System in English.
If we talk about flashing an iOS device as a process, flashing an iPhone is the process of restoring or updating the device software. The most commonly used term is "flashing".
iPhone flashing options
Flashing an iOS device includes 2 processes at once:
- recovery;
- update.
At its core, the processes are identical, that in the first, that in the second case, as a result of flashing on the iPhone, new iOS. Moreover, the concept of “new” in the case of restoring the iPhone does not refer to the version of the operating system, but to its state, in other words, “clean”.
iPhone Flashing Methods
You can reflash iPhone in 2 ways, one of them is universal, i.e. is used for both recovery and update, the second is only for updating:
- iPhone firmware via iTunes;
In the first case, the software is downloaded to the computer and, using the iTunes media combine, it is downloaded directly to the iOS device. Relevant for iOS 4.3.5 inclusive. For iOS 5 and above, the second method is possible, which implies iOS update directly from the device via the Internet via wireless network(wi-fi).
What is the difference between restoring an iPhone and updating it?
As we have already said, restoring or updating an iPhone refers specifically to the software component of the device.
iPhone recovery is a recovery process initial settings devices. Restoring iPhone will delete all content (photos, videos, music) and personal data ( phone book, calendar information), the device will be reset to factory settings.
In a nutshell, restoring an iPhone is resetting the device to the factory state and installing a “clean” iOS of the latest version.
An iPhone upgrade refers to the process of moving from a more old version iOS to a newer one. As a result of the update, all content, personal data and settings will remain intact and iOS will be updated to the new version.
As you can see, the fundamental difference between restoring and updating an iPhone is that as a result of the update, content and personal data are not deleted from the Phone.
The result is:
iPhone Recovery = Delete Content + Factory Reset + iOS Update
As you know, the iPhone, like any other iOS device, can be in several modes provided by the manufacturer: normal mode, (Recovery Mode) and (DFU Mode).
It is possible to restore or update an iPhone in the following modes:
- in normal mode;
- in Recovery Mode;
- in DFU mode.
How to restore iPhone via iTunes?
In order to restore iPhone via iTunes we need:
- the latest version of iTunes (preferred). At the time of writing, iTunes 11.1.5.5 is current. ;
 iTunes window stating that an update is not required
- pre-downloaded file with the version currently installed on the iPhone (optional).
 iTunes warning when flashing iOS
So let's say you have the latest version of iTunes installed on your computer and you have downloaded the firmware file for your iPhone models on HDD.
1 If the " " function is enabled on your iPhone, disable it in the device settings;
 iTunes warning to disable find iPhone
2 Connect iPhone to your computer using a USB cable.
If the iTunes settings are not set automatic start programs when connecting an iOS device, launch iTunes;
 Selecting a device in iTunes
3 Go to the device synchronization settings page with iTunes by clicking on the button with the name of the device type in the right upper corner next to the button iTunes Store»;
 Device information in iTunes
4 Hold down the " Shift» on the keyboard in the pressed position, click on the button « Restore» (for Mac, you need to press the button Alt+Restore). The firmware file selection window will appear with local disk;

5 Select the previously downloaded firmware file with the extension “. ipsw" and click on the " Open". Confirm the request to restore iPhone. iTunes initiates the restore process. No further action is required from you, iTunes will automatically delete all content and download the "fresh" firmware to internal memory iPhone. This will reset the machine to and restore the machine to its factory state.
 Confirming the Start of the Flashing Process in iTunes
 iPhone is being flashed
It is important to know
You can completely trust iTunes to restore the iPhone, and you do not need to download the firmware file to your hard drive, however, after such a restore, if a more recent version of iOS is available in iTunes, it will be installed on the iPhone. In fact, the content will be deleted, the settings will be reset and the iPhone will be updated to the new iOS.
How to restore iPhone from Recovery Mode and DFU Mode?
Procedure for Restoring iPhone from Recovery Mode ( recovery mode) or firmware update mode ( DFU-mode) is completely identical, with one exception, before restoring, you must enter the iPhone into Recovery Mode or DFU Mode, respectively.
2. Connect your device to your computer with a USB cable and launch iTunes. The program will detect the iPhone in recovery mode;
 iTunes identified iPhone in recovery mode
3. By holding down the " Shift» on the keyboard, click on « Restore" (Mac users should press " Alt+Restore«);
iOS firmware file selection window
4. Open the previously downloaded firmware file with the extension " .ipsw«. Further work iTunes will take over, wait for the process to finish.
 Starting the iPhone Flashing Process in iTunes
Is it possible to reset iPhone without updating iOS?
If we are talking about a “clean” iPhone restore via iTunes, as a result, the device will have the latest version of iOS installed, i.e. in fact, a firmware update will occur, and this is far from always necessary, especially for owners of jailbroken devices. Why? Because the jailbreak for the current iPhone firmware version appears, as a rule, with a big delay, and as a result, updating the iPhone will entail the loss of the jailbreak.
Restoring/Updating a “locked” (blocked under a specific operator cellular communication) A jailbroken iPhone entails:
- blocking a "locked" iPhone - you will not be able to connect the device to the cellular network of another operator;
- jailbreak loss.
Fortunately, there is a way to remove all content from it without updating the iOS version and without losing the jailbreak. We have already talked about the SemiRestore utility, which allows you to clear the contents of an iOS device and reset its settings to factory settings without loss. Take advantage if you have a “locked” or “jailbroken” device on your hands.

iPhone update
We have already mentioned that there are 2 ways to update an iOS device on latest version iOS:
- With connection to a computer via iTunes;
- Directly from an iOS device via Wi-Fi.
The first method is practically the same as restoring an iPhone to current version firmware. The second one allows you to update your iPhone to current iOS without connecting to a computer via Wi-Fi.
Update iPhone from Computer via iTunes
1. Connect your iPhone to your computer with a USB cable and launch iTunes. Go to the "Devices" menu and select your device;
Selecting a device in iTunes
2. On the iTunes sync settings and device connection settings page, left-click on " Refresh". Confirm iPhone update to the latest version of iOS.
3. You can save time and not wait for iOS to download to the iTunes service folder by first downloading the latest iOS to your hard drive. With the combination " Shift+Refresh» Initiate the firmware update from the hard drive.
After the update, you will receive an iPhone with the latest iOS "on board", all user content and settings will be saved.
Update iPhone over Wi-Fi
With the advent of iOS 5.0, developers have integrated the ability to update the firmware directly into the mobile operating system. Starting with iOS 5.0 and higher, the "Software Update" menu item is available in the settings of iOS devices. The update is available only when connected to the Internet via Wi-Fi. Bandwidth internet connection cellular networks does not allow you to update iOS over 2G or 3G connection.
1. On iPhone go to Settings – Main – Software Update;
 Switch to software update in iPhone settings
2. Tap on " Download and install» and in the next window, accept the terms of use. Wait until the end of the process.
 This is what updating an iPhone over WiFi looks like
Let us remind you once again that updating iOS does not entail the loss of user data and content and resetting settings, but it is dangerous for jailbroken and locked devices.
Video how to update to iOS 11 over WiFi on iPhone 6s
Video tutorial for restoring and updating iPhone
As you can see, there is nothing complicated in flashing an iPhone, which includes both updating and restoring. Learning the basic skills of managing iOS devices is both useful and allows you to save on trips to service centers.
If you have any difficulties or errors appear when flashing in iTunes, write to us in the comments, we will try to help you!
If you're flashing an iPhone, keep in mind that upgrading the firmware also upgrades the modem. In most cases, this increase is irreversible! There is nothing to worry about if you do not need an unlock, but if you have a locked iPhone, you may permanently or permanently lose the ability to make calls. To upgrade the firmware on a locked iPhone, you will need to use.
This instruction valid only for current firmware that are signed Apple servers.
You can find out which versions of iOS are up-to-date on the pages with information on the corresponding firmware, or in our.
For irrelevant iOS versions should be applied.
- Download the latest version of iTunes from our site and install it (if you haven't already).
- Download from our firmware version you need.
- Connect your gadget to your computer. Hold down the Power (on the top) and Home (on the front panel) for exactly 10 seconds, then release Power while continuing to hold Home for about 8-10 seconds. iTunes will launch and display the following message:
- Click OK.
- If you are syncing your gadget with iTunes, do it before flashing by clicking the "Sync" button. If you're backing up to iCloud, go to the "iCloud Storage and Backups" menu in your device's settings. Remember that when restoring, unlike updating, the device's memory is completely formatted, and you can restore content only if you have a backup copy!
- Hold down the Shift button on your keyboard, then click on the "Restore" button. Specify the path to the downloaded iOS file.

- Wait for the firmware recovery to complete and the gadget to load in normal mode.
- Before flashing, iTunes may give error 3194. This error has several causes, but most often the line in the hosts file is to blame, which could be left after you ran utilities like TinyUmbrella. If you encounter it, follow the steps below.
- Locate the Notepad shortcut (for example, in the Start menu), in its context menu select "Run as administrator".

- In the Notepad window, go to the "File-Open" menu.

- Navigate to "C:\Windows\System32\Drivers\etc" folder. At the bottom, in the drop-down list, select "All files", then you will see the hosts file. Open the file.

- Scroll through the content hosts file. If you see a line that contains "gs.apple.com", you must delete it entirely..

- Close Notepad. Answer yes to the offer to save the file. Then reboot..
- Try to flash again, there are high chances that error 3194 will not appear again.
- In addition, when downgrading an iPhone or iPad with a cellular modem, iTunes is very likely to give an error in the range 1013-1015 in the middle of flashing. This is due to the inability to downgrade the modem. To boot your device normally after such an error, follow the instructions below.
- Download the latest version of redsn0w for Windows.
- Unzip the archive, place redsn0w on your desktop.
- In the context menu of the redsn0w.exe file, select
How to fix error 3194 when flashing
How to fix errors 1013, 1014 or 1015 when flashing
Restoring the iPhone 3G and 3GS is carried out according to the same principle as a rollback to the factory state of later Apple smartphones. However, sometimes a simple procedure ends with an unsuccessful firmware or the appearance of various errors - 21, 29, 1604,1015 and others. Let's see how to return the iPhone to a working state after detecting a problem during recovery.
How to restore iPhone 3G
First, let's deal with general order iPhone recovery. Everything is simple here:
If you need to restore iPhone after unsuccessful firmware, then the order of execution of the procedure will change slightly:

After the firmware is completed, iTunes will offer to restore the data from the backup. Select the "Like New" setting option. The smartphone will ask for activation - insert a SIM card into it. After successful activation, return the necessary information from the backup.
Error 29
Failure with number 29 after restoring the iPhone is mechanical in nature, so no software methods will be able to fix it. Error 29 appears in the following cases:
- Using a non-genuine iPhone battery.
- Charging cable damaged.
- Burning out the SMP controller.
Often, error 29 appears on unofficial devices when trying to update or restore. Fault 29 is eliminated by replacing components with original ones. However, success is not guaranteed even in this case: error 29 sometimes appears after several battery and charging cable replacements. 
If replacing iPhone components does not help, and error 29 remains, then it makes sense to check the SMARTi Power Management IC smp3i power controller.
In severe cases, failure 29 appears when the controller burns out. The problem is eliminated by replacing the damaged part with a working controller taken from the original donor. Other ways to solve error 29 do not allow you to achieve a positive result.
Error 21
Crash number 21 occurs because when restoring an iPhone 3G, the system security software prevents the device from connecting to the Apple update server. To clear error 21:

If failure number 21 occurs, recovery should be carried out in DFU mode, selecting the firmware file manually. How it's done:
- Enter iPhone in DFU. Connect your device to your computer.
- Launch iTunes and go to the device page. Hold Shift and click the Restore button.
- Select the firmware file and start the recovery procedure.
In rare cases, error 21, like 29, is associated with the use of a non-original battery. If the iPhone does not recover after trying to programmatically fix the problem, then try replacing the battery, error 21 will disappear. If fault number 21 continues to appear, contact the service center.
Error 1604
Failure number 1604 appears due to an interruption in the connection between the iPhone and the computer. To resolve the error:
- Replace USB cable(use original wire).
- Try connecting your smartphone to a different port or to a different computer.
If the USB cable and ports on the computer are in order, then try the software method for fixing error 1604. Failures with numbers 16 ** are fixed using the iReb r7 utility.

Since the iPhone 3G and 3GS are supported by the iReb r7 program, this method should help fix the crash. If the described method does not help, try fixing the error with TinyUmbrella and Redsn0w:

Restoring your iPhone after following the steps above should complete without any errors.
iPhone recovery is a standard return operation Apple smartphone to a working state after various failures. Failed firmware, incorrect jailbreak, incorrect iOS update - if you know how to restore an iPhone, you can fix almost any malfunction that occurs during the operation of this device.
Recovery order
To restore iPhone, you need to enter Recovery Mode. To do this is simple:
When the iPhone is ready for the rollback and error correction procedure, click the "Restore" button. 
iTunes will independently find the current version of the firmware and install it on the smartphone, returning it to the state in which it was immediately after purchase.
Working in DFU mode
If iPhone recovery does not work in Recovery Mode, then you need to enter the device into DFU mode. This mode is used when software errors- for example, when the iPhone does not turn on. DFU mode works at the hardware level, so it helps to reset all settings even in the most difficult cases. To enter DFU mode:
- Connect your device to your computer.
- Press and hold Power and Home for 10 seconds.
- After counting to 10, release Power while continuing to hold the Home button.
It is difficult to enter DFU mode the first time, as nothing changes on the screen. If the recovery mode reveals itself as an iTunes icon, then the phone does not seem to turn on in DFU. Therefore, you need to look at the computer screen where iTunes is running. As soon as the iPhone enters DFU mode, a notification will appear in iTunes stating that the program has detected a device in recovery mode, and you need to reset all settings and content in order to continue working with your smartphone. 
If you need to install another firmware, then hold down Shift and click "Restore". An explorer will appear, through which you need to specify the path to the previously downloaded firmware.
Recovery without a computer
If the computer is not at hand, it does not turn on, or you cannot connect your iPhone to it, then try resetting all settings through the device settings. As a result of this operation, you will get a clean smartphone without settings and user information, so be sure to make a backup before resetting. If the smartphone turns on normally:

It is not necessary to delete user files. If the iPhone turns on, then you can fix the malfunctions in its operation by simply resetting the settings. In this case, the user's personal data will remain untouched.
Recovery after a reset
If you need to restore your iPhone after resetting all settings and deleting content, then you won’t be able to do it without a backup. The presence of a backup file with information stored in the device's memory is the main point that you need to check before performing a reset. After the iPhone is reset to factory state, all personal user data is erased from it.
Create a backup before factory reset:

After the reset, the iPhone will be like new: no content or settings remain on it. To get all the information back, you need to connect the device to your computer and use iTunes to restore from a backup. Choose the most recent backup, as it stores the most up-to-date information. 
You can also restore all settings after a reset through iCloud, provided that you have stored backups on the cloud. In that case, when iPhone setup you need to select the option "Restore a copy from iCloud" and specify the appropriate backup.
Recovery issues
If the phone does not turn on after normal recovery, then it makes sense to transfer it to DFU mode and try restoring with iTunes again. Don't trust iTunes this time: download official firmware and select it in the explorer window by holding Shift and clicking the "Restore" button. 
Sometimes the TinyUmbrella utility helps to solve the problem that the smartphone does not turn on after resetting via iTunes. This program has an "Exit Recovery" button. If the iPhone does not turn on after recovery, you need to select it in the TinyUmbrella window and click "Exit Recovery".