Plugin all. How to Install the All in One Seo Pack Plugin

Read also
Flector 5
This is the most popular plugin for WordPress. It is even more popular than the plugin, which is included in the engine distribution by default. The plugin allows users to easily and without unnecessary headaches edit SEO titles on their site.
For beginners, a little explanation: SEO titles can be used by search engines to form search snippets. For example:
This is what the search snippet looks like for home page this site. If you do not specify a meta description for the site (or any page on it), then the search engine will compose this description and show it in the search snippet. The problem here is that the description will be made up of random phrases taken from the page, and for a person such a description will not be very readable and attractive.
Therefore, the very first and main task of any SEO site optimization is to write the right SEO titles for each page of your site. There are many rules for compiling these headings, but it is important to strike a balance between listing keywords and human readability of the snippet.
The title of the page is also important (it is shown in the snippet almost always the way you filled it out) and the meta description (the description can be compiled by the search engine itself, but this does not mean that you need to forget about compiling it).
There are also meta keywords, but they should not be filled in at all - according to official information, both Google and Yandex meta keywords are not taken into account in any way when ranking, but visitors do not see them at all.
Why should you choose it and not some other, more powerful and functional plugin? Because of two things: it's extremely popular and it's very simple. Sounds paradoxical? I'll explain now. Let's assume that the author of a plug-in scored on support of the plug-in. A another update WordPress suddenly it turned out to be incompatible with the plugin and it stopped working. In such a situation, there will definitely be enthusiasts who will correct the plugin code so that it works on new versions WordPress. After all, the plugin is quite simple and it will be easy for any programmer to understand it and it is very popular, and therefore there are many specialists who can program among those who use it.
Usually, if when upgrading WordPress one of the plugins suddenly stops working, then we simply replace it with another similar one. With SEO plugins, such a trick will not work - you can replace that plugin, only now you need to re-score it in new plugin titles and descriptions of thousands of pages can be a daunting task. A few years ago, bloggers advised using not a simple one, but something like Platinum SEO Pack, which is much better functionally. But if you now go to the page of this plugin in the repository, you can see that it has not been updated since 2010. Would you trust such an important feature as the generation of SEO titles to a plugin that has not been updated for more than 2 years? The plugin forum is littered with reports that some of the plugin's features have become buggy, but there is no one to fix the shortcomings, since the plugin is not very popular.
There are also super-harvesters like the SEO Ultimate plugin, which is billed as a "true all-in-one" SEO plugin, implying that the plugin with its limited features cannot be called an "all-in-one" SEO plugin. I do not argue, SEO Ultimate this is really a super plugin that contains everything that is possible for SEO optimization. But the size of the plugin archive is almost 1.5 megabytes, while the entire engine WordPress weighs only 4.7 megabytes.
In my opinion, this is overkill. I don’t even want to check how much memory consumption and processor load on the server will increase after enabling this plugin, well, to hell with it. Not to mention that if you completely rely on such a super-harvester, then jumping from it to another SEO plugin in case of any problems will be extremely problematic. That is why, for all its functionality SEO Ultimate will never become as popular as a simple one.
Actually, now you understand why you need to choose not the most functional plugin, but the simplest and most popular one to generate SEO headlines?
1. Unpack the archive.
2. Copy the folder all-in-one-seo-pack V /wp-content/plugins/.
3. Go to the blog admin panel on the tab " Plugins and activate the plugin.
Immediately after its activation, the plugin will give you a sign like this:
It says that you need to configure and enable the plugin. Plugin settings are in " Settings\SEO all in one", here you must check the option "Module status:"
Formally, this checkbox should enable the plugin, but in fact this checkbox only affects the output of the warning, which I wrote about above. Even if the option is set to "Disable" - the plugin still works. I never understood the meaning of this option, apparently I do not have enough experience with this plugin to explain such things. But you still need to check the box so that the plugin stops displaying its warning.
The plugin is translated into Russian. Not completely and slightly crooked, but translated and no one should have any special problems with setting it up. Each option contains a hint - click on the option to see it:

But in order. The first thing that greets us on the plugin settings page is a bunch of ugly banner ads. I wanted to describe a way to remove them, but then I decided that it’s not worth it - the plugin is updated frequently and editing it every time to cut out ads would be time-consuming. Moreover, it is on the plugin settings page to go after it initial setup you will not have to.
The first part of the plugin settings:

As you can see from the screenshot, here you need to specify the title and meta description of the main page. Carefully fill in this information - the main page of the site is often also the most popular in the search, and the values \u200b\u200bspecified here will directly affect the traffic to your site.
It makes no sense to fill in keywords - as I said, not a single search engine takes them into account now and filling in this information means just wasting your time.
Uncheck the "Canonical Addresses" option. WordPress he himself has been generating them for a long time and you should not duplicate them with a plugin. Moreover, the plugin somehow strangely displays canonical links (indicating the canonical URL on the main page of the site or on the pages of categories has no logic).
The "Rewrite headers" option is required to be enabled. Without this option, the plugin will essentially not display headers at all. Why, then, does the plugin provide the ability not to overwrite headers? Probably so that the plugin can be used in tandem with plugins like , which form only headers and nothing else.
The second part of the plugin settings:

In this part of the settings, the template of generated headers is filled. I fill out this template as shown in the screenshot, but no one bothers you to fill it out as you think is best. When you click on an option, the plugin will show you tips on existing macros and what they stand for.
The third part of the plugin settings:

I can’t say anything about support for custom type records - I just haven’t used it, so figure it out yourself. The option with the obscure and long name "Custom Post Type for SEO Support Columns" is just to display columns with SEO information on the post edit page, like this:

That is, this option allows you to quickly assess which posts or pages on the site do not have completed SEO titles. To select or deselect several types of entries, hold down the "Ctrl" key.
As a matter of fact, I have nothing to say about further options - the plugin settings page already has complete and understandable information on them, which does not need my additional explanation. I can only say that all other options are completely off for me. But I have it, and I advise you to check the options "Use the "noindex" parameter for the archive:" and "Use the parameter "noindex" for the archive of tags:" - they will allow you to avoid excessive duplication of content on your site. While I personally prefer to close archive and tag pages via robots.txt, it somehow seems more reliable to me.
You have configured the plugin, how do you use it now? Yes, actually, it's very simple. For example, we go into editing any post on your site and see the plugin's administrative widget there like:

Fill in and click the "Update" button, everything is very simple. When editing a page rather than a post, the plugin widget will be slightly different:

The difference is small, but it is - you need to fill in the "Labels menu" field with a short page name (that is, under this name the page will be displayed in the menu). In some templates, filling in this option is optional, and in some (where the menu with pages is built using " Appearance\Menu") this option must be filled in without fail, otherwise a long page name will be displayed in the menu.
It is not possible to fill meta-information of categories with a plugin. Or rather, it will display in the title what you specified in the "Category Title Format" option, but the plugin will take the meta-description from the filled "Description" field of the category. For obvious reasons, this is a shortcoming of the plugin - the category description and its meta description are completely different things and often incompatible. For example, the description of categories pops up when you hover over their links:

I don't want to use the same description as the meta description. It is short and informative only for those who are already on the site, and not for those who view the search engine results. So in this regard, the plugin is crooked.
The plugin constantly counts the characters you enter in the title and description, but don't trust its advice. If the title really should consist of 60-65 characters, then the description now cannot be more than 120-125 characters. If only because Google has taken the habit of displaying the date when the entry was published before the description, and thus the length of the meta description is automatically reduced. And one more thing - the plugin can lie about the length of the title and description, if there are special characters like quotes in their text, keep this in mind.
By the way, about quotes. Always, always remember that quotes must be replaced with a sequence of html characters in the form " . If you don't replace the quotes with " , then the description will be truncated, and you won't even notice it until you look at source site pages.
Possible problems? Yes, in fact, the problem can only be if you do not have a function call in your template wp_head();, but now there are practically no templates left where the author would forget to insert a call to this function.
Another possible error is: "PHP Warning: error_log([...]/wp-content/plugins/all-in-one-seo-pack/all_in_one_seo_pack.log)". This means that you have checked the box for:
The plugin tries to create and write logs to a file all_in_one_seo_pack.log in the plugin folder. Though obviously by default the plugin folder doesn't have required permissions for the record. So create manually the file all_in_one_seo_pack.log and put rights on it 777 . Although, to be honest, there is nothing useful in these logs and it's easier to forget about this plugin function.
The plugin is constantly advertised Pro plugin version called "". The benefits of this Pro versions are small: it is ad-free and it supports custom post types. I would not buy a plugin - it is sold according to a curve model like "$39 now and then $10 every month". Never understood this distribution model.
The author of the plugin is also the author of an old plugin, which, by the way, I still use. So, in his plugin, the author implemented a database import from the old plugin to the new one, when you activate the plugin, you will see something like:

After pressing the button " Update Database"all information will be irrevocably transferred from the old plugin to the new one. Rolling back will not work, so just in case, do as the plugin advises you in this message.
Not without flaws, but it perfectly combines ease of use and the necessary functionality, which is why this plugin is the most popular plugin for WordPress or
14.03.2016Good day, dear readers! In this article, we are going to talk about one of the must-have plugins on a WordPress site – All in One Seo Pack.
What is its importance? This plugin allows you to improve the visibility of your blog for search engines (Yandex robots, Google, etc.), which contributes to more successful blog promotion on the Internet. With its help, you can set the title (title), description (description) and keywords (keywords) to the added entries yourself (using our article as an example):
In order to install All in One Seo Pack, we go, as usual, to the admin panel - "Plugins" - "Add New", search, install. And now the fun begins - setting it up.

A section will appear in the admin panel - All in One Seo Pack, in which we will edit: where and what checkboxes to put and what to write in the proposed fields. So, let's look at each section of the settings in order:
1.Basic
We have ticked:
- canonical URLs (helps search bots determine the main pages and thereby prevent duplication);
- Disable pagination for canonical URLs(pagination is the division of information on a page, additional protection from duplicates);
- Set protocol for canonical URLs: Auto;
- Use default title: (because we prescribe them ourselves).

2.Home page
Here is the basic information about your blog:
- title - may include the name of the site;
- description - briefly describe what your blog is about, what information visitors will learn by visiting you;
- keywords - in this field it is advised to enter no more than 2-3 keywords (phrases).
3.Keys
Quite an important point, but you need to use the keys with extreme caution - you can get a ban for misusing keywords, i.e. the blog will fall under the filter of search robots. We have: "Use keywords" - "Enable".

4.Headers
We have ticked:
- Rewrite headers - Enable;
- Capitalized headings;
- Headings of headings with capital letters;
The rest is like this:
 5.For custom post types
This section is only customizable if you are using custom post types. Beginners do not need to climb here. We clicked "Disable".
6.Display
It's simple - choose the places where the tools of the seo plugin will be displayed.

7.Webmaster Verification
The fields in this section do not need to be touched, provided that you have registered with the Google Webmaster. We went through registration and, accordingly, left everything empty.
8.Google
For beginners, there is nothing special to fill in this item yet, so we skip it, the only thing is that we checked the box: “Advanced authorship settings” - Disable.
The section will help to avoid indexing unnecessary pages, thus we will protect our blog from duplicates.

10.Advanced settings
We leave everything by default, we do not make any marks, because We write all the data to the materials of the site manually.
That's all! Don't forget to click on "Update Settings" to save all changes. Now, when adding (or editing) an entry, the AllinOneSeoPack fields will appear (you can see them in the very first figure of this article as an example). We wish you good luck in optimizing your posts and goodbye!
You have already created your site on the WordPress CMS, and now you are facing the most urgent of problems - how to optimize your site or blog and promote it in the search, if not in the TOP 5, at least in the TOP 10. Technically correct website design is also very important, but still SEO-optimization of pages is in the first place. But you must agree, manually write keywords and queries for each page, titles and descriptions of texts, insert quotes and, if necessary, noindex tags problematic and lengthy. To solve all these routine problems, WordPress programmers developed and implemented in software environment CMS plugin All in One SEO Pack. Its main purpose is to optimize the site for search robots.
Optimization of titles and main meta tags are the very first and main features of this plugin. Additionally, you can, forcibly, specify your own values for these tags. Excellent compatibility with all versions of WordPress CMS and other plugins make All in One SEO Pack especially popular with webmasters.
How to install the plugin and configure it correctly? The installation is standard - download the plugin from its official website and upload via ftp or through the admin panel (Plugins - add new - upload) to the wp-content/plugins/ folder. Next - go to the admin panel and on the "Plugins" tab, activate it. Then you need to set it up correctly. In the "Options" tab, find the plugin, as shown in the figure, and follow the link:
You will see a page of settings that you need to fill in according to your requirements. The module is connected as follows:

Then fill in the fields "Page title", "Page description", "Keywords for the main page". The list of keywords is easiest and most reliable to take in the Yandex service. Check the boxes "" and "" if you wish, everything is clear here. If you do not enable the formation of addresses, then in the address bar the address of your pages will be displayed as you specified in WordPress settings. If you do not enable the "Rewrite headings" function, then the headings will be generated from the text of the article. In this case, this option is offered - set the "Rewrite Headers" parameter, this is a manual recording of headers for each entry on the site.
The options "Use tags for keywords" and "Dynamically generate keywords for the post page" should also be enabled. The first parameter adds category titles to keyword tags and excludes unnecessary words The second one does not allow duplicate entry content:

The "Use noindex parameter for categories", "Use noindex parameter for archive" and "Use noindex parameter for tag archive" parameters should not be enabled, as these values will not be determined by the robot later:

The rest of the fields also do not cause much difficulty with the settings. In the "Exclude pages" field, you can enter those pages that will not be processed by the All in One SEO Pack plugin. Fields " Extra options areas for….” filled in if you want to combine all the pages of the site with a common addition to the description.
Now a little about keywords. A specific page or post can be optimized for specific keyword queries. This article is optimized for the query about the All in One SEO Pack plugin, so this phrase must be present in the title "Title", in the description "Description", and in the "Keywords" field. You can come up with key queries yourself, but it’s easier and more reliable to use the Yandex service, as mentioned above.

In the search field, you need to enter your query, and in the left column of the results you will see what key queries users are searching for this information, as well as the number of requests per month. It is better not to use requests, the number of which exceeds 2000-3000 per month, these are the so-called high-frequency requests, and according to them your still young site will break through to the top of the site rating for a very long time. It also makes no sense to promote low-frequency (below the specified limit) requests - too few visitors will not ensure promotion.
After making all the necessary settings and filling in all the marked fields, do not forget to save all new changes:

Today I will tell you how to set up All in One Seo Pack (SEO all in one). This is one of the SEO plugins for WordPress that will make it easier for us to internally optimize our blog, articles and pages for search engines. There is also a similar Platinum Seo Pack plugin. It has many more features and settings, but is still less famous.
I have always used only the All in One Seo Pack plugin for WordPress so far, so I can’t say anything good or bad about Platinum. I know a lot of people have had problems with it. On the other hand, “SEO all in one” does not work smoothly for everyone.
Therefore, there is only one conclusion - use the plugin that will work fine for you. Let me just say one thing - one of these plugins must be installed on a blog with the WordPress engine. Well, today I will show you how All in One Seo Pack is configured.
A bit of theory. What are these SEO plugins for anyway? If you are even a little interested in the topic of search engine optimization, you should know that in order to get high traffic from search engines, it is very important to conduct competent internal website optimization. One of the factors influencing high positions in search results is correct filling meta- title tags, description and keywords, which allows us to make an All in One Seo Pack plugin.
Although they say that the influence of the last two meta tags on the page ranking in the SERP is now almost zero, but still everyone continues to prescribe them. Moreover, the text from the description is often used by search engines to form a snippet, which we can use to make it more attractive, and therefore more clickable.
In order not to be unfounded, I will give an example of the competent use of title and description tags. See how Anton Markin acted in an original way by participating in the competition from www.seocafe.info with a prize fund of 32,565 rubles. Well, wouldn't it be interesting for you to click on such a statement, especially since the words here do not differ from the deeds.
Many of you may not be familiar with this amazing WordPress SEO plugin, so I would appreciate it if you could retweet and upvote this article.
Update 04/22/13 and new All in One SEO Pack settings
Yesterday (April 22) another, this time global, update of the All in One SEO plugin was released. Now the settings are made in three sections of the menu:
- General tinctures;
- Performance;
- Manager functions.
After updating the plugin, be sure to check all the settings, as there are several new items. Also take a look at the source code of the page (Ctrl+U) and check if all meta tags are displayed correctly. me personally old version liked it more. Everything was simple and clear, but here, perhaps, a lot of superfluous. Although, maybe just not used to it yet.
But the new All in One SEO Pack settings for individual posts made me happy. Now it is possible to see directly in the editor how your Title and snippet will look on the search results page. And the most interesting, you can disable indexing separate page, by writing Robots Meta NOINDEX and NOFOLLOW for it.
We have released a new book "Content Marketing in in social networks: How to get into the head of subscribers and fall in love with your brand.
Very soon your life will become a little easier. Bringing your activities to the network, you need to understand that site optimization has grown from a whim into a typical set of works carried out, at least, over the entire top ten in the results of issuance. Concerned citizens, taking care of those who are too lazy or too expensive to promote themselves, decided to create perhaps the best All in one SEO pack plugin for WordPress in Russian.
AIOSP plugin is an extension for the popular CMS, designed to facilitate SEO work on the site, reducing difficult manipulations that require knowledge of the basics of programming, to placing checkmarks on checkboxes.
Plugin All in one SEO pack: description
As the add-on developers tell us:
The most downloaded plugin for WordPress (almost 30 million downloads). Use All in One SEO Pack to automatically optimize your site for Search Engines
*Most downloaded plugin for WP (over 30 million downloads). Use AIOSP to automatically optimize your site for search engines.
This description hints at one of the brightest pluses - the developers will not abandon the popular plugin, and after the CMS updates, the extension updates will also come out.
Why you need All in One SEO pack
The features and bonuses of the module are impressive. Here are the main ones:
- Elementary work with Title and Description, which are important areas of the document.
- Built-in editor robots files. txt and. htaccess - roughly speaking, system files, editing of which is necessary for effective promotion.
- Opportunity quick creation automatic card site (sitemap.xml), which positively affects the indexing of your site.
- Allows you to painlessly work with OpenGraph and .
- It makes it possible to deal with duplicates on the site without the help of programmers, forming canonical addresses.
- Great for beginners and rarely conflicts with other plugins.
- Fairly wide free version
Only the basic pluses of the plugin are listed, which I personally single out from the heap. We will get acquainted with all the buns below.
Where to download the plugin
First you need to decide on the compatibility of CMS and AIOSP. To do this, let's figure out what you have wordpress version. Go to your admin panel and look in the lower right corner:

At the time of writing current version All in one SEO pack 2.3.8, requiring CMS 3.4 or higher. If you have a lower number in the corner - it's bad, you need to upgrade. If it is not possible to upgrade or the religion does not allow, use the extension version 2.3.2.3, which is not so easy to find.
You can download Russian All in one SEO pack 2.3.8 on the site of the CMS itself ru.wordpress.org. Or just click here .
How to install All in one SEO pack
In general, there are two installation methods. The first one requires ftp access and folder browsing. If you are experienced, then you yourself probably know how to install AIOSP. Therefore, consider a simple installation method.
We go to the admin:

On the page that opens, look for the search bar and write All in one SEO pack in it, press Enter.
The list of plugins will be updated and there will be a bunch of different addons. We need a specific one, as in the screenshot.

Click "install" in the right corner of the socket icon in the shield. We wait. We are on the information page. We make sure that the plugin is successfully installed and click on activation:

We observe how there are more buttons in the left menu. And if you are worthy, then the plugin will welcome you.

I am worthy.
We have completed the installation. Everything is working. Yes?
All in one SEO pack: setup for WordPress
We will divide the plugin setup into several stages of different sizes. Let's start with small but important ones.
SEO modules for WordPress
In order to take advantage of all the benefits of the AIOSP plugin, you need to activate the necessary modules. To do this, from the left menu of the CMS, go to "Module Management".

We activate the following by the activate button:

Well, complete rubbish. Almost complete, we are not pro - where should we go. Now the menu on the left should grow and it will all look like this:

Basic settings All in one SEO pack
Since we have enabled all modules for the plugin, let's go through the menu from top to bottom. The first will be "Basic Settings". Inside, we will analyze each box under the tick.
First block


- Set protocol for canonical URLs. We leave the flags on "Auto". All in one SEO pack understands perfectly which protocol is used.


So, we have more or less figured out the basic settings of All in one SEO pack. As a result, I got this:

Block: main page settings
Block: Customize headers
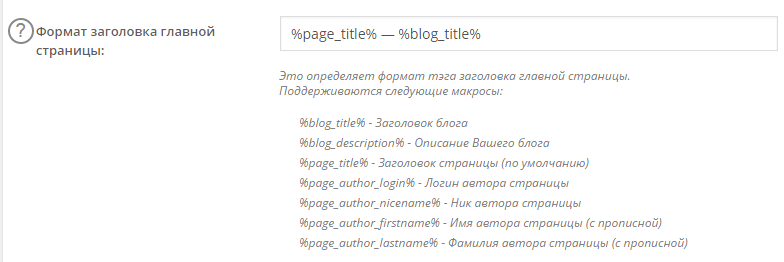
Further we will shorten the description a little because of a large number repetitive information. The bottom line is that the next 12 points are set according to one template. Another nuance is that almost all are filled out correctly. I will definitely write about the points that need to be corrected. I will explain everything on the example of the main one.
- 404 page header format
. You guessed what this template is for. By default, it contains English text. Well, we, in response to the sanctions, will replace this text with Russian.
- Format for navigation. For the same reason as above, let's replace Part with the word "Page".
Understood. Just in case - if you need a list of variables, then just click on the circle with a question next to any item and you will see everything that is hidden.
I will not take a general photo, otherwise it does not fit into the screen.
Setting up All in one SEO pack for custom post types
- SEO for custom post types:
If this option is enabled, then fields for filling in the title and description are added to each specific page of your site (in the admin panel). Definitely leave it on. Almost for the sake of this, this extension was created.
- SEO only for these types of posts: We mark the types of pages for which the paragraph above will be relevant. I clicked on everyone. Why not.
- Enable advanced options . They seem to let us write custom headers again. In short, I do not understand why it is necessary. Those options that we configure are more than enough. So we leave it disabled.
We figured out custom post types.
Setting up images in All in one SEO pack
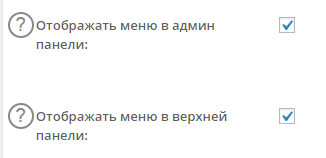
- Show SEO settings for custom post types. Similar to the first paragraph of the previous block. Assign checkboxes to the record types to which the settings will be edited. I'll post it everywhere.
- Display menu in admin panel + display menu in top bar . I see no reason to disable these options. The menu adds to the convenience of working with the site. We tick boxes.
Webmaster verification
Google Webmaster
This is a tool that allows you to track the performance of your site, in terms of search engines. This service provides an impressive number of useful options to help keep track of proper work site. Yandex has a similar tool.
- Google Webmaster Tools:
The thing is useful. But if you are exclusively in Runet, you will also have to install Yandex.Webmaster. And this is to climb either in the template or on ftp. But that is another story. In this field, you can insert a set of characters for confirmation, which is issued by Google when registering a site in the tool. Looks like that:
- Bing Webmaster Center . This is an analogue of the previous paragraph for bing. For me personally, this point is a little sick.

Yes, and not sorry at all. That's why:

- Printerest. The same as in the previous paragraphs.
Google Settings
- Google+ Profile And disable Google+.If you are the owner of a Google+ account, then I recommend filling out and not ticking the next paragraph about disabling.

- Display site links in search box . As I understand it, we are talking about an extended snippet for the Google sickle. That is, when searching for certain queries in Google, the user will be able to see your snippet indecently large. But there is no way to check. We put a tick - it will not be worse.

- Set your preferred site name
. Again, we are talking about micro-marking. Therefore, as in the advice above, we read an article on this topic, and only then enter the name. So far, no checkbox.

- Advanced authorship settings . Another good thing for Google+. The essence of the options is to give the opportunity to put down the rel="author" tag for Google authorship. We leave it unattended.
- Google Analytics ID: In this field, you can enter the code assigned to your site by the GA analytics tool. If you have already connected analytics to the site, fill it out. It should look something like this.
When filling in the field, you will have a number of opportunities that are unique to the web analytics system.
Indexing settings (noindex) in All in one SEO pack
Tag
The attribute tells the robot not to follow any link or all links on the page. So sometimes they struggle with broken links or with links to other sites (and this dilutes the weight of the page). Read more about page weight in our blog.
- NOINDEX by default
. Here we can select the types of pages that by default will not be available to search engines. I do not advise you to do this if you are creating a quality site.
- NOFOLLOW by default
. We can choose the types of pages where the robot will not follow links. If you have a page like: "Our partners" - it's better to let it be written on it. I do not recommend ticking.
- Default NOODP. Forbids the robot to take a description for your site (description) from the DMOZ directory. A good directory in which your site is most likely not registered. But it is better to put a tick on the future.
- NOYDIR by default . What does no yahoo directory mean. In general, the same as the previous paragraph, but for the Yahoo directory. We tick boxes.
- Use noindex for categories . If you do not drive traffic to category pages, you can close them from indexing. On information sites, inexperienced webmasters are often closed, because the headings are something like a duplicate. We leave a checkmark.
- Use noindex for date archives
. We put a tick. Date archives are definitely not useful.
- Use noindex for author archives
. We also close. It is not clear why it is.

- Exclude site from Open Directory project + Yahoo . And here and there we put ticks. This is the same as a few points above.
Fuuh, with indexing everything. Go ahead.
Advanced settings
- Avoid using excerpts in descriptions. Allegedly, the All in one SEO pack plugin can prevent search engine take excerpts from the text and insert into description. In general, ticking or not is up to you. I doubt that this will somehow affect the work of the site.


I also do not recommend filling out the rest of the advanced settings, because we have already configured all this separately.
Setting keys in All in one SEO pack
We are talking about meta-keywords, which, as you know, are dead - set to "Disable".
HOORAY! Basic settings completed. Let's move on to the activated modules.
Performance in All in one SEO pack
There is nothing special to set up. All settings depend on the hosting. That's why this page may be informational for the webmaster. Here are the different versions of the software used. Therefore, we do not touch anything - we just contemplate.

Setting up an XML sitemap in All in one SEO pack
Sitemap.xml is a file that helps a search robot navigate your site, which has a positive effect on the speed of resource indexing. We need to set up a dynamic sitemap that will be updated regularly as new pages are added to the site. Let's point by point:
- File prefix. Leave it as is, sitemap. No .XML and no need to capitalize the file.
- Notify Google. The plot is good. We put a tick.
- Post types and taxonomies. Put checkboxes everywhere. It is important to understand that the statement is true if you closed unnecessary pages from indexing in the previous settings.

- Include daily archives and author pages. We don't tick boxes. Anyway, these types of pages are already closed from indexing in the previous settings.


Additional pages
Beginners with small sites do not need to touch this block. If there are a lot of pages for indexing, you can set the priority to the most necessary ones.

Excluded objects
Here you can not add entire headings to the sitemap. I do not recommend doing this, since links to articles located in this section will also be removed from the sitemap.

Priorities
This is the priority of visiting pages. Again, for sites of 50-100 pages, this item will not play a big role. For the future, you can prioritize the pages visited by the robot, where 1.0 is the maximum and 0.1 is the minimum. I arranged it like this.

Update frequency

Finally, click "Update Sitemap". After the page is refreshed, you can click on "View Sitemap" and the sitemap page will open. xml
Social meta in All in one SEO pack
Setting up this section will help make the announcements of your posts on social networks attractive.
basic settings

Home page settings

Image settings
We will not go into much detail here: everything is too obvious.
- Select source OG: Image. Here you can select an already used image for OpenGraph. We leave Default.
- Use the default image if no other is found. Good stuff. Suddenly they forgot to indicate the image - they will put the planned image, a kind of plan B. Put a tick.
- OG:Image by default. The same image for the previous paragraph.
- Width and height. Specify the number of pixels.
- Use custom fields. Optional field. Better not to touch. Here you can add more different things related to the image. But templates are enough.

Next are the facebook and twitter settings. I see no reason to consider them separately. But! At the end there is an interesting button that checks for duplicate social meta tags on your site. Click on it periodically.

At the end, be sure to save the settings.
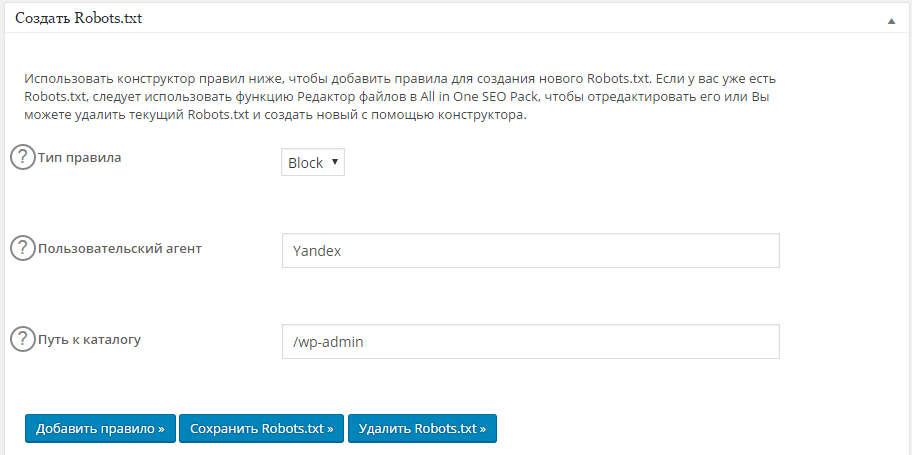
Robots.txt in All in one SEO pack plugin
In general, on this occasion we even have a separate article about . There you can take a standard set of prohibitions that will obviously be useful to the site.
There is a robots.txt file constructor. You can add an allow and block (disallow) rule in it. Everything is extremely simple. We select in the switcher whether we need to prohibit or allow indexing this or that page. Now we write the name of the crawler: if you don't go into details, it's either Yandex or Google. An asterisk (*) means many - in other words, all bots. And in the third field we indicate the experimental page. For example, let's prevent Yandex from indexing the admin login page.
File editor in All in one SEO pack
An excellent option that allows you to climb without system folders edit important files. There are only two sections here.


Import & Export in All in one SEO pack
Everything is extremely simple. This tab allows you to save all the settings of your AIOS plugin to a separate file. You can then import the same settings to any other WordPress site. At first I wanted to make a file with the settings here so that you do not have to read the entire article, but I realized that different sites will need different settings. Therefore, I decided not to confuse anyone and not create a bunch of options for settings.
To export the settings, it is important that all the necessary sections are activated in the saved plugin configuration. Then check the boxes of interest and find the export button at the bottom.
Importing shouldn't be a problem at all.

Blocker of harmful bots in All in one SEO pack
Idea fire. Prevent the site from being scanned by malicious bots. But! Keep in mind that the plugin is foreign, which means it is not very picky about domestic bots and sometimes blocks very harmless crawlers. I met somewhere on the forums that Yandex crawlers were blacklisted by the plugin. In my version, I found megaindex, ahrefs and the like among malicious robots. These are statistics services and they do not cause any harm to the site.


Conclusion
If you have read the article to the end, you are a hero who cares about your own site. This is very good, because the most important thing in SEO is the regular improvement of your resource. Praise yourself by watching a video with chic expert advice on website promotion. Yes, button accordion, but it does not cease to be funny from this.
K o n e c