Setting up dir 300 Rostelecom set it up yourself. Wireless mode on a D-Link router
Read also
D-Link DIR-300 NRU is one of the most popular routers among Russian users. Despite the fact that there is nothing complicated in setting up this router, sometimes it causes problems for novice users. In this manual, we will look at the process of setting up a router for the Rostelecom provider. Since the D-Link DIR-300 has several modifications and firmware, we will dwell in detail on the router settings for each firmware.
Important! Going into the router settings is very simple. Enter 192.168.0.1 into the address bar of your browser, login: admin, password: admin.
Getting ready to configure the dir-300 router
Most likely, before reading these instructions, you have already tried to configure the router yourself. Therefore, it would be a good idea to reset the dir-300 settings to factory settings. To do this, you need to plug in the router and hold the “reset” button on the back of the router for about 10 seconds (until all the indicators on the front panel blink). After this, it will take about 30 seconds to load the router. All settings will be reset to factory settings.
- In Windows 10, Windows 8, Windows 7, you need to go to the Network and Sharing Center (click right click by icon local network in the taskbar). Then select “Change adapter settings”. Right-click on the network card and select “Properties”.
- In Windows XP, go to “Control Panel”, select “Network Connections”. Right-click on the network card and select “Properties”.
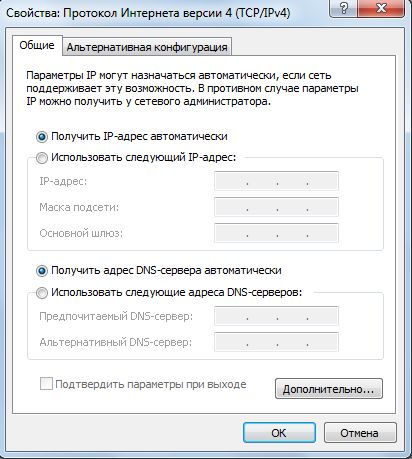
- You will see the connection properties window. Go to the settings of the item “Internet Protocol version 4 TCP/IPv4”
- The settings should be “Obtain an IP address automatically” and “Obtain a DNS server address automatically.” If not, make changes and click OK.
Let's move on to the next point.
Connection D-link Dir-300
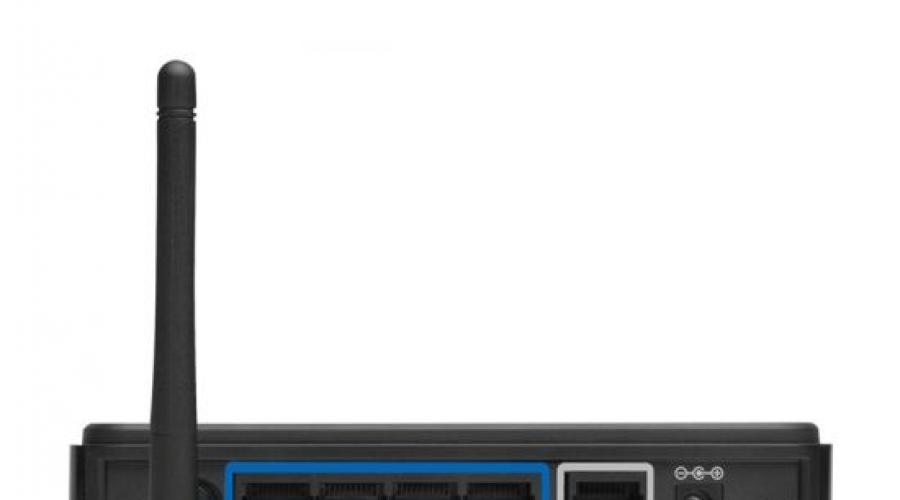
There are 5 connectors on the back of the router. “LAN” connectors for connecting devices on your local network and an “Internet” connector for connecting your provider’s cable. You need to connect the provider's cable to the “Internet” connector, and connect the network card of the computer from which you will configure the router to the LAN port (for example, the first one). If you have an IP-TV set-top box, connect it to LAN port 4. We plug the router into a power outlet.
How to go into the router settings and find out the firmware version
Today there are 2 types of current firmware for DIR-300. They differ in appearance and we will consider the process of setting up DIR-300 for Rostelecom for each of them. Going into the router settings is very simple. Open your favorite browser and enter the address of our router 192.168.0.1 into the address bar of the browser. After this, press “Enter”. Enter your login information: “username” – admin, “password” – admin.
After this, you will be asked to change the password from the administrative panel to your own. You do this, click “OK” and find yourself on home page router settings. Depending on the firmware version, it will look like this.
First, we will look at the process of setting up the D-link DIR-300 router for Rostelecom for more new version firmware 14.x, and then for the older one - 1.3x. You can go straight to the part of the instructions you need. Alternatively, upgrade to a newer version from the D-Link website.
Setting up Rostelecom PPPoE DIR-300 connection for firmware 1.4.x
Click the “Advanced settings” button at the bottom of the page. If you have an English interface, you can change the language in the right top corner pages.
In the advanced settings window, select the “WAN” sub-item. A page will open with a list of current connections. Click on the “Dynamic IP” connection and delete it. Return to the list of connections and click “Add”. Next we will configure the Rostelecom PPPoe connection. You only need to specify the parameters that I will write about. Leave the rest as is.
PPPoE settings for Rostelecom on DIR-300 1.4.x
- Connection type – PPPoE
- Username – Your login from the Rostelecom agreement
- Password and password confirmation – Password from the Rostelecom agreement
- Click “Save”
If the settings are made correctly, the Internet will work after a short time.
You can proceed to setting up Wi-fi on the DIR-300.
Setting up Wi-Fi on DIR-300 with firmware 1.4.x
Go to the main settings page of the DIR-300 router, select the “Setup Wizard” sub-item wireless network” in the Wi-fi section. Next, using the “Wireless Network Setup Wizard,” you will step by step configure your wireless network settings. What needs to be changed:
- Click “Save”, then click “Save” in the upper right corner of the screen (where the light blinks)
This completes the wireless network setup for the DIR-300. You can use Wi-fi from a tablet, phone, laptop (from any Wi-fi-enabled device). To configure IP-TV, go to the end of the article.
Setting up Rostelecom PPPoE DIR-300 connection for firmware 1.3.x
So, in order to set up the Internet from Rostelecom on the specified DIR-300 firmware, we do the following:
- On the home page of the router, click the “Configure manually” button
- On the “Network” tab, select “WAN”. Select the connection available there and select “Delete”.
- Return to the list of connections (it will be empty) and select “Add”
Now we need to configure the Rostelecom PPPoE parameters in our DIR-300 router.
We fill in only the following parameters, do not touch the rest:
- Connection type - PPPoE
- Username - Your login from the Rostelecom agreement
- Password and password confirmation - Password from the Rostelecom agreement
- Check the Keep Alive box if not checked.
Click “Save” and you will again find yourself in the list of connections. There will be a notification at the top of the page asking you to save your settings. Let's save them. If you did everything correctly, the status of the created connection will change to “Connected”. You can proceed to setting up your Wi-fi wireless network.
Setting up Wi-Fi on DIR-300 with firmware 1.3.x
To configure Wi-Fi on the DIR-300, you need to go to the main page of the router settings, click “Configure manually”, select the “Wi-Fi” tab. Then go to the “Basic Settings” tab. We set the following parameters:
- SSID is the name of your wireless network. It will be visible to all Wi-fi users. Serves to identify your network by you and can be anything.
- Country – it is advisable to put “United States of America”. There will be fewer accessibility problems Wi-fi networks on different devices. If you are wondering why, ask in the comments.
- Click the “Change” button
Then go to the “security settings” tab to set a password for the Wi-fi network.
- Network authentication is undoubtedly WPA2-PSK, as the most secure.
- The PSK encryption key is yours Wi-fi password. The password requirements are at least 8 digits, letters are highly desirable.
- Click the “Change” button
- Do not ignore the notification about the need to save settings. Save the changes made.
This completes the Wi-fi setup for DIR-300. Try it, connect. Any Wi-Fi enabled device should work flawlessly. Let's move on to the IP-TV settings, if necessary.
Setting up IP-TV Rostelecom for DIR-300 (television)
Setting up IP-TV for firmware 1.3.x and 1.4.x is practically the same. On the home page of the router, click “Set up IPTV” (if you have firmware 1.3.x) and “IPTV Setup Wizard” if you have firmware 1.4.x. After this, you will need to specify the port to connect the IP-TV set-top box (the Internet will not work through this port). At the beginning of the article, I recommended connecting the set-top box to port 4. If you did this, specify port 4 and save the changes. This completes the IP-TV setup.
I hope you find it useful instructions by setup D-Link DIR-300 for Rostelecom.
This device is designed to create wired or wireless home network. Also, with its help, users can connect to the Internet using Ethernet technology.
The router cannot work with ADSL cables. The article describes in detail the process of setting up the D-link DIR-300 for correct operation on the Rostelecom network.
Connecting a router
Before you start working with the device, you must connect it to the network. Plug the Ethernet cable coming from the Rostelecom provider into the “Internet” port located on the rear panel. In one of the remaining ports, signed as LAN1-4, you need to insert the patch cord connector that comes from your personal computer. After these steps, connect the router to power and wait until it boots up.

- Click on the network connection icon in the Windows tray (panel to the left of the date and time).
- Click on the “Control Center...” hyperlink.
- Using the menu on the left side of the window, go to the “Adapter settings” section.
- Double-click the active network shortcut.
- In the window that appears, click on the “Properties” element.
- Select the “TCP/IPv4 Protocol” category.
- Check the box next to “Receive automatically”.
- Click “Ok” to save the changes.
- Wait a moment until the computer receives a new IP address and click on the “Details” button.
- Find the “Gateway” parameter among the presented data and copy its value.
Authorization in the web interface
Now that your computer is connected to the DIR-300 router, you can start changing the settings. The device is configured using a special web interface:
- Launch any Internet browser.
- Paste the value of the “Gateway” parameter into the address bar.
- You will be taken to a new page where the system will ask for your username and password. They can be found on a special sticker located on the back of the router. In most cases, the pair “admin” - “admin” is suitable.

- Click on the “Login” button to log in to the network.
After these steps, you will be redirected to the main interface menu to configure the DIR-300 router.
External network settings
First of all, users will need to set up an external network to gain access to the Internet. To do this, do the following:
- Click on the "WAN" hyperlink, which is located in the "Network" section.
- In the “Main” section, you must select the type of connection (“Connection mode”) with Rostelecom servers. For most subscribers, the PPPoE (PPP over Ethernet) type is suitable. If you are subscribed to the “Permanent IP” service, you need to select the “Static IP” item.
- Specify any name for the connection.
- If you chose PPPoE, you need to specify your personal password with login. If you don’t know them, look in your copy of the agreement with Rostelecom or check with your provider.

- For “Static IP” you will need to fill in the fields: address (Address), mask (Mask), gateway (Gateway) and DNS server (DNS).
- Click the “Save” button at the very bottom of the screen.
Wireless network
If you are not going to take advantage of the opportunities wireless communication– disable WiFi using the graphical switch in the main menu. This way, the router will consume fewer resources, and strangers will not be able to connect to your network.
If you are using mobile devices and want to set up Wi-Fi, you need to do the following:
- Click on the “Basic configuration” hyperlink in the “Wi-Fi” category on the main page of the web interface.

- In the “SSID” field you need to write the name for your access point.
- In the “Country” column, select “Russian Federation”.
- Click on the “Change” button and return to the main menu.
- Now go to the "Security" category under the "WiFi" section.
- The "Authentication" parameter must be set to "WPA2-PSK".
- In the “Pre-shared key” field, write the code to access your network.
- Select the combined type “TKIP\AES” in the “WPA encryption” column.
- Click "Edit".
Now that the setup is complete, you need to reboot your router for the new settings to become active. To do this, use the “Reboot” tool in the “System” section or simply disconnect the device from the power supply for a few seconds.
Step-by-step instructions on how to do it setting up DIR-300. It starts with connecting the router.
Physical connection
- Plug D-link DIR-300 into a power outlet via the power supply.
- Install the cable from the Internet provider into the appropriate port of the router.
- Connect the computer and router with a wire (patch cord, i.e. blue cable).
- For Wi-Fi, screw on the antenna.
- Most often, the bottom of the DIR-300 contains the address of the local “site” with settings, as well as a login and password. Typically the address is 192.168.0.1.
- Enter it into your browser and you will go to the page generated by the router.
- The default login and password is admin.
- You can immediately change the interface language.
- And set a password for the DIR-300 router. If you forget it, you will have to reset it, along with all settings, to “default”.
- To configure the Internet, go to the Advanced settings item below.
- In the Network block, follow the WAN link.
- Create a new connection; to do this, click the Add button in the lower right corner.
- Here you need to select the type of Internet connection. Usually this is PPPoE.
- You may have to clone the MAC address of your computer's network card into the router using the green arrow button (not always necessary, only if your ISP has a MAC address binding).
- Enter your Username and Password. This is the Internet access data from your provider (if you don’t know, look for it in your agreement with the provider).
- In other fields, you can leave everything as default and click the Save button.
- You will then be redirected to the previous page. The new connection you configured appears there. Check to see if the round check mark for this connection is set to Default Gateway.
- As a result, the Internet on a computer connected via LAN (i.e. by wire) should work. To check, go to any site:
- To prevent the settings from being reset, click Save on the router:
- In Advanced Settings, find the WiFi section. Check that the green switch is in the on position. Just below, follow the link to Basic Settings.
- Check the Enable wireless connection checkbox and enter the name of the network. It will be displayed as the Wi-Fi name, which is visible to all devices (even those not yours) within the router's coverage area.
- Click change.
- We will be brought back, click Security Settings.
- Write down a password for Wi-Fi, otherwise anyone who catches it will be able to use it.
- Save changes to Wi-Fi settings on the DIR-300 router.
- Now turn on the Wireless network connection (it should be present if all drivers and software are present on Wi-Fi).
- A window will appear in the tray next to the clock with the found WiFi networks. Remember what you called it in the router settings. Select and click Connect.
- Enter the password you set during setup Wi-Fi router D-link DIR-300.
- Select a name for the rule (to avoid confusion, it is better to give meaningful names).
- Select specific number public port or specify a range of ports). Public is an external port for the Internet. To register only one specific number, indicate it in the form of a starting and ending number.
- In the test example, we opened port 3389.
- Enter the IP address of the PC (server) to which the ports are forwarded. It is worth reserving this IP address for a specific computer in the DHCP reservation settings on the router, then it will not change over time. If you do not want to make backups in the router, you can enter the IP address manually in the settings of the PC’s network card.
- The test example specified the internal gray IP address 192.168.1.100.
- Register the port for receiving incoming connections on a PC on the local network.
- For the test, we specified the default port 3389.
- Don't forget to check the box on the left to enable the rule.
- Check Enable Multicast Stream for IPTV to work via cable.
- Check the box for Wireless Enhance Mode to operate IPTV over Wi-Fi.
- We save with the “Save Settings” button (at the top of the page).
- Version A1 is flashed via TFTP (so it is more difficult to make a repeater out of it).
- Version B1 can be flashed via the web interface.
- We change the DIR-300 subnet to another one so that it differs from the main source point (for example, a laptop). If the laptop has 192.168.1.1, then here you need to make 192.168.2.1.
- DHCP can be enabled; to do this, select the IP of the main point (192.168.1.1) as a gateway.
- In point WAN settings go to Automatic-configuration DHCP and activate STP. Save.
- In Wireless, select Mode – Repeater (or Repeater Bridge, if you have a different firmware version).
- The other remaining settings must match the source parameters (SSID, channel, connection type).
- The channel must be set to specific, not Auto. Security settings should also be similar to the source settings.
- Save.
- Log in through the web interface and click Reboot.
- The router will reboot in 30-60 seconds, during which time you will be shown a message stating that it cannot be disconnected from the power supply.
- After this, the D-link DIR-300 is completely ready to work with the old settings.
In the end, the wires on the back of the router should look something like this:

Setting up on PC
On a desktop computer connected via a wire, open Control Panel through Start, go to Network and Internet, then Network and Sharing Center, then go to Change adapter settings. See if your local network is turned on. Enable if it is disabled.

From now on, for the network to work, you don’t need to configure anything else on your computer. If you experience any problems, you may not have the driver installed. network card(or for Wi-Fi), refer to our article on.
How to log in to the admin panel
You no longer need to configure the computer itself; the router stores all Internet settings within itself. But to set up the network, you need to visit the router through the web interface. This can only be done via a wire, so you will have to log in either through a desktop PC with a wired connection, or connect a laptop/netbook via a LAN network to the router.


Settings
Primary setup and path to basic Internet settings:


Basic network settings in the D-link DIR-300 router:


Congratulations, you have configured the Internet in the router and connected your computer to it via LAN.
Enabling WI-FI and setting up
To work via WiFi, you need not only a laptop with a wireless network adapter, but also setting up a link router. You already know how to log into the router through a computer, do it.


How to connect to Wi-Fi
If you configured the D-link router via a laptop/netbook using a wired connection, then you no longer need it. Disconnect the wire physically, and in Windows turn off “Local Area Connection”.


How to forward ports on a router
What is port forwarding? This is a connection between a port on the external interface of the DIR-300 router and a device port on the local network. The idea is to give access to the device from the Internet using a specific open port router.
In practice it might look like this. There is a need to provide access to remote control slave. desktop PC connected to the Internet via the DIR-300 router (or another reason). To do this, a rule is created to redirect the WAN port to the port of the home PC.
To do this, go to the Advanced section, then to the Port Forwarding setting.
How to set up:

Setting up IPTV
Setting up IPTV on routers: D-Link DIR-300, DIR-400, DIR-615 and DIR-655. Log in to the admin panel (instructions at the beginning of the article), you will see the main settings menu. Click Advanced, then Advanced Network. Specify the parameters:
Perhaps the interface in your model will differ slightly from the picture shown.

If the specified menu items are not in the router, it may need to be flashed new firmware supporting IGMP proxy or Multicast Routing. Also note that the interface shown here is English, yours may be Russian.
How to turn on the router as a repeater
In order for the DIR-300 to work as a repeater, it needs to be flashed with the DD-WRT program.
Let's start setting up the repeater:

Wi-Fi setup:

After saving the settings, go to Status > Wireless > Site Survey, select the source point. Click the Connect button and save again. As a result, your router should receive the source IP and operate as a repeater.
Video settings on Rostelecom
Step-by-step video instructions D-Link settings DIR-300 for Rostelecom:
How to reset and reboot
To reset the settings to factory defaults, the router must be plugged in. After that, click the Reset button. It is recessed into the body to prevent accidental pressing, so you will need a toothpick. In some models, to reset you need to press Reset and hold for 15 seconds.

This will reset absolutely all settings, including the password (by default, like the login, it is admin).
How to reboot your router:


Also, to reboot the router, you can physically disconnect it from the power outlet (preferably for 15-30 seconds).
Conclusion
You have learned how to configure the D-link DIR 300 router. And remember, the main ways to fix some problems with the router are to reboot and flash the firmware. Even if you have the most latest version firmware, then re-flashing can get rid of network glitches that have appeared (similarly).
The DIR-300 router is one of the most popular and affordable routers. It is easy to set up, compact and reliable. Since its release, it has been updated several times and has also gone through many revisions. This article will step by step review the process of installing and configuring the D-Link DIR-300 router for Rostelecom.
Characteristics of the D Link DIR-300 router
Externally, the device looks completely ordinary - a small rectangular box. Depending on the revision, various decorative elements may be present.
The front panel contains elements indicating the device status. Here are their designations, from left to right:
- power indicator. Shows the router's connection to the electrical network;
- Internet. The light indicates the current status of the network connection;
- wireless connection. If Wi-Fi is turned on, a blinking indicator will notify you that data is currently being transferred;
- a numbered row of LAN ports indicating a cable connection.
The rear panel is standard for this type of device - a WAN port, 4 LAN ports, a power connector, a reset button and an antenna. At the bottom of the router there is a sticker with information about the model, revision, administrative panel address and login password.

Preparation and a little theory
Usually a special cable is supplied with the router, which is used for initial setup. It is a regular twisted pair cable with connectors at the ends.
There is no particular difference in operating systems No. All setup is carried out in a browser window, which is available in almost any OS.

Before setting up the D-Link DIR-300 router, you should check the network status settings. In Windows, this can be done through “Change adapter settings”. In the list of connections, right-click on the one you need and select “Properties”. Here you are interested in whether the marker is set to “Obtain an IP address automatically”. If not, then you need to select it. This is necessary so that the router itself can assign an address to the connected computer, since it has a DHCP function.
Start
Before you configure the D-Link DIR-300 router, you need to physically connect it to your computer. This is what the supplied cable is used for. It connects to any of the 4 free LAN connectors.
You need to insert a wire from the provider, in this case it is Rostelecom.
Now, in theory, there is a connection between the router and the PC. You can already contact him at a specific address. For DIR 300 this is 192.168.0.1, you need to type it in the browser. If you are unable to connect, you should make sure the address is correct by looking at the sticker on the bottom of the device.
The browser should display a page asking you to enter your login and password. When first launched, their default values are admin and admin.
Setting up a D-Link DIR-300 router for Rostelecom
The administrative panel is replete with a number of settings and options. For initial configuration you will need the “Network” item. And in it there is a sub-item WAN. Here you need to add a new connection. There is a button of the same name for this. Should be displayed new page with fields for data entry.
The first thing to do is select the connection type. To configure the D-Link DIR-300 Rostelecom router, this will be PPPoE. After selection, the fields corresponding to this particular connection should open.

You will need to enter some data. The first is the name; you can leave it formed by default, since it will not appear anywhere else except in the administrative panel. In the PPP section you need to enter a username and password. The provider must indicate this information in the contract or an appendix to it. The remaining parameters can be left as default.
WiFi
Most users are interested in setting wireless connection. Therefore, the next point you need to go to is Wi-Fi. In the main settings, you should check if the “Enable wireless connection” checkbox is checked.
The SSID field is the name of the network. This is what will be displayed in the list available networks when trying to connect from any device. If the user wants no one to see his access point, then there is a “Hide access point” function. You can connect to a wireless network only by specifying its exact name.
Also in the settings you can limit the number simultaneous connections to the router. If 0 is specified, then there can be as many connections as desired.

Next, you need to go to the security settings, which are located in the section of the same name. Network authentication is the type by which client authorization and identification will occur. Then you need to specify the encryption key. This is the password for WiFi router D-Link DIR-300. It is advisable to choose the most stable option, which would be impossible to achieve by searching through random numbers.
The types of encryption do not make much difference, the main thing is that they are compatible with the adapter of the connected equipment.
For Android device owners
D-Link has created special application Click N Connect for Android, with which you can quickly and conveniently configure the D-Link DIR-300 router for Rostelecom without connecting to a computer.

The application has functionality that allows you to determine your location, provide current list providers of the current city from our own database. The program will walk you through all the setup steps step by step, giving recommendations and advice.
You can download the application from the official Google Play store.
After you have logged in, you should change the default password. This will help avoid security problems and unauthorized access to the router.
The characteristics of the D-Link DIR-300 router may differ in firmware, revision, and design. This is worth considering before attempting to reflash or update the device yourself.
If suddenly the password to enter administrative panel be forgotten, it is easy to fix. There is a Reset button on the bottom of the device, which allows you to reset the settings of the D-Link DIR-300 router. However, it is worth considering that all entered information will be deleted - logins and passwords for logging into the network, connections, etc. But now you can log in again using the default link - admin - admin.
In the instructions for the D-Link DIR-300 router you can learn in detail about other functions and capabilities of the router. This is quite a big list. You can set control over visiting sites, limiting entry by MAC and IP addresses. Among the features of Wi-Fi is the ability to manually set the channel, its power and coverage area.
For those who want to constantly monitor the status of their device, there is a large selection of different monitors and logs. If an unauthorized login was made to the router, this will be displayed in the logs, based on which it will be possible to take measures to improve security.
Conclusion
The D-Link DIR-300 router is quite popular in everyday life. Its simplicity and reliability have proven themselves. This is also evidenced by many positive user reviews about the device. The router is really worth it.