How to connect a second computer. How to connect two computers to each other via a network cable
Read also
If you have two computers, then you will probably want to connect them together via a network cable and thereby create a small network that can be used to transfer data between computers or share online games. In this article you can read instructions that will help you implement this idea.
Step #1: Prepare to connect your computer to your computer.
In order to connect two computers to each other, you need a crimped network cable. If you do not have such a network cable, then you need to make one or buy a ready-made one. If you buy a ready-made one, make sure that it is crimped like a crossover.
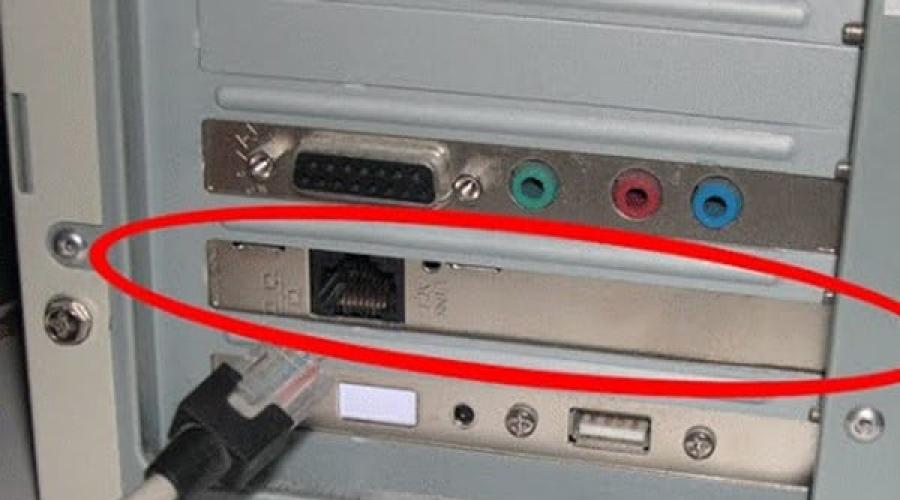
To ensure that the cable is properly crimped, pay attention to the conductors in the connectors at both ends of the cable. The orange and green pair of conductors should be sort of mixed up with each other (see picture below).
If you crimp the network cable yourself, you will also need RJ-45 connectors and a crimping tool (crimper). You can read more about how a network cable is crimped here.
Step No. 2. Connect two computers to each other via a network cable.
This is the easiest stage. You need to plug each end of your network cable into the network card slots on both computers. Immediately after connecting the cable to two computers, the LED inside the connectors should light up, signaling that the network cards have started exchanging data.

If there is no light indication after connecting the cable, this means that the network cards do not see each other. Most likely, you either have one of your network cards turned off or a faulty network cable. This issue must be corrected before moving on to the next step.
Step No. 3. Network setup.
After the two computers are connected by a network cable, you can begin setting up a network between them. To do this, open the “Control Panel” on one of the computers and go to the “Network and Internet – Network and Sharing Center” section. In this window, click on the “Change adapter settings” link.

After this, the window “ Network connections" All network cards on your device are displayed here. Find the one network card, to which you connected the network cable and open its properties.

After this, select the “IP version 4” item with the mouse and click on the “Properties” button.

After this, a window with the properties of the IP protocol will open. Here you need to select “Use the following IP address” and enter the IP address 192.168.1.1 and subnet mask 255.255.255.0. The remaining fields do not need to be filled in.

After that we close everything open windows Click on the “Ok” button to save the changes and move on to the second computer. In order to connect two computers together into one network, all of the above procedures must be repeated on the second computer. The only exception is the IP address. In order for the network to work, the IP addresses must be different. That's why, on the second computer you need to specify the IP address 192.168.1.2.

And just like the first time, close all windows on the second computer by clicking on the “Ok” button.
Step No. 4. Check the connection between the two computers.
Once the IP addresses are set, you can test the connection between the two computers. To do this, on one of the computers, press the Windows + R key combination and in the window that opens, enter the command “ CMD».

This way you will open command line Windows. Now enter the command " PING IP", where instead of "IP" substitute the IP address of the second computer. For example, if the command prompt is running on a computer with an IP address of 192.168.1.2, then you need to enter the command “ PING 192.168.1.1».

If the computers were connected correctly, then you should receive back all 4 packets sent. If packets are lost, then an error was made somewhere and the network is not working.
30 47 925 0
Why might you need to connect one PC to another PC? Goals can be very different - from the desire to play something, to the banal copying of files. Be that as it may, every user who considers his level of knowledge in this area to be above average should be able to connect a computer to a computer. There is nothing complicated about connecting two computers: just get a network cable, or a special PC-Link device, with which you can connect 2 computers to each other via USB. So let's get started!
You will need:
Network cable
So, where should we start if we have already started connecting two computers? That's right, with their connection! We insert one end of the twisted pair connector into the Ethernet port of the computer or laptop. It looks like this:
The second end, in turn, is inserted into another PC. At this point, the physical connection process can be considered complete. But this is not enough - if we connect 2 computers in this way, we will get nothing but an “empty” network connection. After all, in order to connect two computers to each other and use certain functions, they need to be configured in a special way, which is what we will do now.
Connection setup
Right-click on the network connection icon in the system tray and select “Network and Sharing Center.”
In the “Changing adapter settings” section, look for Local Area Connection, open its properties, and then go to the TCP/IPv4 protocol settings window.
There we indicate the following parameters: IP – 192.168.0.n (n-any number from 0 to 250); subnet mask: 255.255.255.0.
USB cable
We connect two computers to each other with USB help cord with the LC-Link device. After this, with installation disk, which comes complete with the device, install the drivers for PC-Link on both machines (insert the disk into the drive, select “Install driver” or “InstallDriver” in the autorun menu, and then follow the instructions).
This article will come in handy if your apartment has not one, but two computers. Sometimes documents need to be transferred between them, and children can play games online. Today we will talk about how to connect two computers to each other.
One of the most simple ways– use of the so-called twisted pair cable. The cost of the work cannot be cheaper, but the data transfer speed is much higher than in other cases. It makes sense to lay a cable if the distance between PCs is less than 100 meters.
We will need:
- Network card in every computer. Attention! They may already be installed on your computer (check), otherwise you need to buy them.
- Twisted pair - twisted in pairs copper wires in isolation. There are shielded (STP) and unshielded (UTP). UTP is suitable for our needs, and it’s easier to buy such a pair.
 3.RJ-45 plugs (also called “jack”), 2 pcs. It is possible that similar ones are used in your telephone socket.
 4. Crimping tool (called a “crimper”).

What's the first step? We measure the distance between computers along the route of future cable laying. Then we go to the store and buy the same amount of twisted pair, as well as a few meters in reserve. We also take forks and crimping tools there.
The purchased cable must be crimped using the Cross-over type. This option is used when connecting computers without using a hub or similar devices. This is done like this:
- From both ends of the purchased cable we cut off the sheath by approximately 3 centimeters.
- We unravel the wires inside and place them according to the picture.

- In this order, we insert the twisted pair conductors into the RJ-45 plugs. Important! The order of colors is not the same for different forks.
- We take a crimping tool, insert the forks into it one at a time and squeeze the crimper handles until they stop.
There are only simple steps– setting up the operating system. We'll show you all the steps Windows example 7:
- We connect the jacks to the connectors of the network cards (usually located on the back wall of the system units; you won’t confuse them with anything else, since the plugs cannot be inserted into other connectors).
- Open the Control Panel, select the System item, and in it you will need Settings remote access– Computer name tab – Edit. We give a name to the computer and the group of devices in which it will work. The system will prompt you to reboot, but we’ll refuse it for now.

- We again need the Control Panel, and there we need the Network and Sharing Center. Find the Local Area Connection item, click Properties - Internet Protocol Version 4 (here we double-click) - Use the following IP address. Enter the IP address 192.168.1.2 and the subnet mask 255.255.255.0.

- Reboot the computer
- We perform the same actions with the second computer. Important! The computer name must be different; only the last digit in the IP address must be different. Titles working group and subnet mask are the same as the first device.
- To use files from one computer on another, you need to specifically allow this. To do this, right-click on the required folder and select the “Sharing – Access tab – Advanced sharing settings” section. Check the “Share this folder” checkbox.

That's all. You learned how to connect two computers together into one network.
Very often, users on forums look for information about connecting two computers in local network. A similar question is asked not only to forum participants, but also on sites where the so-called FAQ (question-answer) is implemented. Since connecting computers via a LAN cable also raises questions among blog visitors, I decided to write a detailed instruction article. It should be said that in this publication we will consider connecting two computers to a network with a LAN cable, and wireless Wi-Fi connection We will consider it in one of the following publications.
How do you understand for local connection we need two computers LAN cable cross-pressed. It is worth saying that for computers with Ethernet interface Auto-MDIX (media dependent interface) type of crimp (direct or crossover) does not matter because the network port is configured automatically. This technology must be supported by two devices.
Nothing is perfect, and in practice it happens that network cards with Ethernet Auto-MDIX refuse to work correctly. To avoid such situations, I recommend that you adhere to twisted pair crimping standards and use each type of LAN crimping for its intended purpose. Before connecting two computers to a local network, be sure to make sure that you are using a working and correct type of cable. Details about where the straight and cross type are used and how to crimp a LAN cable without crimpers (crimping tool).
The length of the twisted pair cable for connecting two computers into a local network should not be more than 100 meters. Otherwise, signal attenuation will affect the quality of the network.
In addition, you can use a FireWire (IEEE 1394 or i-Link) cable to connect two computers if both devices (laptop, desktop) have appropriate ports. If there are no IEEE 1394 ports, then you can install a controller/expansion card for the PCI slot in the desktop FireWire, and install a PCMCIA card with i-Link ports in the laptop. FireWire cables are available in 4-pin and 6-pin versions. Depending on the available ports on the computers you are connecting to, use the appropriate cable.


So, you have connected two computers using one of the methods described above. If you are creating a network connection between two computers via an RJ-45 connector, the controller's Ethernet indicator light should light/blink green (usually the indicator light is located near the RJ-45 connector). If this does not happen or the indicator lights up on only one computer, then check that the cable is crimped correctly.
Also make sure that network adapters are turned on, the drivers for them are installed and the devices work fine. But if the indicators on two computers light up or blink, then it follows that the hardware connection is established and the cable has no breaks and is working correctly.
If you use the Windows 7 (Windows XP) operating system, then as a rule, after connecting, the computers begin to “see” each other and work normally. It all depends on the preset parameters. However, if this does not happen, then you need to make some changes to the network connection parameters.
Let's look at a direct connection of two computers via a FireWire or LAN (twisted pair) cable running the Windows XP operating system, and then we'll look at how to combine two computers running Windows 7. It is advisable that the two computers being connected be in the same workgroup.
Connecting two computers to a network running Windows XP.
Go to Start, Control Panel and click on the Network Connections icon. Right-click on "Local Area Connection" and context menu go to “Properties”.


In the window that opens, go to “Internet Protocol (TCP/IP)” and move the switch to the “Use the following IP address” position.


Here we need to enter the network IP address for the computer. For example, like this:
- IP address: 192.168.1.1
- Subnet mask: 255.255.255.0
- Default gateway: 192.168.1.0 (enter if computers will not see each other)
That is, it is not necessary to enter “Main Gateway,” but if the computers will not see each other, then enter this parameter as well. After that, click “Ok” in all windows.


You need to do the same on another computer, but enter a different IP address. For example, like this:
- IP address: 192.168.1.2
- Subnet mask: 255.255.255.0
- Default gateway: 192.168.1.0 (must be entered if there is no connection)
Now a connection should be established between the computers (if there is no connection between the personal computers, then reboot them). To make sure the settings are correct, go to “Network Connections” and click on the “Local Area Connection” icon. The “Status” window should show “Connected”.


If “Connection is restricted,” check that the network connection parameters are filled out correctly. With connection in the operating room Windows system XP figured it out, now let's look at how to organize a network between two computers in Windows 7.
Connecting two computers into a network running Windows 7.
Actually, in Windows 7 there are no special differences for connecting two computers to a network, but to make it clear to those who use this particular operating system, I will describe the sequence of actions specifically for them.


Go to Start, Control Panel and select Network and Internet. Next, go to “Network and Sharing Center” and click on “Change adapter settings.” Here we are. Right-click on “Local Area Connection” and go to “Properties”.


Now go to “Internet Protocol Version 4 (TCP/IPv4)” and switch the button to “Use the following IP address.” Next you need to enter your network parameters.


It makes sense to enter a default gateway if there is no connection between computers. For example, like this:
- IP address: 192.168.1.7
- Subnet mask: 255.255.255.0
- Default gateway: 192.168.1.0 (enter if there is no connection)
You can set any other parameters for the IP address, as long as they are in the range from 192.168.1.1 to 192.168.1.254.


On the second computer, you need to enter exactly the same parameters and change the last digit in the IP address. For example, like this:
- IP address: 192.168.1.8
- Subnet mask: 255.255.255.0
- Default gateway: 192.168.1.0 (please enter if there is no connection)
After you set the necessary parameters, do not forget to click the “Ok” button in all windows. If there is no connection, restart your computers. To make sure that everything is working correctly, you need to check the connection between the computers. To do this, open a command prompt on one of the two computers. Go to Start and enter cmd in the search field labeled “Search programs and files.”
For example, to check communication on a computer with IP parameters 192.168.1.7, enter the command ping 192.168.1.8 and press the Enter key.


A positive result will be the result shown in the image. If sent = 4, received = 4, lost = 0, then everything is configured correctly. The two computers are connected directly.
Now you can exchange files between computers. Bye!
2018-07-03T11:46:23+00:00
I don't quite understand your question. Why does something have to fly off? Or do you mean that you need to change network settings? For example, to connect to the Internet.
In the previous article we talked about how to make a network cable (patch cord) with your own hands. Let's say you are lucky enough to become the owner of not one, but two computers, and then, as luck would have it, a new problem appears that did not exist before purchasing a new computer: there is a need to connect two computers to each other.
What is it for? Well, for example, if you need to move files from one computer to another, so as not to run around with a flash drive between them (and if the files are large and there are a lot of them, but the flash drive is modest), you can create a shared folder on one of the computers and put everything you need there. You can also use one printer and print to it from any computer. And most importantly, you can use one Internet connection on two computers.
In short, there are many advantages, but there is only one drawback - the network cards in computers will be busy, and if a modem for accessing the Internet is connected via a LAN connector, that is, to a network card, then in order to connect two computers to each other, one of them needs will deliver another network card. If the modem is connected to the computer via a USB connector, then there is no need to deliver anything.
So how do you connect two computers to each other? All actions were carried out on Windows 7 and Vista, but the main thing here is to know the procedure, and it can be repeated on any OS. We turn on two computers and connect them with a network cable. Next, open My Computer on one of them, right-click on any empty area, select Properties. Next we find ourselves in the System window. In this window, click on the button Change settings, next to the computer name.

Here we are on the tab Properties of the system, where we are interested in the Change button, click it. After we clicked the Change button, a window appears Changing the computer name or domain. In the “working group” line, you need to check the box and write the name of the working group that you are creating. If computers belong to the same workgroup, then they “see” each other, that is, on the second computer you will need to specify the same workgroup name. You can come up with any name, the main thing is that it is written in capital Latin letters. Click the OK button.
Afterwards we will see the system message: " Welcome to the working group...(here is your workgroup name)", click OK, and a message will appear stating that in order for the changes to take effect, you need to restart the computer, agree, and click OK. If you close the window Properties of the system, a message will appear asking you to confirm the reboot. Reboot the computer.
 |
 |
In order to connect two computers to each other, on the second computer you need to repeat all the steps that were done on the first and enter the same workgroup name.
After all of the above steps have been completed, you still need to make settings for the created working group. To do this you need to go to Control Panel, and open there. Now the two computers are connected to each other, but in order for folders and printers on one and the other computer to be visible, you need to enable “Network Discovery”, “File Sharing”, “Network Sharing”. shared folders", "Using shared printers", and it is also important to disable "Password protected sharing".

If one of the computers is connected to the Internet, then in order for it to be on the other, you need to make some more Internet connection settings. In the control window network connections need to choose Managing network connections. In the window that opens we find connection via local network, right-click and go to the properties of this connection.
In the connection properties window you need to go to Internet Protocol Version 4 properties And Internet Protocol Version 6. In order to do this, you need to left-click on one of the items (it will be highlighted in blue) and click Properties. In the protocol properties you need to set " Obtain an IP address automatically". We do the same thing on another computer.
And finally the last and important action that needs to be done. In order to have an Internet connection on another computer, you need to allow other network users to use this connection to access the Internet in the connection properties on the computer that is connected to the Internet. To do this you need to open Network connections, and there select the connection that is used to connect to the Internet.
Next, you need to right-click on the icon of this connection and select Properties. In the Properties window, you need to select the Access tab, and in it check the box next to "".