Installation work. How to make a photomontage from your photos How to make a photomontage in photoshop cs5
Do you want to surprise your loved ones and give them an original photo? Perhaps you are just interested in taking a cool photo - of yourself next to a celebrity or against the backdrop of the Martian landscape? Or to place the image of your face in a medieval setting? Maybe combine photos you need for work? This is easy to achieve if you make a photomontage on a computer.
With Photomontage, you can:
- Change photo background
- Remove or add objects from other pictures
- Combine two photos into one
- Do greeting card from the picture
Photomontage on the computer
The most common way to make a photomontage with your own hands is to process photos in Adobe program Photoshop. This professional image processing software has wide opportunities. But it is quite difficult for a beginner, it is not easy to figure it out on your own in one evening. Of course, there are a lot of courses and video tutorials on the net that you can use to learn how to work in Photoshop, but for this you need to have time and desire.
A similar program is GIMP. Unlike Adobe Photoshop, it is distributed free of charge.
How to combine photos in Photoshop
In Photoshop, open the photos you want to mount. For example, this will be an image of your face and beautiful background with sunset or sea surf. Duplicate the layer on each image. On the photo that should become the background, drag the second picture with the mouse. From the Edit menu, choose FreeTransform. Use the mouse to change the size of the photo and its proportions, drag it to the desired location. When finished, press Enter.
Select the mode for adding a vector layer mask on the toolbar. Set the foreground color to black and the second color to white, and use a soft brush to paint over unwanted parts of the photo. They will become invisible. For a softer and more natural background transition, change the size and softness of the brush in small areas.
If you accidentally delete the part of the photo you want, change the colors - from black to white, and paint over the area that needs to be restored with a brush. The drawing will return.
When you're done removing the background, exit the vector mask mode.
You can also mount photos in Photoshop in another way - using the Lasso tool to select part of the image. Select the desired area of the photo, and delete the rest of the image. Overlay the image on the photo that should be the background, and use the photo editor tools to achieve a seamless connection between them. In a high-quality collage, individual fragments are combined so that the image seems to be whole.
To do this, you need to make soft transitions between photos, smooth out the borders, match the color and brightness of each piece, and adjust the scale. Photoshop tools will give you the ability to blend photos, cut or add objects, apply effects, change the color and brightness of part or all of the photo. Using different tools, try to achieve the desired effect.
After you finish working in Photoshop, merge the layers and save the file.
Photomontage online
With your own hands, you can make a photomontage on a computer simply in the browser. To do this, you will need a good internet connection and powerful enough to work with graphic files computer. There are many free photo editing sites, you can find them yourself by typing the appropriate query in Google or Yandex. For example:
- http://fotostars.me/
- https://avatan.ru/
- http://www.fotor.com/ru
- http://photostreet.ru/
To mount photos online with your own hands, no special knowledge or you don't need skills. The site will offer you to upload one or more pictures. Sometimes a photo will have to be uploaded from a computer, sometimes you can specify a link to a photo that is stored on another site or social network. Please note that the result will depend on the quality of the photo.
The online photo editor will offer a set of backgrounds, frames and other decorations of your choice. After placing the photo on the background of your choice, you can play around with the settings and effects to get the best result.
After the photomontage is ready, you can get a link to your photo, save it on your computer or send it by mail. If the result does not suit you, you can go back and redo the collage from any stage.
Photo collage using smartphone or tablet
Modern smartphones also allow you to make a photo collage with your own hands - both iPhone and Android and Windows phones.
With the help of a photo editor for smartphones and tablets with a photo, you can do everything with your own hands the same as in online photo editors:
- Add or change background
- Add frames and decorations
- Apply effects
- Add text
Do-it-yourself photo editing, if you approach things creatively and wisely, is not an easy task. But with the desire, the availability of free time and the skills of searching the Internet, you can achieve amazing results. We hope our tutorials will help you create an image that you will be happy with.
Dear reader, this Photoshop tutorial primarily intended for those who are just starting to comprehend the basics of processing digital photography. To the one who is on this stage words and concepts such as “layer masks”, “adjustment layers of adjustments”, “curves”, etc. are frightening. My task is to show how, using a minimum set of tools that do not require deep knowledge and multi-level combinations in Photoshop, to embody bring an interesting idea to life.
Before you go over the lines further, ask yourself a question. Do I have a lot of shots from the so-called "About Nothing" series in my archive?
Let me explain a little - first of all, these are random shots, duplicates from a released series based on one plot, or such shots that seemed like “masterpieces” in the viewfinder, but for some reason they didn’t like it when looking at the house on the monitor. If the answer is “yes”, then I hope that you might learn something useful from this article.
Tip - if possible, do not put in the trash at first glance unsuccessful frames immediately after uploading to the computer from the camera. After all, any archive has a certain period of storage of the document. It is quite possible that in a week, two or a year, you will find that by connecting two frames from the series “About Nothing” together, you get a funny scene.
Yes, montage is not photography in its purest form, but no matter what it is called, it is primarily your creativity and the realization of a flight of fancy.
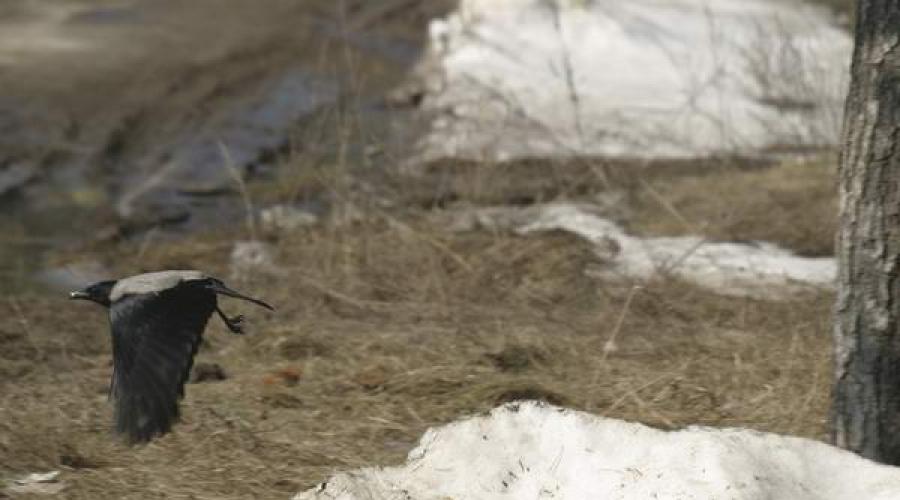
The two frames I chose for this tutorial are separated by exactly one year. Exactly one year ago, while walking through the forest, I tested my camera for continuous shooting and photographed a crow during takeoff. Having released a series on it, I received all the phases of its take-off. The shots taken that day remained in a folder called "Test". And just recently, a dachshund in a hunting stance got into my viewfinder. Her look seemed so interesting to me that I could not resist and took a picture. And only at home I realized that this look goes "to nowhere." “She must look at something in the frame,” I said to myself and began to save the situation. Having turned over the archive, I stumbled upon this crow. The season is almost the same, the focal length is almost the same, the position of the camera relative to the subject is the same. Only the sun in the frames was on opposite sides, but after mirroring (Flip Canvas Horizontal) the photo with the crow, everything fell into place. It remains to decide what is easier to do - move the crow or the dachshund. It turned out that it’s easier to put a dachshund in a frame with a crow, because to accurately cut out a crow and rearrange it from dark to White background, it will take much more time, use more tools and settings. Our task is: minimum actions - maximum results.

Tip - first of all, make sure that the sharpness of the transferred objects (if their location in the frame is supposed to be in the same plane) is identical and, if possible, the objects are equally illuminated. It is also worth watching the ratio of sizes. Using these rules, you will achieve the most realistic perception of the picture. And one more thing - the depth of field (depth of field of the depicted space) should also not be violated (well, there are no sharp objects in the focal blur zone!).
So, let's start processing photos
Outline our dachshund along with the adjacent snow background using the Lasso Tool (lasso) (photo 1).

If you select a dachshund exactly along the contour of its body, then, figuratively speaking, on the new frame it will simply hang in the air. We'll have to draw a shadow. By rearranging it with a “native” background, we will kill two birds with one stone. Firstly, there is no need to paint on the shadow and, secondly, it looks more naturalistic. There are two simple ways moving objects. The first is to copy the object to the clipboard Ctrl+C and then paste it into another frame Ctrl+V. The second way is to select the Move Tool, click it in the selection area and simply drag the object, while holding down the left mouse button, to another frame (photo 2).

We position the dachshund in the place we need and remove the excess with a regular eraser with a soft edge (photo 3).

After everything is done, “suddenly” it turns out that the size of the dog, which is in the same plane as the crow, is implausibly large. This just refers to the ratio of sizes, which I have already mentioned. No problem. Go to “Editing” (Edit), select the item “Arbitrary Transformation” (Free transform) and, while holding down Shift key, give the dog the appropriate dimensions (photo 4).

Pay attention to the fact that after you erase the remnants of the old background with an eraser, the outline of the object should not seem to be “cut down with an ax”, but blend smoothly into the background. Select the Blur tool and gently go over the edge of the cut out object. The force of the tool can be changed (photo 5).

Tip - be sure to look at how the cut out object is combined in brightness and contrast with the background. If necessary, adjust the levels of its brightness and contrast. The very last step is the command "Merge Layers" (Flatten Image).
With such a primitive method it is very easy to do what you can see on the final version. Now look at all three photos and tell me which is more interesting? And is it worth deleting something that initially seemed not worthy of attention.
After all, it is worth making a little imagination and your pictures will acquire a second life.

A car traversing the expanses of the Galaxy, or a child who finds himself inside a cartoon - nothing is impossible with modern photo editing software! If earlier magical transformations were only available to professionals, now anyone can learn how to make a photomontage and turn an ordinary picture into an exceptional one. All it takes is imagination and PhotoMASTER.
The program allows you to quickly and efficiently replace the background in the picture, getting an amazing result without special skills. Read the article - and you will learn how to achieve such shots in a matter of minutes.


Step #1. Upload a snapshot
The first thing to do is on a PC or laptop. It will take no more than two minutes to unpack and install PhotoMASTER, and then you can safely proceed to the transformations.
In the start window of the program, click on the command "Open Photo" and add the original photo.
If the uploaded file is in RAW format, the software will automatically offer a choice of several pre-processing presets to “develop” a raw image. If a JPEG photo needs basic enhancement, use the tone controls on the Basic tab.

Perform image correction before photomontage
Step #2. Separate the subject from the background
To make a photomontage on a computer, open the menu "Tools" and find the item "Background Replacement".
Your task at this stage is to separate the object or person in the picture from everything else. To do this, the program offers fairly simple tools - multi-colored brushes to distinguish between the object and the background, as well as an eraser with adjustable size for precise correction of defects.
With a green brush, circle the subject in the frame. No need to paint over the entire surface - just mark the general shape.

Mark the object in the picture
With a red brush, mark the background around the figure. Reduce the thickness of the drawing if you want to mark small areas of the background. If you accidentally drove over the edge - do not worry! Use the eraser to correct the mistake.

Mark the background in the photo
To evaluate the result, reduce the transparency of the background to a minimum.

This is how the photo will look after removing the background
Feel free to experiment - you can use the same function for other purposes. For example, if you want to replace a face in a picture, be in the place of a movie character or next to your favorite actor. To do this, select with a brush "An object" the face in the original image, and everything else as the background.
Step #3. Adjust your boundaries
Click "Further" and "PhotoMASTER" will offer to clarify the boundaries of the object. To do this, again you need to use brushes. "An object" And "Background". The first restores accidentally deleted parts of the image, and the second erases the excess. You can change the size and degree of feathering of the brushes for more convenience.

Adjust the brush size and refine the boundaries of the object in the picture
Set the image zoom to 100% to see more "raw" fragments. So you can make a photo montage of your photos better and more impressive.
Step number 4. Choose a new background
Now you have to decide on a new background for the picture. Show your imagination - let the result be unexpected! Take a look at the collection of pictures offered by "FotoMASTER". There you will find more than a dozen options - from European landscapes to outer space. Just click "Select image for background" and choose your favorite photo.
In addition, in "PhotoMASTER" you can make a photomontage using your image. To do this, click "Download" and add the file. Stretch if necessary original photo or change the location of the subject in the frame. When you are satisfied with the result, save it by clicking the "Apply" button.

Choose a new background for a photo from the program catalog or upload your own picture
Remained final touches! Take advantage of the regulators "Shading" And "Borders" to improve the result. The first setting is useful in order to soften the edges, the second - to reduce or, conversely, increase the boundaries of the object. Additionally “twist” the indicator on the scale "Adapting Colors to the Background", this will help to achieve the most naturalistic effect.

Feather the edges of the object to make it look more natural against the new background.
With the command "Save image from transparent background» you will receive a picture with a cropped object in PNG format, this will allow you to overlay the same photo on other pictures in the future without repeating the cropping procedure. Even more options for convenient photo editing!
Step number 5. Save the result
If you wish, you can continue, crop the image, tone it, or apply an effect. "PhotoMASTER" provides an extensive collection of ready-made processing styles. You can find them by referring to the menu. "Effects". Due to the use of filters, the composition will look holistic and organic.

Use effects from the program's collection to give the picture a "zest"
When you're done perfecting your photo, press the button "Save", enter the name of the file - and you're done!
With the help of background replacement, you can embody the most unusual ideas, making a photo montage from your photos on your computer even brighter and more original. Replace faces in photos, place new objects or people in the frame, travel through space and time! PhotoMASTER will help you with all this.
The editor will help you out in any situation related to the need to quickly and efficiently process a picture. Correction of exposure and color balance, elimination of flaws in portraits, artistic design, restoration of old pictures and even the functionality of "PhotoMASTER" will satisfy the needs of even the most demanding user. Download the program and see how effective it is!

Our blog website always open for cooperation with new authors of articles about photography and photo processing.
Recently wrote to us Pavel Nikolaev(retouch studio Re-touch) and proposed an article on photomontage. The article turned out to be very interesting and certainly deserves publication.
I want to talk about how to make a photomontage on your own and replace the background in a photo, as well as make the picture more realistic with the help of shadows. Worked in Photoshop. The sequence of photo processing can be different, the main thing is to follow the movements of the layers.
So let's get started.
Photo montage of kitchen photos
Original photo:

Cropping a photo and removing the background
First, I create a duplicate layer in Photoshop by dragging the main layer onto the create a new layer icon.

I turn off or delete the main layer and start clipping. I am using tool feather or pen tool. In order for the photomontage to be done as accurately as possible, I put dots on a greatly enlarged image.
When the kitchen is allocated, I go to Paths and with the Ctrl key pressed, left-click on the image.

Now I go back to Layers and create a mask on the selected image. This way I will hide the unwanted area that will not be visible due to the mask, and I will be able to adjust it as necessary. If your kitchen has disappeared, and not the background, click Shift+Ctrl+I(invert selection in photoshop).

Before I move on with the background replacement, I need to retouch the exterior of the kitchen.
In this case, this is the extension of the kitchen panel behind the hood and the extension of the hood pipe.
It is very easy to do this.
I use only one tool and a couple of keys. First, I'll mount a photo of the kitchen panel. I select the necessary area with a frame in the area free from shadows and click ctrl+c And ctrl+v.

I have a new layer. It's a bit small for the part I need to close. I propagate it by clicking a couple of times Ctrl+J, apply strips to each other and merge into one layer (select all three layers, and then click ctrl+e).
Rename to panel and continue to work. In the same way, I select a piece of pipe and substitute it, but do not attach it to the kitchen. The brown panel will lie under the layer with the clipping of the kitchen, and the layer with the pipe above kitchen (do not forget to rename the layers, this will streamline your work).
Certainly a layer panel still far from ideal.

With help Curves And Hue/Saturation I adjust the color to the most similar to the original. To Curves And Hue/Saturation affected not the picture as a whole, but only the layer panel, when creating adjustment layers, I press Alt and check the box next to the inscription Use previous layer to create clipping mask in the window that appears.

Background replacement
Now I'm going to the next part of the photomontage work and create a beautiful background for the photo.
First of all, on a new layer, which will always lie on top, I will create the geometry of space. There are various options to hold several parallel and perpendicular strips. I use my favorite pen.
Here's what happens in the end.

The next stage of work on replacing the background is the walls.
I had a ready-made piece of wall for photomontage of the size I needed. I dragged it to the photo I'm working with and continue to refine the picture.
After renaming the layer, I turn on the transformation of the layer (by clicking ctrl+t- activate the function free transform in Photoshop) and right-click on the frame, select distortion and pull my wall by the corners, attaching it to the corners of the room, the borders with the ceiling and floor. In the same way I insert the second wall.
Create a separate folder for each wall.
Since there will be more adjustment layers for working with each element of the collage, I'm in no hurry to insert the floor and ceiling - first I'll deal with the walls.
I work with each separately. I add an adjustment layer to the layer with the wall. Curves. Slightly raise the overall curve and select the gradient as an assistant. So that the wall does not look monotonous and boring, I put a few more spots and gradients in the curves.

The second wall is done in the same way.
I also have a template for mounting a photo of the floor. It is not difficult to assemble it from one square of parquet or laminate simple actions - ctrl+c And ctrl+v to the right size.
Then I paste the finished floor into the photo using free transform And distortion.

Here I also use curves and a gradient. I don't use any special tools. Everything is easy and simple.
Photomontage of the ceiling is the easiest to do. My way - in Photoshop, on a new layer I outline the borders with the walls with a pen and fill it with a light gray color. Then I do in Curves gradient (fill the corner with dark), and the ceiling is almost ready.

Photo processing - creating baseboards and shadows
And now I'm moving on to the most interesting part of photomontage in Photoshop - creating shadows and "animating" the photo.
Before I start working with shadows, I will imagine where the light comes from in the kitchen and start painting. I made different shadows different ways, which allows you to process photos in Photoshop. But always with Curves and masks. They help to quickly change the intensity and shape of the shadow.
The first shadow I will have is over the kitchen in the corner. Having roughly imagined how it should look, I draw a couple of triangles on a new layer, fill it with black, make Gaussian blur. I set the blur to a suitable size, choose the optimal intensity of the layer in Opacity. If necessary, I go over the shadow with a soft-edged brush and remove the excess.

I make new layers in the curves for almost every shadow, since the intensity can vary. Thus, I impose shadows wherever they are needed. I do not forget about the pipe from the hood and multi-layered shadows for this difficult area.
Then there are the reflections on the floor. By their saturation, you can judge how glossy the floor you “lay” on the photo when replacing the background. Sometimes I do with reflections the same way as with shadows - on a new layer I draw a strip of the desired size and color, and then in Blur I turn it into a soft, barely noticeable cloud.
And sometimes I just copy the main image, in free transform turn it over, give it desired shape, change the intensity, and a realistic reflection is ready.

But that is not all. The final touch in photomontage is skirting boards.
You can draw the baseboard yourself, or you can find a finished strip and stretch it to the desired size.
In my case, this is a finished plinth. I just gave him direction free transform, made a mask in Curves and applied a gradient, since every detail of the picture should be as realistic as possible and similar to what we see around us every day.
Usually we are surrounded by voluminous objects with many shadows and reflections. To make the plinth realistic, I repeat the pattern of the plinth in the photo clipping mask with a simple eraser with a hard edge and a couple of movements. Now it has a shape and looks like a real one.

I think that photomontage in Photoshop can be considered successfully completed at the level of a professional retouching studio.
It is believed that only a person who has extensive experience working with specialized professional programs. But it was like that before. Now, each of us can experiment with our favorite pictures: for this, it is enough to install an elementary image editor on the computer. In the article we will talk about the program "Home Photo Studio". You will learn about how easy it is to make a photo montage in this application.
Step 1. Install the editor
Of course, at the first stage of work, you need to download photo editing software. and install it on your computer. The installation procedure is extremely simple and is not much different from installing any other application. All you need to do is choose HDD and the folder where the program components should be placed. We also recommend creating a shortcut that allows you to quickly launch the editor.
Step 2. Run the program
Once the installation is complete, launch the program immediately. A menu will appear on the screen, which will list the main operating modes available in the program. From here it is very easy to move on to both basic photo processing and the creation of full-fledged printed products: calendars, collages, postcards and more.
Appearance program start menu
To combine several photos into one, enter the appropriate query in the search bar. In this case, this query is the word: "photomontage". Click on the option that pops up and choose a photo to be the basis of your project. Then proceed to the next step in which you will learn how to make a photo montage in the program.

Enter the name of the function you want in the search bar
Step 3: Add New Layers
The editing window will appear on the screen. Here you can add new elements to the selected image. To do this, click the button "Add Layer". If you originally wanted to "improve" the photo with new elements, you can call "Catalogue of jewelry". In it you will find hundreds of clipart for thirteen various topics. Any added element is easy to customize: change the location, size and even rotate.

If desired, add original clipart over the photo
If you want to combine two full-fledged shots on one photo, then select Add Layer > Photo. Home Photo Studio will prompt you to select an image to upload to your project. Specify the path to the file and start editing.
Step 4: Set Up a New Layer
Allows you to set layer blending modes. Select the image that is on top with the mouse, and then on the right side of the screen, find the line "Blend Modes". Expand the list and select the appropriate option: addition, inversion, overlay, overlay by color ... You can "try on" each filter, finally stopping at the appropriate mode.

Choose the right blend mode
The editor also allows you to use special masks, with which you can make pictures in an original way or achieve the perfect combination of images with each other.

Add a mask for the photo from the catalog
Conclusion
So you learned how to make a photomontage from your photos in the "Home Photo Studio" and made sure that even a novice computer user can cope with this task without any hassle.