Android battery settings. Android Battery Calibration: Customize and Extend Life! Method using Recovery mode
(1
ratings)
On a newly purchased mobile device battery life is significantly higher than after a few months. The problem suggests a low-quality battery and the need to replace it. However, do not rush and spend money on purchasing a new component. In most cases You can resolve the issue by following the instructions below. Consider how to calibrate the battery on Android using a manual or software method.
Determining the "calibration" value of a battery
Calibration is understood as the adjustment of the operation of a certain component, as a result of which it is brought to an optimal state. In the case of a battery, calibration helps to set the correct value for its volume, to prevent premature power failure and rapid discharge.
Signs of the need for a procedure
Before proceeding with the recommendations below, you should make sure that the battery really needs to be calibrated. The main signs of the need for adjustment include:
- Spontaneous shutdown of a smartphone or tablet in the presence of a residual amount of charge. For example, the device is forcibly turned off when the indicator shows another 5% charge. In a normal situation, the device should continue to work even at a rate of 1%.
- Reduced battery life. If initially the smartphone could function without additional recharging, for example, 3 days, and then this period was reduced to one day, this is explicitly indicates the need to calibrate the Android battery.
- Inability to get 100% charge. The problem is rare, but its essence lies in the fact that during the replenishment of the battery capacity, it is not possible to reach the maximum indicator indicator.
note
If at least one of these signs was noticed on the mobile device, you should calibrate using one of the methods presented below.
Manual battery calibration Android
The method involves setting up using a certain sequence of actions for charging and discharging the battery without using software. To carry out the procedure, you only need a charger that came with your phone or tablet. Instruction:
- Required in full charge the battery, then turn off charging and . Next, the smartphone is put on charge again, but in the off state. Immediately after connecting the charger, the phone screen will light up and display the current state of charge. You should again wait for the indicator to 100%.
- The next step requires turning on the machine and changing its settings. You must disable automatic sleep after a certain period of inactivity and set the brightness to the maximum level. This will help speed up the discharge. You can apply other methods - turn on the movie in high quality using a Wi-Fi channel. The main goal is to discharge the battery to a complete shutdown.
- The final step will be recharging to the maximum value. When the full capacity is filled, you can return the settings to their original position.
It is important to know
After performing these manipulations, calibration will occur and troubles with rapid energy consumption should stop.
Android battery calibration through apps
An alternative calibration option would be use of special programs. Let's take a look at the process using two of the most popular applications in this category as examples.
Battery Calibration
The application is available for download in the Play Market and, according to the developers, it can be useful in the following cases:
- done ;
- produced ;
- installed ;
- the battery has been replaced;
- the charge level is incorrectly displayed on a numerical or graphical indicator.
The software is used for:
- battery calibration;
- obtaining detailed information about the battery: temperature, condition, manufacturing technology;
- determining the current and maximum allowable voltage level;
- sound notification about the end of the charging process.
You can calibrate the battery on Android using "Battery Calibration"You can do the following:

Will be useful
According to users, the application helped to significantly increase the battery life of mobile devices and eliminate rapid discharge.
The essence of this Android battery calibration program is to display the amount of charge. Hence, knowing the capacity of the battery, you can bring the indicator to the correct value. Before proceeding with the installation and use of the application, you need to look at the battery capacity. This is done in one of the following ways:

When the necessary information is obtained, you can run the application and proceed with the calibration. To complete the procedure, you must:

Important advice! In order for the phone battery to last longer and keep its charge perfectly, after buying a smartphone or tablet, make 5 full charge and discharge cycles of the battery. This will greatly increase battery life.
Ways to calibrate the battery on Android
- Without Root Access
- With getting Root access
- Through programs and applications
- Using the Recovery Menu
How to do battery calibration without root access
Method 1.
First you need to find out the full capacity of your battery in milliamp-hours. To do this, you need to look under the battery, where all the information about it is stored, or you can find information on the Internet, in some kind of review, which indicates the characteristics of your model. After that, the calibration program from the Play Market should be installed on the device. There are a lot of them, but the most effective one is Current Widget: Battery Monitor.

With this program, you can find out the battery charge in milliamps (mah). From now on, you should charge the device to the maximum charge level. After that, turn off and turn on the device again. This action will let the phone know what the real and actual battery limit should be. If this method does not work, then you can try to do five cycles of charging and discharging the device and after the fifth time, remove the charger and hard reset the phone or tablet. Hard reset will reset all created settings to their original state, but the command does not work on all Android operating systems.
Method 2.
The following Android battery calibration method is very similar to the first one, the only difference is that no additional apps need to be installed. To do this, you need to charge the phone to the maximum value. After that unplug the charger and turn off the phone. Then reconnect the charging cable and wait until the LED indicator lights up green, indicating that the battery is fully charged. Then you need to turn on the phone and turn off the auto screen off function. This action can be done using the settings. All this is necessary in order for the phone to discharge faster. After the cycle of absolute discharge, we charge it again to the maximum value. After all the operations, the android operating system should consume the battery economically and perform a full discharge cycle.
Android battery calibration program
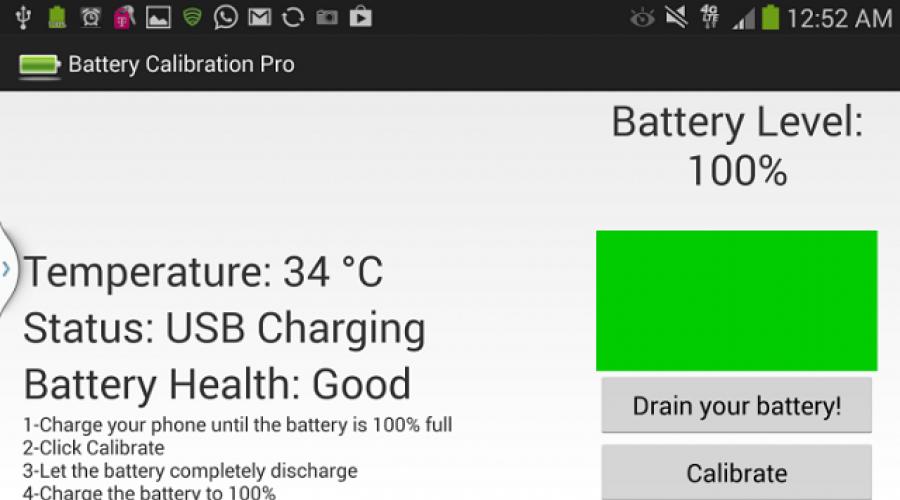
You need to install the calibration program from the Play market. There are a lot of them, but the most common is Battery Calibration. After installing this application, you need to charge your phone or tablet to the maximum value, and then launch this application.

The charge values on the display and in the application will differ significantly, so you need to wait until they reach the same value. As soon as they become the same, you need to press the "battery calibration" button. Your device's battery has now been calibrated. This method is similar to the one we did without root access.
Calibration using Recovery
You need to go into Recovery mode on Android (Usually this is holding down the power button and the + volume button on the device turned off) and go to the additional settings section, where the “wipe battery stats” function is located.

It will delete all previously made settings and settings. After resetting all past settings, you should perform a complete discharge of the device. After that, put it back on charge and charge to the maximum value. When the maximum charge value is reached, you need to go back to the application and perform the calibration. This action will strengthen the settings and increase the functionality of the android operating system.
Users have cases that each of the methods does not work. This happens because the battery he is using is more than five years old and any calibration will not help here. When buying a new phone, it is recommended to immediately perform several cycles of full discharge and charge. This action will increase the functionality of the phone and ensure a long life.
Users complain about battery problems most often, which is why there are so many articles on this topic.
If you notice that the battery has become less efficient, it may be time to calibrate it.
How to check if there is a problem with the battery
First you need to understand why the performance of the battery has deteriorated - due to system calibration or the battery itself. We'll talk about calibration in a bit, but for now we need to check if the battery is damaged.
If the battery is removable, turn off the device, remove it and inspect. Check for bulges and smudges. The figure below shows what a “healthy” battery looks like and a bloated one. If the phone is not lying flat on the table, this can also be a sign of a swollen battery.

Do I need to calibrate the battery?
If you see that the battery itself is normal, you can proceed to the next steps. If you think that the problem is still in it (even after calibration), we advise you to take it to a repair shop, consult a specialist.
Did the battery need to be replaced? Then choose only the original battery or from a trusted manufacturer.
Buying a cheap, unreliable battery will only add to the headache in the future, trust me.

Keep in mind that battery problems can have different causes. For example, if the phone does not charge, it is quite possible that the input port is faulty.
Also, the battery can drain quickly if you recently updated the software, so it's worth clearing the cache.
What is battery calibration?
The Android system has a section that shows the battery status (Battery Stats / Battery), it is full or discharged.
The problem is that sometimes these data are not true. And situations are possible when the phone is discharged, although the charge indicator is normal.
To calibrate a battery means to have the system display the battery status correctly again.
It's important to understand that you can't calibrate the battery yourself, because it's a power source that holds a charge and discharges.

Lithium batteries have PCBs that prevent them from exploding or deep discharging.
Smartphone battery myths
Lithium-ion batteries do not have storage, so there are few ways to keep them performing.
The problem is generally in how the system reads and displays the capacity of the battery, and not in itself.

There is also a myth that deleting the batterystats.bin file will miraculously calibrate the battery.
On most devices, this file simply stores information about battery usage since charging. And it reboots every time the battery is charged to 80% or more and unplugged.
The batterystats.bin file contains the same data that you see in the Battery section, it just looks more visible there: this is how the system monitors battery usage during the next charge cycle.
When we mention battery calibration, we are talking about a percentage counter that has stopped showing the correct data and needs to be rebooted.
How to calibrate battery for android without root rights
One of the easiest ways to calibrate is to fully charge and discharge the battery. It is, of course, worth remembering about the problems with low voltage in lithium batteries, and a decrease in their life expectancy due to complete discharge. But if the problem with the battery really got it, it's worth the risk.
What to do, method 1:
1. Completely discharge your phone until it turns itself off.
2. Turn it on and let it turn off again.
3. Connect the charger. Without turning on the phone, let it charge up to 100%.
4. Unplug the charger.
5. Turn on your phone. Perhaps the charge indicator does not show 100%, then reconnect the charger and charge the phone to 100% (without turning it off).
6. Disconnect the phone from charging and restart. If still not 100%, reconnect the charger and charge until you see 100% on the indicator.
7. Repeat all over again until you see 100% (or so, if you consider this sufficient) on the phone disconnected from charging.
8. Now you can completely drain the battery and let the phone turn itself off again.
9. Completely, without interruption, charge the battery again. In theory, this should restart the battery status counter.
Remember that doing a full charge and discharge is often not recommended. Even if the battery is so dead that the phone won't turn on, its charge reserve is enough to prevent the system from crashing.
So do not take risks, do a complete discharge a maximum of once every three months. If you see that this is not enough, you will have to deal with more serious problems.
Simply put, completely discharging the battery harms it. And attempts to reboot it do not add life. On the positive side, the charging process will automatically stop if a safe limit is reached.
And the battery always has a small margin of charge, even if the phone no longer starts.

Again, do a full discharge only if absolutely necessary, because the operation seriously affects the life of the battery.
How to calibrate a battery for Android with root rights
In fairness, we will write this method as well, especially since it is known that different manufacturers use batterystats.bin for different purposes. The process is similar to the above, but a step has been added using the root access application.
What to do, method 2:
1. Completely discharge the phone until it turns itself off.
2. Turn it on and let it turn off again.
3. Without turning on the phone, connect to charge, wait for 100%.
4. Turn off the charger.
5. Turn on your phone. If 100% is not there, return the charge (the phone can be turned on at the same time) and charge up to 100%.
6. Turn off charging and restart your phone. If 100% is not there, reconnect the charger, bring it to the maximum.
7. Repeat these steps until the uncharged phone shows a reading of 100% (or so, if you find this sufficient).
8. Install the Battery Calibration app. Before starting it, make sure that the indicator shows 100%, restart the phone.
9. Once your phone starts up, the first step is to open the Battery Calibration app and calibrate the battery.
10. After calibration, discharge the battery to 0%, let the phone turn itself off.
11. Fully, without interruption, charge the phone (it should be turned off) - now the battery status counter should restart.
It is impossible to imagine a modern person without a mobile phone and a tablet computer.
We use these devices more than once every day, and some almost never let go of their gadget. But the more a person uses his electronic equipment, the faster its battery is discharged.
Based on this, the question arises - is it possible to somehow extend the operation of a smartphone or personal computer? It is possible, and there is a solution to this problem - you just need to calibrate the battery of the gadget. When should this procedure be carried out?
- If the new smartphone was actively used for about 2-3 days and the amount of charge remained the same;
- If the phone's battery starts to run low quickly.
There are two ways to calibrate the battery - using a special program and "manually". So, if the battery of your android device is not enough for you all the time, let's proceed to calibration.
The first and easiest way to calibrate an android battery:
You will need to download from the Play Market a special battery calibration program "Battery Calibration" and install it on an electronic device.
It is suitable for all types of equipment and is installed on both phones and tablets with the Android operating system. After installation, run the program and follow the information on the screen of your electronic device.
The battery itself will perform all the manipulations, and the calibration will be done and completed.
One caveat - to use the "Battery Calibration" program, Root access rights are required. If you do not have them, it is recommended to use.
You can use the second method of calibrating the battery
You will need free time and a strong desire to have a battery with a long time of active use. In this case, everything is done manually.
Let's start with the calibration:
- We charge the electronic device in the on state for 8 hours. Before that, it is recommended to completely discharge it so that the charge is 0%.
- Turn off your phone or tablet completely and charge it for another 2 hours when it is off.
- Unplug your device and turn it on for 2 minutes.
- Turn off your phone and let it charge for another 1 hour.
After these manipulations, an electronic device on android will delight its owners with a long battery charge.
This method of battery calibration is suitable for both a smartphone and a tablet, since both devices charge in exactly the same way. Battery calibration is recommended for all types of devices that for some reason do not charge to 100%.
There are such situations, and instead of going to the service and giving your device for flashing, try to handle it on your own first.
There will definitely be no harm from this manipulation, but the battery power will definitely increase, and your gadget will keep the charge much longer.
This video shows another way to tune the battery.
The system for calculating the amount of remaining charge in the battery may not reflect the true results. Therefore, our devices often turn off faster than they run out of power. And the point here is not at all about breakdowns - battery parameters change over time, and smartphones and tablets cannot track the true state of affairs. The battery needs to be calibrated, which we will talk about in our review. Why do I need battery calibration on Android and how is it done?
Battery calibration - the essence of the procedure
Your device began to discharge suspiciously quickly, and you are thinking of replacing the battery? If the smartphone or tablet is already three or four years old, then the procedure is fully justified. But if you have a brand new device in your hands, and only a few months have passed since the purchase, this may mean that there are problems with battery calibration - electronics cannot properly track battery capacity.
It would seem that everything should be much simpler - at the maximum battery capacity, the phone shows 100% charge, and at the minimum, zero charge is shown. In fact, things are more complicated, and we may encounter the following situations:
- The device turns off at 50-60% of the charge;
- The device works for a long time up to 15-20% of the charge, after which it is discharged in a matter of minutes;
- The device is discharged to 1% and continues to work as if nothing had happened (sometimes for quite a long time).
All this is extremely unnerving, since users do not understand whether the device will work for another couple of hours or “die” in a matter of minutes. If your device is experiencing similar symptoms, it means that the calibration is broken. What to do? You need to redo it using some tools.
Our task is to let the smartphone know how much battery charge should be taken as 100% . Let's try to do this with the help of some methods and programs.
Manual battery calibration on Android
This is not to say that this method gives the best results, but it does not require the use of any programs and root rights. It is also similar to the most common "training" of the battery, which was carried out on old nickel-cadmium batteries that had a memory effect. We will calibrate the battery on Android using a conventional charger.
For faster results, use a powerful charger that provides fast charging of the battery - such properties are possessed by "charging" from tablets.
Manual calibration is performed as follows - we charge the battery to 100%, turn off the charger and smartphone (tablet), reconnect the charger and charge the battery for some more time. After that, the battery must be discharged, and with the display on- go to its settings, set the maximum timeout, leave the device alone. After a full discharge, repeat the procedure 5-6 more times.
In some smartphones, there is no timeout to infinity. Set the maximum value or use special applications to quickly discharge the battery (they reduce the charge by creating a load on the battery). You can also start playing some online video, for example, from Youtube.
Calibration using programs
Next, we will calibrate the battery using a special widget. It will indicate the current filling of the battery and allow you to control the process of a full charge - you just need to look at the widget readings. You can download such widgets and programs in the Play Market by entering the phrase "battery monitor" in the search.
After installing the software, you need to charge the device up to 100%, looking at the readings. If the specified capacity has not yet been reached, we continue the charging process.
In order to find out the maximum capacity of the battery, read the contents of the label pasted on it - it indicates the capacity, power and rated voltage.
As soon as the battery charge reaches its maximum, you need to “tell” the device about this. To do this, the most common general reset to the factory parameters is performed. The reset is done through the device settings, through the engineering menu or through special keyboard codes. After a factory reset, the smartphone / tablet will consider the current charge as a 100% full capacity reference.
Since the operation involves a complete reset, do not forget to back up all the data stored on the device - we have already talked about how to make backups in our reviews.
Root Calibration
All of the above methods give good results, but there are better ways. The battery calibration program for Android Battery Calibration will tidy up the half-kick charge counter. But this will require root rights - without them, the program does not work.
To obtain superuser rights, use the instructions on our website or on specialized forums. Once you're rooted, download and run Battery Calibration. Put your smartphone on charge and wait until the program shows 100% charge. Now click on the "Battery Calibration" button - you're done!
The advantage of this method is that only one charge cycle is enough, and not 5-6 cycles.. Also pleased that there is no need for a general reset. Only the need to obtain root-rights scares away.
If you are tired of your operator
Guys, we know perfectly well that operators raise prices and force subscribers to connect services that the latter do not want to use. Fortunately, now there is a great opportunity to go to another operator with your number. There are virtual operators that provide very good rates and cool benefits when porting a number. One of them is Tinkoff Mobile, which is increasingly chosen by visitors to our site.