How to change the interface language in windows 10. Changing the interface language
Read also
You know, I have been debugging this article for a long time for later, and each time I find some new reason, of which the most popular turned out to be that very few users ever change the language of their operating system.
But, after two different users contacted me in a short period of time with a request to help change the system language, while in different versions of Windows, I realized that it was time for this article to appear on our website.
In general, as you probably already understood in this manual, I will try to show in as much detail and simply how you can change the language of the operating system to whatever you are interested in.
The examples that you will find below will be provided on the two most popular operating systems to date, Windows 10 and of course Windows 7.
Yes, yes, do not be surprised, the "seven" even now remains the most common system among users, you can see for yourself by visiting us at VK group and looking at the results of the survey, in which Windows 7 is the undisputed leader.
Anyway, let's not argue about which Windows is cooler, let's move on directly to the very process of changing the display language on both versions of operating systems.
Two ways to change the interface language in Windows 7
There are several options for changing the interface language in Windows 7, either using the local language pack installer or through the "Update Center".
As for me, a more convenient way is to install the language pack locally, and it does not take a significant amount of time. In general, let's look at the whole procedure for using this method.
The first step is, of course, downloading the required language pack to your computer. You can, of course, do this on the Microsoft website. True, I noticed that at the moment not all packages are available for download, so below I will leave links for downloading the main languages \u200b\u200bthat you may need.
- English language– Download x64 (x32)
- Russian language– Download x64 (x32)
- Ukrainian language– Download x64 (x32)
If you are interested in other language packs, then we look for them on the Microsoft website or on the Internet there are enough of them, you can also write to me in the comments and I will help you find what you need.
So, the desired language pack has been downloaded to the computer, this step is probably the most difficult when using this method.
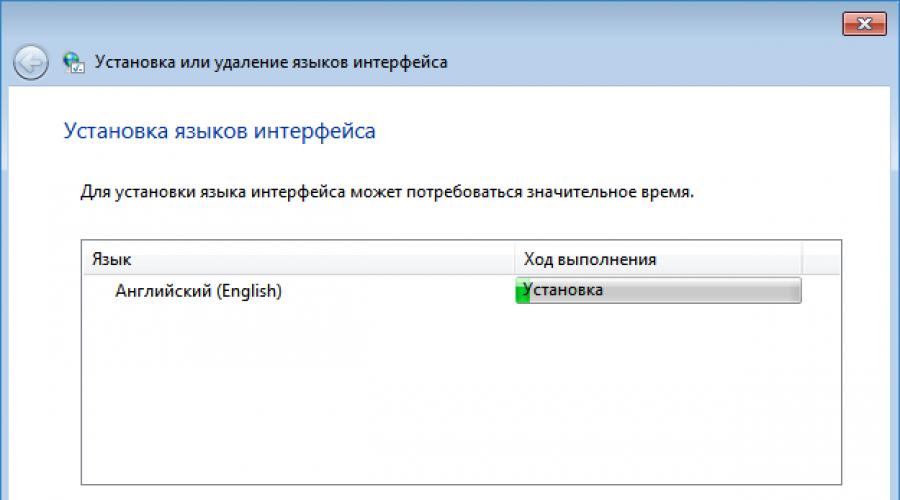
Now, by double-clicking, we launch this file, after which the automatic installation of the language you have chosen should take place. Yes, that's right, you only need to run the file, but then everything will happen by itself, the installation starts, which takes several minutes and after which the window disappears without a trace.

After the window disappears, you can already change the interface language by selecting it from the list of available languages. To do this, we go Control Panel" - "Language " - " Languages and Keyboards", And here we pay attention to the section" Interface Language", It is there that a field should appear in which you can select the language you have installed.

Well, we complete the interface language setting by clicking on the " Apply». After that, the system will notify you that in order to change the interface language, you need to at least log out of the system, or simply restart your computer.
But, that's not all, there is also another option for changing the interface language, which, in the same way, may suit you and even seem much more convenient to some.
In general, we again need to get to the language settings through the control panel and go to the “ Languages and Keyboards", only this time you should press the button" Install or remove language».

By the way, in Windows 7 Professional, this item is not present, since MUI packages are supported only in the "Maximum" and "Corporate" versions.
In the next step, we choose that we will use " Update Center" to install the required interface language and click " Next».

After that, the update center should start and start searching for available languages. The search itself can take quite a lot of time, so you have to be patient.
After the search process is completed, a report will appear on the number of available updates to install on the computer. It should be noted that in Windows Update, there are two types of updates:
- critical(Important) - Which, according to Microsoft, should be installed first to improve system performance and security.
- Optional- which usually include installing additional languages \u200b\u200band other similar things.
Accordingly, in the report that appears, we should click on the link with optional updates, after which a list of system languages \u200b\u200bavailable for download and installation will open, marking the desired language packs for Windows 7, click "OK" and start the installation.
After the language packs are downloaded and installed, you can use them by going back to the language and keyboard settings, selecting the desired system language from the list that appears there.
As in the previous version, in order for the interface language to change, we should log out of the system and log back in.
Changing the interface language in Windows 10
Well, now let's deal with Windows 10. I want to immediately note that this example can be used not only in Windows 10 but also in Windows 8, the principle of changing the system language is the same.
So, launch the control panel and go to the " Language».
Click on " Extra options" and in the first paragraph of redefining the interface language in Windows, set the value to " Use language list' and save it.

Next, add the desired language, for example, for me it will be English, using the corresponding button and finding it in the available list. By the way, for convenience, you can use the search located in the upper corner of the active window.

Returning to the list of languages, we find the one we added, in my example it is " English", And click on the "Options" button against it.

In the parameters window, in the section " Interface language", You should download the language pack by clicking on the appropriate button" Download and install the language pack". The installation process will begin, after which, instead of the button for downloading the package, a link "" will appear.


In general, in this way, in the top ten, you can install absolutely any language that you like for the interface. By the way, this option is also relevant for tablets, it changes there in the same way.
That's basically it, if you have any questions, you can always contact me using the comment form or by joining us in the VK group.
How to change the interface language in Windows 10 and 7
How to change the language of Windows 10 - many users ask this question. When buying a laptop in foreign online stores, it happens that there are difficulties with the interface language settings. We will try to answer all the main questions that arise in this case.
Change the system language on a Windows 10 computer
Unlike Windows XP, changing the language in Windows 10 is available for all Home and Professional editions (excluding regional editions, such as the China only edition). Versions of "Single language" (as it used to be with Windows 8) do not have the standard functionality for changing it.
You can take into account the slightly changed functionality of changing the language in the Spring Creators Update 1803. Next, we will describe all the convenient methods:
Version 1803 and older
First, open Settings - Time and language - Region and language. These parameters completely replace the settings from the control panel (there are no settings in the Control Panel in Insider builds), everything goes towards the complete replacement of the classic settings with the new Parameters.
Preferred Languages is a tool for downloading language packs. According to Microsoft, a special neural network is engaged in the current translation of the system, which should improve the quality of translation.
It is worth paying attention to the line "Apps and websites will be displayed in the first supported language from the list". To change the application language in Windows 10, you just need to set the desired value to the first place.

To the right of each item, you can see icons that indicate the presence of Text-to-speech, speech recognition, handwriting support.
By clicking on the "Add ..." button, you can see the entire available list.

The interface language is responsible for switching this system setting. The change is made by selecting the desired package, and to apply the changes, you need to log out of the system.

In the new version of Windows 10, the process of switching has become easier. There are not many different settings that are responsible for different, but similar functions, but are located in different places (Settings and Control Panel).
Version 1709 and earlier (1703, 1607, 1511 and 10240)
The change process on previous versions is slightly different. Additional settings are also formed in the settings in the control panel, but let's start in order.
Open Settings - Time and language - Region and language. You will notice few differences from the previous method.

Adding a language allows you to select the desired package.

Procedure:
- Add;
Open Options and download the desired package;

- Click "Use as primary..." and log out to apply the changes.

Sometimes it is not possible to change the menu language in the Windows 10 store by default, the problem is that the correct parameters are not set.
Open Control Panel - Clock, Language and Region - Language.
In order for standard applications (including the Store) to be displayed in Russian, it must be in the first place, as indicated by the corresponding warning.

Priority is selected using the Up and Down buttons.
Change Windows 10 Welcome screen language
We figured out how to change the language of the interface and applications, but what if the welcome or lock screen is in English? There is a way out and this method also allows you to change the language when loading Windows 10:
- Open Control Panel and select Regional standards;

- The Region window will open, where you need to go to the Advanced tab and click Copy settings;
- When changing the settings of the Welcome Screen and the new user, it may go wrong, so check the appropriate checkboxes to use the new settings.

How to change the interface language on a computer in Windows 10 to Russian?
Not all users can change the system language, especially if it is unknown to him. Let's show you how to change the language of the operating system on a Windows 10 laptop in images, using English as an example.
- Open the start menu and click Settings;

- Open Time & Language;

- Then open the Region & language tab, select Add language and enter Russian or Russian in the search bar;

- Then, Russian will appear, which you will need to click on and select Set as default;

- Then, to change to Russian, you need to log out of the system. Right-click on the start button or Win + X, then Shut down or sign out - Sign out (Exit).
Have a great day!
There is nothing complicated in the Russification of operating systems from Microsoft, as it seems at first glance. You can perform this operation both with English, Chinese, and with any other international version. In this article, you will learn how to Russify Windows 10 in several ways.
You can change the main language pack to Russian in absolutely any international version of Windows 10. The only exceptions are the home Chinese edition and the Home Single Language version. In the first case, you will either have to buy separately access to language packs, or reinstall the "top ten" completely. So, if you purchased a Chinese tablet from AliExpress or another similar site, make sure that the OS version is international.
In full editions of Pro, it is enough to change the language in the system settings. In Home Single Language and Enterprise LTSB, you need to additionally download the crack (also using the standard "dozens" functionality). The methods presented in the article work with all editions of Windows 10 x32/x64-bit. Let's analyze them in more detail.
Via OS settings
Below is a guide with which you can change the language to Russian:
- Right-click on the "Start" icon and select the "Settings" line in the menu that opens.

- Open the "Time & Language" subsection.

- In the "Region & Language" tab, click on the "Add a language" button.

- Using the search bar, find "Russian" (1) and click on the corresponding item (2).

- Now the Russian language pack is available for installation. Click on the marked line to open the three settings buttons. Select "Options".

- In the window that opens, click on the "Download" button to start downloading the language pack. It will take some time.

- After clicking on the button, you will see a download status bar. Wait for the full download. The duration depends on the speed of your internet connection.

- To change the interface language completely, click on the "Russian" line again and click on "Set as default".

- It remains only to restart the computer and check the performance of this method.
We have analyzed the official way to Russify Windows 10 from Microsoft. The interface language pack is completely free. Now you have to set the time, time zone and geolocation.
After Russification, most likely, all installed applications from the Microsoft Store will remain in the same language. You can translate them like this:
- Open the Control Panel.

- Go to the "Language" section.

- The marked line must be strictly in the first place in the list. If it is not, you need to select it and click on the "Up" button.

- Now in the "Control Panel" open the "Regional Options" window.

- In the "Location" tab, select Russia and save the changes.

- The operating system will be able to switch the language the next time you restart your computer / laptop. If this does not happen, then you will have to manually update each program from the Microsoft Store.
It remains to put Russian text instead of English for the welcome screen and changing the user account. You can do it like this:
- Open the Regional Settings window again.

- Go to the "Advanced" tab and click on the "Copy settings" button.

- Check the boxes next to the marked parameters and close the settings by clicking on "OK".

We figured out how to completely change the language pack. In some cases, this method may not work, so consider alternative options.
By installing a language pack
In this case, we need a separate installpack and a built-in Windows application. First, download the language pack in .cab format. Its version must fully comply with the installed OS - the same assembly, bit depth, edition. Otherwise, a conflict may occur, so it is better to follow this recommendation.
Launch the necessary application and follow the instructions:
- Hold down the Win + R keys to launch the Run window. Enter the command "lpksetup" in it.

- In the window that appears, select the "Install display languages" item.

- Now select the path to the cab image using the "Browse" button.

- Click on "Next" to start the installation. After that, restart your computer and open "Settings".

- Go to the "Time & Language" section.

- In the "Region & Language" subsection, click on "Russian" and select "Set as default". After that, restart your computer again.

Now you know all the official ways to Russify the Windows 10 operating system. This instruction may come in handy when using almost any version and edition of the OS, except for the official Chinese one. You can even translate the interface from Polish into Russian or any other language.
Possible problems with Russification
You may encounter difficulties during the installation of a language pack. The most common problems are listed below.
The Language pack cannot be downloaded via "Settings". In this case, check the stability of the Internet connection on your tablet or PC. Try rebooting your device and putting the pack to boot again. If this does not help, then see if updates for the operating system itself are downloaded via Windows Update.
The cab image with the language pack does not fit. Everything is simple here: you need to try installing another pack that will exactly match the current version. You can view the OS build as follows:
- In the search bar on the taskbar, enter the query "About your computer" and open the application of the same name. In the English version, you need to enter About your PC.

- In the "About" tab, pay attention to the "Windows Features" subsection. It contains all the necessary information.

Conclusion
The developers of Windows 10 made sure that changing the language pack was as simple and convenient as possible, even for a novice user. All methods described are fully functional.
Video
If you have difficulties with Russification, then watch this video with a step-by-step description of all the steps from the article.
In this article, we will talk about language change keys. This issue is especially relevant for users who have to use text editors for work purposes every day. This article will also be useful for students who often have to prepare term papers and abstracts in electronic form. So how do you change the language change keys in Windows 10?
Solving the issue using system settings
In the "ten", if you look at the default settings, the input language can be switched using keyboard shortcuts such as Windows + space and Alt + Shift.
However, among the people, many people use the more familiar Ctrl + Shift key combination. In general, this information may not be enough, because not everyone is comfortable using the mentioned combinations. So let's get started.
On the control panel, open the "Language" section (to begin with, click on the system main menu icon). If the Category view is enabled, select the Change input method option, and if the Icons view is enabled, then click on the Language item.
In principle, the creators did not deprive users of the ability to use the methods that were used in versions prior to Windows 8. In this case, the “Advanced Options” link from the “Language” item in the Start menu, which we mentioned already in this article, will come to the rescue. . In the "Switching input methods" sub-item, check the box next to the line "Allow me to choose an input method for each application."
 In order to get rid of displaying the input language, you need to hide the language bar using the language bar. Again we turn to the "Advanced options" and in the sub-item "Switching input methods" check the box next to the line "Use the language bar, if available." Then click the "Options" link and in the new "Languages and Text Input Services" dialog box, select the "Hide" line and then OK.
 In general, this is all you need to know about combinations for changing the input language. As you can see, the developers did not fantasize about unusual innovations, simply adding to the parameters of the G8 version. Most of the amendments are made using the "Advanced Options" link ("Start" - "Language") and its subparagraphs.
The creators left all the most necessary parameters, so it’s hard to get confused among them. Therefore, following the above instructions, you can easily change the keyboard shortcuts to change the input language.
If you have any questions about "How to change language change keys in Windows 10? Language switching combination”, you can set them in the comments
if(function_exists("the_ratings")) ( the_ratings(); ) ?>
It will be about how to Russify Windows 10 Pro using the English system as an example. Similarly, you can Russify the professional "ten" of any localization: German, Chinese, etc.
First of all, make sure that your computer is connected to the Internet, as to perform the Russification procedure, you need to connect to Microsoft servers.
1. Right click on the button Start and select control panel:
2. On the control panel, select language:

3. Click Add a language (add a language):

4. Select Russian and press Add:

After that, Russian will appear in the list of languages.
5. Click Options next to Russian:

After that, a new window will open. In its upper part you will be able to see the area Windows display language. Wait while the system checks for a language pack.


7. In the window with a request for elevation, click Yes:

After that, the download of the Russian language pack for Windows 10 will begin, and then its installation:

8. When the language is set, you need to click again Options near the Russian language.