Setting up an L2TP connection for Beeline. Setting up L2TP Beeline connection on Asus RT-N10
Read also
It is difficult to imagine a modern home or office without a connection to the World Wide Web.
Prepared by us detailed instructions ASUS RT N10P router settings will help you connect to the Internet on your own; we will look at how to properly connect the device with cables, enter settings depending on your provider or operating system, set up WiFi.
Turning on the router
This device includes: the router itself, a power adapter, and a cable for connecting to a computer.
This is enough to start connecting and then setting up the device.

Let's perform the following steps in order:
- connect the power adapter to the device and to a 220V socket;
- We insert the Internet cable into LAN 1 on our device, and insert the other end into the computer port (if the provider’s wire was there before, it should be removed);
- We connect the Internet provider cable to the WAN socket on the device;
- turn on by pressing a button.

The router begins to download the firmware. A model of the same device with firmware v2 will not differ in settings, the only difference is in the size of the firmware storage memory.
After connecting the device to the mains, it is recommended to full reset settings.
This is done by pressing and holding for 12-15 seconds with some thin object (pen, paper clip) on the back panel of the button in the Reset hole.
Preparing for setup
You need to understand that now your computer has another intermediary on its way to the Internet - your router. He takes on a number of tasks to ensure communication. Next, you need to make sure that the Internet protocol settings on your computer are set to automatically obtain an IP address.
After connecting your computer to the router, the network address will be assigned to it not by the provider, but by the router itself. It forms its own network and assigns addresses in it. You should also make sure that the computer will automatically receive the DNS server settings - this is a server that interprets the site names you enter into the “language of communication” of the servers.

Often it is this setting, when the network is in complete order, that influences the fact that the pages on your monitor screen do not come off.
We find in the settings of your operating system:
- connection via local network;
- open Properties;
- Next, go to Internet protocols and note that we will receive the IP address and address server address (DNS) automatically.
How to enter ASUS RT n10p settings
We launch an Internet browser on the computer. In the field for entering Internet addresses, enter four groups of numbers separated by a dot - this is the network address of the device being configured. For this model, the address usually used is 192.168.1.1. There is no period after the last unit.
A field for entering your login and password should appear on the screen. By default, the manufacturer specifies both the login and password - admin.
Confirm by entering. If the field for entering your login and password does not open, you can check the address of your device on the product body.
Connection After we have figured out how to access the router settings via the WEB interface, we can connect to the provider’s server. Settings different operators
Internet may differ, so below we will look at the most common ones.
Setting up for Beeline (Beeline)

We go to any browser, enter the network address of the router in the address bar and find ourselves in the Network Map window. Next, in Advanced settings, select Internet.
- Specify the parameters:
- WAN connection type - L2TP;
- get an IP address - automatically, Yes;
- connect to DNS - automatically, Yes;
- login (the account number that you pay) and password (the same one that is needed to enter your account on the provider’s website);
- VPN server - tp.internet.beeline.ru;
We confirm.
Setting up for Rostelecom
Also, as in the previous case, we get into the settings. Next, click WAN.
- Enter the necessary functions for connection, the main ones of which will be:
- connection type - pppoe;
- automatic obtaining of an IP address;
DNS needs to be set, also automatically.
Enter your username and password (you can see them in the contract). If there is no contract, you need to call the provider’s technical support, they will be able to help you recover your data. It is not necessary to change the remaining parameters. After setting up a connection to the provider’s server, you can start ASUS rt n10p and secure access parameters.
You need to go to Wireless Network and specify the following settings:
- Fill in the SSID column with the name of the network. This name will be broadcast and you will select it to connect to WiFi;
- in the Authentication Method column, indicate the most secure type of protection for the WPA2-Personal network;
- In the pre-shared key field – enter the network password. We indicate it in English letters and numbers; there must be more than eight characters.
How to reset settings
If the router works intermittently and reconfiguring it does not bring results, then reset them and enter the settings again. On the back panel of the device, in a small hole, you need to press the Reset button with a sharp object and hold it for 12-15 seconds. As a result, the power indicators on the device will light up. This means that the settings have been changed to their original settings.

The settings are also reset in the router control panel. Go to the section Additional settings, click Administration, Manage settings, Factory settings and select - Restore.
How to set a password
In Administration, System, the access data to the device menu is changed. After entering the password, you should remember it or write it down. Remember, the Wi-Fi password and the menu access password are different passwords.
If you forget your WiFi password, you can always change it in the device menu, and if you forget the data to access the device menu, you will have to reset the settings to factory settings and configure everything again.
Setting up IPTV
If your provider supports the transmission of television channels over the Internet, you can access them through your router. Let's use the web interface again and open the router settings. We will be interested in additional settings, LAN and route.
We check that multicast routing is enabled (it should be Yes). In the IPTV UDP Multicast to HTTP Proxy Port column you can enter the value - 1234 (this is useful when you need to make your work easier WiFi networks, freeing it from multicast packets). That's it, the channels are configured for wired TV set-top boxes.
To provide access to TV channels to wireless clients, you will need to go to Advanced settings, Wireless network, Professional and set the Multicast routing speed to 24. Please watch TV on a tablet or laptop.
Finally, let’s clean up our wireless network from multicast packets. Instead, http packets will be broadcast. In the previous settings we have already set the value to 1234. Open the list of channels - this is a file in .m3u format. To do this, we will use any text editor.
Video: Setting up ASUS RT N10P router
Udp://@239.23.0.200:1234/ - this is what everyone’s record looks like television channel at first. And we need to change each entry, presenting it in this form: http://192.168.1.1:1234/udp/239.23.0.200:1234/. Eight digits - 192.168.1.1 - is the router address. If your device has a different address, they need to be changed to yours.
1234 is the previously set proxy port (set your values if they differ from those indicated above). We edit the list of channels, save and use it in the player to watch IPTV. The iptv setup is complete.
If you have PPTP
To connect to the PPTP provider, you need to specify network settings, which are issued by the provider. Just as in the case of a PPPoE connection, enter the username and password. The PPTP server can use encryption or select the Auto option.
Another required parameter for connection: you must specify the IP address of the provider's PPTP server.
To view the status of the pptp connection, you need to go to the Network Map option.
Updating the firmware
To update the firmware, you need to go to the ASUS page on the Internet and find our device, indicating its model. Then select the type of your operating system and download required file: http://www.asus.com/ru/Networking/RTN10P/HelpDesk_Download/.
After this, in additional settings you need to open the Administration option and run the firmware update. To do this, select the previously downloaded file through Explorer and click the Send button.
Question answer:
Can the ASUS RT N10P router work with a USB drive?
Answer: no, unlike the ASUS rt n10u model, it is not equipped with a corresponding connector.
Can it work with a 3g modem?
Answer: it cannot, it is not equipped with a USB port.
How to make access point mode?
Answer: The modem settings allow it to be used in several operating modes to meet different requirements. Launching Quick setup Internet, then Internet Settings, you can select Access Point (AP) Mode.
How to connect a printer?
Answer: If the printer is equipped with a WiFi module, it can be connected to wireless network your router using the WPS button.
This router meets all modern requirements: a convenient menu for setting up the asus rt n10p router, security, a wide range of settings. You can stream up to four networks with different access levels. The device is ready for use, you can access the Internet both via WiFi and a wired connection, print documents without connecting wires to a laptop, and so on.
>To set up a Wi-Fi router Asus RT-N10 online Beeline We will use the web interface. To do this, open any browser available on your computer - Google Chrome, Firefox, Opera, Safari - and enter in the address bar 192.168.1.1 .
The interface for setting up routers is almost the same for the entire ASUS RT-N10 family, so this instruction can also be used when setting up Wi-Fi routers RT-N10+, RT-N10 E, RT-N10 B1, RT-N10 C1 and RT-N10 U.
After entering the credentials, we get to the main menu of the router. How can I replace it? Our copy was equipped with firmware 2.0.2.1 .

Setting up a network (Internet connection) ASUS RT-N10
Well, now let's move on to the setup. Select a menu item Additional settings. Select an item WAN, then tab Internet connection.
We set the following values:
WAN connection type: L2TP
IPTV STB port selection: if you connected this service, select the port to which the set-top box is connected, otherwise skip
Enable UPnP: Yes
Obtain WAN IP address automatically: Yes
Connect to the DNS server automatically: Yes
Account setup
Username: your username (most often - the contract number with Beeline)
Password: the password given to you by your provider (or yours if you changed it)
ISP specific requirements
Heart-Beat or PPTP/L2TP (VPN) server: tp.internet.beeline.ru
We leave the remaining parameters unchanged.

Save all settings - press the button Apply.

Setting up Wi-Fi (wireless network) ASUS RT-N10
SSID: the name of your future wireless Wi-Fi network, here you can enter any convenient value
Hide SSID: Enables or disables network identifier (SSID) broadcasting, that is, allows you to hide your network from devices running Windows OS. The parameter set to “No” makes the network visible in devices. To avoid problems, we recommend leaving the value unchanged
Wireless Mode: We recommend leaving it in the Auto position.
Authentication method: WPA-Auto-Personal
WPA encryption: set it to AES
WPA Preshared Key: you must specify an encryption password wireless wifi networks - any sequence of numbers and Latin letters, at least 8 characters long.

To save the settings, click on the button Apply.
Setting a password for the ASUS RT-N10 web interface
In chapter Administration > System You can set a password to access the router settings. You can also specify your time zone there.
Routers from ASUS are rightfully considered one of the best: they are easy to configure and work quite stably. By the way, I was personally convinced of the latter when my ASUS router worked for 3 years in both heat and cold, lying somewhere on the floor at a table. Moreover, it would have continued to work if I had not changed the provider, and with it the router, but that’s another story...
In this article I would like to talk a little about setting up an L2TP Internet connection in the ASUS RT-N10 router (by the way, setting up such a connection is useful if you have Internet from Billine (at least, it used to be there...)).
1. Connect the router to the computer
Usually problems rarely arise with this, everything is quite simple.
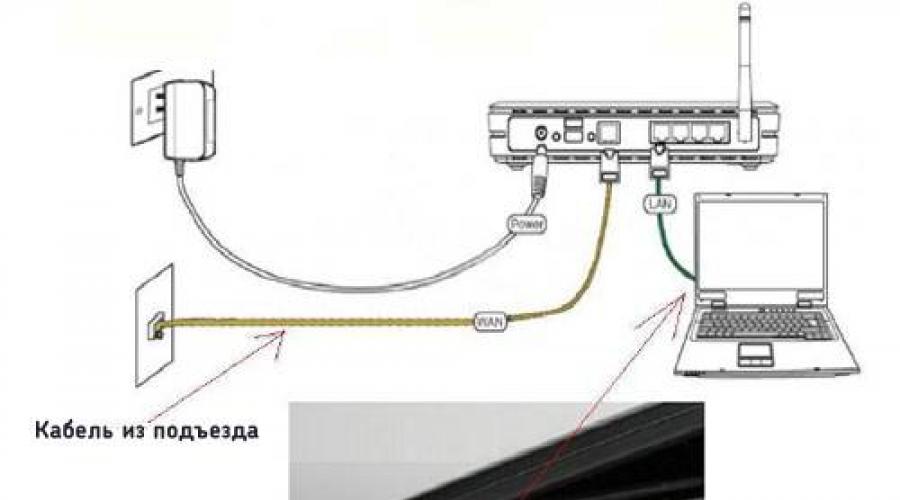
There are several outputs on the back of the router (from left to right, picture below):
1) Antenna output: no comment. You won't be able to attach anything there besides it anyway.
2) LAN1-LAN4: These outputs are for connecting to computers. You can simultaneously connect 4 computers via wire (twisted pair). A cable for connecting one computer is included.
3) WAN: connector for connecting an Internet cable from your provider.
4) Output for power supply.
The connection diagram is shown in the picture below: all devices in the apartment are connected to the router (laptop via Wi-Fi, computer via a wired connection), and the router will independently connect to the Internet.
By the way, in addition to the fact that thanks to this connection, all devices will have access to the Internet, they will also be in a common location. Thanks to this, you can freely transfer files between devices, create files, etc. In general, it’s a convenient thing.
When everything is connected everywhere, it’s time to move on to the settings of the ASUS RT-N10 router...
2. Enter the settings of the Asus RT-N10 router
This is best done from a desktop computer that is connected to the router via a wire.
Open a browser, preferably Internet Explorer.
Go to the following address: http://192.168.1.1 (in rare cases it may be http://192.168.0.1, as I understand it, it depends on the firmware ( software) router).
If you entered everything correctly, the page with the router settings should load. Let's move on to them...
3. Setting up an L2TP connection for Billine
In principle, you can immediately go to the “WAN” settings section (as in the screenshot below).
Our example will show how to set up a connection type such as L2TP (by and large, the basic settings are not much different from, for example, PPoE. In both cases, you need to enter your login and password, MAC address).
- type WAN connections : select L2TP (you need to select the type based on how your provider’s network is organized);
- IPTV STB port selection: you need to specify the LAN port to which your IP TV set-top box will be connected (if you have one);
Enable UPnP: select “yes”, this service allows you to automatically find and connect any devices on the local network;
- get WAN IP address automatically: Select "yes".
- connect to DNS server automatically- also click “yes”, as in the picture below.
In the settings section account you need to enter the password and username that your Internet provider provided to you when you connected. Usually specified in the contract (you can also check with technical support).
The remaining items in this subsection can be left unchanged and left as default.
At the very bottom of the window, do not forget to indicate “ Heart-Best server or PPPTP/L2TP (VPN)» - tp.internet.beeline.ru (this information can also be specified in the agreement with the provider for Internet connection).
Important! Some providers bind the MAC addresses of the users they connect (for the purpose of additional protection). If you have such a provider, then you need to enter that MAC address in the “MAC address” column (picture above) network card, to which the Internet provider wire () was previously connected.
After that, click on the “apply” button and save the settings.
4. Wi-Fi setup: password to access the network
After all the settings have been made - on a desktop computer connected via a wire - the Internet should have appeared. All that remains is to set up the Internet for devices that will connect via Wi-Fi (and set a password, of course, so that the entire entrance does not use your Internet).
Go to the router settings - “ wireless network", General tab. Here we are interested in several important lines:
SSID: here enter any name of your network (you will see it when you want to connect with mobile device). In my case, the name is simple: “Autoto”;
Hide SSID: optional, leave “no”;
- Wireless mode: leave the default “Auto”;
Channel width: there is no point in changing either, leave the default “20 MHz”;
Channel: set to “Auto”;
- Extended channel: we don’t change it either (it seems like it can’t be changed);
- Authentication method: and here Necessarily set "WPA2-Personal". This method will allow you to lock your network with a password so that no one can join it (except you, of course);
- WPA Preshared Key: Enter the password to access. In my case it is the following - “mmm”.
The remaining columns can be left untouched, leaving them at their default settings. Don't forget to click the "apply" button to save your settings.
5. Setting up a laptop to connect to a Wi-Fi network
I will describe everything step by step...
1) First go to the control panel at the following address: Control Panel\Network and Internet\Network Connections. You should see several connection types, we are now interested in " wireless connection" If it is gray, then turn it on so that it becomes colored, like in the picture below.