Fix windows 10 compatibility issues.
Read also
Everyone will accept, today I want to tell you about how to run old programs in the top ten, namely about Windows 10 compatibility mode. Compatibility Mode Windows programs 10 allows you to run software on a computer that worked fine only in previous versions of Windows, and in the latest OS the program does not start or works with errors. This guide on how to enable compatibility mode for Windows 8.1, 7, Vista or XP in Windows 10 to fix program startup errors is suitable for those who have old software, the developer of which stopped supporting and updating it a long time ago..
By default, Windows 10 prompts you to automatically enable compatibility mode after crashes in programs, but only in some of them and not always. Manual inclusion of the compatibility mode, which was previously (in previous OS) performed through the properties of the program or its shortcut, is now not available for all shortcuts and sometimes you need to use a special tool for this. Let's consider both methods.
Enabling compatibility mode through the properties of a program or shortcut
And so we have everything with you, installed Windows 10 threshold 2, if you don’t have it, you can download it from the link on the left.
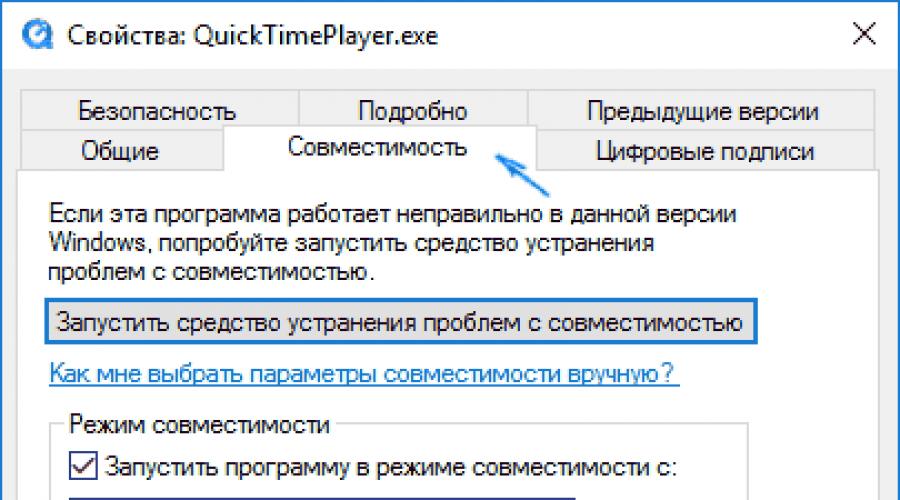
The first way to enable compatibility mode in Windows 10 is very simple - click right click click on the program's shortcut or executable file, select Properties and open, if found, the Compatibility tab.

All that remains to be done is to set the compatibility mode parameters: specify the version of Windows in which the program ran without errors. If necessary, enable the program to run as an administrator or in a lower screen resolution and reduced color mode (for very old programs). Then apply your settings. The next time the program will be launched with the parameters already changed.
How to enable program compatibility mode with previous OS versions in Windows 10 through troubleshooting
To run the program compatibility mode setup, you will need to run a special troubleshooter Windows problems 10 > Running programs designed for previous versions Windows.

You can do this either through the control panel item > Troubleshooting (the control panel can be opened by right-clicking on the Start button).
Or in the search, you can enter > Run programs created for previous versions.

This will launch the Windows 10 Legacy Programs Compatibility Troubleshooter. It makes sense to use the "Run as administrator" option when using it (this will allow settings to be applied to programs located in restricted folders). Click Next.

After some waiting, the next window will prompt you to select a program with compatibility problems. If you need to add your own program (for example, portable applications will not be displayed in the list), select the item Not in the list and click Next, then specify the path to the executable exe file of the program.

After selecting a program or specifying its location, you will be prompted to select a diagnostic mode. For manual guidance compatibility mode for a particular version of Windows, click Program Diagnostics.

The next window will ask you to indicate the problems that were noticed when running your program in Windows 10. Select The program worked in previous versions of Windows, but does not install or does not start now (or other options, as appropriate).

In the next window, you will need to specify which OS version to enable compatibility with - Windows 7, 8, Vista and XP. Choose your option and click Next.
In the next window, to complete the installation of compatibility mode, you need to click Check the program. After it starts, checks (which you do yourself, optional) and closes, click Next.

And finally, either save the compatibility options for this program, or use the second item if the errors remain - No, try using other options. Done, after saving the settings, the program will work in Windows 10 in the compatibility mode you selected.
Windows 10 is more than two years old, and all major programs have long been optimized to work in it. However, there is software, like specialized utilities or old games, that hasn't been updated in years and doesn't work properly on newer versions of Windows. Fortunately, Windows 10 has the ability to run any program in a special compatibility mode with previous versions of the system, which helps to cope with the problems of outdated software. This article will show how to run an incompatible program in windows 10 and fix it in several ways.
How to enable compatibility mode through program properties
The easiest way to activate compatibility mode is to set it in the properties of the program (namely, the executable file, like. exe) or its label.
Where to find the program shortcut in Windows
All shortcuts that various software places on the Start menu can be found in the folder C:\ProgramData\Microsoft\Windows\Start Menu\Programs. Program executable files, as well as shortcuts that are not in the Start menu, are most often located in the application folder. It can be found in the following directories:
- The most common option: C:\Program Files or C:\Program Files (x86).
- Rarer variant: C:\Users\username\AppData\Roaming.
How to enable Compatibility Mode
Enabling compatibility mode through the built-in diagnostic utility
A little more convenient settings compatibility mode is provided by the built-in Windows utility Troubleshoot compatibility issues.
- Click Win+S. Enter Running programs made for previous versions of Windows.
- Run the found utility.

- Click on the inscription Additionally.

- Select an item Run as administrator.

- Click on the button Further.

- Find necessary program. If it is not in the list (for example, it is a portable application), then select the item Not on the list and specify the path to its executable file.
- Click Further.

- Choose manual or automatic way to configure compatibility settings. Often auto mode does not help fix problems, so we recommend using manual. To launch it, click Program diagnostics.

- Check the box The program worked in previous versions of Windows, but does not install or run now and press Further.

- Specify the version of the system in which the program previously worked correctly, and click Further.

- Click on the button Check program to perform a test run.
- Click Further.

- If everything is in order, then select the item Yes, save these settings for the program. Otherwise, use the button No, try other options and set compatibility mode differently.

- Close the troubleshooter.

In most cases, this manual will help you work with old programs in the current operating system from Microsoft.
Favorite games and familiar programs cannot be replaced with new ones. When Microsoft releases a new OS, software compatibility from previous OSes is the first thing developers think about. But sometimes trying to run the old one results in an error. Are Microsoft employees so careless about their work?
No, the fact is that for legacy software, it is recommended to enable compatibility mode, which does not work 100% by defaultHow to run old software on a new OS
Despite numerous changes in Windows 8.1 and 10, they support programs for XP and 7 with rare exceptions. Windows 8 compatibility issues occur, but this is 1 in 100 cases. Similar things happen with applications for XP and OS released earlier. A common problem is the inability to run an old game.
What is compatibility mode? If software or a 3D toy was made for win2000, then it probably won't work on Vista. The point is different OS structures. Software is designed to work in a specific environment. Getting into an unfamiliar one, it does not start or functions with errors. Windows compatibility is a way to "slip" the old OS data that is present in the new one to the application. But sometimes the need to run such functionality is unreasonable.
Developed software receives new installers regularly. It makes no sense to run an old antivirus on an eight or ten when it has already been updated 10 times. Therefore, first check if there is a new "build". The exception is programs in the past releases of which remained useful features, for some reason not implemented in updates. In order for the old application in the new OS to work correctly and without failures, it is recommended to set the compatibility mode. This is not a special program for running old games or software: everything is implemented standard means Windows.
Legacy programs and games in G8 (or 8.1)
How to make game compatible with Windows 8? Do you have a retro game lying around or old program, which has no worthy analogues, but it does not start or is “buggy” on the G8? Running old games on Windows 7 or 8 can be made stable. To do this, right-click on the shortcut and call the context menu. Pay attention to the "Properties" item. Launch and select the "Compatibility" tab.
This window provides the necessary options to help set compatibility on Windows 8 for legacy applications.Running old programs on Windows 7 will be easier if you know for sure which OS your game was released for, then for the "Run this program in compatibility mode for ..." option, select this operating system. According to statistics, 90% of applications that conflict with Windows 8 and 8.1 work without problems in compatibility with XP Service Pack 2 or 3. Select the desired option, click "Apply" and "OK". If the first time it didn’t start, try other options, remembering to click on the “Apply” button.
If you are wondering how to disable compatibility mode in Windows 7, then just follow the steps above in reverse order. But that's only basic setup. The "Compatibility" tab in the properties of the application shortcut also offers advanced settings:
- reduced color mode;
- lowering the display resolution;
- disable image scaling for modern screens.
Color reduction
Games and applications for legacy operating systems were created to run on computers whose monitors differed in image resolution of 640X480 or 800X600 pixels. Modern video cards and monitors offer resolutions up to 2000-3000 pixels. You need to configure Compatibility View settings. It is recommended to run such software in color. By activating the mode, you will run the program with the permission for which it is intended. In the "Compatibility" tab, check the box next to the corresponding item and select the appropriate color option - 8 or 16 bits.
Using a different screen resolution
Old games were created for screens with a resolution of 640X480. This resolution is supported in modern monitor models, but not used. Sometimes the Windows 7 compatibility problem lies precisely in the stretched image.
To run older games on the new OS, apply the option "Use screen resolution 640X480"Disable image scaling
If computer program or a video game was meant to run on monitors 10-20 years ago, on new displays they are distorted - the image is stretched and smeared. To prevent this from happening, check the box next to "Disable image scaling ...". Now the picture looks correct.
Is it completely incompatible windows application 7 Not often. It is not recommended to enable compatibility mode for such applications:
- antiviruses;
- garbage cleaners;
- hard disk utilities;
- tweakers.
This is the risk of violating the stability of the OS.
Automatic application of parameters
Windows has special software that determines the appropriate correct launch mode for outdated applications and games. This is a good compatibility check with Windows 7, 8 or 10. To launch, use the context menu of the installer file. At the top, click on the "Fix Compatibility Issues" line.
A new window will open, offering two options: use recommended settings and diagnosticsThe first point fits. Select: A new window will open showing suggested options for the program to run correctly. The “Check the program” item will help you test the proposed parameters in practice. By clicking on the button, you will launch the application with these parameters. If OK, save the result. Now the application automatically starts as it should, with the necessary options.
The diagnostics point helps you choose options for the correct launch, based on problems with the application.
By editing the registry
You can enable Windows 7, 8 or 10 compatibility through the registry. This method is used in rare cases, as there are enough other methods. For curious users, to run the game in compatibility mode or a legacy application:
- Click on Start.
- Type cmd in the Run field and press Enter.
- In the command prompt window that opens, type regedit and Enter.
- On the empty space of the right half of the window, right-click and select "Create".
- Here choose to create a "String Parameter".
- Parameter name - full path to the executable file of the program for which you are setting compatibility with Windows 7, for example.
- Now right-click on the parameter name and open "Edit".
- In the "Value" line, write one of the options:
- WIN7RTM - to install compatibility with the "seven";
- VISTARTM - for "vista";
- VISTASP1 - "whisks" with service pack 1;
- VISTASP2 - "whisks" with service pack 2;
- WINXPSP2 - for "ex pi" with service pack 2;
- WINXPSP3 - "ex pi" with service pack 3;
- WIN2000 - for Windows 2000;
- NT4SP5 - for Windows NT version 4;
- WIN98 - for Windows 98;
- WIN95 - Windows 95.
- Do you intend to open the program in compatibility mode with admin rights? After your choice above, add the word RUNASADMIN (separated by a space).
- Now find the branch HKEY_LOCAL_MACHINE\Software\Microsoft\Windows NT\CurrentVersion\AppCompatFlags\Layers.
- Repeat steps 5 - 10 for this branch.
- Save and restart your computer.
Now you know how to enable compatibility mode on Windows 7, 8 10.
WATCH VIDEO
If the computer is used by two or three or another number of users under separate accounts, it is recommended to apply the program compatibility settings for "accounts". Otherwise, booting under a different login, you will have to configure from scratch. To do this, go to the OS under the administrator account. Applying compatibility mode as the first method (in the shortcut menu), apply the item "Change settings for all users". Now the program starts with the same characteristics on all accounts.
Users are faced with cases when outdated software does not start after the manipulations done and no program for game compatibility on Widows 7 helps. But this does not mean that there are no chances to use the "prehistoric" program or play a retro game. What to do? Answer - ! This is a program that creates an environment for running an OS inside an OS. On Windows 10, you can run Windows 2000 or XP and install the application or toy of interest in your native environment in a virtual machine. Example virtual machine- Virtualbox software. This method is reliable and guarantees full compatibility. For the smooth operation of a virtual machine, you need a PC with advanced technical specifications.
Let's take a look at this guide on how to disable compatibility mode in the Windows operating system. Special Mode compatibility allows you to run old programs in the new Windows versions.
Many users use software in their work on a computer, the latest releases of which were released a long time ago. It happens that the developer stopped supporting the application, the program is not updated for some reason, and in the meantime a new version of the OS has been released. Until the transition to a new version of Windows, the program works and fully satisfies the needs of the user.
After installation new version Windows or after upgrading to Windows 10 from previous versions of Windows 7 or Windows 8.1, it turns out that some programs do not work on the computer. Use Windows Compatibility Mode to run older applications that work normally on earlier versions of the operating system.
In some cases, the user needs to disable Windows Compatibility Mode. For example, a new version of the application has been released to support a new version of Windows, or because this mode interferes with some programs.
Sometimes, there are messages that the program is running in compatibility mode, so the user is faced with the question of how to disable this mode for separate program or disable the mode altogether on the computer.
There are two ways to disable Windows Program Compatibility Mode:
- disable program compatibility mode
- disable compatibility mode in windows operating system
In the first case, the compatibility mode will be disabled for a separate program. In the second option, the system service responsible for the compatibility of programs on the computer will be disabled.
To disable Program Compatibility Mode in Windows, you can use several methods: from the "Service Control" disable the "Program Compatibility Assistant Service", disable using the Local Group Policy Editor, or disable the service in the system configuration.
How to disable compatibility mode for an individual program (1 way)
To disable compatibility mode for an individual program, follow these steps:
- Right-click on the shortcut or program file. Select "Properties" from the context menu.
- In the Properties: Application Name window, click the Compatibility tab.
- In the "Compatibility Mode" section, uncheck the box next to "Run this program in compatibility mode for:", and then click on the "OK" button.

After that, the compatibility mode for this application will be turned off in the Windows operating system.
Disabling the Compatibility Assistant service in the System Configuration application (method 2)
The easiest way to disable the Program Compatibility Assistant service in Windows is to use system program System configuration.
Make the following settings:
- In the search Windows line enter the expression: "msconfig" (without quotes), and then run the system utility.
- In the "System Configuration" window, open the "Services" tab, find the "Program Compatibility Assistant Service" service.
- Uncheck the box next to "Program Compatibility Assistant Service", click on the "Apply" and "OK" buttons (In Windows 7, the service is called "Program Compatibility Information").

- Restart your computer.
After the computer starts, the Program Compatibility Assistant service will be disabled in the Windows operating system.
Stop the Program Compatibility Assistant Service (Method 3)
Another way is to disable the Compatibility Assistant service in the local services in the Windows operating system.
Configure the following settings:
- Press the "Win" + "R" keys on your keyboard at the same time.
- In the "Run" window, in the "Open" field, enter the expression "services.msc" (without quotes), and then click on the "OK" button to execute the command.
- In the Services window, double-click on the Program Compatibility Assistant Service service.

- In the "Properties: Program Compatibility Assistant Service (Local System)" window, in the "General" tab, click on the "Stop" button if the service is running in this moment time.
- In the "Startup type" setting, select "Disabled", and then click on the "OK" button.

Disabling Compatibility Assistant in the Local Group Policy Editor (method 4)
Users of the Windows operating system in editions: Pro, Enterprise, For educational institutions can use another method using the Local Group Policy Editor.
Go through the following steps:
- Enter "gpedit.msc" (without quotes) in the "Search Windows" field, and then launch the Local Group Policy Editor.
- In the "Policy" setting local computer”” open the “User Configuration” section.
- Follow the path "Administrative Templates", then " Windows Components", find the "Application Compatibility" policy.
- Double-click the left mouse button on the "Disable Program Compatibility Assistant" option.

- In the "Turn off Program Compatibility Assistant" window, select the "Disabled" option, and then click on the "OK" button.

Conclusion
If necessary, the user can disable the Windows Program Compatibility Mode for an individual program or disable the Program Compatibility Assistant service in the Windows operating system in three different ways.
Compatibility mode in a laptop / computer on windows 10 solves problems with running applications or drivers.
If you don't use this feature, you can turn it off. So you will slightly increase the performance of your PC.
There are several options to disable program compatibility mode in windows 10: via group policy, local services and administration.
These settings should also be disabled for those for whom they cause a performance failure, annoying constantly pop-up window, or generally interfere with correct installation programs.
How to turn off compatibility mode in windows 10 through services
To apply the direct shutdown option, we call the execute command, type the word services.msc and click OK.
There we find the Compatibility Assistant Service line, right-click on it, select the "properties" line and disable it.
In conclusion, apply and okay. The method is simple, fast, reliable, but it will not work with all services - the system will not allow it.
Disable program compatibility mode in windows 10 through group policy
To call a group policy in the "execute command" (you can in command line or search) we drive another word - gpedit.msc. No dot at the end.

In the window that appears, go along the road: Administrative Templates =>> Windows Components =>> "Application Compatibility".
Now we click on the line disabling the program compatibility assistant, after which we put a “black mark” in front of the word disable and confirm our actions.
Disable Windows 10 Compatibility Assistant via Admin
To disable the parameters with this option and in the appropriate place, remove the birdie - this service will no longer start at boot.

That's all - all three methods are fully functional - a minute of time and the service is disabled.
True, I always leave it - I have to use programs that are not yet purely for windows 10.
Of course, all this can be done in manual mode, although you still have to make adjustments.
This assistant itself does not always correctly select the appropriate mode. Good luck.