Demo version agent 2.0. Agent Plus: Mobile trading
Read also
Move the second photo to the previously opened one.
You can read more about connecting photos in.
Then, using the Move Tool, we set the desired location of the photos relative to each other. It is necessary to make sure that one photo overlaps the other, and a smooth transition will be mounted at the point of overlap. For convenience, you can temporarily reduce the opacity of images in the Layers panel, and it’s also a good idea to put guides on the overlap boundaries.

Now let's determine which photo will be on top and, if necessary, change the arrangement of layers in the Layers Panel. I will have an image with Twitter on top.
Then set the opacity of the image layers back to one hundred percent.
And now, let's move on to actually creating a smooth transition between photographs, in in this example We will do this using a layer mask and applying a black and white gradient.
Add a layer mask to the layer with the top photo by clicking on the corresponding icon at the bottom of the palette, and the colors in the color palette automatically changed to black as the main color and White background New, a mask icon will appear in the Layers Panel on the corresponding layer. Then open the Gradient Tool in the tool palette. In the left top corner In the Photoshop working window, click on the triangle to open the gradient palette, and select the very first one, called “From the main color to the background.” Then we draw a line from one guide to another in the direction shown in the figure.

In order to draw a gradient line strictly horizontally (or, for other cases, strictly vertically), hold down the Shift key.
As a result, we get a smooth transition to transparency on the right edge of the top image, which gives the effect of a smooth transition between the two photographs.
On the mask icon in the Layers panel we will see the following changes: black color shows full transparency, and white, on the contrary, full opacity of the image to which the layer mask is applied.

That's all, the task is completed!
Create colorful collages from photographs - it's quick and convenient! Need to stitch photos together? Using the Home Photo Studio program, this procedure will take no more than two minutes. Watch the video tutorial and find out for yourself how to combine two or more photographs into one image in the Home Photo Studio program.
Method number 1: quickly combining several photos into one
“Home Photo Studio” will help you smoothly connect two, three or four photos and effectively disguise the connection line in just a couple of mouse clicks. Similarly, you can create an unusual collage from several photos! Photos may be different in size or the same. You can design collages at your discretion, for example, add a bright fill that effectively completes the composition of the photo.
The finished image can be saved on your computer or printed immediately!
Method number 2: simple photo montage To combine two photos, you can use the Photo Montage tool, which has the most advanced simple work with layers and masks. Thanks to fine adjustments of the parameters, you can create the effect of old paper on the background layer, beautifully trim the edges, or give objects a mystical glow. Ours has convenient search functions, and a tool for combining photos can be easily found by searching for “Connect” or “Photo Montage”. From brief instructions
you will learn how to combine two photos into one using our program.
Step 1. Install the program To do this you will need to download it. Installation file
. After installation, you will need a couple of photos that you want to process and a little time. We recommend making copies of these images in case something goes wrong and you accidentally save a bad adjustment.
Step 2. Choose a method for adding photos
Click the “Open Photo” button to select the desired image. Alternatively, you can type “Connect” or “Photo Montage” (without quotes) into the search bar at the bottom of the list. You can also use one of the images that you recently edited - they will appear above the search bar.
Select a photo that will become the background layer. You can only select one image option. In this mode, the main characteristics of the picture are shown and in the preview window you will see what is shown on it. This is very convenient if you have a lot of photos and the folder is configured to display small icons, a table or a list.

Step 4. Go to the “Photo Montage” mode
If you worked through the “Open Photo” button, the program will display the picture you selected. You will see the main menu of the program, where you can retouch the photo before sending it to “Photo Montage” or go straight to this option. If the photo was loaded directly into the photo montage section after searching by functions, the image will be opened in the appropriate mode.

Step 5. Working with layers
To select a second photo that will lie on top of the background one, click the “Add Layer” button and select one of the options from the drop-down menu. The catalogs of decorations, backgrounds and textures contain basic images supplied with the program. To use another picture, click on “Photo”.

Step 6: Select and Edit the Overlay Frame
This is what the interface for selecting the second photo looks like. After selecting a picture, it will be immediately placed on top of the background as a new layer. You can move it with the left mouse button, stretch it, tilt it at different angles, and set transparency. Layers, with the exception of the background layer, can be easily removed using the red "X" button. The button in the form of two blue sheets of paper copies the layer. Each layer can be trimmed without harm to the entire painting. You can immediately save your creation through the “Save to file” button in the lower left corner.

Step 7. Saving the result
After clicking the “Apply” or “Save to file” button in the “Photo Montage” mode window, all changes made to the photo will be saved, and they will no longer be able to be rolled back. Therefore, do not forget about spare copies of the original pictures. In any case, the program will take you to its main window, where you can retouch the photo and save it as a memory.

You can also try experimenting and find out using the Stylization menu settings.
You've probably seen that when people post their weight loss achievements, they also post BEFORE and AFTER photographs combined into one. By the way, I did this too when I wrote. In general, today I will show how this can be easily done. So crack your fingers and let's go!
I wanted to tell you the most quick way, but decided that it was not worth repeating, since I already talked about it in the lesson about. It will turn out that you will have one photo inside another. Let's focus on other ways.
Combining two images
In this example, I decided to do a “Before and After” style photo merge. Don't tell me that these people are not alike. These are two different people). In general, open two photos in Photoshop, and then proceed in order. I took photos of two people: thin and ripped.
- First, let's make the images the same height. To do this, being in each photo separately, go to the “Image” menu - "Image Size". Look at the number of pixels in height. It turned out that the thin one has 680 pixels, and the pumped one has 1329.
- In this case, it is better to reduce the size of the uploaded image to 680 pixels in height in order to make them equal and not lose quality. Do you know how this is done? If not, then look at my article about (although everything should be clear anyway). And by the way, remember the horizontal size of the image of the jock. I got 487.

- Now go to the photo of the skinny woman and go again to the “Image” menu, only this time select “Canvas Size”. Here we will simply enlarge the work area without enlarging the photo itself. So the horizontal size of the skinny photo is 453 pixels. We mentally add 487 pixels (the horizontal size of the jock’s photo) and get 940. It is this number that we write in the width cell. We do not change the height and leave it at 680.
- Now we need to choose which side these new additional 487 pixels will appear on horizontally. If we leave it as is, the canvas will increase in both directions by 243 and 244 pixels (487/2). But we want to do “Before and After,” which means the thin one should be on the left, therefore the empty piece of canvas on the right. Then in the location, click on the left arrow so that the center moves to the left. You can also choose the background color, but in our case this is not necessary, any will do, since we will close it anyway. Then click OK.

- Do you see? Now we have a huge piece of white background. Now go to the photo of the beefy guy, take the Move tool, hold down the left mouse button on the photo and drag it to the tab with the photo of the skinny guy.

- It's a small matter. All that remains is to move the photo directly onto the white background. We accurately calculated the width and adjusted the height, so that everything should stand exactly.

So simple and easy way combine two images).
Merge with smooth transition
There is another interesting effect when the transition from one photo to another is smooth. Let me do this using the example of two animals: a lion and a saiga.
- Open the image of a lion and a saiga in our editor, but in different tabs.
- Go to the lion layer and select .
- Now select and make sure that the transition is from black to white. And now draw a line with this gradient approximately in the middle, as shown in my picture.

- Your part of the image with the lion should be painted over with a red tint. Great. This is what we need. Now look at the Layers panel and our active lion layer. Is he the main one? Those. Is there a lock on it? If yes, then left-click on it to make it disappear, otherwise we simply will not be able to edit this layer.

- Now remove the quick mask mode by clicking on its icon again. You will have to highlight part of the image dotted line. After this, press the key DELETE and make sure the content is worth it "Content-Based", then click OK. The right side of the image should be removed, and with a smooth transparent transition. Just deselect it (just click once with any selection tool, for example a rectangular area).

- Now go to the tab with the saiga (damn, it’s still a funny animal and name). It is advisable to equalize the height (in pixels) of these two images, as in the previous example. Now we take the “Move” tool and drag the poor saiga straight to the lion.

- And now the trick (just kidding, of course it’s not a trick). We hold the layer with the saiga in the layers panel (poor animal, we are holding it again) with the left mouse button, and then drag it down so that it is below the lion.

- Do you see what happened? The king of beasts and the antelope are combined into a single photo. Cool! You can move the antelope a little using “Move”. Let's see. Smooth transition was a success. In my opinion it turned out quite well. Cute and relaxed.

Well, in general, something like this.
Of course it's photoshop. And there are many more ways to combine several photos into one. But I think that these methods will be quite enough for you to start with. Moreover, in the last version we didn’t just link 2 photos into one, but made a simple collage, i.e. We use several different images in one.
By the way, if you want to make amazing collages, then I highly recommend you check out excellent course on this topic. Many examples are examined in detail. From several simple images you will learn how to make simple masterpieces, so go ahead!
Best regards, Dmitry Kostin.
1 voteHello, dear readers of my blog. Today we will talk about one very simple manipulation, thanks to which you can create quite beautiful objects. It's great when just one function is enough to do something complete, unique and useful. This is exactly the case.
Today I will tell you how to combine two pictures in Photoshop. You will receive not only step by step instructions, but in the future, thanks to this article, you will be able to process the edges of the image: highlight the borders with a contour, and also create smooth transitions. All this will add grace to your work and allow it to look good on the wall if you want to print a collage.
Such portraits can even be sold if you have some ambition, entrepreneurial spirit and a subscription to my blog. I often talk about simple ways to promote your business on the Internet; all you have to do is choose the right tips and use them.

Well, now let's move on directly to working on photographs. How to combine them?
Merging photos together
For work, I downloaded 2 photos from . You can have several pictures, it's not that important. Save them in a folder, open Photoshop and get ready for further action.

There are several ways to add an image to the program. For example, the item “File” - “Open” in top menu. I love a different method that is perfect for creating a collage. I simply drag one image into the program’s working field from a folder, and then another.
In general, this method for this work is considered the “correct” one. In the article I told why. If you are adding a picture in the usual way, then several manipulations with the size can lead to the fact that the pixels in the photo are broken and the quality suffers. If you paste a picture from a folder, Photoshop treats it as a Smart Object and prevents pixel damage.
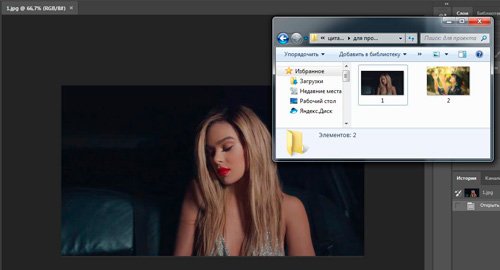
If you drag several pictures at once, they open in adjacent windows. If you first add one to the work field, and then a second or third, and so on, then they are superimposed on the original image.
It won't be difficult to reduce, enlarge or drag a new photo. All this is done using the mouse. The only thing I can reveal is a few useful secrets. If you hold Shift and then start manipulating the cursor, the proportions will be preserved. The picture will not be “stretched” horizontally or vertically.
Another useful keyboard shortcut is Ctrl+T. If you, say, have already worked on an image and pressed enter to apply formatting, and then again want to change the image size or its location, then these hot buttons will help you call the same function again.

Are you generally well versed in the term “”? If knowledge is not enough, I recommend reading the post on my blog, in which I talk in detail about this Photoshop feature. There will be no blank spots left in knowledge.
Now I will only recall the main points. Don't forget that clicking on one of the layers will activate it, you can work with the selected one, and the rest will remain untouched. However, if you want to do this now, many functions will be closed to you. What is the reason?
The top layer (under the number “2”) is not rasterized, and the second (“Background”) is closed from editing. Click the lock on the right to unlock the options below.
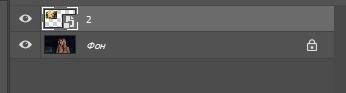
What I called “2” will have to be done differently. Click right click mouse, and then select the “Rasterize Layer” function from the menu that appears.

That's it, now you have access to all the functions of Photoshop and can apply them on both photos.
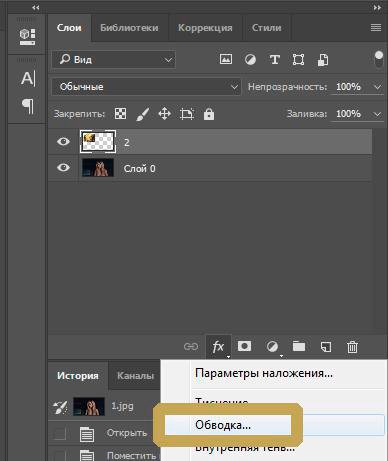
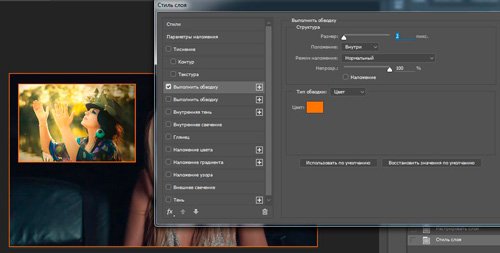
Stroke
This blog already contains, in it you can learn how to work with complex contours. Now, I think we will need a simple design option for a frame for the image.
To do this, click on the Fx function in the right menu and select “Stroke” in the window that appears. Do not forget that it will be applied to the layer on which you clicked, and it subsequently became highlighted. In this case "2".
The settings are easy to understand. The size determines the width of the frame, you can choose the position (from the center, outside or inside the picture), make the shade more or less saturated - the “Opacity” parameter is responsible for this, and, in fact, the color itself, which, if desired, can be replaced with a gradient or pattern in the "Type" menu.
Play around with these settings yourself. Don’t forget to turn on “View”; to do this, check the appropriate box under the “New Style” buttons on the right.
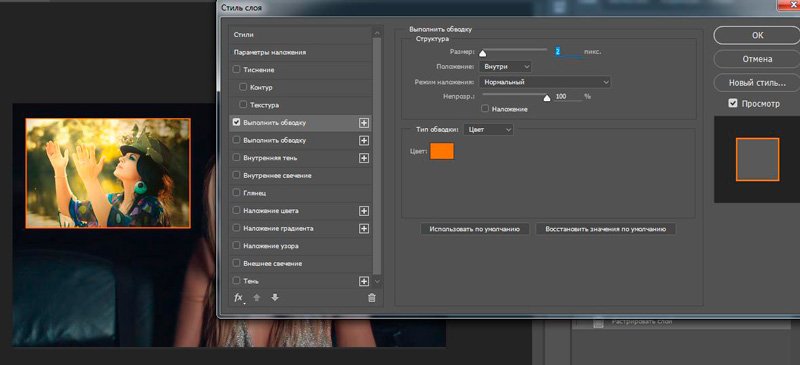
I will apply a stroke to both images next to each other.
Smooth transition
In order for one image to merge with another, you need to do things a little differently. Now I will show you a simple method for beginners.
First, I'll select a rectangular selection, you can read in the previous post. Then I select the borders of the picture, which will be blurred, and then the “Select and Mask” option.

To better see the result, select the “On Layers” view.

There are also a lot of settings here, but for now we will only need Feather and perhaps Shift Edge. Click the sliders and then click Invert.

Now for everything to work out at its best, select "Select" from the top menu and then "Inverse". You can simply use the hotkeys Shift+Ctrl+I.
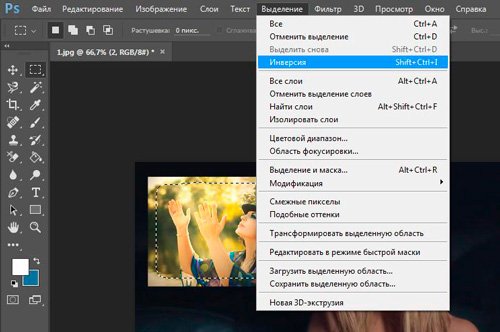
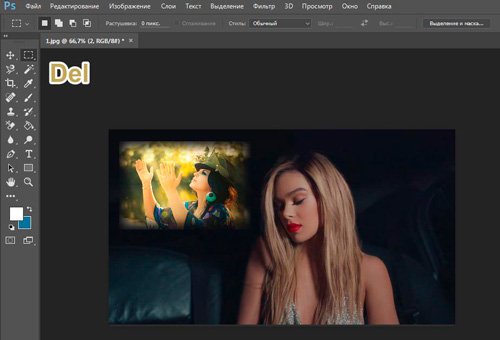
Done, press the Del button on your keyboard. If you had not applied the “Invert” parameter, now it would not be the edges of your picture that would be removed, but everything that is in the center.
You can do things a little differently than in the previous example. First, select the layer (now I'm working with the background), then outline the image using a rectangular selection, then apply an invert, and finally open the “Select and Mask” function.

Ready. This is what the photo looks like now. You forget to press Del. By the way, to get rid of excretory ants along the border of the picture, use the combination Ctrl+D.

Our drawing turned out to be translucent. Read it if you want more details. I suggest you create a new layer as a substrate. Next to the Trash icon in the menu on the right, you will find a button to create a new layer. Then drag it under the background image.

Select the appropriate color and fill tool and apply it to the picture. By the way, I think that now you may need an article about that for the image. There are many interesting things in this post. simple ways and manual creation techniques.

That's basically it.
Video instruction
If you still have questions, you can watch a video on how to combine two pictures side by side.
Well, this tutorial is suitable for you if you want to take a photo with a smooth transition. There are settings in this video that I didn't talk about in the text of this article, so don't ignore them.
Well, I just have to remind you that if you want to learn more about the tools that are in Photoshop, then the course will help you with this « Photoshop from scratch in video format » . A lot of detailed information for a novice user, especially if in the future you are thinking about making money from your skill.

Well, for those who want to achieve maximum results in their hobby - the course « Magic collage » . An incredibly useful thing, in which more attention is paid to the artistic component of the work: light, shadows, and so on, as well as a maximum of professional secrets of drawing processing.
That's all for me. Don't forget to subscribe to Start-Lak group VKontakte so as not to miss something useful. See you again and good luck.
Automation of mobile trading allows you to achieve:
- reducing transportation costs;
- reduction of the staff of operators for entering information from sales representatives;
- optimization of product balances in the warehouse;
- increasing sales volumes.
The software product "Agent Plus: Mobile trading" has a number of technological advantages.
Configurability: the ability to independently expand or change the functionality of the product without the participation of the development company.
Development speed and free updates: Updates are regularly released to Agent Plus: Mobile Trading, including new features. All updates are provided free of charge.
Prompt free technical support for working with the product: service specialists technical support"Agent Plus" is always ready to help and provide answers to any questions regarding the installation and operation of the "Agent Plus: Mobile Trading" software throughout the entire period of work and already at the stage of testing the demo version.
Free modules for connecting to 1C:Enterprise: Ready-made connection modules for integration with the accounting system "1C:Enterprise" 7.7/8.X are available free of charge in the "Download" section.
Comfortable user interface: For the convenience of users, the capabilities of the Android operating system are used: multi-touch control, voice search, convenient work with photographs and pictures and others.
The product is sold in two versions - "Basic" and "Professional": versions differ in functionality, configurability, need for implementation and price.
The software product "Agent Plus: Mobile trading" is available in two versions: "Basic" and "Professional".
| Functionality | Basic | Prof |
|---|---|---|
| Collection and processing of applications for the supply of goods: The sales agent promptly fills out a request for the supply of goods. | ||
| Multi-warehouse accounting: the sales agent can indicate the warehouse from which the shipment must be made. | ||
| Merchandising: a sales agent can record the client’s remaining goods, photograph the display of goods, store equipment or competitors’ products with a mobile device camera. | ||
| Accounting for mutual settlements: the sales agent can track payments and debts of each client. | ||
| Accounting for cash transactions: a sales agent can accept payment from clients. | ||
| General and individual discounts: a sales agent can operate with general discounts and individual discounts provided for a specific client. | ||
| Personal prices and discounts: a sales agent can operate with prices and discounts provided for specific goods. | ||
| Planning visits to retail outlets: A visiting route for a sales agent can be drawn up in advance, indicating the recommended time for visiting each client. | ||
| Online control: monitoring the work of employees using GPS and free online maps. | ||
| Offline control: monitoring the work of employees using GPS and offline maps. |
||
| Trading from wheels: the sales agent can carry out the delivery and shipment of goods himself, with the execution and printing of all necessary documents at the point of sale. | ||
| Working with photographs and pictures: the sales agent can use pictures for demonstration appearance goods and a mobile device camera to take photographs of the facades of retail outlets or the customers themselves. | ||
| Working with barcode scanners: As a barcode scanner, a sales agent can use a mobile device camera or an external portable (pocket) scanner via Bluetooth. | ||
| Unlimited number of price types: a sales agent can use any types of prices (wholesale, small wholesale, retail, etc.). | ||
| Customer survey: The sales agent, if necessary, can conduct any survey of the client. | ||
| Working with customer sales history and product matrices: When filling out an application, a sales agent can operate with product matrices and past sales turnover for each client. | ||
| Detailed customer contact information: a sales agent can use any contact information client (phone numbers, address, client photo, birthdays, etc.). | ||
| Printing documents: Printing is possible on both stationary and mobile printers. | ||
| Data exchange with the main accounting system: While working fully, a sales agent may not have to visit the office at all, using wireless data exchange with the main accounting system located in the office. | ||
| Configurability: the ability to independently expand or change functionality mobile application without the participation of the development company. | ||
| Implementation |
* Implementation of "Basic" is not required in cases where the configuration based on the "1C:Enterprise" platform has not changed: the functionality of accounting for mutual settlements, the structure of the product directory, the structure of the "Order" and "Cash Order" documents. Otherwise, minor modifications to the data exchange module may be required.
"Agent Plus: Mobile trading" implements two-way data exchange via wireless technologies(GPRS, Wi-Fi, etc.) with an accounting system installed in the office. Data transfer is carried out through the data exchange service "Agent Plus: Data Exchange Service" (DOS). Before starting work, the sales representative exchanges data with the accounting system, receiving from the central database up-to-date information about the balance of goods in the warehouse, a route sheet for the current day, and begins work. During the day, a sales representative places orders in a mobile device for the supply of goods to customers and sends them to the central database and periodically receives information about current balances.
"Agent Plus: Mobile trading" is an independent software product with its own database. This allows you to integrate it with various accounting systems. On this moment There are data exchange modules for 1C 7.7 "Trade + Warehouse", 8.1 and 8.2 "Trade Management", supplied free of charge with the software product. Integration with other configurable information systems is possible.
All work on the implementation of "Agent Plus: Mobile commerce" at your enterprise can be performed by in-house programmers of your enterprise or by programmers of the official partner of Agent Plus LLC.
Software "Agent Plus: Mobile trading" works on various mobile devices ah (smartphones, tablet computers) running the Android operating system from version 4.0 to 5.1.
"Agent Plus" is a certified partner of Samsung. We recommend using software"Agent Plus: Mobile trading" on mobile devices of companies: Samsung, HTC, Acer, LG, Sony. If you want to purchase mobile devices from other manufacturers, contact Agent Plus Technical Support Service for additional recommendations.
- Minimum requirements for mobile devices
- operating system: Android from version 4.0 to 5.1
- Processor: clock frequency not lower than 800 MHz
- Size random access memory(RAM): not less than 512 Mb
- Printer requirements
- Printing standards: "HP PCL" version 3 and higher (except "HP PCL 3 GUI") and "ESC/P"
- Encodings: "Ср1251", "Cp1125", "Ср866", "Ср866ukr", "KOI8_R", "UTF-8", "UTF-16"
- Thermal printer models supported: "UNS SP1.b" and "Star SM-T300"
- Requirements for barcode scanners
- Models "ChipherLab 1660" and "ChipherLab 1661".
To use the product "Agent Plus: Mobile trading" you must purchase a license. One license can only work on one mobile device. This is due to the fact that the license key is “linked” to the mobile device.
In this regard, questions arise: “What should I do if a mobile device with the Agent Plus: Mobile Trading product installed is lost or broken? Can the license be transferred to another mobile device?”
These issues are very important for our clients, since the loss or breakdown of mobile devices can cause downtime in the work of sales representatives, for whom a mobile device with the Agent Plus: Mobile Trading product installed is the main working tool.
To manage licenses, our clients can use the “License Control and Accounting Service,” which will allow them to independently transfer a license from one mobile device to another, if necessary.
"License control and accounting service" allows you to:
- register mobile devices;
- link licenses to mobile devices;
- unlink licenses from mobile devices;
- browse detailed information about the mobile device (contact details of the sales representative; information about the operator mobile communications, about the SIM card, MU identifiers)
- generate reports on the use of licenses (history of bindings/unbindings, number of free licenses).
Using the "License Control and Accounting Service" the client will always have access to up-to-date information on the use of a fleet of mobile devices and licenses, and will also be able to independently prepare a full-fledged working tool for a sales representative at any time without downtime and losses.
Access to the "License Control and Accounting Service" is provided via the Internet through any web browser. Each client receives a personal virtual account.
To start using the "License Control and Accounting Service" you must purchase a subscription, the minimum subscription period is 1 year, the subscription cost is from 4,500 rubles per year, depending on the number of licenses used.