Wi-Fi router Zyxel Keenetic Extra II - Reviews. ZyXEL Keenetic Extra: simple and advanced setup of a Wi-Fi router Main advantages of the model
Read also
If you have just signed an agreement with one of the Internet providers and purchased everything you need (router, cable), you may want to install and configure network access yourself, without additional expenses for technical specialists. That's why you got to this page and therefore you will succeed.
This article will discuss in detail the process of independently connecting the Internet via an Ethernet cable to the router. Zyxel Keenetic ii for various providers and data transfer protocols (PPPoE, L2TP, PPTP).
How to start the router?
Carefully remove all components of the device from the packaging and follow the following algorithm when connecting it:
- Unpack and connect the power supply to the device;
- Insert the cable from the provider (the one through which Ethernet data is transmitted) into the WAN port that is selected among all;
- Remove from the package and connect to the router, as well as to network card main PC connecting cable: it is quite short, the same at both ends, inserted into any of the five free connectors of the router and the only one available on the computer/laptop;
- Plug in the power supply, then press the power button on the rear panel;
- Wait until the device starts up completely, as a result of which 3 diodes will light up on the indicator panel: power, network, connection to PC.
The new connection should now appear in the bottom right corner of your PC screen. Let's do some preparatory work:
- Right-click on this icon and open Control Center;
- On the right side of the window that opens, the name of your connection will be located, highlighted in blue. Click on it;
- Another window opened. Open properties by clicking on the corresponding button;
- Scroll down the list of parameters for the current connection and find Internet Protocol version 4: select it and open properties (the button below the list);
- Make sure that in both cases IP and DNS are set to receive settings automatically. If this is not the case, set the selectors to the appropriate value;
- Apply the changes.
This completes the preparatory work. Let's move on to the main settings.
Connection setup
When configuring the Zyxel Keenetic ii router, we will use a web configurator common to the entire Kinetic family. Therefore, having learned to configure this model, you can handle connecting third and third generation devices and other types like Lite, 4G, etc.
And so, first we need to open this very web configurator:
And now you are in the main menu of the device. In it you can find information about the current firmware ( top list on the right), about connected connections (top left), as well as two types of menus: a text menu at the top and a bottom menu, consisting mainly of graphic icons. We are interested in the second one – “Internet”.
But before you proceed to entering parameters, find the provider’s contract or obtain the following data from the support service:
- What access protocol is used: we have already listed the most popular ones above (PPPoE, L2TP);
- Authorization data (personal login and password - contained in the contract);
- Is it necessary to specify the IP address as well as the dedicated server name (VPN). These values, if required;
- Is a static address assigned to you, or is it updated (dynamic) in each new session?
- Does the provider register MAC addresses (for example, Dom.ru does this) and, if so, which one belongs to you;
We will need all this to connect the Zyxel Keenetic ii router to the network.
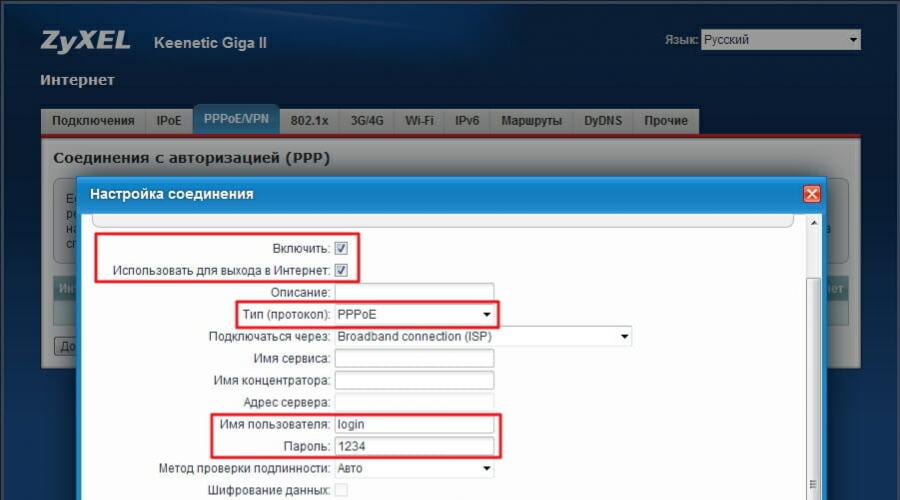
After going to the Internet tab of the main menu, you will see an updated list of tabs at the top of the page. Go to the PPPoE/VPN section and click on the add connection button. In the window that opens, make the following settings:

Example of setting up a router in PPPoE mode
- We check the first two selectors, which will enable the connection and designate it as the main one for accessing the external network;
- In the protocol field, indicate the one that your provider told you. For example, PPPoE;
- If the supplier reported that this is necessary, indicate the server address;
- Immediately after it we indicate our personal data as a user;
- The protection method (i.e. authentication) is set only at the request of the Internet provider;
- Below, if you are supplied with a dynamic IP, we do not change anything. And if it is static, then we select manual settings and enter the corresponding values for the address, subnet mask and gateway used (Some providers do not supply an IP address on the client wan port at all. In this case, you must select the “Without IP address” option);
- All other parameters are optional for owners of the Zyxel Keenetic ii router and are assigned only at the request of Rostelecom, Beeline or any other company with which you have entered into an agreement;
- Click on apply settings and wait for changes to be made to the router configuration;

Example of setting up a router in PPTP mode
If the supply agreement provides for a static IP, and you were unable to configure the connection using the algorithm above, try the following additionally:
- While in the same “Internet” section of the Zyxel Keenetic ii router, open the IPoE tab of the top menu;
- Click on the name of the only interface indicated in the table;
- In the pop-up window, we also check the two top selectors;
- Find the IP parameters line and select the manual configuration method;
- In the fields that appear, enter the data from the provider;
- If domain server addresses were provided, please indicate them below;
- Here you can also specify the static MAC address assigned to you by your provider. To do this, remove the “Default” setting in the corresponding field;
- We apply the changes and check the Internet availability again.

Example manual settings ip addresses
To be sure, you can reboot Zyxel Keenetic ii and turn it off, then (after 15 seconds) turn it on network adapter the PC you are using.
If the router is not new, and the setup was carried out previously for other providers, you need to reset the settings to factory settings. To do this, you need to find the Reset button on the back panel of the device and press it for 10-15 seconds, after which the router will reboot. In this case, the login password (1234) and other parameters will become initial. Now you can configure it again and continue to use a high-quality Internet connection using the Zyxel Keenetic ii router.
Found a typo? Select the text and press Ctrl + Enter
Excellent catching, no glitches, etc. I measured the speed via wifi - 82 megabits download and upload above 70! Internet fiber 100 Mbit.
Minuses
Didn't find it
Review
I was looking for a router for a store - several departments, the total area seems to be more than 200 sqm. The walls are brick. Internal - sibit and brick. It's on the refrigerator in the grocery store - on the right in the office space through the thick wall it catches all the bands! On the left is a hardware store - there is also fishing there in all lanes! Only my brother has one at the very end of the construction store, and through a metal display case, if the door is open - 1-2, and if it is closed - it’s already bad, but the room is like a bunker. There I had to run a wire to a network of computers, since I initially counted on a wired connection. And in a grocery store, the online checkout works great. So it exceeded my expectations! Why did I choose Zyxel? Because this company has been producing modems for a very long time... I took Zyxel to my cousin’s apartment - it works great and works for a couple of years without interruptions. I also read the reviews - more positive. For office use, mikrotik is offered everywhere - it costs several times more. TP Link was offered - refused, it was painfully buggy. And so in my Khrushchev apartment, the ancient D-Link receives very weakly in the edges. But dir 620 has been working for more than 5 years.
It's time for a change for Zyxel. In the fall, the company changed its logo (for the first time in 27 years!) and updated its website, and at the very end of 2016 it introduced new router models with a completely different design: Zyxel Keenetic Air and Extra II. This is exactly what we will talk about. Air and Extra II are very similar both in appearance and in filling. In fact, we will be testing the Extra II model, and the differences in the younger version will be discussed separately, since there are not many of them. Air and Extra II are already on sale in Russian stores at a price of about 2,900 and 3,500 rubles, respectively.
| Router | Zyxel Keenetic Air | Zyxel Keenetic Extra II |
|---|---|---|
| Standards | IEEE 802.11 a/b/g/n/ac (2.4 GHz + 5 GHz) | |
| Chipset/controller | MediaTek MT7628 (1 × MIPS24KEc 580 MHz) + MT7612 | |
| Memory | RAM 64 MB/ROM 16 MB | RAM 128 MB/ROM 32 MB + swap |
| Antennas | 4 × external 5 dBi; length 73 mm | |
| Wi-Fi encryption | WPA/WPA2, WEP; WPS (separately for each band); 2 × guest network | |
| Maximum speed | 802.11ac: up to 867 Mbps; 802.11n: up to 300 Mbps; 802.11g: up to 54 Mbps | |
| Interfaces | 2 × 10/100 Mbit/s Ethernet | 5 × 10/100Mbps Ethernet, 1 × USB 2.0 |
| Indicators | 4 × on the top cover, at each Ethernet port | |
| Hardware buttons | Disabling Wi-Fi/starting WPS, resetting settings, operating mode switch | Disable Wi-Fi/start WPS, reset settings, custom Fn |
| Dimensions (W × L × H) | 167 × 100 × 33 mm | |
| Weight | 210 g | 230 g |
| Nutrition | DC 9 V, 0.85 A | DC 12 V, 1 A |
| Price | 2,900 rubles | 3,500 rubles |
| Possibilities | ||
| Access to the Internet | Static IP, DHCP, PPPoE, PPTP, L2TP, 802.1x, WISP; KABINET; DHCP Relay; Multi-WAN; Ping checker; NetFriend Setup Wizard; 3G/4G modem, Keenetic Plus DSL (Extra II only) | |
| Services | DLNA, FTP, SMB, AFP server; print server; IPv6 (6in4); parental control/filtering/telemetry protection “Yandex.DNS”/SkyDNS; BitTorrent client Transmission; VLAN; VPN server (IPSec, PPTP); Entware, Keenetic Plus modules (only for Extra II) | |
| Port forwarding | interface/VLAN+port+protocol+IP; UPnP, DMZ; IPTV/VoIP LAN-Port, VLAN, IGMP/PPPoE Proxy, udpxy | |
| QoS/Shaping | WMM; indicating the interface/VLAN priority; shaper | |
| Dynamic DNS Services | DNS-master (RU-Center), DynDns, NO-IP; KeenDNS | |
| Operating mode | Router, WISP; media adapter, access point, repeater | |
| VPN forwarding, ALG | PPTP, L2TP, IPSec; (T)FTP, H.323, RTSP, SIP | |
| Firewall | Filtering by port/protocol/IP; Packet Capture; SPI; DoS protection; Brute force protection | |


Possibilities
All tests were carried out using the stable firmware version NDMS 2.07. More information about NDMS and its capabilities was discussed in materials about Keenetic, as well as about. Note that the number of devices with NDMS has already exceeded 4 million. Coincidentally, while getting acquainted with the new routers, the developers transferred the upcoming version of NDMS 2.08 to the public beta stage. Since it will soon become available to all users, it makes sense to say a few words about some interesting innovations. Firstly, support for schedules appeared. In the web interface you can use them to manage work time network interfaces and Internet access, but in general schedules will subsequently be available for other settings. In particular, through the console interface you can set a schedule for turning on/off the front and rear indicators. However, for convenience, the function of disabling them can be assigned to one of the hardware buttons on the router body.
NDMS 2.08
Secondly, in the settings of access points, a function has appeared to automatically redefine the channel every 6/12/24 hours, which can be useful in the case of particularly “dirty” broadcasts. Thirdly, the free DDNS service KeenDNS has acquired the option of forwarding web resources (HTTP and HTTPS) from local network out through the Zyxel cloud. For example, in this way you can gain remote access to the NAS web interface even in the absence of a “white” IP address. And in general, this is much more convenient for an untrained user than manual port forwarding or creating tunnels. As a matter of fact, it was not intended as another DDNS, but as a simple way to give the user the opportunity remote access to home network devices. The list of new functions does not end there, but some of them - such as support for EoIP/GRE/IPIP tunnels, an SNMP server, protection against brute force attacks on shared network resources (FTP, for example) or new capabilities for third-party Entware packages - will be of interest only to specialists.Testing
Settings Wi-Fi standard: automatic selection of channel and its width, WPA2 encryption, access points are not isolated, and WPS and guest networks are disabled, other parameters are left at default. You cannot force a width of only 40 MHz (for 2.4 GHz) or 80 MHz (for 5 GHz) in the web interface. The stands were in direct visibility at a distance of four meters from each other. First stand configuration: Intel Core i7-2600K, 16 GB RAM, ASUS PCE-AC68 (indicated as A in the table), Windows 7 SP1 x64. Second: Intel Core i7-4700HQ, 12 GB RAM, Windows 8.1 Update 1 x64, Realtek RTL8168 (in table R), ASUS USB-AC56 (in table U). Communication between the wireless and wired network segments is obviously limited by the speed of the network ports.
| Router ZyXel Extra II/Air | |||||||
|---|---|---|---|---|---|---|---|
| Streams | 1 | 2 | 4 | 8 | 16 | 32 | 64 |
| Average Wi-Fi speed 802.11ac 5 GHz, Mbit/s | |||||||
| A -> R | 94 | 95 | 94 | 94 | 93 | 91 | 87 |
| R -> A | 94 | 95 | 94 | 94 | 92 | 91 | 89 |
| A<->R | 158 | 155 | 149 | 149 | 144 | 137 | 128 |
| A -> U | 141 | 126 | 128 | 137 | 148 | 153 | 152 |
| A<>U | 164 | 174 | 177 | 178 | 169 | 159 | 146 |
| A (5)<->U(2.4) | 167 | 172 | 174 | 173 | 172 | 160 | 144 |
| Average speed of Wi-Fi 802.11n 2.4 GHz, Mbit/s | |||||||
| A -> R | 93 | 94 | 94 | 94 | 92 | 90 | 87 |
| R -> A | 90 | 90 | 94 | 94 | 91 | 90 | 90 |
| A<->R | 134 | 130 | 131 | 152 | 157 | 148 | 137 |
| A -> U | 60 | 58 | 61 | 61 | 56 | 55 | 50 |
| A<>U | 57 | 62 | 63 | 60 | 58 | 53 | 45 |
Data exchange within the 5 GHz band and between the two bands is very, very good, but working exclusively at 2.4 GHz could be better in some places. On the other hand, the new products are precisely designed for those who want to expand their home network by moving to 5 GHz. As for WAN connections, regardless of the type, the connection speed will be around 90-95 Mbit/s, and in duplex 135-165 Mbit/s: VPN connections are still slower than direct ones. To test network operation with drives, we used a LanShuo INIC-3609 box and a Kingston SSDNow V+200 SSD with one NTFS volume. The access speed for FTP and SMB for reading and writing fluctuated around 9.5-11.5 MB/s. In general, everything is good, but there is one nuance - in each of the tests, the CPU load reached the maximum.

Connecting the ZYXEL Keenetic Extra II router to a computer
The next step is to connect the router ZYXEL Keenetic Extra II to a laptop or Personal computer(PC). To do this, you need to connect the cable provided by the provider to the “INTERNET” port of the router (this is the cable that goes to the apartment, house, office, etc. from outside). Connect the cable that came with the router to one end of the router’s “HOME NETWORK” port, and connect the other end to a laptop or PC. And yes, don't forget to connect the power cable.

If you encounter network problems while connecting, go here to resolve the problem:
Authorization of the ZYXEL Keenetic Extra II router
So, we connected the router, now you need to use any browser (be it Google Chrome, Mozilla Firefox, Internet Explorer, etc.) get into its web interface. To do this, open the browser and enter the router address in the address bar: my.keenetic.net or 192.168.1.1 and press the button " Enter" on keyboard.
Afterwards, the router prompts us to perform quick setup, select the interface language - “Russian” and click Web Configurator.

After this, the router can display a window for setting a password on the web interface. Here, if you wish, you can set a password or not. If you set a password, write it down somewhere.

Also, ZYXEL routers operate in different modes, so it’s a good idea to check whether the mode is selected. Click on the shortcut in the bottom menu " System" and go to the tab " Mode". If you are setting up the Internet by entering your login and password, leave it in " Internet Center - main mode".

Setting up the ZYXEL Keenetic Extra II router
Now you need to configure the router. First of all, let's secure wireless network by setting a password for wi-fi. Then you will need to find out what type of connection is used to access the Internet, is it PPTP, L2TP or PPPOE. You can find out by calling your provider (this is the organization with which you entered into an agreement to provide Internet services). So, let's start setting up the router.
Setting a password for wi-fi
The ZYXEL Keenetic Extra II router is dual-band, which means that the router supports 2 operating frequencies of wireless connections, 2.4 GHz and 5 GHz. 5 GHz allows you to achieve higher bandwidth, but has a shorter range than 2.4 GHz, 2.4 GHz is more susceptible to interference. 5 GHz is not supported by all devices. You can select both, and depending on the circumstances, change the wireless connection on the devices.
I offer video instructions for setting a password for wi-fi on a router ZYXEL Keenetic Extra II
Let's also take a written and illustrative look at setting up a Wi-Fi password on a router ZYXEL Keenetic Extra II in two frequencies.
1.
On the Web interface, click on the shortcut " Wi-Fi network"go to network settings" 2.4 GHz access point".
2.
Enable hotspot", then in the field " Network name (SSID)“Come up with and indicate a name for the wireless network; this name will be displayed in the future when you connect to the network. I advise you to indicate the frequency used in the name of the network, for example: “imya seti 2.4”.
3.
"Network protection" - WPA2-PSK.
4.
Network key
5.
"Channel width" - "20 MHz".
6.
Click " Apply".

7.
Click the tab " 5 GHz access point".
8.
Check to see if the checkbox next to " Enable hotspot", then in the field " Network name (SSID)"come up with and indicate the name of the wireless network. I advise you to indicate the frequency used in the name of the network, for example: "imya seti 5".
9.
"Network protection" - WPA2-PSK.
10.
Now you need to set a password for the wireless network. In field " Network key"We come up with and enter a password.
11.
"Channel width" - "20/40/80 MHz".
12.
Click " Apply".

Setting up PPTP
PPTP on the router ZYXEL Keenetic Extra II using the example of the ZYXEL Keenetic Omni II router.
PPTP on the router ZYXEL Keenetic Extra II.
1.
Internet".
2.
Select the tab " PPPoE/VPN"press" Add connection".

3.
Turn on" And "".
4.
IN " DescriptionType (protocol)"choose" PPTP", "Connect via"choose" Broadband connection (ISP)".
5.
Username"), password (in line " PasswordServer address
6.
"Configuring IP settings" - "Automatic".
7.
Apply".

Setting up PPTP with a static IP address
PPTP with static IP address on the router ZYXEL Keenetic Extra II
1.
Click on the shortcut in the bottom menu " Internet".
2.
Select the tab " PPPoE/VPN"press" Add connection".
3.
In the window that appears, check the checkboxes opposite " Turn on" And " Use to access the Internet".
4.
IN " Description"enter any words in Latin letters, for example "Host", " Type (protocol)"choose" PPTP", "Connect via"choose" Broadband connection (ISP)".
5.
Below you are asked to indicate your username (in the line " Username"), password (in line " Password"). You will also need to specify the server IP address (in the line " Server address").
6.
Manual" against " Configuring IP settings".
7.
Specify IP addresses and DNS.
All this data is usually specified in the contract with the provider. If for some reason you cannot find them, you need to call hotline provider and find out how you can get them.
7.
After you have entered all the necessary data, press the button " Apply".

L2TP setup
I offer video instructions for setting up the connection type L2TP on the router ZYXEL Keenetic Extra II using the example of the ZYXEL Keenetic Omni II router.
Let's also take a written and illustrative look at the connection setup L2TP on the router ZYXEL Keenetic Extra II.
1.
Click on the shortcut in the bottom menu " Internet".
2.
Select the tab " PPPoE/VPN"press" Add connection".
3.
In the window that appears, check the checkboxes opposite " Turn on" And " Use to access the Internet".
4.
IN " Description"enter any words in Latin letters, for example "Host", " Type (protocol)"choose" L2TP", "Connect via"choose" Broadband connection (ISP)".
5.
Below you are asked to indicate your username (in the line " Username"), password (in line " Password"). You will also need to specify the server IP address (in the line " Server address"). All of the above data is provided by the provider (the organization that provided the Internet).
All this data is usually specified in the contract with the provider. If for some reason you couldn’t find them, you need to call the provider’s hotline and find out how you can get them.
6.
"Configuring IP settings" - "Automatic".
7.
After you have entered all the necessary data, press the button " Apply".

Setting up L2TP with a static IP address
Let's look at setting up the connection L2TP with static IP address on the router ZYXEL Keenetic Extra II. Typically a static IP address is provided legal entities, or how additional service to the basic tariff for individuals.
1.
Click on the shortcut in the bottom menu " Internet".
2.
Select the tab " PPPoE/VPN"press" Add connection".
3.
In the window that appears, check the checkboxes opposite " Turn on" And " Use to access the Internet".
4.
IN " Description"enter any words in Latin letters, for example "Host", " Type (protocol)"choose" L2TP", "Connect via"choose" Broadband connection (ISP)".
5.
Below you are asked to indicate your username (in the line " Username"), password (in line " Password"). You will also need to specify the server IP address (in the line " Server address").
6.
Since the connection uses a static IP address, select " Manual" against " Configuring IP settings".
7.
Specify IP addresses and DNS.
All of the above data is provided by the provider (the organization that provided the Internet).
All this data is usually specified in the contract with the provider. If for some reason you couldn’t find them, you need to call the provider’s hotline and find out how you can get them.
7.
After you have entered all the necessary data, press the button " Apply".

Setting up PPPOE
I offer video instructions for setting up the connection type PPPOE on the router ZYXEL Keenetic Extra II using the example of the ZYXEL Keenetic Omni II router.
Let's also take a written and illustrative look at the connection setup PPPOE on the router ZYXEL Keenetic Extra II.
1.
Click on the shortcut in the bottom menu " Internet".
2.
Select the tab " PPPoE/VPN"press" Add connection".
3.
In the window that appears, check the checkboxes opposite " Turn on" And " Use to access the Internet".
4.
IN " Description"enter any words in Latin letters, for example "Host", " Type (protocol)"choose" PPPOE", "Connect via"choose" Broadband connection (ISP)".
5.
Below you are asked to indicate your username (in the line " Username"), password (in line " Password"). All of the above data is provided by the provider (the organization that provided the Internet).
All this data is usually specified in the contract with the provider. If for some reason you couldn’t find them, you need to call the provider’s hotline and find out how you can get them.
6.
"Configuring IP settings" - "Automatic".
7.
After you have entered all the necessary data, press the button " Apply".

Setting up PPPOE with a static IP address
Let's look at setting up the connection PPPOE with static IP address on the router ZYXEL Keenetic Extra II. Typically, a static IP address is provided to legal entities, or as an additional service to the basic tariff to individuals.
1.
Click on the shortcut in the bottom menu " Internet".
2.
Select the tab " PPPoE/VPN"press" Add connection".
3.
In the window that appears, check the checkboxes opposite " Turn on" And " Use to access the Internet".
4.
IN " Description"enter any words in Latin letters, for example "Host", " Type (protocol)"choose" PPPOE", "Connect via"choose" Broadband connection (ISP)".
5.
Below you are asked to indicate your username (in the line " Username"), password (in line " Password").
6.
Since the connection uses a static IP address, select " Manual" against " Configuring IP settings".
7.
Specify IP addresses and DNS.
All of the above data is provided by the provider (the organization that provided the Internet).
All this data is usually specified in the contract with the provider. If for some reason you couldn’t find them, you need to call the provider’s hotline and find out how you can get them.
7.
After you have entered all the necessary data, press the button " Apply".

Updating firmware and components
I offer Video instructions for updating the firmware on the router Keenetic Air using the Keenetic Omni II router as an example.
I hope the article was as helpful as possible.
If you wish, you can support the project:
Instructions for setting up Zyxel Keenetic Extra
We will independently configure the connection of the Internet center to the Internet through the built-in web configurator. To configure, connect to the device via an Ethernet cable (included, yellow):
Launch your browser (Google Chrome, Mozilla Firefox, Internet Explorer, etc.) and type in the address bar 192.168.1.1
(default IP address of the device) (Zyxel Keenetic routers also have a site for setting up my.keenetic.net). To enter the menu, enter the login admin and password 1234. You will see the device’s web configurator: 
We set a password to enter the web interface of the router settings - the default login is admin.
Click “Apply” to save settings: 
The settings menu is located at the bottom - go to the item “Internet” - “Connections”".
The interface has already been added here "Broadband Connection" To open it, just click on the name: 
In field “Configuring IP settings” Leave it set to Automatic. Click “Apply” to save settings: 
It is advisable to immediately update the router firmware; to do this, go to the menu “System Monitor”. Updates are available. Click on the name “Available”: 
After you will see a window with the update process, you need to wait until it is finished, after which the Web configurator will load on its own: 
Next we go to the menu “Wi-Fi network” for wireless connection settings.
Because The router supports two frequency ranges: 2.4 GHz and 5 GHz- configure both connections: 
Click “Apply” to save settings.
And at a frequency of 5 GHz. It is better to add 5G to the name of the network so that you can always determine at what frequency the connection will occur: 
Click “Apply” to save settings.
* When selecting a country, be sure to indicate - United States. Russia country supports channel range 1-13. When choosing the country Russia, you may encounter problems connecting to your Wi-Fi networks. Many devices do not support connection when selecting a channel higher than 11. We strongly advise against going beyond channel 11. When you select the country United States/USA, the channel range is 1-11.
At this point the settings are completed - it would be a good idea to check if the checkbox is checked IGMP to view IPTV on the menu " home network” - "IGMP Proxy": 
For the correct performance of all network resources"VL-Telecom" is at your home, you also need to change your home subnet.
To do this, go to the local network settings, tab "Segments", select "Home": 
Next we change IP address and pool start address(default will be 192.168. 1
.1 must be changed to 192.168. 0
.1: 
After changing the IP address, setting up the router on this site (192.168.1.1) will not be available. After a while, in the address bar, type 192.168.0.1 (the IP address of the device assigned by us) (Zyxel Keenetic routers also have a site for setting up my.keenetic.net). To enter the menu, enter the login admin and the password assigned at the beginning of the setup: 
The setup is complete. Go to tab "System Monitor". Here you can view the Internet connection status and the received network settings: 