How to install an external circuit on another computer. How to copy the certificate and private key from the registry
Read also
Transferring the Kontur.Extern system to another computer. Setting up an additional workplace.
For initial installation systems Contour.Extern,use the instruction .
To transfer the Kontur.Extern system to another workplace necessary:
1. Copy certificates
If the keys electronic signature(ES) at the old workplace were installed in the Registry, you need to copy them to any removable media. To do this, follow these steps:
1. Go to the "Copy" Diagnostics profile at the link .
2. Insert the media to which you want to copy the certificate.
3. On the required certificate, click the "Copy" button.
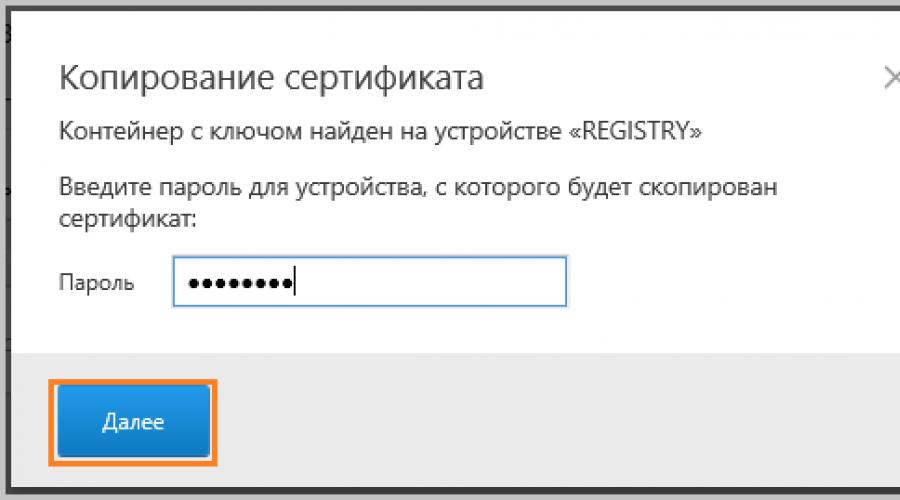
If a password has been set for the container, the message “Enter the password for the device from which the certificate will be copied” will appear.

4. Select the media where you want to copy the certificate and click "Next".

5. Specify a name for the new container and click the "Next" button.

6. A message should appear indicating that the certificate was copied successfully.

If several certificates are installed on the computer, repeat steps 3-6 for each certificate.
2. Transferring the program Kontur.Extern Light
If you use the Kontur.Extern Light program for work, you need to transfer the settings and the database of transferred documents from one workplace to another. If you don't use it, go ahead.
To transfer Kontur.Extern Light, you need to copy the settings files and databases from the previous workplace and place them in the appropriate directory on the new workplace:

ATTENTION! When performing any actions with the RSBASE file, remember that it is not recommended to delete or move it from the directory if you are not sure of the need for these actions.IN given file all settings and a database of previously transferred documents are stored.When transferring a file from one computer to another, it is recommended to use the file copy function. After that, install Kontur.Extern Light using the installation disk to the desired workplace.
3. Installing the Kontur.Extern system on a new computer
If you are not prompted to install/update any components when you log in to the web drive, then go to your personal certificate.

For a complete installation of the system, click on the "Install" button.

When using WebDisk, automatic check components already installed in the workplace. After clicking on the "Install" button, only the components that are missing for correct operation will be installed. This method installation is recommended.

You can also use custom installation component (not recommended). To do this, click on the link "Select components to install", check necessary components and click the "Start Installation" button.
Wait for the installation process to finish. After that, restart your browser (if necessary, restart your computer) and open the web drive again.

4. Installing the certificate
For check installed certificate or use the "Extern" shortcut. It will appear on the desktop after the components are installed.
If, when entering the service, a message appears that the certificate is not installed, or the certificate is on the flash drive, install the certificate manually.
To transfer the Kontur.Extern system to another workplace, you must:
- Copy certificates to any removable media if they are installed in the computer registry;
- If you use the Kontur.Extern Light program for work, you need to transfer the settings and the database of transferred documents;
- Install the Kontur.Extern system and components on new computer using the web drive;
- Install certificates on the new computer.
Copying Certificates
Transferring the program Kontur.Extern Light
If you use the Kontur.Extern Light program for work, you need to transfer the settings and the database of transferred documents from one workplace to another. If you are not using it, skip this step. To transfer the Kontur.Extern Light program, do the following:

Installing the system on a new workplace
It is recommended to use the web disk to install the system. Using the web disk, only the actual components necessary for correct operation are installed. Administrator rights are required for installation.
Take advantage of our instruction to install the program
Installing certificates
For correct operation in the reporting system, install all certificates of the organization (valid and expired) with removable disk according to our instructions .
The system has been successfully installed.
To get started, use the CenterInform shortcut on your desktop.
To transfer the Kontur.Extern system to another workplace, you must:
- Copy certificates to any removable media if they are installed in the computer registry;
- If you use the Kontur.Extern Light program for work, you need to transfer the settings and the database of transferred documents;
- Install the Kontur.Extern system and components on a new computer using a web disk;
- Install certificates on the new computer.
Copying Certificates
Transferring the program Kontur.Extern Light
If you use the Kontur.Extern Light program for work, you need to transfer the settings and the database of transferred documents from one workplace to another. If you are not using it, skip this step. To transfer the Kontur.Extern Light program, do the following:
Installing the system on a new workplace
It is recommended to use the web disk to install the system. Using the web disk, only the actual components necessary for correct operation are installed. Administrator rights are required for installation.
Take advantage of our instruction to install the program
Installing certificates
For correct operation in the reporting system, install all certificates of the organization (valid and expired) from a removable disk according to our instructions .
The system has been successfully installed.
To get started, use the CenterInform shortcut on your desktop.
FAQ
Question: What is included in the extended tariff plan?
Answer:
The advanced plan includes:
1. The right to use the computer program Kontur.Extern:
- Reporting to the IFTS
- Service "Requests and statements"
- Non-formalized document flow with the IFTS and PFR
- Personalized reporting to the FIU
- Pension co-financing
- Calculations on insurance premiums in the Pension Fund of the Russian Federation
- Reporting to Rosstat
- Extracts from the Unified State Register of Legal Entities / EGRIP
- Mass sending of reports, requests for statements
- PF report
- Reporting to the FSS
2. Subscriber services:
- Advisory support
- Newsletter
- Issuance of one certificate EDS keys valid for 1 year
Question: How does the Kontur.Extern system differ from other programs for submitting tax reports via the Internet?
Answer:
The main difference is that when working on other systems, the usual Email, and when working in the Kontur.Extern system, work is carried out through the SKB Kontur server.
This results in the following performance differences:
- Confirmation of the special communications operator (equivalent to a postal stamp) in the Kontur.Extern system arrives within 2-3 seconds after sending; confirmation of the special communication operator in other systems can come within a few hours (until the mail reaches their server and returns back).
- When updating reporting forms in other systems, you need to track them and download them from the Internet by installing them on your computer; when updating reporting forms in the Kontur.Extern system, the user does not take any action, the forms are updated simultaneously for all users of the system on the SKB Kontur server, i.e. by logging into the system, you always work with up-to-date forms.
- Subscribers of the Kontur.Extern system can work with the system from any computer connected to the Internet, without transferring the database, because the database is stored in encrypted form on the SKB Kontur server; subscribers of other systems need to transfer the entire database to another computer, and then back.
- Subscribers of other systems need to periodically do backup in case of a computer breakdown, and even in this case, part of the data may be lost (depending on the time of the last copy); subscribers of the Kontur.Extern system do not need backup (SKB Kontur is responsible for the safety and confidentiality of data).
Instead of regular client disks. Using the web disk, only the actual components necessary for the correct operation of the system are installed. You must install from the web disk with administrator rights.
- Transferring Kontur.Extern to another workplace
Primary installation Contour.Extern
1 To start installation, open the web disk at https://install.kontur.ru/ .
When you first log in, a message may appear asking you to install the AddToTrusted utility (or Kontur-Install-KEKEP if using a browser other than Internet Explorer). This utility will add the necessary domains to trusted sites and configure security settings for them. You must click the "Download configuration file" button and install the utility.
In the message that appears at the bottom of the window, click the "Run" button, you can also save the utility to any directory and run the AddToTrusted_User.exe file. After the installation of the utility is completed, close all browser windows and re-enter the web drive at https://install.kontur.ru
- If you are not prompted to install / update any components when you log in to the web drive, then proceed to request or install a personal certificate.
2. In the window that opens, click the "Next" button and wait for the process to complete. If necessary, change the installation type by clicking on the appropriate link at the top of the page.
3. For a complete installation of the system, click on the "Install" button.
When using a web drive, the components already installed on the workplace are automatically checked. After clicking on the "Install" button, only the components that are missing for correct operation will be installed. This installation method is recommended.
You can also use custom installation of components (not recommended). To do this, click on the "Select components to install" link, mark the required components and click the "Start installation" button.
When installing the system using a web disk, CryptoPro 4.0 is installed by default (CryptoPro 3.9 for servers).
CryptoPro versions 2.0, 3.0 and 3.6 are no longer certified by the FSB, they are also not installed from the web disk. In addition to Crypto Pro 3.6 R4 - its certification has been extended until 03/01/2018. If necessary, distributions of any versions of CryptoPro can be downloaded from the website of the developer company.
- An automatic optional upgrade to CryptoPro 3.9 will be offered if CryptoPro 3.6 R2, CryptoPro 3.6 R3 or CryptoPro 3.6 R4 is already installed on the workplace;
- A mandatory upgrade to CryptoPro 3.9 is made if CryptoPro versions 2.0, 3.0 or 3.6 below 3.6 R2 (build 3.6.6497) are already installed on the workplace.
4. Wait for the installation process to finish.
5. After - restart the browser (and, if necessary, the computer) and open the web disk https://install.kontur.ru/ again.
- To request a new certificate, click the "Get in personal account» (as a rule, this procedure is carried out at the first connection or renewal of service). Requesting and installing certificates is described in.
- To install an existing certificate, attach the key carrier to the computer and click the "Install from root token" button (as a rule, this procedure is carried out when the system is reinstalled, for example, on a new computer).
After completing all the steps, you can start working in the system. To enter, click on the "Go to Contour.Extern" button or use the shortcut that appears on the desktop.
The fundamental difference of the system from all others is that it is the only online reporting system in Russia, in which applied web technology (technology "thin client"). This implies that all modifiable forms and modules are located and updated on the secure server of the telecom operator, and a minimum of software is installed on users' working computers.
This technological feature is due to 10 competitive advantages.
- Reports are guaranteed to reach the inspection
The loss is excluded, since with the web technology Kontur.Extern it is simply impossible (reliability in sending reports is due to the presence in the receiving complex "ARM Priem", developed by SKB Kontur and installed in the Federal Tax Service, special module"Guaranteed Delivery Service").
Thick client systems have the problem of losing reports.
- Legally significant confirmation of the special operator
Allows you to verify the fact of transmission of the report, generated at the time of sending automatically (in the same second).
With "thick client" systems, it happens that it is delayed from several hours to several days. Sometimes it doesn't come at all.
- Submitted reports are stored on a secure server
If desired, they can be uploaded to the local computer at any time using the Contour.External Light module. Therefore, even if the user's computer breaks down, the report archive will be preserved. Moreover, you can access them from any computer connected to the Internet (for this, you need to have a rutoken or a floppy disk with you, where the key certificate is stored, install the CryptoPro encryption program on the computer and register the certificate - everything is done within a few minutes ).
User reports of "thick client" systems are stored only on his local computer, and he himself needs to take care of their safety.
- Forms are always up to date
The user does not need to think about updating the system. The specialists themselves make updates on the Kontur.Externa server. You don't need to download or install them. This saves the subscriber from the need to track the release of updates, as well as from possible problems associated with downloading and installing them. In addition, it saves money on internet traffic.
- Ability to work from any computer connected to the Internet
It's handy anyway. For example, if you want to work from home. But it is especially true in the event of a computer breakdown, Internet or electricity outage. This is possible due to the fact that all the necessary information is stored on a secure server Kontur.Externa. (to do this, you need to have a rutoken or a floppy disk with you, where the key certificate is stored, install the CryptoPro encryption program on your computer and register the certificate - everything is done within a few minutes).
If the user works in the system according to the “thick client” principle, then he is “attached” to his working computer, since all the software is installed on it. If the Internet, electricity or a breakdown of his computer fails, he will no longer be able to send a report. If the Internet or electricity is turned off, you will have to transfer system unit and connect where there is Internet and electricity. If the computer breaks down, you need to reinstall all the software on another computer, which is usually quite laborious and not all accountants can do it. Perhaps if not system administrator, the easiest way in this case will be to submit reports on paper.
- Free roaming throughout Russia
Coverage - all 83 regions of Russia. Relevant if the organization has branches in other cities.
Other systems do not work in all regions, and usually you need to pay extra for shipping to other regions.
- Uninterrupted operation even on peak days
There are no "freezes" and other problems. Even during peak periods, the Kontur.Externa server is only 10% loaded from its capacity. SKB Kontur is constantly working to improve the entire server infrastructure.
- The ability to generate and send information to the Pension Fund, Rosstat, FSS throughout Russia.
To generate and verify files for the PF, the Kontur.PF Report system is used, which works on the principle of a "thin client" (the user can be sure that he generates reports in current version systems). A feature of reporting in the FSS is a special service. If the FSS portal fails, it queues the report and sends it when the portal is restored.
Other systems have these services either in test mode or not in all regions.
- Possibility to order and receive extracts from the Unified State Register of Legal Entities and EGRIP.
- High-quality technical support, working around the clock and seven days a week. Federal call center.


Subscribe to news
copying Windows tools
If a floppy disk or flash drive is used for work, you can copy the container with the certificate using Windows tools (this method is suitable for versions CryptoPro CSP not lower than 3.0). Place the folder with the private key (and, if available, the certificate file - the public key) in the root of the floppy / flash drive (if it is not placed in the root, then working with the certificate will be impossible). It is recommended not to change the name of the folder when copying.
There should be 6 files with the .key extension in the folder with the private key. As a rule, the public key is present in the private key (the header.key file in this case will weigh more than 1 KB). In this case, copying the public key is optional. An example of a private key is a folder with six files and a public key is a file with the .cer extension.

private key public key
Copy on Diagnostics Profile
1. Go to the "Copy" Diagnostics profile at the link .
2. Insert the media to which you want to copy the certificate.
3. On the required certificate, click the "Copy" button.

If a password has been set for the container, the message “Enter the password for the device from which the certificate will be copied” will appear.
4. Select the media where you want to copy the certificate and click "Next".
5. Specify a name for the new container and click the "Next" button.
6. A message should appear indicating that the certificate was copied successfully.
Bulk Copy
- Download and run the utility. Wait for the entire list of containers/certificates to be downloaded and tick the ones you need.
- Select the Bulk Actions menu and click on the Copy Containers button.

3. Select the media to store the copy of the container and click OK. When copying to the registry, you can check the box "Copy to the computer's key container", then after copying the container will be available to all users of this computer.

4. After copying, click on the "Update" button at the bottom left.
If you want to work with copied containers, you need .
Copying with CryptoPro CSP
Select "Start" > "Control Panel" > "CryptoPro CSP". Go to the Tools tab and click on the Copy button.

In the Copy Private Key Container window, click on the Browse button .

Select the container you want to copy and click OK, then Next. If you are copying from a root token, an input window will appear in which you must specify a pin code. If you have not changed the pin on the media, the default pin is 12345678.

Come up with and manually specify a name for the new container. Russian layout and spaces are allowed in the container name. Then click Done.

In the Insert Blank Key Media window, select the media on which the new container will be placed.

You will be prompted to set a password for the new container. We recommend that you set a password that is easy for you to remember, but that outsiders cannot guess or guess. If you don't want to set a password, you can leave the field blank and click OK.
Do not store your password/pin code in places that are accessible to others. If the password/pin-code is lost, the use of the container will become impossible.

If you copy the container to a ruToken smart card, the message will sound different. In the input window, enter the pin code. If you have not changed the pin on the media, the default pin is 12345678.

After copying, the system will return to the Tools tab of the CryptoPro CSP. Copying completed. If you plan to use a new key container for working in Extern, .
Often people who use electronic digital signatures, you need to copy the CryptoPro certificate to a USB flash drive. In this lesson, we will look at various options for performing this procedure.
By and large, the procedure for copying a certificate to a USB drive can be organized in two groups of ways: using internal tools operating system and using the functions of the CryptoPro CSP program. Next, we will look at both options in detail.
Method 1: CryptoPro CSP
First of all, let's consider the method of copying using the CryptoPro CSP application itself. All actions will be described using the example of the Windows 7 operating system, but in general, the presented algorithm can also be used for other operating systems of the Windows family.
The main condition under which it is possible to copy a container with a key is the need for it to be marked as exportable when it is created on the CryptoPro website. Otherwise, the transfer will fail.

- Before starting manipulations, connect the USB flash drive to the computer and go to "Control Panel" systems.
- Open section "System and safety".
- In the specified directory, find the item "CryptoPro CSP" and click on it.
- A small window will open where you need to move to the section "Service".
- Next click the button "Copy...".
- A window for copying the container will be displayed, where you need to click on the button "Review…".
- The container selection window will open. Select from the list the name of the certificate from which you want to copy to a USB drive, and click OK.
- Then the authentication window will be displayed, where in the field "Enter password" it is required to enter a key expression with which the selected container is password-protected. After filling in the specified field, click OK.
- After that, you return to the main window for copying the private key container. Note that in the name field key container the expression will be automatically added to the original name "-Copy". But if you wish, you can change the name to any other, although this is not necessary. Then click on the button "Ready".
- Next, a window for selecting a new key carrier. In the presented list, select the drive with the letter that corresponds to the desired flash drive. After that press OK.
- In the authentication window that appears, you will need to enter the same arbitrary password to the container twice. It can either match the key expression of the source, or be completely new. There are no restrictions on this. After entering, press OK.
- After that, an information window will be displayed with a message that the container with the key was successfully copied to the selected media, that is, in this case, to a USB flash drive.


Method 2: Windows Tools
You can also transfer the CryptoPro certificate to a USB flash drive only using the operating system. Windows systems through simple copy through "Conductor". This method will only work when the header.key file contains a public certificate. In this case, as a rule, its weight is at least 1 Kb.

As in the previous method, descriptions will be given using the example of actions in the operating room. Windows system 7, but generally suitable for other operating systems of this line.


At first glance, transferring a CryptoPro certificate to a USB flash drive using the operating system tools is much easier and more intuitive than actions through the CryptoPro CSP. But it should be noted that this method is only suitable when copying a public certificate. Otherwise, you will have to use the program for this purpose.