MobiMover is an application for sharing files between iOS devices and a computer. MobiMover - an application for exchanging files between iOS devices and a computer Data exchange programs
Read also
Often, users working together on a local computer network are faced with the question of how to distribute files over the network? In a computer class, which is usually a single local network, you often have to exchange a variety of files. In modern operating systems, it is possible to provide access to your network resources. Typically, this role is played by a network folder on the teacher’s computer. Often, when sharing, students may accidentally or intentionally delete other people's files. How to avoid this?
You can go the other way by organizing the real thing file storage with password access not linked to accounts Windows users. To do this, you just need to create FTP access. Most likely, now you are thinking: “This is very difficult! I will not be able to set up such a serious program.” Yes, you are partly right, because not everyone FTP server can be quickly or easily installed on any computer. But that's only until you find out HFS program capabilities(HTTP File Server)! As you already understand, we will next talk about organization of file sharing in local network using the HFS program.
Description of the HFS program
In fact, data transfer in the program is organized not through FTP, but through the HTTP protocol. That is, you can work without any problems through any browser on any computer. The only thing you need is to know the IP address of the computer where this program is running. By functionality latest version The program is very rich. However, for me personally, even old version to distribute files to your students.

Main advantages of the program
- fast file sharing
- works via http protocol
- absolutely free
- open source
Additional program features
- creates a special virtual file system of folders
- works through any browser
- Possibility of channel control
- various settings
- various control modes
- logging all connections
- control of all connections
- ability to use multiple accounts
Of course, you won’t see very productive work in multi-threaded mode in this program, but it copes well with distributing files to a small group of students.
Downloading the program
It is best to download the program from the repository on a famous project or, alternatively, from the website of the program developer. At the time of writing, the version of the program available was 2.3i Build #297.
Program installation
Works this program in the operating room Windows system and under the Wine emulator on Linux.
You won't see a regular installation. Just extract the program into separate folder and run the file for execution. The program is already working! However, it will not distribute anything, since file access needs to be configured.
Self-test
An unusual, but very useful procedure that allows you to determine whether your computer will be visible on the Internet, so that you can distribute files immediately via the Internet anywhere in the world. To do this, click on the topmost item Self Test. If this test is passed successfully, then you can safely start distributing even on the Internet.
Subtleties of access settings

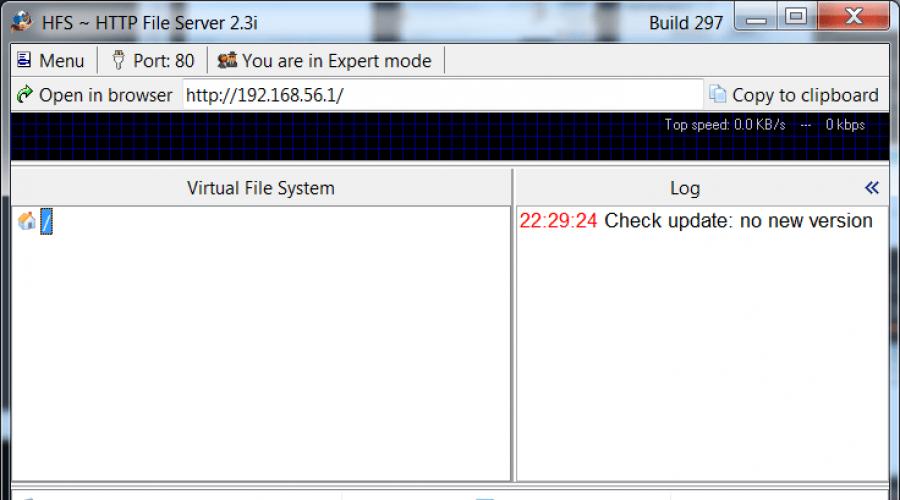
You see this program window. This displays the basic data that users will need. The address of the computer from which you are distributing can be copied from top line, using a special button.
To start distribution, you need to add a folder. It can be added as virtual or real. The real one is worth choosing if it contains many files and subfolders. The author of the program warns that for distribution you need to use folders with names that do not contain spaces.

Also, in the context menu window of a file or folder, after starting the program, the line “Add to HFS” will appear, through which you can easily add a file for distribution. This item can be added or removed after installing the program using the command Menu > Other options > Shell context menu.
Saving the structure of files for distribution is specified via the menu item > or the +[S] combination.
To save all settings, select > > and all settings will be saved in a file in the same directory as the program.
To increase or decrease the set of commands in the program menu, there is a button or command key.
To create different users with different access rights, select > > from the menu or press the command button.

To access a specific folder using a password, you must select the folder and call the "Set user/pass" context menu command. A window will appear in which you need to specify the user name and password.

Under heavy load, you can limit the access speed for individual users and computers.
To prevent the program from interfering with your work when starting, I advise you to activate a menu item such as Menu > Start/Exit > Start minimized.
How can a user connect from another computer?
To access file system ordinary users There is no need to install any programs from other computers on your network.

To do this, you just need to launch any browser and enter the address of the distributing computer via the http protocol in the address bar. Next, open the appropriate folder and download, as usual from the Internet, the file you need.
How to upload user files to an FTP server?
The HFS program allows you not only to distribute files from the teacher’s computer, but also to upload them to specified folders, add new subfolders and delete them.

To do this, you need to create a folder in the mode and select in context menu Properties item (Alt+Enter). There, go to the Upload tab and configure permissions. After all the steps done, do not forget to press the button.
After these manipulations, the user will have new buttons in the browser, including one through which you can download the file specified in the system.
In addition to uploading files, you can assign deletion rights to certain users certain files and folders.
Our company has developed new technology, which proved that files could be transferred over the Internet at amazing speeds. Our File Transfer feature is significantly faster than our competitors.
Supported file operations
The "File Transfer" function allows you to perform the following operations with files and folders in the panels of a local and remote PC:
- Copy and move files and folders:
from a local PC to a remote one (and vice versa), or on the same PC from one folder to another. - Delete files and folders.
- Rename files and folders.
- Create new folders.
- View properties of files and folders.
- Change properties of files and folders.
Opening documents and running exe files
Using the "File Transfer" function, you can open documents and run exe files on a local or remote PC. To do this, you just need to click the mouse button twice. When running the installation file, you can also set options command line(if necessary).Resuming the copying procedure in the event of a network connection failure
The "File Transfer" function resumes copying files in the event of a connection break, exactly from the point where copying was interrupted. Therefore, you don't need to start the whole process all over again. If you want to resume copying a file after the connection is restored, simply drag the file into the same folder. The program will inform you that part of the copied file already exists, and will offer you to either continue copying further or start it from the very beginning. This feature is especially useful when copying large files. If you need to leave the office, simply pause file copying, and the next day upon your return, simply resume copying from the paused location.Compress files to improve transfer speeds
Our program compresses files before transferring them between computers. This is done using a fast compression algorithm, which does not reduce the performance of the program at all, and at the same time provides a good compression ratio. Moreover, it significantly reduces network load, traffic volume and significantly increases transmission speeds in low-speed networks. throughput(for example, with a dial-up connection.) Data is transferred between computers in compressed form and thus has a smaller volume.Our File Exchange function is intelligently designed: it understands most common extensions (for example, zip, jpg, gif, avi, etc.) and does not compress them again, which in turn helps to avoid wasting time for useless re-compression.
The compression function of our program compares favorably with the solutions of our competitors. Typically, competitive file compression algorithms do not compress files before sending them over the network.
Therefore, file transfer can be a lengthy process on low-bandwidth networks.
Dynamically adjust data buffer size to increase transfer speedOur File Sharing feature continually evaluates your connection speed. According to the results obtained, it dynamically changes the size of its data buffer, as a result of which the maximum data transfer rate is achieved.
Typically, our competitors' programs use a fixed data buffer size. This is ineffective because If your connection speed is high and the data buffer size is small, then the file transfer speed will not reach its maximum possible value. However, our program dynamically determines the volume for its clipboard, depending on the connection speed and other parameters. Thus, Anyplace-Control provides the highest possible speed for file transfer.
Our competitors' file transfer function transmits each file as a separate network message and waits for a report of its delivery. And if you need to send a large number of files whose size is small - this will significantly reduce performance, because the program, as mentioned above, requests a report after each file is delivered to remote computer
. Our program works on a different principle. It can send several files simultaneously in one network message and waits for a report from the entire group of files. The program can place as many small files in one network message as the data buffer capacity allows. This significantly improves program performance by reducing the number of network messages (and delivery reports) across the network.
An alternative to Microsoft's Network Neighborhood If you use Microsoft Network Neighborhood to access files over the network, you need to open for folders general access
so that they are visible to all network users. However, making folders public is not at all safe. Using the Anyplace Control program, you do not have to make your folders publicly available. You have full access to files on a remote PC, but in Network Neighborhood these folders will remain unavailable for public use. Unfortunately, on most networks, Network Neighborhood works very slowly. Sometimes you need to quickly find some deleted file, but Network Neighborhood simply does not allow you to do this, forcing you to wait for a long time. Anyplace Control offers you instant access to deleted files and high speed
file transfer , which is definitely an advantage for you. As already noted, DC++ is free. Her
- installation file
- On the page of the downloaded site, go to the Download section.
In the Download section there are links to download the DC++ installation file. Sometimes you may see multiple download links different versions programs. In our example, the stable version 0.830 is offered, and an experimental version is also sometimes offered. An experimental version is a version that is in the process of being finalized. It is functional, but may contain errors as it is a work in progress. You can use this version at your own risk. But it is better to install the stable version.
- Click the link corresponding to the version of DC++ you want to install. The process of downloading the installation file will begin.
The DC++ installation file is several tens of MB in size, so depending on the speed of your Internet connection, the download may take from several seconds to several minutes.
After the installation file has been downloaded, you can begin installing and configuring the DC++ program.
Installing DC++
The DC++ program can be installed on any computer running Windows control. For computers running other operating systems (Linux or MacOS), there are alternative clients.
- Run the DC++ installation file (the file is called something like DCPlusPlus-0.830.exe, where 0.830 is the version number). If a security warning window appears, click the Run button. The program installation wizard will launch.
- In the first window of the installation wizard, select the program language. We will choose Russian.
- Click OK. The following installation wizard window will appear.

The DC++ program has been translated into many languages, including Russian. All these languages are installed with the program, and you can select a different language at any time. Selecting the Russian language at the installation stage saves the user from further changing the program interface language in the settings dialog box.
The second window of the installation wizard prompts you to select components to install the program. The DC++ component is required for installation (in fact, this is the program we are installing), the Shortcuts component in the main menu adds a shortcut to launching the program in the main menu Windows menu, and the Save settings in user profile directory option ensures that settings are stored in your profile's user folder. Thus, if your computer is used by several people logging into the system under their own accounts, they will be able to customize the program for themselves.
- In the installation wizard, select the check boxes for the components and options that you want to install.
- Click the Next button. The following wizard window will appear, prompting you to select the program installation folder.

By default, the program is installed in the Program Files folder (or in Program Files (x86) for 64-bit systems). Unless absolutely necessary, it is better to leave the default path unchanged.
- Leave the suggested path unchanged (or, if necessary, specify a different folder), and then click the Install button. The installation process of the DC++ program will begin on HDD. This process may take up to several minutes.
- When the installation is complete (a Done message should appear above the progress bar), click Close to close the installation wizard. The DC++ program is installed on your computer.
Adding the DC++ program to the Windows Firewall exceptions list
DC++ and similar applications manage the ports through which other users can connect to your computer. The Windows Firewall is used to protect your computer from unauthorized connections, so it can block ports for the DC++ program, as it considers external connections hacker attacks. In this case, the program will run, but it will not be able to connect to hubs, not to mention the computers of specific network participants.
- There are two ways to go here:
- Turn off Windows Firewall. But in this case, the computer will become vulnerable to unauthorized connections and hacker attacks.
- Add the DC++ program to the Firewall exceptions list. This list contains programs that the Firewall allows to open certain ports.
When you launch the DC++ program for the first time, a window appears prompting you to add the DC++ program to the exclusion list.

- In the System Alert window Windows security(Windows Security Alert) select the Private networks checkbox.
The Public networks checkbox is cleared by default because these networks are not secure. You may check this box at your own risk.
- Click the Allow access button. The DC++ program will be added to the Firewall exceptions list and will no longer be blocked.
You can also add the program to the Firewall exceptions list manually. We will describe this procedure in case the security alert window does not appear when you first launch the program.
- Open the Windows Control Panel.
- In the Control Panel window, click the Windows Firewall link.
- Click the Allow interaction with an application or component link in Windows Firewall(Allow an app through Windows Firewall). The Allowed Apps window opens.
This window contains a list of programs and services that use various network connections. The DC++ program should also be added to this list.

- Carefully review the list of programs in the Allowed Apps window and make sure that the DC++ program is not in the list.
- Click the Allow another app button. The Allow an app dialog box will appear on the screen.
- Find the DC++ application icon in the Allow an app window, highlight it, and then click the Add button. The Allow an app dialog box will close and the program you selected will appear in the exceptions list.
- Make sure the checkbox located to the left of the DC++ program name in the list is checked.
- Select the checkbox located in the Home or Work (Private) column for the DC++ program. If you plan to use DC++ on public networks, also check the box in the Public column.
- Click OK to apply the changes.


The DC++ program has now been added to the exclusion list and the Firewall will not block it. Take this experience into account when installing other programs that use network connections, for example, when installing torrent clients.
Basic settings of the DC++ program
Before you start using the DC++ program, you need to make some settings. The settings are made once, later you can launch the program and immediately start using it. Settings can be changed at any time if required. But some initial setup necessary.
Please note that when you launch the DC++ program for the first time, the program settings dialog box automatically opens.

Personal settings
The DC++ program has a large number of settings, so they are organized into categories. The settings category is selected from the list located on the left side of the Settings dialog box. The contents of the main part of the dialog box change depending on which category of settings is selected. Now we need to make the necessary settings.
- Make sure that the category is selected in the program settings dialog box Personal information(Personal information).
- In the Nick field, enter some alias under which you will connect to DC networks.
An alias (nickname) can be anything and contain letters, numbers and symbols. However, it should be taken into account that each hub has certain rules, including those related to the pseudonym used. For example, some hub may have a restriction on the minimum length of a nickname, for example, a nickname must contain at least five characters. Another hub may prohibit the use of any characters in a pseudonym other than letters and numbers. Of course, it is impossible to predict what rules exist at a particular hub. But the hub rules will be displayed in the program window as soon as you connect to the hub. The connection will happen in any case, but if your nickname does not comply with the established rules, you will be disconnected from the hub. The text of the rules installed on the hub will remain in the program window, and you can study it carefully and, if necessary, make changes to the program settings.
You can change your nickname periodically, but it’s better to immediately create one that will be accepted on any hubs (that is, make it not too short, not too long, without punctuation, best using letters of the Latin alphabet). The fact is that network users who often download files from your computer can add your nickname to their favorites list in order to quickly connect to your computer in the future. And if you change your nickname, these users will simply lose you. What if they didn’t have time to download the latest episode of their favorite series, which is only available on your computer? Their problems? Maybe. But any computer network based on mutual respect. Are you connecting to download something? Then give something in return.
So, we sorted out the nickname (pseudonym). It must be specified. The remaining fields in the Personal information category can be filled in as desired. In the Email field Mail (E-mail), if you want, you can enter your address Email. In the Description field - any information that you want to convey to network users. For example, here you can write Complete collection classical music, if you want to tell other network members that you have a huge library of classics on your computer.
In the Line speed drop-down list, you can specify the speed of your outgoing Internet connection. Please note that it is outgoing, since the network user will download files from your computer using your outgoing connection. It is not necessary to indicate the actual speed of the outgoing connection, but it is desirable that other network users can estimate the time it takes to download files from your computer. If you don't know the speed of your outgoing connection, you can test your speed on one of the dedicated sites, such as Speedtest.net.

MoneyWiz 3 – Fiat and Crypto - an application for iOS that will greatly facilitate financial management, thanks to the support of the function automatic application data and categorization of transactions.
A few words about MoneyVis:
The program will become your reliable assistant in financial management. With it, you don't have to do much of anything yourself: just connect to one of thousands of supported banks from around the world, and the application will download transaction information and categorize them. At the same time, the latest version of the program supports operations with Forex and cryptocurrency. And thanks to the use of proprietary artificial intelligence algorithms, the results of automatic distribution become more accurate as the application is used.
Additionally, MoneyWiz 3 - Personal Finance uses the SYNCbits synchronization service to keep your data up to date across all your devices. An interesting feature is the function of transferring data between applications, or manually synchronizing data. It allows you to import transactions into CSV format, QIF, OFX, QFX and files in MT940 format. The same files can be transferred to mobile phone or computer, including for transferring data to other applications.
Key features of the program:
- Support for Internet banking system from anywhere in the world.
- Access to more than 16,000 banks in 50+ countries.
- Automatic categorization of transactions.
- Cross-platform data synchronization.
- Highly efficient budget allocation, transaction planning, financial forecasting and reporting.
- Ability to manually enter transactions and import bank statements.
- Reliable data encryption.
- Ability to set a PIN code for entry.
- FaceID and TouchID support.
- Availability of the program in Russian.
Screenshots
