Where is brightness located on a computer? Adjusting the brightness of your computer or laptop screen automatically and manually

When developing Windows 10, Microsoft specialists changed the familiar screen settings interface. It has become simpler, allowing users to produce various settings on an intuitive level. Determination of optimal screen parameters occurs already during installation of the system in automatic mode. All that remains is to configure them for a specific user, if the need arises. The set parameters must correspond to the maximum capabilities of the display screen and video adapter. This achieves the clearest graphics and color gamut.
Setting the screen resolution
Customizing the screen on a personal computer, tablet or laptop with Windows 10 is not very difficult for any user. Its interface is simple and intuitive, which allows you to modify the screen at your discretion in a few clicks. To configure:
- Click on the “Options” icon. In the Start menu, click on the Settings icon
- Click the System icon in the Settings window.
 In the "Options" window, click on the "System" icon
 - Open the "Screen" tab.
 Review your screen settings
 - Check your screen resolution. It must match the recommended resolution of the device.
- If the resolution is set correctly, click on the “Graphics Adapter Properties” button.
 Click on the "Graphics Adapter Properties" button
 - Make sure that your adapter is selected in the “Adapter Type” tab.
 Check that the video adapter is installed correctly
 - Close Graphics Adapter Properties by clicking OK.
- Change the screen resolution if necessary.
- Close the System Settings window.
- Screen setup is complete.
Other screen parameters can be adjusted as needed.
At Windows installations 10 all screen parameters are usually adjusted automatically. The exception is rare or outdated types of video adapters, the drivers of which are not in the database on Microsoft servers. In this case, the driver is downloaded from the manufacturer’s website or installed from an optical disc that is included with the computer or laptop upon sale. It contains distribution kits of all drivers for installed devices.
Video: how to change screen resolution on a computer, monitor or tablet with Windows 10
Increase or decrease screen brightness and contrast
Brightness and contrast are some of the main screen settings. Each user adjusts them individually to their own requirements.
Contrast on laptops and tablets is adjusted automatically. On monitors and displays personal computers There is a Menu button with which you can adjust the contrast using the device menu.
There are several options you can apply to change the screen brightness settings.
Changing screen brightness in system settings
There are two ways to access screen options:

Video: How to change screen brightness through Windows 10 settings
Changing screen brightness using the keyboard
Almost all modern types keyboards, it is possible to change the brightness of the screen without resorting to system settings. Previously, only laptops had this feature, but now this function is also inherent in many types of personal computer keyboards. As a rule, you can change the brightness using two keys, which have a sun icon and an arrow indicating an increase or decrease in brightness. They are most often located in the upper or lowercase keyboards.
 Use the keys to adjust the brightness level of your screen
 In some cases, you may need to press the Fn key along with these keys to change the screen brightness.
If the keys do not respond to commands to change brightness, download and install the keyboard driver from the manufacturer's website.
Changing screen brightness through Notification Center
In the Notification Center, you can set the screen brightness level only in fixed positions. To change the brightness level, follow these steps:

Change screen brightness using the battery indicator on the "Taskbar"
On laptops and tablets, there is a battery charge indicator on the “Taskbar”, which can also be used to change the screen brightness:
- Left-click on the battery charge indicator.
 Click on the battery indicator
 - Click on the screen brightness change tile.
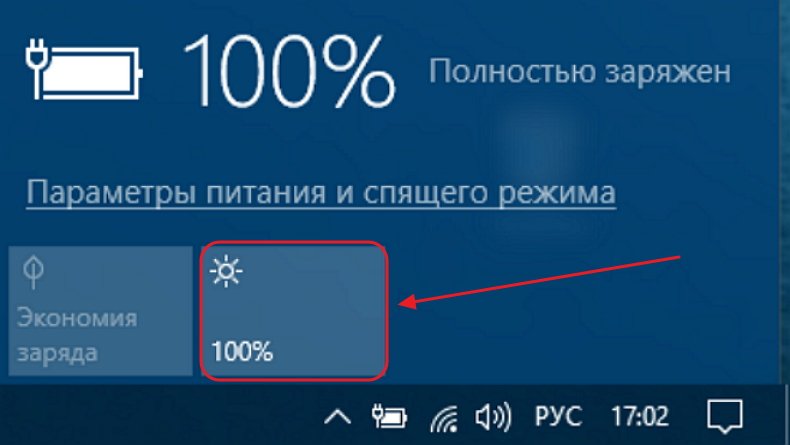 Adjust the screen brightness level
 - You can change the brightness level using fixed values from 0 to 100% in 25% increments.
- Click on the "Power and Sleep Options" tab.
 Click on the "Power and Sleep Options" tab
 - Click on the line “Advanced power settings” in right side the "Settings" window opens.
 Click on the "Advanced Power Options" tab
 - In the “Power Options” window, set the required brightness using the “Screen Brightness” slider.
 Adjust the screen brightness level using the slider
 - Click on the “Power Plan Settings” tab.
 Click on the “Power Plan Settings” tab
 - In the “Change circuit parameters” panel that opens, use the “Adjust brightness” slider to achieve its optimal level when powered from the mains and from the battery.
 Adjust brightness on mains and battery power
Changing screen brightness through the Start menu
You can also use the Start key to access the screen brightness settings panel. To do this you need to do the following:

What to do if the screen is flickering
Frequent screen flickering in Windows 10 can be caused by two problems:
- usage outdated drivers video adapter;
- incompatibility of what is installed on the computer software application and system requirements.
The problem does not occur as often as it did when Windows 10 first began to spread.
This is due to the fact that the main companies that produce components for computers have brought their software applications to the required parameters. On those computers with video adapters manufactured 6–7 years ago, incompatibility may occur, since their drivers were not developed taking into account modern requirements.
To resolve the error, you need to find out whether the driver or software application is the source that creates the screen flickering.
- To solve the problem and restore normal operation of the screen and video adapter, you must use the following method:
- Right-click on the “Taskbar”.
 Click on the “Task Manager” line.
 - In the menu, click on the line “Task Manager” Check for blinking in the Task Manager panel. If the panel blinks along with the screen, then the reason is the old video adapter driver.
 Check for blinking Task Manager panel
 - Double-click the “Control Panel” icon on the “Desktop”.
 On the “Desktop”, double-click on the “Control Panel” icon
 - Click on the “Administrative Tools” icon in the “All Control Panel Items” window.
 Click on the “Administration” icon
 - Double-click Computer Management in the Administrative Tools window.
 Double-click on “Computer Management”
 - Expand the Event Viewer tab in the Computer Management window.
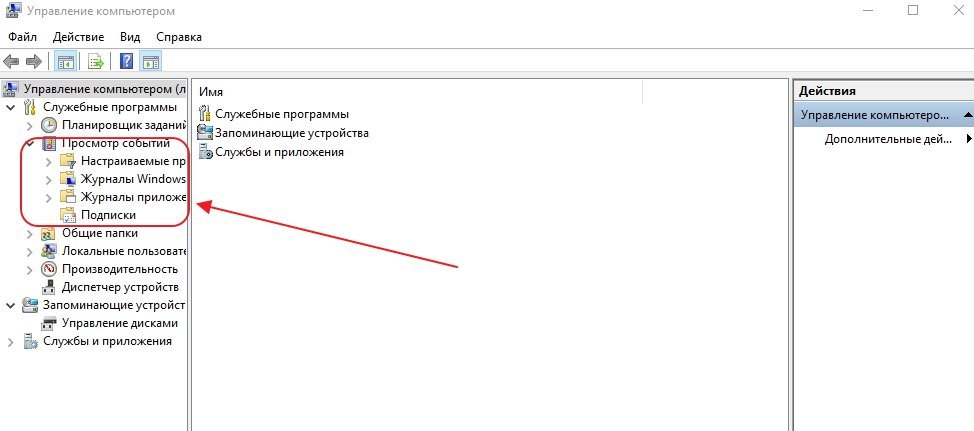 Expand the Event Viewer tab
 - Expand the Windows Logs tab.
 Expand the Windows Logs directory
 - Check the Application and System tabs for errors.
- If a software application compatibility error is detected in the “Application” tab, then remove it. Then download the latest version of the application from the developer’s website and install it on hard drive.
 Click on the Application tab and check for errors
 - If an error in the “System” tab indicates that an updated video adapter driver is needed, then perform the same operations as for the software application to replace it.
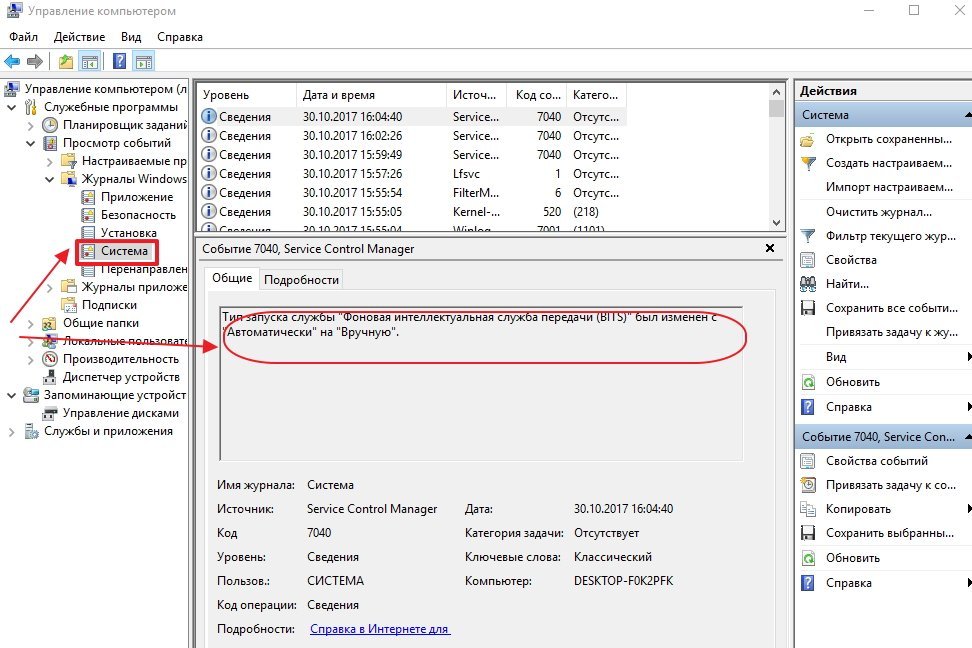 Click on the "System" tab and check for errors
Video: how to update video adapter drivers in Windows 10
What to do if applications or games do not open in full screen
All modern programs automatically adjust to the screen size. If you install an application or game that was developed many years ago for older editions of Windows, then it can be deployed in a reduced size. In this case, it becomes necessary to expand them to full screen. There are several ways to solve this problem:
- Using hot keys:
- press on the keyboard at the same time Alt keys and Enter;
- the application will expand to full screen;
- When you press the keys again, the application will return to its previous state.
- Changing launch options:
- right-click on the game or application icon on the “Desktop”;
- Select “Properties” from the drop-down menu;
 Select “Properties” from the drop-down menu
 - in the panel that opens, click on the “Compatibility” tab;
 Click on the Compatibility tab
 - press the “Run Compatibility Troubleshooter” button;
 Click on the "Run Compatibility Troubleshooter" button
 - If the application is not maximized to full screen, then check the “Compatibility Mode” box and select the required edition of Windows from the drop-down list. Please note that the Windows 10 edition is not listed. Last on the list will be Windows 8.
 Select the required edition of Windows
 - Click the "OK" button.
- Update video adapter drivers:
- determine the video adapter model in “Device Manager”;
- go to the manufacturer’s website;
- download and install the new driver.
- Changing game graphic settings:
- launch the game;
- go to settings;
- find the item for changing screen settings;
- set full screen mode;
- restart your computer.
- Changing screen resolution:

If a game or application requires a screen resolution of 640X480, then you can set it in the “Options” block on the “Compatibility” tab. But it must be very old game or application that was created during emergence of Windows in the software market.
Video: How to run an application in compatibility mode in Windows 10
Calibrate the touch screen on Windows 10 tablets
Calibration touch screen must be performed for the tablet to respond adequately to finger touch. If the device is not calibrated, then instead of the letters you press, others will appear on the screen or the image will rotate one hundred and eighty degrees.
To calibrate the touch screen, you need to do the following:

Disable turning off or dimming the screen
With prolonged inactivity, the display screen goes dark after a certain period, and after a few minutes the computer goes into sleep mode, turning off completely. In the system parameters, you can set the option to turn off sleep mode and screen dimming. To disable the energy saving mode, you need to perform a number of operations:
- Left-click on the “Start” button.
- Open Settings.
- Select the "System" section.
- Click on the “Power and Sleep” icon.
- Click the "Advanced power options" button.
- In the “Power Options” window, click on the “Configure power plan” button.
 Select "Power Plan Settings"
 - In the “Turn off display” line, disable screen dimming when running on AC power or battery power. To do this, select “Never” from the drop-down lists.
 Select "Never" from the drop-down list
 - Similarly, in the fields next to the “Put the computer into sleep mode” icon, disable putting the computer in the off state.
 In the drop-down list, click on “Never”
 - Click "Save Changes".
Video: a non-standard way to disable screen dimming
One of the main criteria for a graphical interface is brightness, contrast and color gamut. The clearer the display of graphic objects looks, the more comfortable the work will be for the user. Therefore, do not neglect spending a few minutes in order to achieve maximum effect when displaying graphics and text documents. It should be remembered that incorrectly setting the screen parameters also affects the user’s visual system and can lead to a gradual deterioration of vision. To adjust the screen and fix minor problems with the image, you can use the methods given in this article. If they do not lead to the desired result, then you should contact the service center specialists.
Related posts:
No similar entries found.

 How to adjust the contrast/brightness of the monitor (screen) image on a laptop?
Contrast comes from the English word “contrast”. Any monitor has it, be it a TV, computer, laptop or even mobile phone. But, most often it is necessary to adjust the screen contrast specifically for the computer. If you know the algorithm of action, then this will not be difficult. Contrast is the ratio of the brightness of the lightest part of the screen to the darkest part of the screen. Settings can be made using the buttons on the monitor. Correctly adjusted contrast will improve the perception of text and images. It will also provide realistic color reproduction if we're talking about about digital images.
How to Adjust Contrast on Windows
So, your equipment can be of any brand (trade manufacturer), but the Windows operating system must be installed. When the computer boots, the logo of this system appears on the screen. Also, already when the computer is turned on, it is displayed on the “Start” button. Most residents of our country have just such an operating system installed.
So, you need to use monitor color calibration. Calibration will help you adjust not only contrast, but also other color parameters as needed. Everything must be selected exclusively for yourself, but focus on average indicators.
The setting method will depend on the monitor:
Some monitors have a brightness and contrast button on the front panel. Some monitors may have these controls on the back panel. Standard symbols for each characteristic will be used.
On-screen menu. For some types of monitors, as well as for laptops, configuration occurs using the on-screen menu. You can find it in the “Menu”, which will open when you click on the “Start” button. You can view the original values and set your own.
Laptop screen. It will be possible to use the brightness button on the front panel, but in older models. Modern models do not have a contrast control. Therefore, you will need to use the Fn key and click on the and icons to decrease or increase the contrast, respectively.
What are the optimal settings?
There are some for the computer screen standard settings contrasts that must be adhered to for comfortable work. Despite the fact that all people are different and the requirements for images may be different.
The image frequency on modern monitors is recommended in the range from 60 to 85 Hz. As for brightness, it should not be higher than 80 candelas per square meter. High contrast (this, as we have already found out, is the ratio of brightness of black and white) can make the image as clear as possible. The higher the contrast ratio, the faster your eyes will get tired. Optimal setting it must be produced taking into account the middle on the scale offered by the manufacturer.
Interesting! Using the NTest program you can select the most precise settings screen for yourself, and then set them on your computer.
These are the main points on how to configure the image on your computer. Most often, when installing an operating system, average indicators are used. But, for more comfortable work, you need to twist them in one direction or another. By the way, the perception of the image can also depend on the time of day and on how the lighting falls on the screen. All this must be taken into account when selecting characteristics for yourself. Dealing with contrast is not difficult, although you will have to spend a little personal time.
And further useful articles about contrast:
-

How to choose a voltage stabilizer for a refrigerator?
-

Will the refrigerator's operating instructions help troubleshoot problems?
-

Conversion (conversion) of 2d to 3d images on TV.
-

What is an air ionizer-purifier?
-

Ceramic multicooker - which is better, ceramics or Teflon, reviews.
Everyone knows that spending a long time at the computer is bad for your health. This especially affects human vision. The fact is that a person is not able to see the frequency, but the eye picks up this frequency, and over time, weakening of vision may occur. When using a computer, your eyes gradually get tired and stop focusing clearly on the image. But for many, a computer is a job, which means it’s impossible to avoid this harm. In order to reduce it as much as possible, proper adjustment of the monitor color, as well as its resolution, is required.
Configuration using AdobeGamma program
For optimal color display, adjustments must be made using special program, which is called AdobeGamma. The first step is to install it on your computer. After installing the program, you should set the screensaver on your desktop in a solid gray color. Setting monitor colors in Windows 7 for the desktop is in the “Personalization” section, which appears in a pop-up window when you right-click on its splash screen (background). There you need to select the “Desktop Background” item and in it the “Image Location” drop-down menu, in which there is a “Solid Colors” menu item. Grey colour can be seen immediately.
Now it's time to proceed directly to the procedure itself. After launching the AdobeGamma application, setup is carried out using the setup wizard (you need to select this option) - a special program that allows you to go through the entire process step by step. The next step is to select a “color profile”. It is generally recommended to leave the default profile (for inexperienced users). Now you need to click on the “Next” button to continue and set the contrast to the maximum value. The brightness should be adjusted so that the square, which is located inside another square, is as close to black as possible, but still stands out a little from its background. You can simply skip the next step.
Next, you need to configure the gamma correction using the bottom tab of the general settings window. If the program for adjusting monitor colors is not localized, it will be called WindowsDefault. To the right of it there is a small field where you are prompted to enter the value of the Gamma parameter. The most commonly used is 2.2. In the same window, you need to uncheck the ViewSingleGammaOnly parameter to display gamma values by color. Now, using the mouse, you need to bring the result to such a state that all three squares become absolutely indistinguishable from their background. At the next stage, the color temperature is set, which should be 6500K. The setup is now complete. After completion, it is possible to compare the obtained result with the original value. To do this, use the Before and After buttons. Customizing colors Windows monitor 10 is carried out in a similar way with the only difference being that the versions of the AdobeGamma program may differ.
Adjusting the Image Using Monitor Functions
Almost all monitors have special functionality (menu) with which you can quickly make color adjustments. The interface of such a menu is as clear as possible and is translated into Russian for most devices, so to change the contrast, color or brightness of the screen, you just need to select the appropriate item using the buttons located below. For more detailed information, you can refer to the manufacturer's instructions, which usually come with the device. For example, setting the color of a Samsung monitor is done using a special Menu button located under the screen, when pressed the monitor menu drops down. It has two main sections responsible for color rendering - Picture and Color, which will help you make all the necessary settings. U different manufacturers And different models these sections may have different names, but ultimately the meaning is still the same.

Image adjustment via the system
Windows itself also provides functions that allow you to adjust the color of your monitor. There is a program for this called “Calibration”, which can be found by searching in the “Start” menu. The application itself will tell you what to do next after launching it. An important parameter is the correctly selected screen resolution, which is optimal for the monitor being customized. Typically, in the drop-down menu listing acceptable screen resolution values, it is marked as “Recommended”. This is the one you should choose. This parameter is located in the video card settings. To get there, you need to click on the desktop right click mouse and select the appropriate item in the menu that appears. Different video card manufacturers call it differently, for example, for NVIDIA you need to look for a line called “NVIDIA Control Panel”, and for Radeon - “Radeon Graphics Specifications”. All other color settings are also located there. To achieve best result In addition to the correctly selected screen resolution, you must select the highest color depth value of 32 bits. As a rule, this setting is always located in the same place as the screen resolution setting, so it won’t be difficult to find it.

Adjusting screen brightness
Surely many have noticed that the monitors standing on the stand in the store have visually different images. On one it is dimmer, and on the other, on the contrary, it is too bright. This is due to different settings colors for each individual device. If the buyer is not satisfied with the default color settings of the monitor, he can change them. To do this, you need to click the button called Menu and in the panel that appears, select the Picture value, where the brightness and contrast settings are located with the adjustment sliders located to the right of them. It is worth noting that for different models and manufacturers the names of these parameters may vary or even be marked with schematic figures, but the general meaning is always clear to the end user.
After finding the desired settings, you need to take a blank white sheet of paper, place it in front of the monitor, and create a regular one using the Notepad program. blank document and compare the color of a sheet of paper with the white background of the document in the program. This procedure is carried out to evaluate and subsequently adjust the white color of the monitor. Next, for the slider responsible for the brightness of the picture, you need to find a position so that White color on the monitor matched the white color of the sheet of paper on the table.
Adjusting the screen contrast
To adjust the contrast, 2 images of identical shirts of different colors can help: one shirt is black and the other is white. The main thing is that the colors are monochromatic. Both images need to be opened and placed next to each other. Now you should move the contrast slider until the folds on both shirts become clearly visible. Once this effect is achieved, you can adjust the brightness a little more. At this point, the process of completing the brightness and contrast adjustments can be considered complete. The white color obtained as a result of these manipulations may differ from the monitor settings that were set by default at the time of purchase. However, experts say that this is just an optical illusion caused by the eye getting used to the original values.

Setting the color of a laptop using Windows
Laptops have long become an integral part of our lives. It is enough to configure the laptop correctly once so that later problems do not arise. unnecessary problems and didn't have to spend extra time. Setting the colors of a laptop monitor is not much different from the settings regular monitor. They are located in the “Color Management” section of the Windows Control Panel. Having entered the section, you need to select the “Details” tab and then click on the “Calibrate screen” button. Then simply follow the instructions provided by the setup wizard.
Customize Laptop Color Using the intelHDgraphics App
But it is not the only way, applicable for solving this problem. For example, there is software that solves this problem better. If the laptop is running on Intel processor, then you should adjust the color through the “Graphic characteristics” section. You can get there using the same pop-up menu, called by right-clicking the mouse. When you open a section, a window will appear with several categories responsible for the video card parameters. To adjust the color, select the “Display” category. There, in the “Color” tab, you can find the “Advanced” tab, in which the necessary color adjustment controls are located. The only parameters are hue and saturation, with which the adjustment is made. The level of increase or decrease in values is determined by the user himself based on his needs.

Features of adjusting brightness on a laptop
It is known that if you need to quickly adjust the monitor screen, you can use the interface of the buttons located on its body. But on a laptop, things are a little different, and to be honest, this becomes a real problem for many uninformed users. The fact is that there are simply no such buttons on the laptop body. This is not due to the lack of space for this functionality, but to the fact that the optimal image is selected by the equipment developer.
But sometimes the need for quick color adjustments arises. To solve this problem, the laptop has special key Fn, responsible for additional functionality. Holding this key will activate additional functions keys that have icons in a different color. To adjust the brightness of the monitor, you need to use the keys with the image of a sun (standard brightness icon).

Testing Color Rendering Using Real Color
There is another remedy that is considered a reference in certain circles. These are special Real Color wallpapers that bear some resemblance to the tuning grids once used on televisions. When using this method, special wallpapers with the optimal resolution for a computer or laptop are installed on the desktop. By looking at the screen from a normal distance, you can determine whether the color rendition is calibrated correctly. If the settings are correct, a smooth gray gradient should be visible, but if stripes appear and shades mix, it means the color is set incorrectly.

To summarize, we can say that adjusting the monitor color is a rather painstaking task and depends on many factors. Therefore, for each individual case, its own parameters must be applied to meet specific needs. But in order not to be scattered among many different methods, you need to do this: for quick setup use the built-in system parameters, and for more complex tasks you can resort to third-party applications.
image source http://4k-monitor.ru
good and correct setting The display is not the last task in order to work comfortably and efficiently not only with images, but also simply at the computer. The factory settings of monitors are always too high for brightness and contrast; manufacturers do not make adjustments at all, and users themselves often simply do not know about it.
I note that we will talk about the simplest screen settings; professional calibration is much more complicated.
You can configure it either programmatically (if your display is connected to a PC with operating system, which has tools for such settings), and in hardware. Adjusting using the menu buttons is not much different from adjusting the picture on a modern TV.
Hardware setup
Start by learning the buttons on your monitor. If nothing is clear, then you will have to read the instructions, or use the “unscientific poking method” (not recommended). After you have figured out the control buttons of the device, you can go directly to the settings.
Important note: ensure proper lighting! If the sun or a 200 W light bulb hits the monitor directly, no adjustments will help. In a good way, this is a separate big topic, but now a few basic recommendations:
- The bright light source should not directly illuminate the monitor;
- The light should not hit the eyes;
- It is better to use uniform diffused lighting, for example, in the form of an LED strip.
Setting and assessing image quality
When working with a matrix monitor Low quality, mistakes often occur when choosing colors when processing images, photographs and print layouts, when creating websites and resources.
The picture below will allow you to evaluate how well the monitor is configured. On each half of the picture there are numbers 1 2 3 4 5
If you see all the numbers on both bars, then the monitor is set up well. The average level will show you the numbers 3. With a very bad setting, only 1 and 2 are visible.

Remember how many numbers you can see. With this, after configuration, you can evaluate the quality of the improvements made.
But, first, a small off-topic “with a beard”:
“...I downloaded the program “Cleaning the monitor from dust”, laughed, installed it, launched it. The monitor was filled with an even dirty gray color, the keyboard turned off, clicking the mouse did not help.
I took a napkin, wiped the dust off the monitor, and saw a barely visible “Thank you, you can exit the program” button. I went out and thought, looking at the blank monitor...”
Therefore, first we put the surface itself in order, after which we move directly to the settings.
Brightness
The brightness should be adjusted so that in the picture the black colors of the suit and shirt do not merge into a single whole and the cross in the background becomes visible. The brightness parameter is responsible for the difference between details and dark colors.

Contrast
Responsible for light colors and their details.
In the image, to adjust the contrast, you should select a quality such that the folds and buttons on a white shirt are clearly visible. Set the contrast to zero and gradually increase it. As soon as these details begin to disappear, it is worth going back a little.

Gamma
The next important parameter is gamma. The exact ideal setting cannot be performed on all monitors, but it is still worth getting closer to the ideal. A good gamma setting will be indicated by missing spots of light and dark shades in the center of the test image.

Gray setting
Eliminates unnecessary shades that distort the colors on the display. This is done either software or hardware by adjusting the 3 primary colors (red, green, blue). Ideally, a picture with gray stripes should not be interrupted by extraneous shades. Only shades of gray.

Ideal gray setting.
Software setup
We launch the calibration tools programmatically (described for Windows).
In Windows 7, click the “Start” button and write the word “calibration” in the search bar. Launch. You will be given a series of image adjustment tests. There are very few of them. Go through them.
In Windows 10, enter the command cttune in the search bar, ClearType will launch, turn it on and select the display that is most convenient for your eyes. Then enter the dccw command. The calibration of screen colors, gamma, brightness and contrast will begin. Everything is described in the tests, read and follow the advice.
Checking the result
Now go back to the beginning of the article and look at the first image with numbers. At the very beginning, I asked them to remember. If you have improved the settings, you will see at least one more number.
Set it up correctly and in the end you will be pleasantly surprised at what your monitor can do!
Have you set up your monitor? Get to work: profession "".
To work comfortably at the computer, so that your eyes don’t get tired, sometimes you need to change some screen parameters. One of these is brightness. Let's look at several techniques to help you understand how to adjust the brightness on your computer (we'll take Windows 7 solely as an example of the operating system's working environment).
Standard screen brightness setting regardless of system
To set the necessary parameters, you must distinguish computer systems in terms of their structure.
In desktop PCs, the monitor is a separate component, so adjusting the screen brightness in Windows 7 or any other system is done either using special buttons placed on the front or from its own menu, called up on the monitor itself.

In laptops, the screen is an integral part of the entire design and does not have buttons for setting the necessary options. Configuration is carried out using keyboard shortcuts. In most cases, the main one is used. In addition to it, function buttons (F1-12), up/down arrows, right/left and other combinations can be used.
How do I adjust brightness on my computer (Windows 7) using personalization?
As for the settings using your own Windows tools 7, there are several basic options here. And it starts with personalization.
How to adjust brightness on a computer? For this purpose, Windows 7 offers quick access to the main parameters, which is done by right-clicking on an empty area of the “Desktop”. In the new window you will be able to see quite a lot of customizable characteristics, where you can select the desired parameter.
How to adjust computer brightness (Windows 7) using power plans?
No less in a simple way settings is to change the desired parameter in the choice of power supply scheme. This section can be accessed on desktop computers from the “Control Panel”, and on laptops it is enough to right-click on the battery icon in the system tray. In Windows 7, the transition will occur exactly in the section we are interested in (in the tenth version, the brightness can be adjusted directly from the menu that is called up).

How to adjust brightness on a computer (Windows 7) using this method? Very simple. You need to select the scheme you are interested in and call Extra options. Several basic options will be presented here. Just below the main settings there is a special slider, which allows you to change the display.
Adjustment can also be made from the “Screen” section, which provides options for turning off the display, most often used in case of prolonged inactivity of the system or when sleep mode (hibernation) is activated.
Using graphics utilities
An equally interesting way to understand how to adjust screen brightness on a computer (Windows 7) is to use specialized utilities and video card management programs, which are usually installed initially for graphics adapters. In most cases this applies NVIDIA cards and ATI Radeon.

Such applications and panels quick access to the settings are in some way alternative tools to the tools of Windows systems and often allow for more fine-tuning using an expanded functional set, which in standard systems is simply missing.
What to use?
Of course, if we are not talking about advanced customization, the easiest way is to adjust the brightness and other parameters by means independent of the system or video card. But when you need more fine tuning, it's worth comparing Windows features and a tool database of utilities for graphics adapters. In any case, they can even be used in parallel.