What are meta tags in Drupal and where to look for them. What are meta tags in Drupal and where to look for them Metatag: Mobile & UI Adjustments - information for mobile platforms
Read also
Despite the fact that Drupal version 6 has lost its official technical support, I am sure that there are a number of sites that still use this version of the engine.
By default, Drupal does not have built-in meta tags such as “Description” (a short description of the page) and “Keywords” ( keywords). But this, in its own way, is one of important points in website promotion.
Today I will tell you how you can correct this situation.
1. To solve this problem, there is such a plugin as “ Nodewords", and the first step will be his. Since many avid webmasters claim that most stable version of the currently existing ones is the version 6.x-1.9, then I recommend that you install it. You can download this version at the end of the article.
2. After the archive with the plugin has been downloaded, unpack it. Contents (folder nodewords) upload via FTP to your website, in the folder /sites/all/modules/.
3. Go to your site's control panel, section " Site design", paragraph " Modules» – « List» ( quick way go to this section - add /admin/build/modules/list to your site URL).
On the page that opens, in the list, we find the module Nodewords and cancel the items “ Nodewords 6.x-1.9" And " Nodewords - basic meta tags»
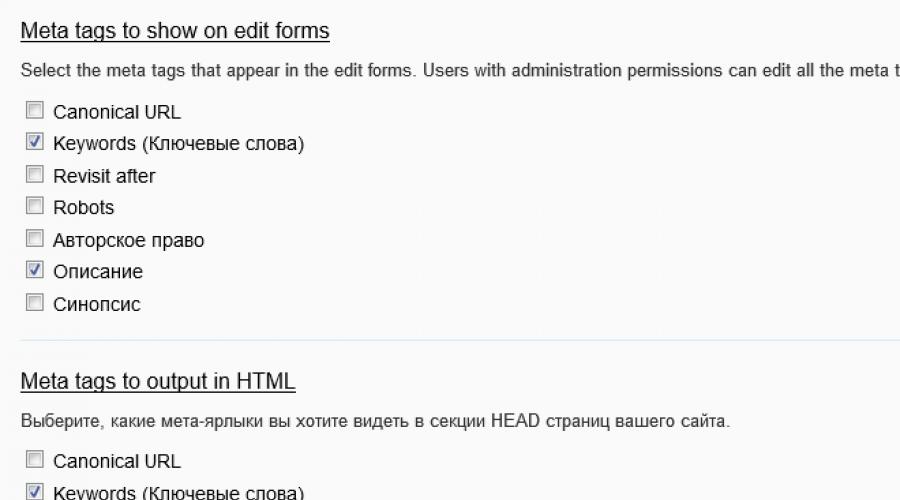
Here we mark the required fields that will appear for filling in your materials. In our case, these are the fields “ Keywords" And " Description».

In addition to these fields, you can include fields of authorship, canonical address, or, for example, include a meta tag that tells the robot after what time it can index the material again. This is not so important for us now, so we go down to the bottom of the page and click “ Save configuration».
5. If you have several types of materials, then change each of them (section " Content", paragraph " Types of materials» – « List" or Fast passage – /admin/content/types/list) by clicking on the corresponding button.

Check that in the setting " Meta tags settings"The ability to edit meta tags has been enabled.

6. The final step will be to check the possibility of adding metadata to the materials on your site. To do this, go to adding material and see if a column appears for adding relevant information.

If everything is so, then you did everything correctly, otherwise write about the problem you encountered in the comments to this article.
In addition to the fact that the meta fields are filled in, check that they are saved and displayed correctly on the site. To do this, open source your site and see if the appropriate tags appear.

In fact, the plugin is quite functional and, in addition to adding simple meta tags, it can work with tokens (macros that store information about the site), provide metadata for error pages, and also configure page indexing.
SEO website optimization, which is managed by the Drupal system, is primarily the creation of more flexible settings. After all, from the point of view SEO optimization in Drupal everything is configured correctly. But to optimize the resource so that users and search engines could use it as comfortably as possible, it is simply impossible to do without installing additional third-party modules.
1. Create readable URLs
Resource optimization should start with CNC. Setting up readable addresses is discussed in detail in the article Getting to know Drupal 7. Creating readable page urls (CNC). Now let's look at this issue briefly.
In Drupal, namely in the platform package, there is already a built-in module called Path. It makes it possible to create synonyms (the addresses of site pages that are clear to both the user and search engines) when creating new pages.
Using this module, each new node creates its own special address of the type your_site/node/node#, in which the node number is assigned automatically.
If the Path module is not active, then the node address and its own number in it will look like your_site/?q=node/node#.
The module also makes it possible, when creating a new material, to independently set the desired address at which the page will be displayed.
It follows that this page in the search engine can be available to the user at once at three completely different addresses. During optimization, only the last (custom) version of the page address is retained. The solution of the problem can be done in two ways:
- In robots.txt we close unnecessary page address options from search engines. But this option can cause confusion in that particular case if some internal links on the site lead to pages that are closed to all search engines.
- The best option is to create a redirect (301 redirect) from the first two address options above to the third page address created specifically for potential users. Module called Global Redirect in automatic mode performs 301 redirects for all resource pages without exception. And there is no need to change the settings of this module; they are initially configured optimally.
If you need to generate addresses based on the headings of the material posted on the page, then in this case you need to install the Pathauto module. But to install it you will need to first install Token. It allows you to use templates of different data from one page.
If the Internet resource is in Cyrillic, then it is worth installing a transliterator module. This module converts headings written in Cyrillic before being written into an address.
In the Pathauto module settings you can set automatic template for each type of content that is posted on the site.
2. Create a site map
Now you can move on to creating the optimal site maps. Because, as practice has shown, regular applications and services for creating sitemaps can include a lot of unnecessary information. Fortunately, we work with Drupal, and therefore we have a convenient module for this with flexible configuration, which allows us to create the sitemaps that we need. This is the XML-Sitemap module.
After installing it, we will receive several modules. I would recommend configuring them like this:


After connecting sitemap creation to the content and taxonomy terms that we want to see in our sitemap, we need to create a new sitemap. To do this, in the “configuration” section, select “search and metadata”, then “XML sitemap” and there we actually select creation new card site.

After creating the sitemap, select the “update sitemap” tab, update it and now we have our own sitemap file without anything extra in it.
The created site map is automatically given an address. By default, the module is set to save the sitemap file to the your_site/sitemap.xml directory. You can change it if you wish, but this is not recommended since search engines usually look for this file in the root directory of the site. This address should be added to the search engine web wizard's panels.

Now, after adding new material to the resource, the site map will be automatically updated. This means that the update does not require additional administrator actions.
3. Optimize page titles
Let's go directly to site page headers. Using a module called Page Title, you can customize the page title at your own discretion. To do this, in the settings of this module you need to specify what exactly the page title should be, depending on its type.

When using this module, Token must be enabled. Indeed, in this case, the same settings are used as during the CNC setup. See description above.
In addition, this module allows us to create our own titles, different from the default ones it generates for specific pages. To do this, you need to check the box in the settings for material types, which will make it possible to set titles when creating new units of content for this material.

4. We simplify the process of internal website linking
As for internal linking of pages, the administrator has two ways to solve this problem:
1. Link the pages yourself. This is tedious, but can be done without installation additional modules.
2. You can speed up the process of adding internal links by using the CKEditor editor. A module called CKEditor Link in tandem with this editor allows you to conveniently add links to already created resource pages. After installing the modules, the linker is connected in the CKEditor settings (section configuration, working with content, CKEditor). We select a text format in which facilitated entry of links will be available (I chose full HTML), click edit.

Here we open the change in appearance.

And activate the link plugin with a tick.

That’s it, now we don’t even need to remember the page URL or its name to create a link on the site. Simply select the desired item from the list that appears on the monitor and confirm your choice by pressing “OK”.

5. Add meta tags to pages
To create on the site meta tags There are several different modules you can use, but one of the easiest to use is Metatags Quick. This module allows you to add a meta text field to a specific content type. The inscription that will be entered into this field will be located in the head of our page, as expected, with a meta tag. A new field for the types of material required by the administrator is added through a tab under the eloquent name “field management”. There we create fields for the meta description of our page (description) and assigning keywords to it (keywords), select the “meta” field type, and save it.

That's it, now when creating new nodes we can assign meta tags to them.
6. Specify the main mirror of the site
In automatic mode, Internet resources are available to users on mirrors with and without www them. As a rule, leading search engines identify a mirror quite normally. But there are also cases when you need to explicitly specify a resource redirect with or without the www symbols. To do this, you do not need to add any additional modules, since in Drupal, in a file called htaccess, there are separate pieces of code that just need to be uncommented. In the .htaccess file (located in the root directory of the site) from Drupal 7.34, we are interested in lines 93-94 if we want to redirect users to a mirror with www, and 99-100 if our main mirror is without www. To explicitly indicate the option we need, we need to uncomment (remove the hash mark at the beginning of the line) the lines we need.

7. Optimizing the website theme
Now the time has come customize theme site. IN different materials When working with WORDPRESS, tags H1-6 are optimized. Nose administrative panel Drupal will not be able to influence these specific tags. These tags can only be changed in manual mode on topic. All themes are placed in the folder your_site/sites/all/themes/your_theme. But there are simply no universal tips for setting up a theme - they are individual for each of them.
Theming of Drupal is the topic of not even one lesson, but a whole series of courses. For now, I’ll simply advise you to add the following code to your template.php file.
function your_theme_html_head_alter(& $head_elements ) ( unset ($head_elements [ "system_meta_generator" ] ) ; )
It will remove the Generator meta tag from the Drupal header. After all, you don’t need an extra open link, created by Drupal by default, to a third-party Internet resource from all pages of your site, do you?
8. Setting up pages for 404 and 403 errors
You can configure service pages in the section called “configuration”. These pages will be shown if a potential user makes 404 and 403 errors (moving to a page that does not exist on the site or to a page that the user does not have access to).

9. Speed up page loading
Now it's time to start optimizing site page loading. Drupal 7 automatically connects many style files and scripts to the resource page. By going to the “Configuration” section and selecting the “performance” tab, you can automatically optimize style files. In the same tab, you can set your individual caching parameters for all pages and blocks of the site.
If you are engaged in website optimization, then you work with setting up meta descriptions of key pages. In Drupal, the metatag module will help you with this work. https://www.drupal.org/project/metatag. Read more about how to set up and work with it.
Installing this module is a typical process - you need to copy the module into a folder with other modules, usually sites/all/modules, which depends on your drupal site design. After this, on the modules administration page we will find a huge list of new modules that are included in the metatag kit. In version 7.x - 11, current at the time of writing, there are as many as 17 modules.
Let's look at some of them.
Metatag - basic module
If you need to set basic tags such as - description, keywords, abstract, original-source, rights; links - canonical link, shortlink, publisher, author link; flags for search robots, tags for Google news, and a bunch of other things, then you only need to install this module.
General settings are here:
- admin/config/search/metatags - default meta settings for different site objects.
- admin/config/search/metatags/settings - provides control over the display of metatags in different types publications, dictionaries, etc., settings related to other modules installed in drupal, caching management and much more.
Private settings are made in the site target editor. For example, if you have allowed working with meta tags for publications of the “regular section” type, then in the article editor of this type The “Meta Tags” tab will appear.

If you are using a taxonomy, similar settings will appear in and terms.
Metatag Importer - import data from other modules
This module allows you to copy data from other modules, for example from the very popular Nodewords. Convenient if you have previously used other modules and decided to switch to Metatag.
Importer needs to be activated only at the time of export, then it can be disabled.
Its admin panel is here - admin/config/search/metatags/importer.
The remaining modules can be divided into two categories:
- Additional meta tags;
Additional meta tags.
Metatag: App Links - app links metadata.
Adds an additional set of tags to the basic meta tags for mobile devices— several dozen new meta fields: al:ios:url, al:ios:app_store_id, al:ios:app_name, al:iphone:url, al:android:url, al:android:package, al:windows_phone:url and etc. These tags allow you to link a web page with an application in the application store (corresponding tags for each type of device).
Metatag: Dublin Core, Metatag: Dublin Core Advanced - a set of fields approved by DCMI.
What is this Dublin Core Metadata Initiative (DCMI)? .
Two modules will be added to the settings of publications, terms, etc. more than fifty fields for customizing meta descriptions. They do not overlap with the base tags, despite the similarity of the tag names. Their meta names begin with the prefix “dcterms” - dcterms.subject, dcterms.publisher, etc.
Metatag: Facebook - integration with Facebook API.
A couple of meta fields for setting up and administering social application widgets. Facebook networks.
Metatag: Twitter Cards - integration with Twitter.
Metatag: Google+ : interaction with Google+
Adding page meta descriptions for the Google+ social network.
Metatag: Verification - tags to verify ownership.
To check that the site belongs to you, search engines and some social networks suggest installing a special meta tag on the main page of the site with verification code. To configure them use this module.
The version under review supports 4 providers - Google, Pinterest, Bing and Yandex.
Tag settings can be found here: admin/config/search/metatags/config/global:frontpage - in global settings home page.
Metatag: OpenGraph, Metatag: OpenGraph Products - meta descriptions of Open Graph Protocol
Adds a huge number of fields according to the Open Graph specification. Tag names are prefixed with “og:” so they can be used in conjunction with other sets and basic meta descriptions.
Metatag: hreflang - information about pages in other languages.
Generates several meta fields (based on the number of languages included on your drupal site), where you can specify page versions in other languages. Something like this:
< link rel = "alternative" href = "http://yoursite.org/english-version-of-page.html" hreflang = "en" / > < link rel = "alternative" href = "http://yoursite.org/russion-version-of-page.html" hreflang = "ru" / > |
Setting these fields manually is a rather boring task; it is possible to customize the template in the global settings. Perhaps, if there are language versions of the page, the fields are filled in automatically (you should check this).
Metatag: favicons - icons for the site
Drupal actually has an icon setting right in the theme. But this module significantly expands the number of options, mainly due to touch icons for Apple devices.
New fields are hidden in the global settings tab of the main page - admin/config/search/metatags/config/global:frontpage
Metatag: Mobile & UI Adjustments - information for mobile platforms
This meta-data applies to the entire site, so the settings are included in the global parameters of the front page (admin/config/search/metatags/config/global:frontpage).
They allow you to adjust the appearance of the site and user interface when displaying a site on different mobile platforms.
Interaction/integration with other modules.
Metatag: Context - interaction with the context module
When the Context module is installed, it allows you to use its definitions, allowing you to assign meta tags using different conditions.
Metatag: Panels, Metatag: Views - integration with the panels and views module
Metatag couldn't ignore these very popular content modules. I wouldn’t want to try on the captain’s cap – it’s obvious and write something else about it. But it’s somehow not very nice when the h3 heading goes without corresponding text.
I didn’t plan to describe all the modules, but somehow it happened by itself :)
Problems with Metatag
I noticed problems when displaying global tags for the main page if a fixed publication is used as the main page. If this problem occurs to you, you can use this crutch (code for the case of basic tags)
December 20, 2014
I told you earlier how to connect CKeditor to Drupal 7. After configuration, the module will connect editor CKeditor to the publication editing fields. How to connect wysiwyg to your own forms? In the 6th version of Drupal, the editor was connected using the CKeditor module...
ReadHello, blog site readers! The meaning of Title and meta tags Description and Keywords for search engine promotion the site is difficult to overestimate. By default, Drupal generates Title automatically from the main title of the material, the ability to set meta Description tags and Keywords are completely absent. Such miscalculations from an SEO point of view are unacceptable. Today I will talk about two modules, Page Title and Metatags Quick, that allow you to solve this problem.
This article discusses only the technical side of the issue. As for the rules for forming Description, Keywords and Title Drupal from an SEO point of view, I dedicated this topic. I strongly recommend that you familiarize yourself with it.
Title setting in Drupal - Page Title module
Now, when creating a material, a new field is available to us, which is responsible for generating the Title in Drupal.

Setting up Keywords and Description in Drupal - Metatags Quick module
Install the Metatags Quick module in Drupal and activate it (we don’t need the Extra functionality and Upgrade from nodewords components).
Go to the section “Configuration” - “Search and metadata” - “Meta tags (quick) settings”. Here is a list of all available meta tags.

In addition to the especially important Description and Keywords, there are also optional ones:
- Canonical URL - allows you to set the main address of the page. If the site has several pages with the same content, but different URLs addresses, then the main one will be considered the one whose address is indicated in the “Canonical URL” meta tag.
- Copyright (Copyright) - we provide a link to our website to show authorship.
- Robots - allows you to enable or disable indexing individual pages site.
We include meta tags for Materials and . Each meta tag will create a separate field for itself.
For example, go to “Structure” - “Types of materials” - “Article” - “Manage fields”. New fields for meta tags have already been created there. In my case, these are (Meta)Description and (Meta)Keywords. You can edit the output order for convenience.


We do the same for all types of materials and taxonomy terms.
The Metatags Quick module has an Extra functionality subsystem, which is responsible for automatically generating meta tags based on the page content. I will not specifically consider it so that you will not be tempted to use it. Title, Keywords and Description in Drupal must be set manually for each page! So don't be lazy.
Description and Keywords for the main page
And everything is fine in the Metatags Quick module, but it does not specify Description and Keywords for the main page. An annoying mistake that should be corrected on your own. Go to the server in the directory with the active one and open the template.php file for editing.
At the very end we insert the following code:
| function TOPIC NAME_page_alter($page ) ( $meta_description = array ( "#type" => "html_tag" , "#tag" => "meta" , "#attributes" => array ( "name" => "description" , " content" => "Meta Description Tag Text") ) ; $meta_keywords = array ( "#type" => "html_tag" , "#tag" => "meta" , "#attributes" => array ( "name" => "keywords" , "content" =>"Keywords separated by commas" |
) ) ;
drupal_add_html_head( $meta_keywords, "meta_keywords" ) ;
drupal_add_html_head( $meta_description, "meta_description" ) ; ) In the code, indicate the name of your theme and description, keywords suitable for the main page of your site. Save the template.php file after making changes.
Removing the Generator meta tag
| The Generator meta tag is automatically generated by Drupal. It contains information about current version system and a link to the drupal.org website is provided. This is bad both from a security point of view and from the point of view of search engine promotion of the site. Let's delete it. We log into the server using , go to the /includes directory and open the common.inc file for editing. It is best to do this in the editor, as it highlights the code syntax and makes working with it more convenient. Find and delete the following code: |
// Show Drupal and the major version number in the META GENERATOR tag.