Windows 7 components cannot be restored. Component Store Management
Read also
If the performance of the computer has significantly decreased, but the SFC utility could not solve the problem, then you should use the DISM system tool to restore the Windows image.
Windows 10 includes useful utility command line called Deployment Image Servicing and Management (DISM). This tool appeared in Windows Vista. In Windows 10 and Windows 8.1, the DISM tool is installed by default.

The utility can be used to restore and prepare Windows images, including the environment Windows Recovery, program Windows installation and Windows PE. DISM can also be used to patch a system recovery image with a current OS installation, and even to maintain a virtual hard disk.
If your computer is constantly getting errors and you're noticing problems during startup, you can use the System File Checker ( System File Checker, SFC) to analyze the integrity of system files and replace damaged and missing files with a working copy.
If the SFC utility cannot fix the problem, then most likely the tool was unable to obtain the necessary files from the Windows image, which could also be damaged. In this situation, you can use DISM to repair the Windows image and then reuse SFC to fix damaged files.
In this guide, we will introduce step by step instructions on using DISM to return a stable and healthy system state.
Warning: before starting work with the DISM utility, it is recommended to make a complete backup system or create a system restore point. In case something goes wrong, you can return the initial state systems.
How to work with DISM commands in Windows 10
When working with DISM, there are three main options for restoring a Windows image: and RestoreHealh. It is important to use them in that order.
Using the CheckHealth option in DISM
The command in DISM allows you to detect image corruption. This command is used only for troubleshooting and does not perform troubleshooting operations.
Command line because DISM requires device administrator rights to run.
DISM /Online /Cleanup-Image /CheckHealth

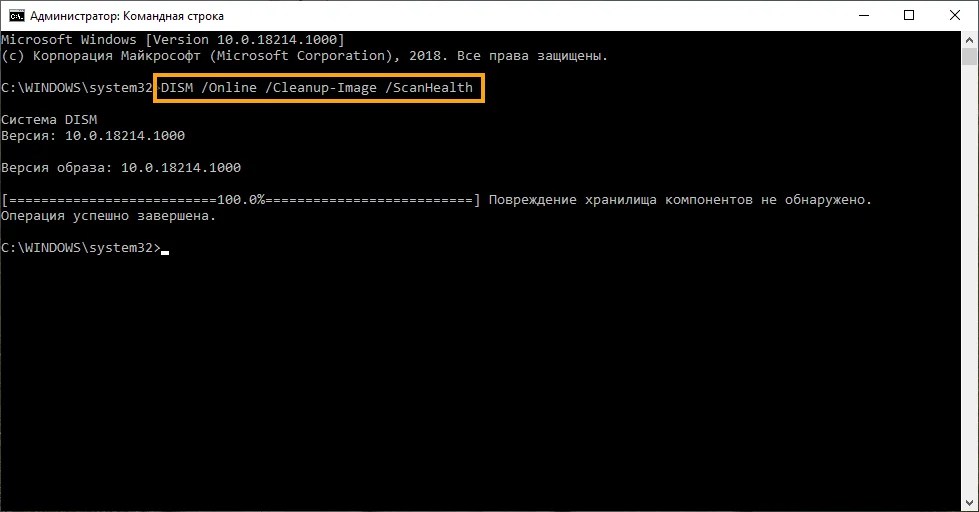
Using the ScanHealth option in DISM
The command in DISM allows you to scan the Windows image for any corruption. Unlike /CheckHealth, /ScanHealth can take up to 10 minutes.
Follow these steps to run this command:
1. Type in the search menu Start Command line, click right click click on the link that appears and select Run as administrator.
2. At the Command prompt, type the following command and press Enter:
DISM /Online /Cleanup-Image /ScanHealth
Using the RestoreHealth option in DISM
The command in DISM allows you to automatically carry out the procedure for repairing damaged Windows images. Unlike /ScanHealth, the /RestoreHealth check can take up to 10 minutes.
Follow these steps to run this command:
1. Type in the search menu Start Command line, right-click on the link that appears and select Run as administrator.
2. At the Command prompt, type the following command and press Enter:
DISM /Online /Cleanup-Image /RestoreHealth
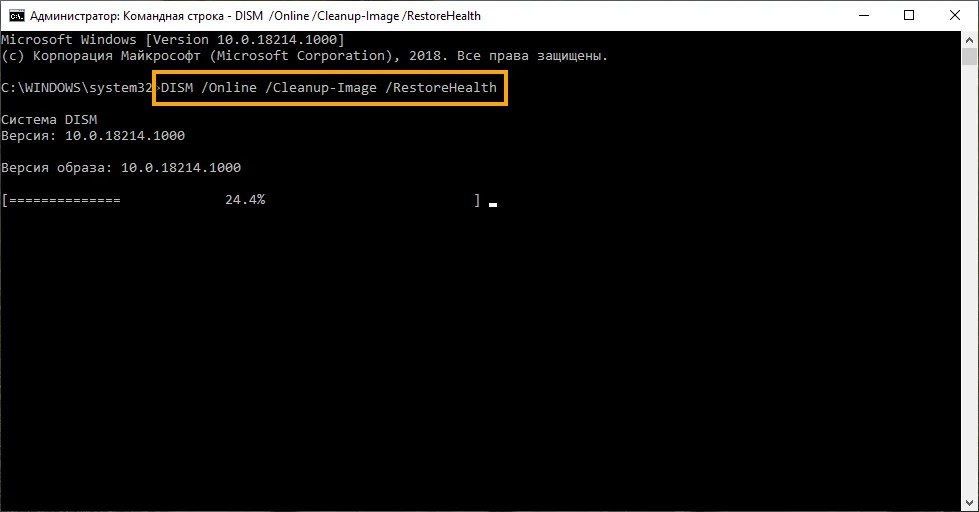
Note Note: While running /RestoreHealth or /ScanHealth, you may notice the procedure hanging between 20% or 40% - this is completely normal behavior.
When you run the /RestoreHealth command, DISM will try to use the Center windows updates to replace damaged files. However, if the problem has spread to Windows Update components, then you need to specify an alternative source of working versions of the files to restore the image.
You can specify a new location for working versions of files with the statement /Source next to /RestoreHealth.
Before you can use the recovery commands, you need to prepare a copy of the install.wim file from another computer, installation media Windows 10 or file ISO Windows 10. It is also very important that the source of the working versions of the files matches the same version, edition and language of the operating system that is used on the computer.
You can download the ISO image of Windows 10 instructions below:
Note: don't forget to replace "repairSource" with the path to the source of the working versions of the files. For example: E:\Sources\install.wim .
Now you can run the command to fix the Windows image:
1. Type in the search menu Start Command line, right-click on the link that appears and select Run as administrator.
2. At the Command prompt, type the following command and press Enter:
DISM /Online /Cleanup-Image /RestoreHealth /Source:repairSource\install.wim

DISM /Online /Cleanup-Image /RestoreHealth /Source:repairSource\install.wim /LimitAccess
DISM /Online /Cleanup-Image /RestoreHealth /Source:wim:repairSource\install.wim:1 /LimitAccess
The command will initiate a Windows image restore using the working versions of the files included in the install.wim file from the Windows 10 installation media. This will not use Windows Update as a source to download the required files for the restore.
Also, not only can you provide a path that points to install.wim, but you can also use the file install.esd, which is an encrypted version of the Windows image.
If you upgraded to Windows 10 from a previous version of the operating system, the installation files may still be stored on the C drive, which means you may have a source of good files.
To use the install.esd file to restore a Windows image on your computer, follow these steps:
1. Type in the search menu Start Command line, right-click on the link that appears and select Run as administrator.
2. At the Command prompt, type the following command and press Enter:

You can use the following command to limit the use of the Windows Update service:
Alternatively, you can use the following command to accomplish the same task:
If the install.esd file is located on a different drive, use the following command:
DISM /Online /Cleanup-Image /RestoreHealth /Source:repairSource\Install.esd
Note: don't forget to replace "repairSource" with the path to the source of the correct versions of the files. For example: E:\Sources\install.esd .
The Deployment Image Servicing and Management tool always creates a log file at %windir%/Logs/CBS/CBS.log that contains all issues that have been fixed and found.
How to fix problems with Windows 10
The instructions above apply only to restoring a system image. To fix problems in Windows, use the SFC System File Checker.
1. Type in the search menu Start Command line, right-click on the link that appears and select Run as administrator because SFC requires device administrator rights to run.
2. At the Command prompt, type the following command and press Enter:
Sfc /scannow
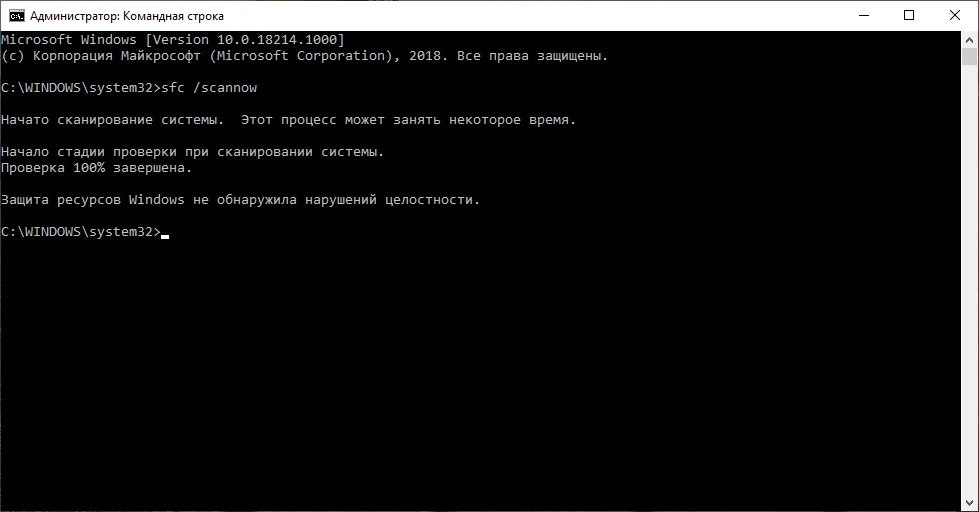
Note: It may take up to three SFC runs to resolve the issue.
The SFC utility will scan and repair corrupted system files in Windows 10. For a detailed introduction and the capabilities of the tool, read the instructions.
Found a typo? Select and press Ctrl + Enter
When working on the Windows 10 operating system, and any other, anything can happen. For example, while working, you notice terrible brakes. There is an idea that a virus or viruses have worked. When checking with an antivirus, there is a chance to find viruses, and when you clean them, it’s not a fact that there will be any changes, since they managed to screw up.
So, to check Windows files for integrity, you can run the utility sfc /scannow from the command line and if a message appears that "Windows Resource Protection found corrupted files but couldn't repair some of them" then this article will help you get rid of this error. If you have Internet access, you can use the article:.
When you scan the system for the integrity of components, if damaged files are found, they are replaced with working ones from . Maybe this folder has been deleted or the files in it are damaged, then you will see a message that "Resource Protection found corrupted files...".
How to Repair a Damaged Component Store Using Power Shell
Read where I repaired the component store using the following command:
| DISM /Online /Cleanup-Image /RestoreHealth |
For it to work, you need to be connected to the network, as the command contacts the update center and downloads the necessary files from there. It is possible that this command will not help either, then we will use a more powerful tool -.
Click on the search icon on the taskbar, and then enter the phrase "PowerShell", choose the item from the results Windows PowerShell, right-click on it and click on the option "Run as administrator".

In the window that opens, enter the following command:
| Repair-WindowsImage -Online -RestoreHealth |

For everything to work, you also need the Internet. You need to wait a little while the files are downloaded, after which the component store will have a healthy state and the system will not bring you errors.
If everything went well, then in the results you should notice the line:
ImageHealth State: Healthy

It means that everything is restored.
What to do if there is no Internet to restore the component store?
In this case, you will need boot disk, or a flash drive with Windows 10. Almost any image will do, it is desirable that there be a dozen. Can be downloaded from the Microsoft website.
After downloading the image, double-click on it, thus creating a virtual drive. See what letter he has in the explorer, for example, it can be F.
We return to PowerShell again and enter the following command:
Dism /Get-WimInfo /WimFile:R:\sources\install.wim
, Where R: letter of the generated drive, with installation files Windows 10. This command will determine what kind of system image is in the virtual drive.

| Repair-WindowsImage -Online -RestoreHealth -Source R:\sources\install.wim:1 |
Letter R is our drive, and the figure 1 – index of the image from the first command.
After restoring, try running the system file integrity check again - sfc /scannow, most likely you will see a message that everything damaged was successfully restored.
Returning to the Component Store technology in Windows 8, let's look at recovery scenarios. Recall that starting with Windows Vista, Microsoft introduced the concept of component based servicing. Thanks to the component structure, it was possible to create a more stable system for installing / removing updates, patches and SP service packs. The same system underpins the architecture of Windows 8. Storage files Windows components on disk are located in the directory \ Windows\ WinSxS, which tends to grow significantly over time in size (read more about why the size of this directory grows over time and how to reduce the size of the WinSxS folder).
However, in some cases, the component store can become corrupted, which leads to problems when installing Windows updates and other Microsoft software. To restore the component store in previous versions Windows (Windows Vista, Windows 7, Windows Server 2008 /R2) Microsoft developed special utility — CheckSUR or System Update Readiness Tool (KB947821). This utility is quite large in size (more than 350 MB), and as new Windows updates are released, it is regularly updated. This means that every time you have to download a fresh version CheckSUR.
Advice. In one of the previous articles, we already considered an example of using CheckSUR to find and restore damaged components: .
What does this utility do? The System Update Readiness Tool checks the integrity of the following resources:
- Files in directories:
- %SYSTEMROOT%\Servicing\Packages
- %SYSTEMROOT%\WinSxS\Manifests
- The contents of the registry branches:
- %SYSTEMROOT%\WinSxS\Manifests
- HKEY_LOCAL_MACHINE\Schema
- HKEY_LOCAL_MACHINE\Components
- HKEY_LOCAL_MACHINE\Software\Microsoft\Windows\CurrentVersion\Component Based Servicing
In the event that CheckSUR finds errors or inconsistencies, it will attempt to repair them.
Component store issues can cause various errors when installing Windows updates. Below is a list of typical error codes that this utility should fix.
List of WindowsUpdate errors caused by component store corruption
| Code | error | Description |
| 0×80070002 | ERROR_FILE_NOT_FOUND | The system cannot find the file specified. |
| 0x8007000D | ERROR_INVALID_DATA | The data is invalid. |
| 0x800F081F | CBS_E_SOURCE_MISSING | The source for the package or file not found. |
| 0×80073712 | ERROR_SXS_COMPONENT_STORE_CORRUPT | The component store is in an inconsistent state. |
| 0x800736CC | ERROR_SXS_FILE_HASH_MISMATCH | A component's file does not match the verification information present in the component manifest. |
| 0x800705B9 | ERROR_XML_PARSE_ERROR | Unable to parse the requested XML data. |
| 0×80070246 | ERROR_ILLEGAL_CHARACTER | An invalid character was encountered. |
| 0x8007370D | ERROR_SXS_IDENTITY_PARSE_ERROR | An identity string is malformed. |
| 0x8007370B | ERROR_SXS_INVALID_IDENTITY_ATTRIBUTE_NAME | The name of an attribute in an identity is not within the valid range. |
| 0x8007370A | ERROR_SXS_INVALID_IDENTITY_ATTRIBUTE_VALUE | The value of an attribute in an identity is not within the valid range. |
| 0×80070057 | ERROR_INVALID_PARAMETER | The parameter is incorrect. |
| 0x800B0100 | TRUST_E_NOSIGNATURE | No signature was present in the subject. |
| 0×80092003 | CRYPT_E_FILE_ERROR | An error occurred while Windows Update reads or writes to a file. |
| 0x800B0101 | CERT_E_EXPIRED | A required certificate is not within its validity period when verifying against the current system clock or the time stamp in the signed file. |
| 0x8007371B | ERROR_SXS_TRANSACTION_CLOSURE_INCOMPLETE | One or more required members of the transaction are not present. |
| 0×80070490 | ERROR_NOT_FOUND | Windows could not search for new updates. |
In Windows 8 and Windows Server 2012, functionality similar to the CheckSUR utility is already built into the system and is called inboxCorruptionRepair(built-in component recovery). Built-in component recovery can work in two modes: background And manual. Background Repair automatically starts if errors occur when you try to install a Windows Update. Windows in this case automatically tries to fix the damaged component and reinstall Windows package update. In case if automatic recovery cannot fix the problem on its own, the administrator can fix the errors manually by restoring the component store to a healthy state. You can do this using the DISM Image Servicing Utility (command Dism /Online /Cleanup-Image) or using Powershell (cmdlet Repair-WindowsImage).
To check the status of the component store, open an elevated command prompt and run:
Dism /Online /Cleanup-Image /CheckHealth
Adviсe.
- DISM unlike most Windows utilities case sensitive.
- The Dism /Cleanup-Image command saves logs to C:\Windows\Logs\CBS\CBS.log and C:\Windows\Logs\DISM\dism.log
Similar Powershell command:
Repair-WindowsImage -Online -CheckHealth
The CheckHealth check will take a few minutes. As you can see, the current status of the component store in the image is Healthy. recovery is not required.
In the event that any problems or errors are found, you should start the storage recovery procedure with the command:
Dism.exe /Online /Cleanup-Image /Restorehealth
Similar Powershell command:
Repair-WindowsImage -Online -RestoreHealth
IN this example system file restore was successful:
The restore operation completed successfully. The component store corruption was repaired.

In the event that the system itself was unable to restore some components in the repository, you may need a distribution kit ( installation disk) Windows 8. Paste this disk to drive or . Let's say the drive with the distribution kit is assigned the letter E. Get the list available versions Windows 8 on disk using the PoSH command:
Get-WindowsImage -ImagePath E:\sources\install.wim

In this example, we see that there is only one image on the disk (Windows 8 Pro) with index 1 (Index: 1).
The following command will start a vault repair, restoring the damaged components from the original Windows 8 image:
Repair-WindowsImage -Online -RestoreHealth -Source G:\sources\install.wim:1
After the restoration is completed, make sure that the component store is in a healthy state (status: Healthy)
The next (not always mandatory) step is to check the integrity of system files using the command:
Sfc /scannow
Advice. If you resorted to repairing the Component Store because of problems installing Windows updates, restart the Windows Update service and reset the local update cache. To do this, run the following commands on the command line:
Net stop wuauserv net stop bits net stop cryptsvc ren %systemroot%\SoftwareDistribution oldSD ren %systemroot%\System32\catroot2 oldCat2 net start cryptsvc net start bits net start wuauserv
This documentation has been archived and is no longer maintained.
Component Store Management
Many Windows users asking the question: "Why is the WinSxS folder so big?" This topic has been discussed on the blogs, but this section provides more information about the principles behind the component store (specifically the WinSxS folder) and then links to topics that describe ways to limit the size of the WinSxS folder.
The short answer is that the size of the WinSxS folder is actually not as large as it might seem at first glance, since Windows binaries located in other places can be taken into account when calculating it.
Windows Component Store and WinSxS Folder
The WinSxS folder is located in Windows folder, For example: c:\Windows\WinSxS. This is the location for the Windows Component Store files. The Windows Component Store supports the functionality required to customize and update Windows. Here are some examples of using files from the Windows Component Store.
Using Windows Update to install new versions of components. This keeps the systems secure and up to date.
Enable or disable Windows features.
Add roles and features using Server Manager.
Move systems between different editions of Windows.
System recovery after damage or failed boot.
Removing problematic updates.
Execution of programs using parallel assemblies.
The Windows Component Store first appeared in Windows XP to support parallel builds. Starting with Windows Vista, the Component Store has been enhanced to track and maintain all the components that make up the operating system. These various operating system components keep track of objects such as files, directories, registry keys, and services. Specific versions of components are often packaged. Packages are used by Windows Update and DISM to update Windows. The components and packages used during the Windows Setup process are handled by the Windows Component Store. Determining the size of the Windows Component Store is complicated by the fact that many Windows files are in directories outside of the Windows Component Store using the method hard connection. In some cases, files certain version components are found both in the Windows Component Store and outside of it. By using hard ties Windows may give the impression of storing multiple copies of the same file without actually using up space for multiple copies.
hard ties
A rigid link is an object file system, which allows two files to refer to the same disk location. This means that multiple files can refer to the same data, and changes to that data in one file are reflected in other files. This makes it difficult to calculate the size of directories, as shown in the following example.
Directory A contains three files: 1.txt, 2.txt and 3.txt.
Directory B contains one file: 4.txt.
Files 1.txt and 2.txt are hard-linked and contain 1 MB of data.
Files 3.txt and 4.txt are also hard-linked and contain 2 MB of data.
In this example, you can see that hard links allow multiple files to refer to the same dataset.
What is the size of catalog A?
The answer depends on what you plan to do with directory A.
When reading files in directory A, the size of all read files will be the sum of the sizes of each file. In this example, it will be 4 MB.
When copying all files from directory A to a new location, the amount of data copied will be the sum of all the data involved in hard links to the files. In this example it will be 3 MB.
If you free up space by deleting directory A, the size will only be reduced by the size of the hardlinked files in directory A only. In this example, 1 MB can be freed.
Now back to the question of how much space the Windows Component Store takes up, specifically the WinSxS folder. The third answer in the catalog A example comes closest to evaluating the additional occupied place. Files that are hard-linked to the rest of the system are needed for system operations, so they don't need to be counted, and for files that are hard-linked to multiple locations in the Component Store, only disk space should be counted.