stress test memory in linux. Software Guide: Useful overclocking utilities and more
Why is it worth doing a CPU stress test? To test the reliability and stability of your machine/system. Running a stress test will also help you know if you need to upgrade or add new cooling to your machine. In my topic "Cpu stress test on Linux (Debian/Ubuntu/Mint or RedHat/CentOS/Fedora)" I will tell you how to use the cpuburn utility to test the load on the processor (s).
cpuburn installation.
Install cpuburn on /Debian/Ubuntu/Mint:
# apt-get update && apt-get install cpuburn
Installing cpuburn on RedHat/CentOS/Fedora:
# yum update && yum install cpuburn
You can see the usage guide for the cpubun utility by running:
#man cpuburn
cpuburn, burnBX, burnK6, burnK7, burnMMX, burnP5, burnP6- a collection of programs for testing heavy load on the CPU.
burnP5 optimized for Intel processors Pentium with/without MMX.
burnP6 optimized for Intel PentiumPro, Pentium II & III processors.
burnK6 optimized for AMD K6 processors.
burnK7 optimized for AMD Athlon/Duron processors.
burnMMX testsalternative cache/memory test on all processors with MMX.
burnBX Alternate cache/memory test is optimized for Intel processors.
These programs are designed to load x86 processors as much as possible for system testing purposes. They have been optimized for various processors. FPU and ALU instructions are encoded in assembler in an infinite loop. They don't test all instructions. The goal is to create a load and see what temperature it creates by putting a load on the processor itself, the system, motherboard and power supply.
The testing tool is designed to crash your computer, so make sure nothing critical is running on it and all important data is backed up on your hard drives. It is best to run the program on file systems and mount read-only. Note that root privileges are not required.
Run desired program in the background, checking the result of the error. You can repeat this command for each processor. For example,
# burnP6 || echo $? &
To monitor the progress of CPUBurn, use ps. You can monitor CPU temperature and/or system voltage via ACPI or LM sensors, but only if your system supports it. After completion, it is worth terminating this (e) processes, for example:
# killall burnP6
Install htop to monitor loads on your server.
# apt-get update && apt-get install htop
# yum update && yum install htop
Let's run htop to check the load:
Linux cpu stress test (Debian/Ubuntu/Mint or RedHat/CentOS/Fedora) completed.
Why is it worth doing a CPU stress test? To test the reliability and stability of your machine/system. Running a stress test will also help you know if you need to upgrade or add new cooling to your machine. In my topic "Cpu stress test on Linux (Debian/Ubuntu/Mint or RedHat/CentOS/Fedora)" I will tell you how to use the cpuburn utility to test the load on the processor (s).
1. Install CPUburn.
Install cpuburn on /Debian/Ubuntu/Mint:
- # apt-get update && apt-get install cpuburn
Installing cpuburn on RedHat/CentOS/Fedora:
- # yum update && yum install cpuburn
You can see the usage guide for the cpubun utility by running:
#man cpuburn
burnP5optimized for Intel Pentium processors with/without MMX.cpuburn, burnBX, burnK6, burnK7, burnMMX, burnP5, burnP6- a collection of programs for testing heavy load on the CPU.
burnP6 optimized for Intel PentiumPro, Pentium II & III processors.
burnK6 optimized for AMD K6 processors.
burnK7 optimized for AMD Athlon/Duron processors.
burnMMX testsalternative cache/memory test on all processors with MMX.
burnBX Alternate cache/memory test is optimized for Intel processors.
These programs are designed to load x86 processors as much as possible for system testing purposes. They have been optimized for various processors. FPU and ALU instructions are encoded in assembler in an infinite loop. They don't test all instructions. The goal is to create a load and see what temperature this creates by putting a load on the processor itself, the system, the motherboard and the power supply.
The testing tool is designed to crash your computer, so make sure nothing critical is running on it and all important data is backed up on your hard drives. Your best bet is to run the program on filesystems and mount as read-only. Note that root privileges are not required.
Run the desired program in the background, checking the result of the error. You can repeat this command for each processor. For example,
- # burnP6 || echo $? &
To monitor the progress of CPUBurn, use ps. You can monitor CPU temperature and/or system voltage via ACPI or LM sensors, but only if your system supports it. After completion, it is worth terminating this (e) processes, for example:
- # killall burnP6
Install htop to monitor loads on your server.
- # apt-get update && apt-get install htop
- # yum update && yum install htop
Let's run htop to check the load:
- #htop
The cpu stress test on Linux (Debian/Ubuntu/Mint or RedHat/CentOS/Fedora) is complete.
iperf utility. On one computer, the server is started (with the iperf -s command), on the other, the client (with the iperf -c command server_ip). There are versions for both windows and Linux (sudo apt-get install iperf). Unfortunately, I could not use more than 130Mb / s with one client, so you can run several clients, even better on several machines.
Processor warming up
cpuburn utility (sudo apt-get install cpuburn). It is launched by the burnP5 command (there are versions sharpened under different processors- version P5 is quite suitable for Intel Atom). Loads the processor at 100%, allows you to check the efficiency of cooling and the reliability of power circuits at peak loads. Such stress tests must be carried out under the control of the temperature of the processor and other components - for example, the processor can be cooled well, but even a small radiator was not installed on the power circuit. Under heavy load, the processor consumes a lot of current, and the power system can overheat (its efficiency is not equal to 100%).
disk test
sudo apt-get install hdparm
sudo hdparm -tT /dev/sda
Obviously, it is desirable to run them with a minimum of disk activity, and do not trust one run - do at least three tests.
It is very useful to run all these tests after upgrading the power system, and before hiding the server on the far shelf.
Post Views: 152
I ran the Linpack test and thought: is it time for me to change the thermal paste on my laptop?
Yes, according to the results of several tests in a row (I will not clutter up the article with pictures), it is clear that the processor goes into throttling (skipping cycles and resetting the frequency when heated), but how quickly does it start doing this?
CPU stress test in Linux terminal
Having asked this question and searched the Internet for utilities, I realized that the main problem in solving the task I set was the simultaneous launch of at least a couple of utilities and wide eyes in two windows ... And I came to the conclusion that the console version is more suitable for me, rather than multi-colored windows of open programs.
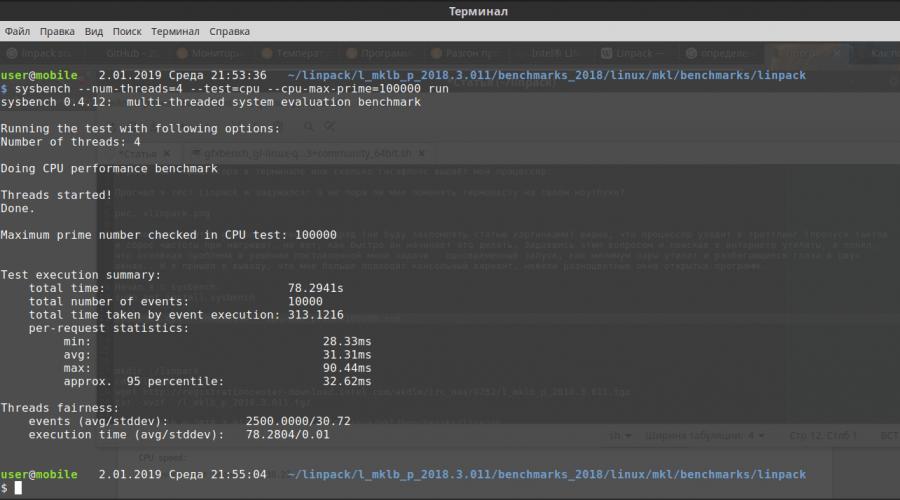
I started with sysbench:
sudo apt install sysbench
sysbench --num-threads=4 --test=cpu --cpu-max-prime=100000 run
- --num-threads=4- this is the number of threads, I have a dual-core four-thread Intel® Core ™ i7-640M, so 4;
- --cpu-max-prime=100000- this is the maximum number of operations performed, I set it to 100000, because default is 10000, ending the test too soon.

Then I switched to Linpack. Since I have a processor from Intel and I have a certain amount of laziness (laziness is the engine of progress), I took, downloaded and unpacked the ready-made Intel Linpack, after creating the linpack directory in my home directory:
mkdir ./linpack
cd ./linpack
wget http://registrationcenter-download.intel.com/akdlm/irc_nas/9752/l_mklb_p_2018.3.011.tgz
tar -xvzf ./l_mklb_p_2018.3.011.tgz
For AMD processors I would not try this option, since the Intel compiler inserts bookmarks that check the processor, and if it is not Intel ... well, think about a hundred or two extra instructions, the processor will execute and obviously lose performance. For AMD it's better to build Linpack from sources like these . In this article, I will not consider building from sources - read the README in the source code.
Let's get back to Intel's Linpack. There is a lot of extra stuff and I don’t need it, but what I need to consider regarding version 2018.3.011. I will immediately go to the desired directory, so as not to type long commands later:
cd ./l_mklb_p_2018.3.011/benchmarks_2018/linux/mkl/benchmarks/linpack
Since, by default, Intel's Linpack is designed for testing server Xeons, let's create our own file that will be used as input options - just reduce the number of tests, otherwise we'll get tired of "a couple of days" waiting for the test to complete. I have Linux Mint LMDE 3 so I use text editor xed, and I like it more functionality, especially when you run it as root - it changes color to red. And so, we create in the same directory that we moved to, a file, for example, my_test:
And copy the following content into the created file:
Shared-memory version of Intel(R) Distribution for LINPACK* Benchmark. *Other names and brands may be claimed as the property of others.
Sample data file lininput_xeon64.
5 # number of tests
1000 2000 5000 10000 20000 # problem sizes
1000 2000 5008 10000 20000 # leading dimensions
4 2 2 2 1 # times to run a test
4 4 4 4 4 # alignment values (in KBytes)

Well, actually launching Linpack with the created file:
./xlinpack_xeon64 -i ./my_test
./xlinpack_xeon64 ./my_test
You can also use stress-ng or stress, but this still does not solve the problem I set. These utilities do not show me the output of temperature, frequencies and time from the start.
The temperature can be shown by sensors - more about installing this utility. And this utility will be needed in the further consideration of my question. Linux is great and powerful: the same task can be solved in different ways. I was too lazy to take on C, and I wrote the missing part for me in BASH, because there were not so many lines. Without sensors installed, my script will not work. Naturally, I did not write the fixation of throttling - it will be visible by resetting the frequency and temperature anyway. Here is the script itself:
#!/bin/bash
out=0 # test process control variable
pid_test="tty" # PID of the test process (made an existing directory to run without arguments)
cpus_num=$(cat /proc/cpuinfo | grep -ci "processor") # number of processors/cores/threads
echo -en "\033[?25l" 1>&2 # hide cursor
echo -en "\033[^:]*: //g" | sort -u # output processor model
echo -en "\033=$(sensors | sed "/Core ""$i""/!d;s/.*crit = +\(.*\)[.]°C).*/\1/ ")
if [ -n "$(cpu_crit_temp[i])" ]
then
let cpu_red_temp[i]=cpu_crit_temp[i]-10
let cpu_yel_temp[i]=cpu_crit_temp[i]-30
cpu_min_temp[$i]=1000
cpu_max_temp[$i]=0
fi
done
start_time=$(cat /proc/uptime | sed "s/[.] .*$//") # start time
if [ -n "$1" ]
then
script_pid="$$"
(if ! $@ > "$0_out" 2>&1 # run test file
then
kill -s SIGABRT $script_pid # signal the main script to fail to run
fi 2>/dev/null)&
pid_test="$!" # PID of the test process
fi
while (true) # temperature control
do
for ((i=0; i<$cpus_num; i++))
do
cpu_freq[$i]=$(cat /sys/devices/system/cpu/cpu$(i)/cpufreq/scaling_cur_freq | sed "s/...$//")
cpu_temp[$i]=$(sensors | sed "/Core ""$i""/!d;s/.*+\(.*\)[.]°C[ \t]*(.*/\ 1/")
if [ -n "$(cpu_temp[i])" ]
then
(($(cpu_temp[i])< ${cpu_min_temp[i]})) && cpu_min_temp[$i]=${cpu_temp[i]}
if (($(cpu_temp[i]) > $(cpu_max_temp[i])))
then
cpu_max_temp[$i]=$(cpu_temp[i])
time_max[$i]=$(cat /proc/uptime | sed "s/[.] .*$//")
let time_max[i]=time_max[i]-start_time
fi
if (($(cpu_temp[i]) > $(cpu_red_temp[i])))
then
echo -en "cpu$(i):\t"
echo -en "\033)"
echo -en "\033)"
echo -en "\033)"
echo -en "\033) > $(cpu_yel_temp[i])))
then
echo -en "cpu$(i):\t"
echo -en "\033)"
echo -en "\033)"
echo -en "\033)°C; max: "
echo -en "\033)"
echo -en "\033)sec)"
else
echo -en "cpu$(i):\t"
echo -en "\033)"
echo -en "\033)"
echo -en "\033)°C; max: "
echo -en "\033)"
echo -en "\033)sec)"
fi
else
echo -en "cpu$(i):\t"
echo -en "\033)"
echo -en "\033 .*$//")
let time=time-start_time
echo -en "Time:\t$time sec."
[ ! -d "/proc/$(pid_test)" ] && break # exit when test is over ( The best way control via comm and cmdline, but... too lazy)
[ "$out" != "0" ] && break # exit on test failure
echo -en "\033[$(i)A\r" 1>&2 # move cursor up $i lines and to start of line
sleep 0.1 # pause, so that the frequency output does not jump much
done
echo ""
echo -en "\033[?25h" 1>&2 # enable cursor
if [[ "$out" == "0" && -n "$1" ]]
then
rm -fR "$0_out"
exit 0
elif [[ "$out" == "1" && -n "$1" ]]
then
kill -9 "$pid_test" 1>/dev/null 2>/dev/null
cat "$0_out" | sed "/^$/d;/Sample data/d;/CPU frequency/d;/Parameters are set/,/Data alignment value/d"
rm -fR "$0_out"
exit 1
elif[ "$out" == "1" ]
then exit 1
elif[ "$out" == "2" ]
then
echo -en "\033)