How to make a tablet for orienteering from a navigator. How to make a tablet for orienteering from a navigator Orienteering tablet
The emergence and application of new equipment and technology allows people to reduce the time to perform any actions and operations in certain areas of activity. This article will discuss the use of GPS technology in compiling sports maps.
All of the following is not a guide to using programs and navigator. This is a description of working with a GPS navigator by the Russian compiler Konstantin Tokmakov, based on his personal experience. Use in article specific titles firms, programs, and links is not an advertisement.
1. Minimum Requirements to the GPS navigator
The GPS navigator must have good antenna(better remote), the ability to mark waypoints, record tracks and save them to your computer. The authors of the article used a Garmin GPS navigator, the GPSmap-60 series.
2. Preparation of the image for preliminary work on the ground
Image preparation is carried out using the program SAS.Planet http://sasgis.ru
Work in the SAS.Planet program.
3. Determination of the magnetic north in the image.
The determination of the magnetic north in the image is carried out using the program OziExplorer. This program can be found at www.oziexplorer.com.
4. Drawing lines of the magnetic meridian on the picture
To apply the lines of the magnetic meridian to the image, open the *.jpg file in any graphics editor, For example Adobe Photoshop, and draw the lines of the north, taking into account the known degree of declination.
5. Preliminary work on the ground with a GPS navigator
On preliminary stage To work on the ground, you need to create a network of waypoints in the GPS navigator, as well as pass linear landmarks with track recording turned on. On the ground, the location of the waypoint must be marked with a bright tag with the waypoint number printed on it. In a GPS navigator, it is desirable to set a point with the position averaging function enabled. The approximate waypoint accuracy should be less than 5 meters.
It has been experimentally established that each waypoint relative to the other should be within a radius of no more than 150 m.
6. Uploading information from a GPS navigator
Working with OziExplorer.
7. Print and save a snapshot with tracks and waypoints
Working with OziExplorer.
The settings are completed, the image can be printed. It turns out something like this picture:

This picture with track points will be the basis that is placed on the tablet for direct drawing of the map.
To save tracks and waypoints in the menu File(File) select command Save(Save to File). Select a command from the dropdown list Save Waypoints(Save Waypoint to File). Create a folder for waypoints and save. Similarly, we save tracks by selecting the command Save Track(Save Track to File).
8. Work on the ground using prepared materials and a GPS navigator
On the ground, being in any place we need this moment location, use the navigator to determine the bearing and distance for the nearest base waypoint. On the tablet, we postpone these values from the base waypoint and get the point of our location on the map being created.
Thus, with the help of a GPS navigator and an image, the accuracy of the planned justification of the future map increases, and for the compiler, the amount of work associated with measuring distances and directions is significantly reduced.
It remains for us to wish everyone success in the application modern technology and technology and good weather in the "field"!
Konstantin Tokmakov (St. Petersburg)
Polina Razdrobenko (Vitebsk)
16.12.2010
Comments
Gennady
Yes, with sophisticated equipment, it's probably a bit difficult .... I've been drawing maps for a long time, I have my own methodology and "bells and whistles". In Penza, my cards are considered the best. I don't use anything as a basis. Waste of time. But I would like to talk with the draftsmen.
please discuss one interesting feature Google Earth: due to its incompetence in this matter. I am 17 years old, I was interested in cartography. Studied a lot of mitodik that you all suggested. I found the base of the polygon, took the tablet and went to draw WHEN SEARCHING FOR THE SUBSTRATE IN GOOGLE IN THE LOWER RIGHT CORNER I FOUND THE HEIGHT ABOVE SEA LEVEL (as I moved along the relief, I noticed a change in the altitude reading). I myself run on this map (the resemblance is quite good) Question: WHAT DID I GET? CAN THIS METHOD BE USED TO DRAW A MAP? WHO IS INTERESTED IN THE RESULT OF MY INDIVIDUAL WORK write
17:31 15.12.2013
Anton, finish at least 3rd school and get off the caps.
On the subject: to rotate the substrate, you can look in the internet for the declination for the nearest airfield. Further on the choice: either rotate the image in Photoshop by the specified value, or directly in the parameters of the substrate in the window.
Alexey Isakov
Hello everyone, so few comments. Probably too specific our occupation. I live in the city of Svobodny in the Amur Region. I drew 4 cards. I take pictures from Google Earth, copy in a large approximation several adjacent sections of the desired area (the main thing is not to change the approximation when moving), knowing our magnetic declination (we have +12 degrees), I rotate all the copied pieces. I print it out on a color printer, glue the whole picture (maybe about 1 sq. M.) I go to draw with ordinary plastic, putting separate parts of the picture under it. Its scale is not always convenient, so I calculate it in advance and make a cheat sheet how many millimeters are in 1,2,3,4,5 meters, etc. The main objects in the picture are clearly visible through the plastic, I find small things on the ground and finish painting. I don't draw more than 2 hours at a time. At home, plastic along with the substrate for the scanner, then in the okad, the card grows gradually. The last relief in the old way with a rail and a weight from the bottom up along the main paths, open slopes (a rail 1.25 m high so that 4 measurements are obtained at 5 meters) I wanted to learn how to draw on a tablet with a stylus and a navigator, but I'm afraid to make a mistake with the choice and how to do it right?
Gennady, tell us briefly about your methodology. Still interesting
22:37 31.03.2015
Drawn five maps Start: I take a photo from Sasplanet and a relief from the American earth scan. I am converting US data to Ocad11. Field work was carried out with the help of the Holux 245 logger. I tie the roads and the borders of the forest with a photo image from Sasplanet, I used the tracks of the passages. Office work was carried out in OCAD-9.4. I draw on plain writing paper. I draw the relief using the tracks of the passages, the passage along the horizontals.
23:39 15.09.2015
Gennady is stuck.
15:40 19.10.2015
I want to clarify my previous comment. I drew six cards. Beginning: Downloading a photo of the future competition area using the Sasplanet program. Taking a relief from the American earth scan. In Ocad11 I convert American data to .gps format. Gradation through four meters. The relief is very simplified. Field work was carried out using the Holux 245 logger. I first go around the competition area along the boundary points of the photo taken by Sasplanet (which are clearly visible). Office work was carried out in OCAD-9.4. I am uploading the track around the competition area.gps file. Loading .gps relief. Uploading a Sasplanet photo as a background. I will bind the boundary points of the photo from Sasplanet, I used the tracks of the passes. I receive a preliminary map which I print out in black and white format 1 cm: 50 meters. I go out into the forest and draw on simple writing paper. At first I used a tablet with lavsan tracing paper, but then refused. OCAD-9.4 does not want to be friends with the Holux 245 logger, it does not see it. The laptop has a maximum operating time of four hours and you have to walk up to eight hours. I draw the relief using the tracks of the passages, the passage along the horizontals. I preliminarily apply relief to the paper as I see it. At home in OCAD-9.4 I load the track and the scanned drawing map (field work). I draw a map. Recently, the gps track sometimes fails, I can not understand why.
17:23 25.12.2015
Found cracked OCAD 11 Russified. Installed. I tried to find a description of the work of OCAD 11 in Russian. Have not found. If anyone knows the link please give [email protected].
Anonymous
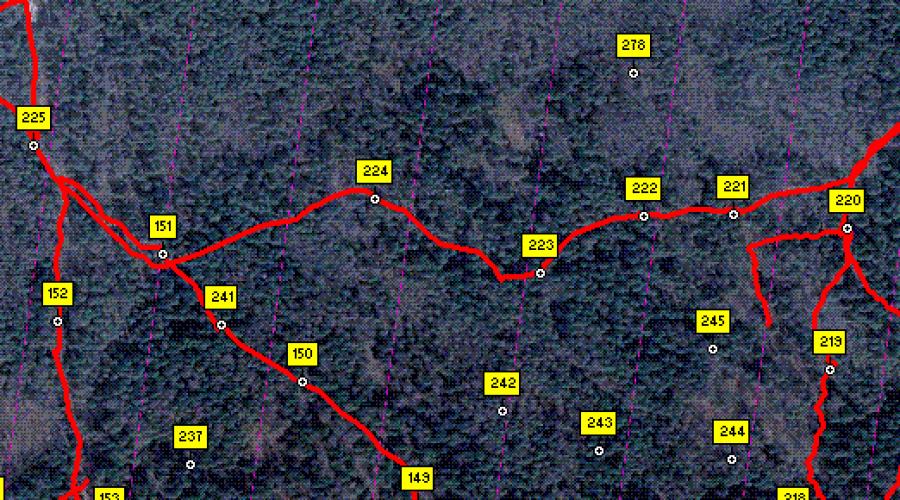
In the given example, between points 255 and 151, two non-coinciding lines are visible, I assume that in fact these are tracks from a repeated passage along the same route. Which one to use? If generalized, then there is a chance to lose small details, although this is not always important. In addition, when recording a track, significant surges from re-reflected signals and loss of accuracy may occur when the number of satellites decreases or when passing through deep hollows and / or under powerful crowns. It can be very difficult to identify such a non-systematic error in the future. If, when recording a track, you do not add details along it, which is a solvable but non-trivial task, then you still have to go through it with accurate shooting or apply details by eye, which can lead to distortion and deterioration of the map quality. In addition, household appliances usually approximate the route with their arcane algorithms and may introduce errors. In general, shooting tracks is more harmful than useful. Excessive thickening of the base points is also not always good. The fact is that the error of each point is a constant value, and if special measures are not taken, it can deviate from the true position by 10-15 meters or more. For two conjugate points, the error can double, i.e. and have an absolute value of 20-30 meters, which, with a distance between base points of 150 meters, is completely unacceptable. With this in mind, the distance between the base points should not be less than 300 meters. Of course, the accuracy of surveying the base points can be increased to the guaranteed 4-5 meters and higher by a series of repeated measurements with a hardware restart of the receiver, but this requires significant time costs and can only be justified in extremely difficult terrain. Usually the same 300-400 meters of interval between points is enough. At this distance, the acceleration of the manual shooting course gives an almost perfect result. All of the above applies to household receivers and is excluded by the use of professional geodetic instruments with DGPS or other error compensation system.
19:08 10.04.2017
(Anonymous) The Holux 245 logger gives errors of a maximum of 3-5 meters in the forest (guaranteed), in urban areas the error is crazy. It is not possible to use it. Logger made friends with a computer. With a simple relief, I take the computer to the forest from the first steps of drawing. Heavy and not very long battery life. At the final stage of work on the map, I definitely take a computer with a logger. I'm looking for a lightweight and durable tablet, with a small price.
13:39 16.05.2017
(Filipov) Are there examples of work where you can see your maps?
Log in to the orienteering site in the Kirovograd region Ukraine on Facebook, or give a link to the email address (see above).
22:42 16.07.2017
Bought Panasonic Model CF-U1 series. A good option for a sports map corrector (GPS and Ocad11 in one device). The price is skyrocketing.
13:47 19.09.2017
I drew nine cards. From my own experience I say - a lot of garbage is printed. Even by me.
13:52 26.10.2017
The ability of an orienteering map drawer to a large extent depends on funding and technical capabilities. However, the speed of drawing is highly dependent on many factors: the experience of the cartographer, the availability and quality of the bases used (aerial photographs, topographic bases, Lidar data), the complexity and saturation of the area itself, the time of year, and so on. 1. Aerial photos: Downloading a photo of the future competition area using the Sasplanet program. I bind the image in Global Mapper. I'm uploading to Ocad11. 2. I take relief from the American earth scan. In Ocad11 I convert American data to horizontal. Gradation through two and a half meters, it is possible and more and less. The relief is very simplified. If possible, I get topographic bases 1:100m (digitization is laborious, but there are paid programs). With Lidar data, everything is simplified, but Ocad12 is needed, there is no way to get it in Ukraine (the Baltic States have a cost of 20 € per sq. km). In Ukraine, there is an opportunity to get an ort-scan of the land (90 UAH per hundred square meters or 9,000 UAH per sq. km). 3. Field work: I draw a map using GPS: Field work was carried out using a Holux 245 logger (reserve track) and Panasonic CF-U1 series model. Fallback drawing on paper.
Articles and Lifehacks
Navigator for the car, like a tablet computer - laptop, and it is important for the user to know how to make a tablet out of the navigator.
Benefits of this tablet
- Navigators equipped with less powerful devices often have screens with low resolution.
- For more powerful processor faster calculation of coordinates and launch additional applications(viewing the situation on the road).
- In addition, devices differ in screen sizes: a tablet contains a more detailed amount of information.
- However, a larger device is more difficult to place in a car without obstructing the view.
Easier navigation control software(it's easier to install an update on a tablet). Tablet computers also have a fast start option.
Due to its size, the tablet is problematic to fix on the windshield.
When using the tablet in a car, an additional Charger, which will allow you to maintain a certain level of charge battery during the operation of the device.
The main features of such devices

- First, entering the menu, you need to select the "Settings" section, in which you should go to the "Location" tab. The user will be offered several options for determining its location.
- If the option "GPS satellites" is available, this item must be checked.
- Using tablet computer as a navigator you need to find in the main menu and run special program with cards.
- To avoid traffic costs, when determining the location of the owner, he will be asked to connect Wi-Fi.
- By selecting the pointer icon, in the window that appears, the user will receive a proposal indicating the most convenient route of movement.
- The user needs to specify the end point of the movement, press the "Get route" button and wait for the map to appear.
It will mark the route (including possible turns and traffic jams) and the estimated time during which the user will be able to reach the desired destination.
(continued, beginning:
Part 1, Part 2, Part 3, Part 4)Dedicated to the organizers of orient-starts
- Sometimes I hear what difficulties the organizers of various trail races face. And they should come up with a track, and mark the track, and make sure that someone doesn’t remove the markings, and organize food and record the results from the general start, and gather a bunch of volunteers for this business, using a tiny starting contribution of several hundred, or even thousands of rubles from the participants.
⬇️
(continued, beginning: Part 1, Part 2, Part 3)
- “How do orienteers train?” You ask, not even suspecting that the answer to this question expresses the whole essence of orienteering. As well as when choosing a variant of movement from CP to CP from a variety of possible ones, so the training of an orienteer is varied and multifaceted. And how many techniques have been invented and tested by coaches, do not count. Someone leans on athletic training, someone on the technical part, and someone is looking for a golden mean that can fit perfectly into the intervals between competitions. There are not many coaches and athletes who are ready to share their secrets. But there are exceptions. Meet Leonid Novikov.
⬇️
(continued, beginning: Part 1, Part 2)
- Many of my friends, when they learn about ski orienteering, are very surprised and ask: “How can you navigate skiing? The snow in the forest is waist-deep. On hunting grounds? Where's the map?"
⬇️
(continued, beginning )
- First, let's analyze the classic type of orientation, this is an interval forest start in a given direction.
So, you are on the outskirts of the starting corridor, 3-4 minutes before the start. Every minute there is a peep of the starting clock, at the command of which your next opponent is face to face with the distance, bringing the same fate to yours for one more minute. Usually, before the starting corridor, participants are offered to clear the memory of the electronic mark chip and check the cleaning. Do not neglect this operation, despite the fact that the memory of modern chips is quite large, but rather spend a couple of seconds on this before entering the corridor so as not to waste your nerves on the distance.
⬇️
- It seems to me that the moment has come when it became necessary to tell those of you who quite by chance jumped on the orienteering site of the Novosibirsk region what such an exotic sport as orienteering is like.
⬇️
People who decide to participate in orienteering for the first time are sometimes surprised and ask why this plastic platform is needed on top of the steering wheel. Most, of course, guess that its main purpose is to store the card, but not everyone understands all the advantages of such a design.
The most obvious benefit is the storage and access to the map while driving. There is no need to stop, take out the card, and then pack it back into your pocket, backpack, or “teeth” (yes, some people even drive like that).
A map is a reduced representation of an area, such as a forest, park, or part of a city. In life, we often come across maps, from paper to electronic, but orienteering maps are special :) These are detailed terrain maps, where even deep in the forest every clearing, hole or fallen tree is marked. Such cards are made in special conventional signs. Just as reading a book requires knowledge of the alphabet, working with a map requires knowledge of the symbols and symbols used in it. And the better you know these designations, the deeper and more detailed you understand the map.
Orienteering tablets for cycling or skiing are a rather rare and even exotic type of sports equipment, and they are unlikely to be found in any sports store. Therefore, below is a list of places where you can get them.
Do not forget that a simple bike tablet can be assembled by yourself from improvised means.
Bicycle orientation (mountain bike orientation, MTVO, cycling) is a sport that attracts both orienteers and mountain bike enthusiasts. The essence of the MTVO competition is that a participant on a bicycle must follow a given route in an unfamiliar area, using only the help of a map and compass.
Somewhere along the route (or they say on the course) there are checkpoints (abbreviated as CP), which are mandatory points to visit. Between them, the athlete is free to move as he pleases, choosing the best path for himself. The winner is determined by the time spent on the distance, subject to visiting all the specified checkpoints.
A cycling tablet for beginners is not a mandatory thing, but those who have already participated in cycling understand that it is still more convenient with it :)
As the simplest card holder, you can use a plastic file with a clasp and an attached string to wear around your neck.
Here we will describe in more detail how to independently assemble a more advanced tablet. We will need the following parts: planchette, clamp, screw, nut and washer, 3-4 rubber bands. This is all that is needed for a budget solution.
Imagine that you are running through the forest, there is no trace around. The sun is shining, birds are singing, nature is beautiful and serene. Not a soul, you are in the heat of the race. Perspiration covers your face, and your heart is beating so fast that it seems about to jump out of your chest. You are filled with excitement, excitement and anxiety. Before your run, you don't waste time looking at the mirror. Success does not depend on how well dressed you are. You have a map and a compass in your hands, a fleeting glance at them - and you outline your path to the smallest detail, step by step ... You enjoy your speed and feel the taste of victory. No matter how old you are, you can run when you need to. The forest is waiting for only one thing: for you to return ...


Foreign tablets for ski orientation:

Babylon - Universal wire frame "collar". Cheap tablet for children and beginners with a table 250*250 mm made of cellular polypropylene. Fast fastener on one side of the chest harness. Full adjustment of the chest harness vertically and horizontally. Smooth adjustment of position of removal of a table. Folds up and down. Fall safe. The table is equipped with two rubber bands for attaching the card. Folds flat for transport. Compass holder optional (plastic +50rub., metal +100rub.)
800 rub.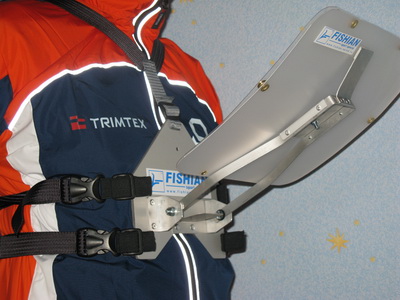
Universe - Universal frame. Traditional tablet with curved table 250*250mm. Fasteners on one side of the chest harness. Full adjustment of the chest harness vertically and horizontally. compass holder located below the level of the table, allows you to install any type of flask. Smooth adjustment of the position of the removal of the "Arc" type. Folds up and down.
1600 rub.
Polaris - Universal frame. Special tablet with curved table 250*250 mm. Fasteners on one side of the chest harness. Full adjustment of the chest harness vertically and horizontally. Compass installed takeaway table. Smooth adjustment of position of removal like "Arrow". Folds up and down. Expert advice!!!
1600 rub.Name the necessary devices, tools for surveying the terrain plan. How is the tablet oriented? How to draw a direction from a point? How is distance defined and indicated?
The plan of the earth's surface is compiled on the basis of photographs taken from an aircraft (Fig. 24). In addition, a plan of a small area can be taken using measurements while on the surface of the Earth.
Rice. 24. Shooting a plan of the earth's surface from an aircraft.
1. Preparatory work. To shoot a plan of the area, the tools that you used in elementary grades are enough. Thick white paper is glued onto a sheet of plywood measuring 40x30 cm. IN upper corner on the left, a compass is attached with sealing wax so that the letter "C" is in the upper part (Fig. 25). On the same edge of the paper, a north-south direction indicator is set, and a linear scale is drawn below. It is signed in accordance with the accepted scale.

Rice. 25. Tablet and target line.
When shooting any point on the earth's surface, the tablet is first oriented with a compass. To do this, you need to turn the magnetic arrow so that its direction corresponds to the direction of the pointer on paper. The tablet is now ready for filming. To survey the plan of the earth's surface, depending on the size of the area, use various ways. Let's take a look at the simplest of them.
2. Polar. The method is used to capture a plan of a small area. These surveys are carried out from one point on the earth's surface, called the pole. Therefore, such a survey is called polar. For example, Figure 26 shows that a small piece of terrain needs to be surveyed. The survey pole is chosen from the middle of the site, from where it is clearly visible. The student (observer) after orienting the tablet on the drawing marks the point of his location (point A). Then he draws lines to the tree (1), as well as to the points (2, 3, 4, 5), showing the bends of the river. Measures the distance to objects of sight. Using the selected scale, plots the distance on the tablet. A separate tree, shrub, river and meadow is indicated by conventional signs.

Rice. 26. Polar way.
3. Perpendicular way. Using this method, it is convenient to add objects close to the road to the plan: a forest, a river, a forester's house, etc.

Rice. 27. Shooting a plan of the area using the perpendicular method.
Figure 27 shows the procedure for adding a part of the river and its left bank to the plan. Scale 1:1000 (1cm-10m). At point number 1 on the tablet, orienting by the compass, draw a direction on paper. From this point to the left, towards the forest, we draw perpendicular lines. For example, the measured length is 20 m. In the direction of the line, in accordance with the scale, we set aside a segment of 2 cm. Next, draw a perpendicular to the right in the direction of the river and set aside a distance of 22 m on it, which corresponds to a segment of 2.2 cm. Upon completion of work at point No. 1, we measure the distance in the main direction to point No. 2. To find point No. 2, we need to set aside a distance of 40 m on a scale (4 cm). From this point to the right and to the left we draw perpendicular lines and designate the house of the forester, the edge of the forest and the bend of the river. Along the way, we will introduce the designations of swamps and meadows.
In this way, work is also carried out at points No. 3, No. 4. With the help of this method it is convenient to shoot the outlines of forests, groves, rivers, etc.
4. Bypass method (route shooting). To shoot a plan of a large area, you need to completely bypass the area. For this, a route is chosen along the road, river, coast, ravine, forest outskirts, etc. (Fig. 28). In this case, the survey of the terrain plan is carried out in a mixed way.

Rice. 28. Shooting the area by walking around.
The work is done in the following order:
1) at each point, the tablet is oriented according to the compass and relative to the landmarks of the area;
2) after drawing the nearest objects on the plan, determine the direction to the next point and draw a line to it;
3) measure the distance from one point to the second and mark it according to the scale taken;
4) objects located along the road are taken using the perpendicular or polar method.
5. Final work. After the completion of the field work, the removed plan of the house is processed. The set points, lines drawn between them and additional lines are erased. The necessary conventional signs of terrain objects and explanatory inscriptions are put down.
1. How are the preparatory works carried out for surveying the terrain plan?
2. How is the tablet oriented?
3. What are the methods of surveying the area?
4. Plan the school yard using the polar survey method.
5. Using the perpendicular method, draw a plan of the road or part of the river.
6*. During the tour, make a plan for how to get around the area.