After root rights, I formatted the system on android. Complete removal of superuser rights on Android
Read also
No smartphone manufacturer provides the kind of freedom that Android device users want. It is not possible to remove stock applications, edit system files and the user interface on stock firmware. This is due to the fact that in inept hands the phone becomes a “brick” after 2-3 days of use, and thus manufacturers protect the system from irreversible damage.
Reasons for deletion
Three reasons can force a user to get rid of advanced functionality:
- Warranty repair. The corresponding coupon states that if you receive ROOT rights, install custom recovery and firmware, the official warranty for the device is lost. Therefore, before transferring the device to the service center, we remove the superuser rights and “clean up the tails”.
- Phone sale. If the buyer of the gadget does not know anything about ROOT rights and communicates uncertainly with the equipment, there is a chance that in 2-3 days after the sale he will hear angry insults in his address with a demand to return the money. For reinsurance, it is recommended to return the phone to its original state.
- The appearance of delays, "glitches", errors. No one is immune from accidental file deletion or virus infection. Therefore, it is required to remove superuser rights so as not to damage the system even more.
How to delete?
There are two ways to get rid of extended rights: using a computer or a mobile application.
Flashing using a computer
The most reliable option. After flashing from ROOT, there will be no trace of rights. To do this, go to the official website of the manufacturer of your smartphone or the w3bsit3-dns.com mobile forum, where you will find detailed instructions for the official firmware of the device.
Attention! When visiting the forum, look only for official firmware methods. Do not settle for offers to install a custom version or mod.
Applications
There are applications that set ROOT rights in one click. And there are those who remove them. Let's consider each in more detail.
Root Browser Lite
Download the app. After starting, we perform the following actions:
- Enter the folder "/system/app".
- Find and remove "SuperSu.apk".
- In the "/system/bin" directory, delete "busybox" or "su".
- In the "/system/xbin" folder, also delete "busybox" or "su".
- Reboot device.
After these steps, ROOT rights will be permanently removed.
Attention! When starting the application, do not forget to give it superuser rights, otherwise the system folder will not be displayed.
If SuperSU is your administrator of extended rights, you can get rid of them by following the steps below:

Universal Unroot
The last method is represented by the Universal Unroot application. It is rightfully considered light and fast.
If you are reading this manual, then you know exactly how to get it. But, today's instruction provides for the opposite action - we will deal with the issue "How to remove root on an Android smartphone or tablet".
Disabling root access on a smartphone often becomes relevant, for example, for selling a mobile device. After all, the buyer wants to get a gadget that is as close as possible to the "store" state.
The reasons may be varied.
There are many manuals on the network about rooting devices for Android, but there are not so many reverse instructions. So let's go!
Unroot using SuperSU
Many users of rooted Android devices have the SuperSU app installed. It is a popular device management tool.

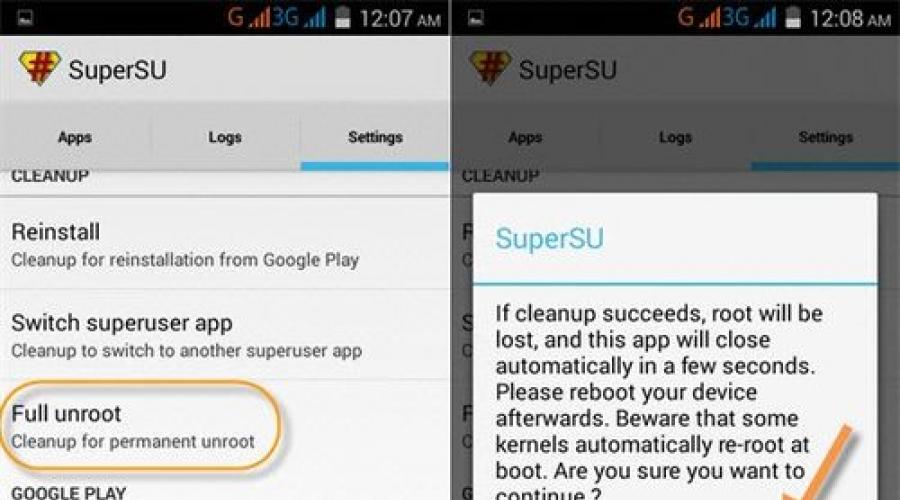
The process of removing Root using this program is very simple. Therefore, we decided to mention it in the first place. Just open SuperSU and go to Superuser Settings. Scroll down the menu and find such an item - "Full Unroot". We tap on this item and simply follow the further instructions.
The phone will do its job. After the end of the process, you just need to restart your mobile device and enjoy.
Remove root using a third-party application
In the role of a third-party application for disabling root rights on an Android smartphone or tablet will play . It's in the Google Play app store:
This option is useful for those users who do not have SuperSU. True, it will be necessary symbolically  fork out to download it. But, first you need to carefully study the list of supporting devices. So that it doesn’t turn out like this: the money was transferred, but the program does not work.
A large number of Samsung devices do not support the proposed utility due to KNOX incompatibility. LG devices need to remove their root access but the phone won't admit it to you thanks to eFuse.
In short, it is up to the reader to decide whether it is worth paying money for such a service.
For those who do not have SuperSU and do not want to spend their hard-earned money, there is a fairly reliable third way. We will use the file manager for the mobile phone.
How to remove root rights using ES File Explorer
By itself, root access can be a complex software process with a bunch of files and codes involved. But, this is partly not true. Although the files will have to be “aligned” a little.
Let's use my favorite file manager − ES File Explorer. It is completely free and you can download it from the same Google Play:

Then we look for the folder s in the device memory system, open it and in it we find another daddy with a short name bin:


In the specified directory, you need to find two files: "busy box" And "su". I only had one file available - the first one. No matter how many there are, we remove them.
Next, you need to return to the previous folder system. Then go to another folder - xbin. There we find the same files: "busy box" And "su"- remove them:

Again we return to the main system folder - system. We are looking for a folder with applications there - app. In it, we must delete the installation file superuser.apk.
To run some programs and perform various actions with the system, the owner of a smartphone or tablet must first obtain superuser rights. However, it may also happen that you need to get rid of them. In what cases may this be needed and how to remove root rights from Android completely without harming the phone?
Of course, it may be that the status of "Superuser" becomes no longer necessary. But still, more often than not, the following three situations can be called the reasons for removing Root rights from your gadget:
- The gadget began to glitch. It happens that after an incorrect or unsuccessful procedure for obtaining rights, the smartphone often starts to freeze, not work stably, or even periodically reboot.
- You need to take the device to a service center. The problem is that getting root rights on Android is a system hack, and if the warranty period has not yet expired, then this will be a violation of its terms. Otherwise, you will have to pay the full cost of the repair.
- The likelihood of a virus threat. Thoughts that hacking the system and acquiring Root rights do not allow you to protect your device from viruses have recently occurred to many more and more often.
Removal methods
Consider ways to remove Root rights.
Using the application
How to remove Root rights on Android using various programs? To do this, you first need to decide which method is best for the user:
- download from the Play Market and install a suitable utility directly on your smartphone;
- flashing using a program on a PC.
In the first case, any applications that were used to enable these rights are fine. Consider the example of the Root SuperSU administrator. To use it to remove Root rights, you need to follow these steps:
- run the utility;
- go to the "Settings" tab;
- find the item "Complete removal of root".
Universal Unroot is also suitable for this, in this program you just need to press the "Unroot" button, then confirm the action and wait for the device to restart. After that, you will need to double-check the presence or absence of rights using, for example, Root Checker Pro.
If the user also installed custom Recovery, it will also need to be removed or simply reflash the phone or tablet. But it is better to carry out the flashing procedure anyway after root rights have been disabled. Especially in the case when the need arose due to smartphone glitches. And before that, you must first do a full reset and format the memory of both the internal and external drives.
In order to remove Root rights through a computer, you need:
- it is advisable to download the firmware for your phone model from the official website;
- launch software for your brand, which is usually supplied on a disk with the device;
- debug USB on the gadget and connect it to the PC using a cord;
- you need to turn off the gadget, and then go into Recovery (usually by simultaneously pressing the power and volume keys down);
- each program is visually different, but in each you need to find the .tar.md5 file in the PDA section, which is located in the previously unpacked archive with the downloaded firmware;
- in the application, only PDA and Auto Reboot should be checked;
- press the start button;
- after some time, the program will report the success of the procedure, and the device will reboot.
Manually
How to disable root rights on the device without using third-party applications and without connecting it to a PC? To get rid of superuser rights manually, you can either use one of the file managers, or simply reset the settings to factory settings.
In the first case, download the Root Browser Lite application or any other file manager from Google Play and perform the following steps:
- find the SuperSU application at / system / app and completely remove it, even the apk file;
- look for busybox and su files at /system/bin, which will also need to be deleted;
- at /system/xbin, search for the same files and also the .su folder, delete everything if available;
- reboot the device.
For a manual reset, you will need to enter Recovery, for which, as mentioned above, you need to turn off the gadget and hold down the power and volume down buttons. Next, we do the following:
- by controlling the volume buttons or just a sensor, we find the item "Reset to factory settings";
- in it you need to select the items "Clear data partition" and "Reboot the system now";
- the device will be overloaded.
Often, owners of Android devices, wanting to access the file system of their gadget in order to gain full control over the device, ask themselves. However, having got what they want, users often have the exact opposite question - how to remove root rights on Android. Why is this happening?
The need to get rid of the rights of the "Superuser" arises for various reasons.
- A weighty argument can be called the need to contact a service center, since by some manufacturers rooting the device automatically deprives the owner of warranty service.
- There are frequent cases of unstable work, “freezes”, spontaneous reboots and other troubles caused by the presence of ROOT. Usually in such situations, removing full administrator rights is the only way out.
- We have repeatedly told gadgets. A rooted device in this sense carries a real threat when dangerous software, once on the device, uses root rights to embed into the system, which creates serious difficulties in its detection and subsequent elimination.
- You decide to sell your gadget or donate it to an inexperienced user, in this case, restricting access to the system minimizes the risk of the gadget breaking.
- The presence of "Superuser" rights makes it impossible to install updates on Android "over the air".
How to remove root rights on Android
There are several ways to remove Superuser rights, below we will consider the most popular ones.
With SuperSU App
If the ROOT source on the device is the program " SuperSU” (pre-installed or installed by the user), then we need to perform the following steps:
We launch SuperSU, go to the program section " Settings", find the item" Complete Root Removal» (« Full Unroot") and click on it. When a warning appears, press " Continue«:

After that, the uninstallation process will begin, we are waiting for its completion. At the end of the application SuperSU"closes, restart your Android. Ready.
*Note: this method is relevant only if the device has not had third-party firmware installed. Otherwise, by rebooting the device with firmware, root access can be restored again.
Using the Universal Unroot App
This is one of the easiest ways to remove root on Android. Our actions: download and install the utility Universal Unroot. After installation, launch and press the button " Unroot”, To warn the program about consent to permanently remove Root access, press the button“ Yes» (« Yes”), and on the subsequent request for granting superuser rights, click the button “ Provide”, after an automatic reboot of the system, Superuser rights will be removed:

*Note: the program is distributed on a paid basis ($ 1) and is not suitable for all Android models (however, like other Root uninstallers).
Removing root rights manually (via Root Explorer)
Root Explorer is a great file manager for rooted Android tablet/smartphone users. What you need to do to remove root rights in this way:
Using the volume button (to increase or decrease) we find the line " wipe data/ Factory reset" (wipe data / reset to factory settings), activate the action by pressing the power button, and then select " Reboot system now" (reboot system now). After rebooting, the device will restore factory settings:

*Note: on some models, the action may look like this: "Reset to factory settings" (Restore to default) -\u003e "Wipe data partition" (Wipe data reset) -\u003e "Reboot system now" (Reboot system now).
Dear reader! Please write if this material was useful to you. Do you have your own solution to the problem, how to remove root rights on Android?
And that's all we have for today. Good luck!
). It is clear that full access to the file system is not always in demand. If you do not need root access, it is advisable to disable it and remove all root applications. This is not so difficult to do, and you will see for yourself.
In this article, we will tell you how to remove root through a PC using special uninstaller programs. We also mention alternative methods.
If you know other ways or have any questions, please use the feedback form with the note "how to remove root rights".
Whether to remove root: pros and cons
Removing root rights provides the following benefits:
- Warranty retention: You have the right to return the device for warranty repair in the event of a problem.
- If you sell the device, the buyer will receive it "clean".
- Possibility of official update of Android “over the air” (on air).
- The security of the Android OS is improved.
Negatives to keep in mind when removing root rights:
- After a reboot, the device may go into bootloop (see Faq for how to fix the problem).
- There are no 100% reliable programs and guaranteed ways to remove root.
- Many root removal methods are incomprehensible to beginners.
File backup
Important! Before removing root rights, be sure to back up the most important files, copy them to a PC or to the cloud. How to do it correctly, we described [here].
SuperSU - universal and fast way
Installing custom firmware on Samsung
Perhaps one of the most reliable and relatively safe ways to disable root rights is to update to the next version of Android. True, if root is installed, official firmware will not let you update over the air.
The workaround is to update the firmware through a special Odin3 application (ODIN flash tool). It allows you to install official and unofficial (custom) firmware on your phone via PC. There is a risk of turning the phone into a “brick”, but if you clearly follow the instructions on the XDA forum, everything should work out.
Notes:
- For flashing, you will need USB drivers (you can download them for Samsung).
- Using this root removal method, you must first uninstall SuperSu and other applications associated with root.
- You need to install the official one, i.e. stock update (stock ROM).
Detailed flashing instructions are available.
FAQ on removing root rights
Question: Is it possible to get rid of root by performing a Hard Reset?
No. If you used the Unroot method via bootloader modification, you will not be able to remove root rights. After a Hard Reset, you will lose all data, get a clean Android OS, but traces of root will remain in the bootloader.
Use either SuperSU or a stock firmware update for this (if you have a Samsung phone).
Question: If I use SuperSU, will the data on the phone be deleted?
No, but you must remember that removing root via SuperSU may result in a bootloop, as evidenced by the feedback from users of this application. However, if we are not talking about modifying the bootloader, the SuperSU application is convenient and safe.
Question: Removed root rights, rebooted the phone - it went into bootloop.
Unfortunately, this often leads to the fact that the device goes into a cyclic reboot (bootloop).
How to get rid of bootloop you can:
Installing firmware from custom ROM using Odin for PC.
By doing a hard reset.
In both cases, you will lose all user files stored in the phone's memory.