Photoshop cs6 how to enlarge an image. Resizing an image without losing quality with Perfect Resize
Read also
Many designers use a program to process images. Adobe Photoshop. With this program, you can enlarge and reduce images. At the same time, if you reduce a large image, its quality will remain unchanged. But in the case of an increase in the image quality of the photo will be subject to some distortion. In order to increase the size of a photo in Photoshop and not lose its quality, you need to know a few nuances, as well as understand the tools Adobe software Photoshop.
How to enlarge an image
Often, the user does not need to increase the size of the picture, but simply change the scale of the image. Most often, this is done in order to make it more convenient to process small details or specific areas of the image. For such actions, the Zoom Tools tool is ideal. You can also use this tool using hotkeys. It is enough to hold down Ctrl and + or Ctrl and - at the same time to increase or decrease the scale, respectively. Also, the Loupe tool is called by pressing Alt keys, after which scaling is performed with the mouse.
But there are times when users do not know how to enlarge a photo in Photoshop, that is, directly the size of the photo. To do this, it is recommended to use the Free Transform tool, which is located in the Editing menu (Edit). It also has hotkeys. To call this tool, you need to press the key combination Ctrl and T. After that, special knots appear around the image, pulling which, you can freely transform the image in different directions. However, if you press Shift key, the image will be transformed proportionally.
Alternative ways
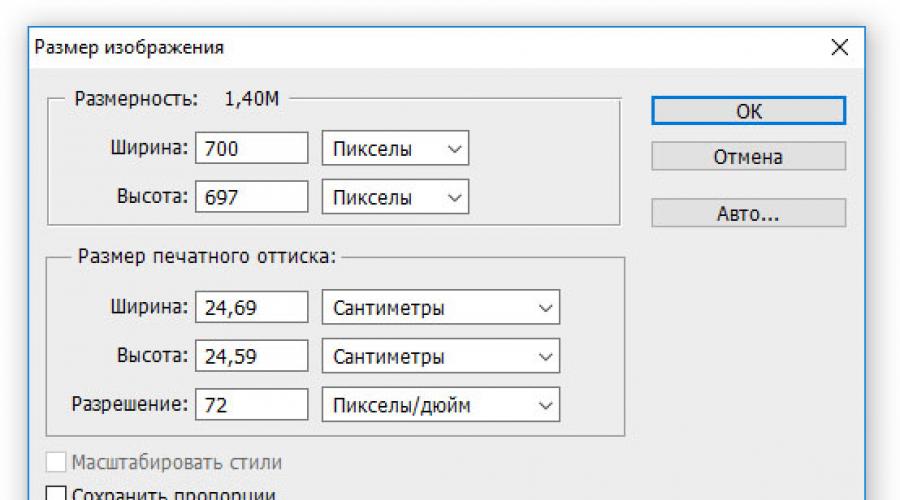
There are several more ways to enlarge a photo in Photoshop that allow you to change the height and width of the image. To do this, in the menu “Image” (Images) there is a special tool “Image Size” (Image Size). In the special height and width fields, you can set your own value, which is located in the section of the pixel array. Here you can also select the Constrain Proportions item, which allows you to proportionally increase the size of the image.
It is worth remembering that when the image is enlarged by 100% in one step, the file distortion will be more noticeable than when the image is gradually enlarged, for example, by 10%. Based on this, it can be concluded that a small increase in several steps is more appropriate than one large increase. In order to change pixels to percentages, you need to switch the value in the Document Size section to Percent.
Improving Image Quality
Obviously, when changing the image, all kinds of distortions will occur in the form of digital noise, blurring of some areas, as well as other unpleasant consequences. To avoid this, it is recommended to sharpen the image after the resizing of the photo is applied. After that, you can duplicate the layer with the "Color Contrast" filter and use "Overlay" as the layer blending method. Do not forget about the transparency of the layers. By experimenting with this function, you can achieve High Quality Images.
With the help of Photoshop, it is easy to reduce or increase the size of the image. Moreover, it can be done different ways depending on what result you are looking for.
Before proceeding with the consideration of methods, first a little theory.
First, what is reducing or increasing the size of an image? First of all, this concept should be understood as a decrease / increase in the resolution of an image, that is, its length and width and, accordingly, the number of pixels that make up any bitmap. .
Secondly, what happens to the image quality after resizing it?
- During the reduction process, there is a loss of pixels, but the quality as a whole does not suffer, it remains quite clear.
- During the process of increasing, Photoshop stretches the pixels and draws them according to its algorithm. Therefore, when zooming in, the image quality always suffers. How more magnification, the more clearly the irreversible loss of quality is visible.
A similar issue was addressed in the lesson related to changing the size of the layer,
A good example of how image quality changes:
In this article, we will look at 4 ways to resize an image in Photoshop and analyze the cases when and in what way it is best to use.
Method 1 - Image Size Dialog Box
This is the classic and most universal way. It is suitable in most cases, especially when you already know how much to reduce and increase the size of the picture.
Open the image in Photoshop.
Open the dialog box Image - Image Size(or keyboard shortcut - Alt+Ctrl+I ). The following window will appear:

Pay close attention to the fields Width And Height. Those values that will be indicated there are the current dimensions of the image. By default they are measured in pixels.
If you initially know to what sizes you need to resize the image, then enter these values in the above fields.
Proportions
If the checkbox is not checked in the window settings Keep proportions, you can enter any values in the length and width fields. But you risk that the picture will be stretched vertically or horizontally. It is very easy to make a mistake and choose the wrong proportions.
Example without aspect ratio
Proportional example
Method 2 - Resizing with Transform
Image transformation is a cool way to add to your Photoshop knowledge. This method is good in two cases:
- reduce or increase the size of the entire image;
- reduce or enlarge the inserted image in Photoshop.
Size details each case.
How to reduce or increase the size of an entire image
Step 1
Open the picture. Choose a team Editing - Free Transform or press the key combination Ctrl + T .
Note
If given command not active (dimmed in gray), then your background layer is locked to change. This is indicated by the lock icon right on the layer.
To unlock the background layer, double click on it. A window will appear New layer, Press OK.
Step 2
A frame will appear around the image. There are handles in the corners and on each side that you need to drag to make the image smaller or larger.
After resizing, click on the checkmark at the top in the options bar. There is a bug in Photoshop CS6 and this checkbox is not visible. If you don’t see it either, then press the Enter button to accept the changes or Esc to cancel.
Step 3.1 Increasing case
If you enlarged the picture in this way, then, as you can see, part of it has become hidden, as if it does not fit into the size in which it was opened. On the one hand, this is also not bad, and in some cases it can also be used.
But if you insist that the image be shown in full, select the command Image - Show All.
Step 3.2 Decreasing case
When you zoom out, you will see a chess background. It is emptiness, transparency. It will disappear when you save the image. But it will be correct to cut off the void in order to ultimately see what the final size of the picture is.
To cut off the void, select the command Image - Trimming.
To in this method also keep the aspect ratio of the image, when you drag the frame handles, hold down the key at the same time Shift.
How to reduce or enlarge an inserted image in Photoshop
In any case, take the case described above into your arsenal. Namely, the ability to use the command free transform(Ctrl+T ). This technique will be needed to carry out such a common operation, how to reduce or enlarge an inserted picture, object, object(call it what you want).
So a familiar situation: you inserted another picture to your main image in Photoshop, but it did not fit in size.
Select this picture and use the transform command. Now, as described above, drag the markers in the desired direction.
Method 3 - Canvas Size
Not the most popular way, but nevertheless we will also consider it - the .
A feature of this method is that we change the size of the image resolution, while the picture itself does not change in any way. Photoshop simply cuts off part of the image (if we are talking about reduction), or adds background color(if it's an increase).
That is, let's say your picture is 700x700 pixels. Through Image - Canvas Size you set the size to 500x500. As a result, Photoshop crops the extra 200 pixels in height and width. In the settings, you can specify where it cuts off: it is either uniform on all sides, or you can select a specific side.
How to reduce image size without losing quality
We looked at 4 ways to reduce the size of an image. Of these, two methods: Canvas Size and Crop are not associated with quality loss. In fact (width and height) the pictures become smaller, but the content itself remains the same scale. To achieve this, you need to sacrifice part of the picture, in other words, just crop it to the desired size. See above for more details on how to do this.
How to scale down a cropped image in Photoshop
In order to reduce the size of a cut out object in Photoshop, you need to be able to: cut out objects, manipulate the cut out area (including its reduction).
Read about how to cut objects in other articles. Let's take a closer look at reduction.
In this situation, you will also need to know how to use the command free transform.
When the object is cut, you need to form around it. After that, apply the transformation and, according to the instructions above, drag the handles in the direction of decreasing this object.
In any case, when reducing the cut fragment in the freed space, Photoshop will automatically add a background color. Therefore, if you have a simple case, then first take care and choose the same background color that surrounds the object to be reduced. To do this, get a color sample with and .
Noticed an error in the text - select it and press Ctrl + Enter . Thank you!
Programs for working with raster graphics, such as Adobe Photoshop, have handy tools to resize images. But before how to enlarge an image in photoshop, you should be aware that this may result in loss of quality. So try to new size The drawing was as small as possible.
1. Open Photoshop, click File >
To use the tiger photo below, click right click mouse over the image and click Save.
Important: Before you enlarge an image, make sure that it does not contain defects such as dust or scratches on the lens, as these will also increase in size:
2. Select Image > Image Size…
3. Before you increase the size of the picture in Photoshop, the "Image Size" dialog box will open
The size of the original image is 10 by 6.667 inches. Let's say we want to enlarge an image to 12 by 8 inches so that it can be easily printed and framed. Since it is important for us to keep the resolution at 300 pixels per inch, we set a new size. In our case, we increased the width of the document from 10 to 12 inches and the height from 6.667 to 8:
5. Choose an interpolation method
Before, how to enlarge an image in photoshop and click "OK", we need to select the interpolation method. To increase the size of an image, the program needs to analyze and redraw the pixels, which is called interpolation.
When choosing bicubic resampling, Photoshop will add new or redraw existing pixels, which is necessary to obtain the correct result when the image is enlarged.
Bicubic ( smooth gradients) is the most accurate method that calculates the value of a pixel based on the average value of adjacent pixels.
Bicubic (magnified) - a variation of bicubic interpolation for images containing digital noise. When using this method, the borders in the image will look the most smooth and soft:
IN this example we increased the document size from 10 by 6.667 to 12 by 8 inches. Notice that the pixel size has increased from 3000 by 2000 to 3600 by 24000. Also note that the final image size has increased from 17.2MB to 24.7MB:
How to Reduce Image Size in Photoshop
You need to know not only how to zoom in on an image in Photoshop, but also how to zoom out. For example, if its resolution is large enough to be posted on the Internet, it is too big size file, or you need to print an image of a specific size.
1. Open Photoshop, click File > Open, and select an image
2. Before you increase the image quality in Photoshop, select Image > Image Size…:
3. The Image Size dialog box will pop up as shown in the picture below
4. Set image size in pixels, document size or resolution
The resolution of the original image is 300 pixels/inch ( ppi). For example, we want to place this photo on the site, and the allowed size is 600 by 400 pixels, the resolution is 72 pixels/inch. First, enter 72 in the "Resolution" field, then set the size in pixels ( 600 - length, 400 - width):
5. Choose a resampling method
Before, how to increase image quality in photoshop and click "OK", we need to select the interpolation method. Typically, to reduce the size of an image, Photoshop removes all unused pixels. Interpolation methods allow you to specify how pixels are processed to obtain the best quality reduced image.
Bicubic (for downscaling) - better for downsizing images. When using this method, the borders of the image will appear sharper. If the result seems too sharp for you, use simple bicubic interpolation:
6. Click "OK" to apply the changes
You have successfully resized the image.
In this example, we reduced the image resolution from 300 to 72 ppi and the pixel size from 3000 by 2000 to 600 by 400. Note that the file size has been reduced from 17.2 MB to 703.1 KB!
Hello my readers!
Resizing an image is a rather important operation not only for those who create and fill their own, but also for everyday use, from social networks to chats and forums.
Exists a large number of programs that will allow you to change the resolution of the picture. But how to make sure that with such editing the photo does not lose its display quality?
This is what I would like to talk to you about today. If you're wondering how to resize an image without losing quality, then you're in the right place.
PAINT
First of all, I would like to talk about the standard Paint photo editor. The set of functions of this utility is not large, but the main features are inherent.
Launch the Paint program on your PC, in the "File" tab, select the "Open" item. In the window that appears, we find the desired image, indicating the path to it by successively opening the necessary folders.
The navigation of the program is very simple: next to the "Select" icon you will find the "Resize" function we need, let's select it.

Before us appeared the window of the image editor itself. We can change the size in two parameters: percentages and pixels. We select the pixels and put a tick on "Keep aspect ratio", this will make it possible to save the very shape of the picture, which will not reduce the display quality. When saving proportions, you only need to enter one parameter (width or length), and the second one will be selected automatically. It's actually quite simple, isn't it?

After the done manipulations, save the file in a format convenient for you.

More available in Paint manual editing. To do this, you need to select the entire image (pressing CTRL + A), then move the cursor to the lower right corner of the image and move it to the upper left, the size will change.
After you have achieved the desired result, click on the unselected area with the left button, and adjust the working canvas of the program to fit the picture. Unfortunately, in manual mode It's very hard to keep proportion.
It should be noted that with the help of Paint you can both increase and decrease the size of any picture.
Adobe Photoshop
If you want to master all the features of this program, then I recommend that you take the course " Photoshop from A to Z in video format". After completing the course, you will be able to work wonders with this software, even if now you know almost nothing.
Change the size and weight of a photo using this software is considered a universal method. Despite the range of possibilities, editing of this nature in PhotoShop is very simple.
To get started, you actually need to have Photoshop installed on your computer. If this software product is already installed on the PC, right-click on the photo and select the “Open with” option, find PhotoShop among the entire list and select it.
Or, first run the program, and then go to the "File" - "open" menu.
On the toolbar, you will see the "Image" section, select it. In the menu, select "Size ...", after which the image editing tool will be launched.


After these manipulations, save the files in BMP format. In this case, there is no difference between the original and the reduced copy. Or, leave the JPG format, but when saving in the "Image Quality" block, instead of the number 8, put 10, this will give maximum quality picture.


If you save the picture for the purpose of its further posting on the Internet, for example, on your blog, then it is better to save it in a different way (so that it weighs less). Look at the screenshots below:


In addition to these options, there are hundreds more types on the Internet. software that perform similar functions. You can also use the services online, they also do an excellent job of their duties, as a rule, they all have detailed instructions.
Sincerely! Abdullin Ruslan
Pictures and photographs are one of the most popular ways to convey information. We regularly post our photos on social networks, sites are filled with pictures and news feeds. Special images are used by web designers to create the most beautiful and attractive websites. In all cases, images of different formats and sizes are used. Luckily, you can resize any photo. Software Adobe Photoshop provides the user with practical limitless possibilities for working with pictures. In this article, we will figure out how to reduce or enlarge an image in Photoshop. Let's get started. Go!
Article on setting photo width and height
Photoshop has implemented a special method that allows you to preserve the sharpness and detail of the photo when it is enlarged. This method is available in versions no older than Photoshop CC.
To enlarge or reduce the picture, launch the program and go to the "Image" menu. Select "Image Size" from the drop-down list. In the window that opens, all the necessary settings will be made. You can get into it by using the key combination Alt + Ctrl + I.
In the "Image Size" window, pay attention to two items: "Width" and "Height". You can change their values to achieve the desired parameters. If you want the photo to shrink or enlarge proportionally, click on the special link icon on the left. If they are linked, then when the height value changes, the width will also change proportionally. If the links are disengaged, then each parameter is changed separately.

In most cases, the relationship is enabled
On the right, you can select the units of measure. By default, "Pixel" is set there, since this particular unit of measurement is usually considered the most convenient. Below you can set the resolution, which is measured in pixels per inch.

There is an option for different situations. Don't forget about resampling
If in the process of editing a photo you want to ensure that all pixels are proportionally adjusted, be sure to select the Resampling option. If necessary, select an interpolation method from the Resampling menu. To select resampling options, click on the small triangle, after which a list will open in which you can select one of several modes:
- Automatically (Photoshop will independently select the most appropriate method);
- Preserve Details (by selecting this method, the noise reduction option becomes available);
- Bicubic with zoom (uses interpolation to get a smoother picture);
- Bicubic Reduction (reduces images while sharpening);
- Smoother gradients (analyzes the colors of neighboring pixels, allows you to achieve smooth color transitions);
- By neighboring pixels (this method is used to maintain sharp edges);
- Bilinear (this method is based on adding new pixels to existing ones, calculating the average color).

The program offers several options
If you don't care about maintaining the total number of pixels, then you can do without this mode.
In addition, you can select the desired option in the "Fit to" section. The default is " original size". It is not necessary to change this item.
Once you have made all the necessary settings, click the OK button for the changes to take effect. After that, it remains only to save the picture and enjoy the result.
Now you know how to easily and quickly enlarge or reduce an image in Photoshop. Write in the comments if this article was useful to you, and ask questions of interest on the topic discussed.