Hamachi Internet does not work. Creating a VPN using Hamachi: troubleshooting errors, setting up tunnels
Read also
– special software, allowing you to build your own secure networks via the Internet. Many gamers download the program to play Minecraft, Counter Strike etc. Despite the simplicity of the settings, sometimes the application has a connection problem with network adapter, which can be fixed quite quickly, but requires certain actions on the part of the user. Let's look at how this is done.
Now we will go to network settings and make some adjustments to them. Let's check if the problem is still there, if so, we'll update Hamachi to the latest version.
Network connection settings on your computer
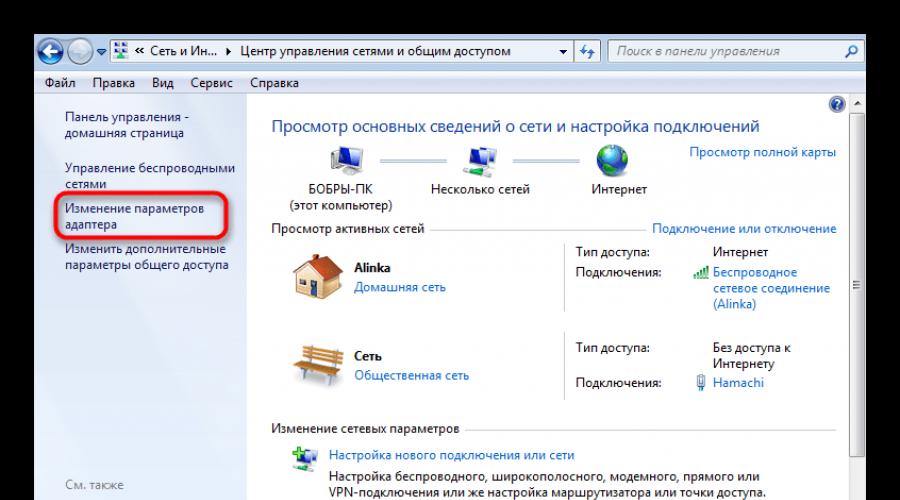
1. Go to “Control Panel” – “Network and Internet” – “Network and Sharing Center”.
2. On the left side of the window, select from the list "Change adapter settings".

3. Click tab "Additionally" and let's go to "Extra options".

If you are missing a tab "Additionally", let's go to "Arrange" - "View" and click on "Menu Bar".
4. We are interested "Adapters and Bindings". At the top of the window, we see a list of network connections, Hamachi is among them. Move it to the beginning of the list using special arrows and click "OK".

5. Restart the program.
As a rule, at this stage the problem disappears for most users. Otherwise, move on to the next method.
Update problem
1. Hamachi provides auto mode updates. Very often, connection problems arise due to incorrect settings in this part of the program. In order to fix it, find the tab in the main window “System” – “Parameters”.

2. In the window that opens, on the left side, also go to "Options" - " Additional settings» .

3. And then in "Basic settings".

4. Here you need to check the box next to « Automatic update» . Restart your computer. Make sure the Internet is connected and working. Once started, Hamachi should automatically detect if there are updates and install them.

5. If the checkmark is present and a new version was never loaded, go to the tab in the main window “Help” – “Check for updates”. If updates are available, update manually.

If this does not help, then most likely the problem is in the program itself. In this case, it makes sense to delete it and download it from the official website latest version.
6. Please note that standard removal through "Control Panel" not enough. Such uninstallation leaves behind various “tails” that can interfere with the installation and use of a newly installed Hamachi. You must use third party software to complete removal programs such as Revo Uninstaller.
7. Open it and select our program, then click "Delete".

8. First, the standard uninstallation wizard will launch, after which the program will offer to scan for the remaining files on the system. The user needs to select a mode, in this case it is "Moderate", and press "Scan"

After this, Hamachi will be completely removed from the computer. Now you can start installing the latest version.
Often, after the steps taken, the connection is made without problems and no longer bothers the user. If things are still going wrong, you can write a letter to support or reinstall the operating system.
Over time, support for old games ceases, servers are closed and it is not possible to play in multiplayer mode via the Internet. Regular gamers will be helped with this by the Hamachi program, which unites players from all over the world and creates a local network over the Internet. But what should you do if an error occurs during the setup process: VPN Status? To avoid further errors, let's do correct settings programs.
About the program
First of all, Hamachi is software designed for building a virtual private network (VPN). It creates its own secure local network of PCs connected to the Internet. This creates an emulation local network, which is successfully used by gamers for online games.
Hamachi Features:
- Network management and administration.
- Creating servers and connecting them to gray IP and client PCs.
- Data protection due to the transmission of encrypted traffic in a peer-to-peer style.
- Creating a network with a “Star” topology and a gateway.
Settings
In case you get a VPN error:
- Remove old version program and restart your computer.
- Go to network connections and check that Hamachi networks you didn't have.
- Install the latest version of Hamachi and log in to the program.
To configure the program:
- Click RMB on Start → Network connections→ PMC over the Hamachi network → Properties.
- Open IP version 4 (TCP/IPv4) → click “Advanced” → in the “IP Settings” tab, in the “Gateway” section, click “Delete”.

- In the “Interface Metrics” field, enter the value 10 and click “OK”.

- Then go to “Control Panel” → “ Windows Firewall" and add " LogMeIn Hamachi» to the exclusion list.

To eliminate yellow triangles next to network member names:
- In the program, click “System” → “Options” → “Options” tab.

- In the tab opposite the “Encryption” and “Compression” items, set the value to “Disabled” and click OK.

- Restart Hamachi (by turning off and on the button in the program interface).
Tunnel problem
VLAN users are faced with a problem related to data transfer delay (high ping). It occurs when data is transferred not from computer to computer, but through Hamachi servers. A sign that the connection is not direct is a blue or red icon opposite the network client. In order to get rid of this error, you need to remove the tunnel through the repeater. To start:

For many games (for example, RPGs or turn-based strategies), having a ping of 400-500 ms is not critical. This creates minimal discomfort, but overall online play will be stable.
Despite the efforts of the Hamachi developers to make this program as “friendly” and simple as possible, many users still have difficulty setting it up. By following the instructions below, you can easily configure Hamachi correctly for gaming or work.
General Hamachi setup on Windows
In this article we will look at how to configure Hamachi 2.2.0.541 - the most available today. The example demonstrates the setting Hamachi for Windows 7, since this OS is the most common today.
In general, Hamachi does not require any additional configuration; all you need is to install the program, run it, and click on the “power” button (Fig. 1).
After this, you need to connect to the network of interest by clicking “connect to existing network"(Fig. 2) or "network" -> "connect to an existing network" (Fig. 3).


If there are enough free slots in the network, you will connect and see a window with a list of participants (Fig. 5).

If Hamachi is launched on your PC for the first time, or information about previous launches is damaged, the program will display an authorization error message (Fig. 6).

In this case, you need to either register for free in the LogMenIn system (Fig. 7), or log in if you already have a LogMenIn account.


First, you should check if everything is ok with the network you are interested in. To do this, enter “hamachi test network” into a search engine and try to connect using any of the details that appear in the search results.
If Hamachi does not connect to any network, click “system” -> “parameters” (Fig. 9).

Select the lowest item in the left panel - “Parameters”, find “Encryption” there and set the type to “Any” (Fig. 10).

Then click the “Advanced settings” item located at the bottom of the window (Fig. 11).

If you do not use a proxy server, set the corresponding attribute with the “no” flag (Fig. 12).

Please note that when using a proxy, connection problems may be caused by it.
Then resolve names using the mDNS protocol (Fig. 13).

Disable traffic filtering by selecting the “allow all” flag in the corresponding field (Fig. 14).

Enable presence in virtual network Hamachi (Fig. 15).

Confirm the changes made (Fig. 16).

Close the program and enter it again.
If the above does not help, try temporarily disabling your antivirus.
Also, sometimes Hamachi does not connect due to the Firewall blocking it.
To turn it off, click " Start» -> Control Panel -> Firewall-> Enabling or disabling Firewall
(Fig. 17) (Fig. 18) (Fig. 19) (Fig. 20)

Sometimes the source of problems is not incorrect setting Hamachi or overly “vigilant” Anti-Virus, but the port through which your router broadcasts.
Open two arbitrary free ports in your router settings (each specific model The router has its own specifics for opening ports - see the instructions). Then configure Hamachi to use them by specifying the local TCP address and local UDP address attributes in the already familiar “advanced settings” window (Fig. 21).

After that, restart the router and restart Hamachi. Important point- when “forwarding” ports, do not confuse the addresses for TCP and UDP protocols!
Special cases of Hamachi configuration
It is worth noting that this program is often used by gamers to build gaming networks, as well as various organizations to create corporate file sharing systems. In such cases, you should strictly follow the instructions of the gaming community or your company. However, at the same time, you must understand that if you decide to download and install a third-party unofficial Hamachi distribution, you are endangering the security of your PC - unless absolutely necessary, refrain from connecting to such networks.
How to set the language in Hamachi?
Unfortunately, there is no optional language selection in the program. In order not to run for a dictionary, it is enough that you have the Russian version of Hamachi. If for some reason you need a different language, reinstall the program after downloading the “hamster” localization corresponding to the language you are interested in.
notice, that Hamachi official website provides the ability to download only the English version of Hamachi. We can do it.
“Judgment Day” has arrived and Hamachi is not connecting to the network. Why and what to do? First of all, the blame must be placed on the antivirus and firewall. Because after updating them, the exception settings may become lost (this may occur as a result of an incorrect shutdown of the PC). Therefore, we re-add Hamachi to the list of exceptions of the antivirus and firewall. Did it help? Then you are amazing! Enjoy the game with your friends.
Did not work? Let's reinstall!
Attention! Before installation, you must delete absolutely all files. Go to the Start menu, then to the control panel, look for the “Add or Remove Programs” item. Waiting for the list to load installed applications. Find Hamachi, click on it and select delete.
Let's check if there are any settings files left:
- Windows XP: Check the Program files folder for the presence of the Log me in hamachi folder. Found - delete!
- Win 7: Perform the action from the point above. Go to the folder C:\Users\%username%\AppData\Local, also look for the folder and delete it.
Reinstalling the client. And this is not the end! After installing the new client, you need to configure the hamachi “Service”. Open “Control Panel” through the Start menu.
We look for the administration tab, open it and find the tab of the same name.
We look for a Hamachi-related service and set the startup option to “manual”. Turn on
After such a voluminous guide, Hamachi will connect to the network in any case, at least out of respect for you.