Create functions in aac format. Create aac version does not appear
Read also
You can create a ringtone from a song you like in iTunes and send it to your iPad or iPod via synchronization.
Ringtone creation
First you need to go to the iTunes drop-down tab "Music" and in the "Songs" tab, select the song from which you want to make a ringtone.
Songs in iTunes
Click right click click on the song (from which the ringtone will be made).
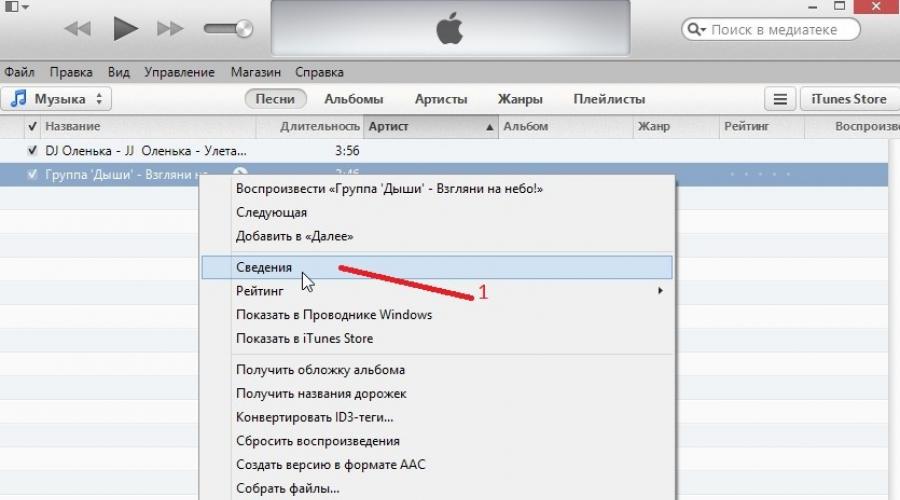
 Song information
 In the context menu that appears, select "Details". A window will open in which you need to go to the "Settings" tab.
 Set the beginning and end of the ringtone
 Set the time and checkboxes at the items "Start" and "Stop time" (Start and end of the ringtone), click "OK". Again, right-click on the same song.
 Create an AAC version
 In the context menu that appears, select "Create version in ACC format." A ringtone will appear, but you need to change its extension so that the ringtone can be sent to other devices with using iTunes. To do this, go to "Folder Options" through the control panel.
 Folders settings
 Go to the "View" tab and uncheck the box "Hide extensions for known file types" and click "OK". Right click on the ringtone of the song.
 Finding a ringtone in a folder
 In the context menu that appears, select "Show in Windows Explorer". The folder where the ringtone was saved will open. Right click on the ringtone.
 Rename ringtone in a folder
 In the context menu that appears, select "Rename". We replace the extension (m4a) with the extension (m4r).
 Consent to replace the extension
 A message will appear about renaming the extension, click "Yes". In iTunes, go to the "Sounds" drop-down tab.
 Open the Sounds tab
 Press "Alt" on the keyboard. A menu bar will appear on it, click "File".
 Ringtones section in the iTunes menu
 In the context menu that appears, select "Add File to Library". Select a ringtone with the m4r extension and click "Open".
 Ready ringtone for iPhone via iTunes
 The ringtone will be added to iTunes and can now be sent to any connected device, which will be synced with iTunes.
Oh those iPhones! It seems to be easy to use and there are a lot of applications in the AppStore, but as soon as it comes to downloading music or installing our own ringtones, we don’t know what to do and what to put where. And the point here is not that people are stupid, it’s just that Apple again beat everything in its own way and we must “learn to live” by its rules.
In this tutorial, I'll show you how to create a ringtone for iPhone and install it on your device.
The Internet is full of sites with ready-made ringtones for iPhone. At the same time, both free ones and for money (albeit small ones) come across. I categorically DO NOT advise you to pay for ringtones, as this is designed for very narrow-minded people.
We will be able to create a ringtone from any mp3 song on our own. This is done quite simply, for this you do not need to be “ IT guru level 10“.
The essence of the process of creating a ringtone comes down to choosing your favorite song, cutting out the necessary piece of the song and converting this piece to the format m4r. Files of this format are used by the iPhone as ringtones.
Well, as we already have, I offer you several options for creating ringtones. Today we will consider the three most likely ways to solve the problem:
Create an iPhone ringtone with iTunes
Not many people like iTunes, and even fewer users have mastered it. But without it, nowhere, and the first way to create a ringtone for the iPhone will be with it.
This method is good because we do not need access to the Internet. And this means that no additional software (except iTunes) will need to be downloaded.
A small disclaimer: you must already have an mp3 file with music for a potential ringtone on your computer and iTunes must be installed. These are the minimum requirements.
STEP 1 - Opening an mp3 file in iTunes- Choose something of your choice. Remember that you have to live with this ringtone and no matter how much you have to blush in the trolleybus when your phone starts ringing.
STEP 2 - Choose your favorite passage- Listen to the song and decide on the time period for the ringtone. Here is one IMPORTANT condition - you need to limit yourself to 40 seconds.
It is better to choose a segment a little less than 40 seconds, since you simply cannot transfer long ringtones to the iPhone. Remember at what second the necessary passage begins and ends.

STEP 3 - Right click on the track name and select Song information from the context menu.
Click on tab Options, enter the start and end times of the ringtone in the corresponding "start" and "end" items, and ONLY AFTER check the boxes next to each of these items. We confirm OK.

STEP 4 - Create an AAC version of the ringtone- now select top menu File - Convert - Create ACC Version.
A truncated ACC version of the ringtone will appear in your iTunes library.

STEP 5 - Copy the file and delete it from the media library– drag the AAC version of the ringtone from iTunes to your desktop. Right click on the AAC version in your iTunes library and select Delete. Confirm the deletion in the window that appears.
STEP 6 - Changing the extension- go to the copied file on the desktop, click on its name and change the extension from m4a on m4r. Confirm the extension change in the window that appears.
If you're using Windows and don't see the file extension, uncheck "Hide extensions for known file types" in Control Panels > Appearance and Personalization > Folder Options > View Tab.
OK it's all over Now! We have just created a ringtone for iPhone! Congratulations! If you want to upload it to your device right away, go to STEP 7.

STEP 7 - Setting a ringtone on iPhone- open iTunes and position its window so that you can see the desktop with the ringtone you just created. Now just drag the m4r ringtone from your desktop to the iTunes window and drop it over your device. This is all!

Ringtone can now be selected from the menu Sounds V Settings iPhone.
How to create ringtone for iPhone online
And now consider the most, in my opinion, the easiest way to create ringtones for the iPhone. This is an online harvester called mp3cut.ru. Everything is so simple here that there is not much to write about. Well, well, well, here's a brief step-by-step plan of what, where and why.
STEP 1 - - Go to the site mp3cut.ru and press the big blue button Open file. Select mp3 file.

STEP 2 - Specify the beginning and end of the ringtone- By moving the sliders, select the desired fragment of the composition.

STEP 3 - - Convert and download ringtone- Press the button Ringtone for iPhone, and then crop. The program will cut and convert your ringtone. On the next page, click Download.

If you forgot how download ringtones to iPhone, see STEP 7 - of the previous section.
iOS apps for making ringtones
The AppStore has a huge number iOS applications to create ringtones in m4r format. I would divide them all into two categories: the first is for cutting your tracks (similar to the one described above), the second is for downloading ready-made ringtones (created by someone else).
Selecting and advising any one of the applications is a thankless task. I will briefly describe the principle by which all these applications work. Both types of applications save the ringtone in the phone's memory, but it still won't be available from the menu Sounds V Settings.
In order for the ringtone to be set to iPhone call, it is necessary to produce some ritual with a tambourine and favorite iTunes:
- STEP 1 - Launch iTunes and connect iPhone.
- STEP 2 - In iTunes, click on your device, and then select the tab Programs.
- STEP 3 - Scroll down to " Shared Files” and select the application that was used to create the ringtone.
- STEP 4 - In the right part of the window, select ringtones and click " Save to…". Save ringtones to your desktop or another folder.
- STEP 5 - You now have ringtones in m4r format on your computer. What to do with them is written both above and below. Read attentively!

How to set ringtone on iPhone
No matter how you create your ringtone, a file with the m4r extension should appear on your computer. Now you are probably asking, And what to do with it now?". Everything is very simple. In order to set a ringtone on iPhone follow three simple steps:
- STEP 1 - Copy the ringtone to your computer's desktop. Then, in the iTunes window, click on the iPhone icon.
- STEP 2 - Now just drag the m4r ringtone from your desktop to the iTunes window and drop it over your device.
- STEP 3 - On the iPhone, go to the menu Settings > Sounds > Ringtone and select a brand new ringtone (it will be at the very top of the list).
The process of transferring a ringtone to iPhone is described in more detail.
Well, what was difficult? I think no! After mastering this lesson, you will become a guru in the production of ringtones and will be able to put any song on your iPhone. Now the main thing is not to overdo it with chanson. Have pity on the ears of at least your loved ones.
Subscribe to our Telegram, Twitter, VK.
note
It came as a surprise to me that you can't set your own ringtone on the iPhone. That is, you cannot just select a song already downloaded to the iPhone and set it as a ringtone. To put a non-standard melody on a call, you need to perform some manipulations.
The first option is to install a program with which you can download ringtones directly on your device. I set myself "Unlimited ringtones" from iTunes. There is quite a large selection of ringtones, but if you need a specific song, you can make a ringtone yourself.
In this case, the easiest option, again, would be to use a special program, for example, Ringtonium Lite. Understanding the basic settings is not difficult. You just need to select a track from the media library and specify which interval of the song the ringtone will consist of. The maximum duration of the melody in the free version is 33 seconds. There are also more advanced features that I haven't seen yet. The application has a built-in instruction. In order to add a melody created in the program to the list of ringtones on the iPhone, synchronization with a PC is required.
The third option is to create a ringtone directly through iTunes.
Open iTunes and select the original song, previously downloaded to the library. On the selected file, right-click and select "Information".
In the upper part, select "Parameters", set the time interval of the future ringtone. To do this, check the boxes "Start", "Stop time" and set the time.
After applying the settings, right-click on the song again and select "Create AAC Version". After the conversion, a file will appear in the list, right-click on it - " Show in Windows Explorer".

A window will open where our file with the m4a extension is located, now you need to change the extension by changing m4a to m4r. We add the final file to the “Sounds” section in iTunes (drag and drop or “File-Add File to Library”), we synchronize with the iPhone. Select the "Ringtones" (or "Sounds") tab and check the box "Synchronize sounds", click "Synchronization".

The file will automatically appear in the ringtones on your phone.
After the melody is installed, delete the created 30-second duplicate of the music file from the iTunes library and reset the time span.
I am very pleased that you can set an individual ringtone or message for a specific contact. To do this, open the contact editing page. At first I didn’t find this function, maybe it appeared when updating the firmware, I can’t say for sure.
Every person has a desire to show their individuality. The most popular way that is available today through devices. By purchasing the iPhone 4S and 5S, many leave the standard melodies for incoming calls and messages. Sometimes being in public places is confusing. It may seem to you that your phone is ringing, but in reality it turns out that it is not.
Faced with the question of how to download a ringtone to an iPhone, it may seem to many that it is difficult. Apple's desire to secure its product creates some difficulties for users. If you understand this issue in stages, everything becomes clear.
How to download ringtone on iPhone 5
A ringtone is an mp3 to AAC file that is less than 40 seconds long. First you need to create it or download a ready-made ringtone to your iPhone.
Such a file is created on a PC using special editors. Online services for creating these compositions are also suitable. The mp3 format is rewritten to AAC via iTunes.
How to Create iPhone Ringtone with iTunes
Download to your iPhone 6 a melody from which you want to create a musical composition for a call or SMS messages. It will show up in the library. When using iTunes version to 12.4.0., right-click on the composition and click "create AAC version".
When using a newer version of iTunes, mark the melody and left-click on the "file" menu. Click "Create a new version" and then click "Create an AAC version". The success of these actions will be displayed as a file added to the library list, with the name of the selected melody, but with a different extension.
Right-click this file and click "show in explorer". In the area that opens, go to the "service" menu, go to "folder options" and click "view". Uncheck the box next to Hide extensions for known file types. This will display the extensions. It is necessary to change the format of the file needed for the melody from m4a to m4r.
Changing the display of the icon is a confirmation of the success of the procedure. The length of the music track must be no more than 40 seconds, otherwise the iPhone will not allow you to install it. Now you can throw ringtone for iphone. For easy searching, move the file to the folder you need.
How to create a ringtone for iPhone 4 using special programs
Such programs can be downloaded and installed through the App Store. These programs allow you to download your favorite music and transform it into ringtones for your phone. They save you extra hassle and produce m4r files as output. Popular programs are Ringtones, RMakerPro and RingTunes.
How it works: you specify a melody on your phone, select the required segment, and convert. As a result, an m4r format file is created. But transferring a melody to an iPhone 4 for installation will only be possible through iTunes from a computer. , this is part of Apple's policy.
You need to connect your phone to your computer and open iTunes. At the bottom of the window, the icon of the program that was used to create the composition will be displayed, and the created melody will be visible next to it. Copy it to your hard drive. Now go to the ringtones through the "media library" and add the file. Sync your device.
how to add ringtone to iphone without computer
There is an easy way to download a ringtone from the Internet without using a computer. This can be done through the purchase of a sound signal in the iTones Store store.
How to add a ringtone to iPhone from the store:
- We find the section of sounds.
- We move to the "ringtones" and in upper corner choose "shop".
- Ringtones here are divided into groups, you can listen to the songs and choose what you like. The price is indicated opposite the file. Also, to the left of the price, the duration of the composition that you are going to throw off is indicated. It should last no more than 40 seconds.
- To complete the purchase, you must have the appropriate funds in your account.
After the purchase is made, it remains only to find out how to put it as a sound signal.
How to Download Ringtone to iPhone 4

To transfer the downloaded or created signal to your phone, you need to connect the USB cable from the iPhone 4 to the computer. Open iTunes and enter your phone number. Then go to "sounds". If it turned out that such a section is not displayed, then go to the "settings" and put a mark in the "sounds" column. Now this section is displayed and you can find it.
Then, in the "file" menu, click "add to library" and select a song from the folder where it is saved. In the "sounds" section on your phone, click on the "sync sounds" column. You will have the options "all sounds" and "selected sounds". In the second case, you must select from the list the previously downloaded file that is synchronized with the phone.
After that, click "synchronize" and wait for the end of the process. All, sound file on iPhone 4.
How to put a transferred ringtone on iPhone
The downloaded ringtone in the iPhone can only be set to an incoming signal or SMS notification. You need to go to settings and select "sounds". Next, choose a ringtone. A list with possible songs comes out, as a rule, the new signal will be displayed at the top of the list. And put a check mark next to the one you uploaded.
If you still cannot add a ringtone to iPhone, make sure that its playing time does not exceed 40 seconds. Now your phone will play in a new way.
Apple has a strict policy on its devices that does not allow direct transfer of data of any kind. iPhone owners will not be able to connect their phone to a computer, transfer music, photos, videos to it, or delete content directly on the phone. Only a special iTunes program installed on a PC will make it possible to synchronize files between your phone and computer.
Apple explains its position by concern for users, allegedly in this way it protects its devices from viral or simply low-quality content. However, most likely, the main reason is money. Music, sounds, apps, books, and more can be purchased from the AppStore, owned by the company without violating the copyrights of the owners.
Everything would be fine, but it is quite difficult for users of the Russian-speaking segment of the market to find compositions in the AppStore that are popular in their homeland. Another reason for dislike for this kind of purchases is an ancient rule, very beloved by many: why pay for what you can get for free.
If Apple completely closed the ability to download custom music and sounds to the phone, it would lose a significant part of its fans, so this option is provided in the iTunes program. You can add all the necessary files to the library of this program, and then sync iPhone with PC, after which they will be on your phone.
Building your own music library
Before organizing iTunes music libraries, take into account that iPhone does not support all types of audio files, so there are practically no restrictions on formats for music, even more, when you try to add songs of a format not supported by iPhone to iTunes, the program itself converts them to AAC format.
Ringtone sounds are different, the iPhone supports the .m4r format and a duration of no more than 30 seconds, so you will need to add it first and then add it. After all the preparations, the sequence of actions is as follows:
- Launching iTunes(check for updates). If you have not yet tried to download music through iTunes from your computer, then initially you will see the "Music" tab, and on it the "Search Media" button. When you click on it, the following will happen:
- iTunes will start searching for ALL media files on your computer, in all supported music formats. That is, sounds and music from games, programs, applications will get into the library. These are thousands of files, if the PC has at least a dozen games.
- Your favorite songs will be lost among this volume. The only way out is to select all the files that got into the library in this way, and then delete them. So think - do you need it? We do not recommend adding music in this way.

- The first way to add music and sounds. Open the "File" menu and go to the "Add File to Library" submenu. You can select "Add Folder to Library" if you want to transfer an entire folder at once (with a music album, for example). The same effect can be achieved by using the keyboard shortcut CTRL+O.
- Second way is the "Grab and Drop" function, joke), it's called Drag-and-drop. Open two windows side by side, with the folder where the music is located, and with iTunes. Select the desired files, hold down the left mouse button and drag it to the iTunes window, then release the mouse button.
Deleting music
Removing music from the iTunes library is also easy. Select files in the program, press the right mouse button and call the context menu. Select the "Delete" item, confirm the pop-up request. To speed up the process of deleting unwanted sounds, you can also use the "DELETE" key.
Surely you all know that iTunes is used to synchronize information from your iPod, iPhone or iPad to a PC. For example, if you have any movies, videos, or music on your computer, then sync will add those files to your iPhone, iPad, or iPod. However, as you know, if you delete any information from iTunes, it will also be deleted from your mobile phone. What to do if you need to transfer information from the iPhone to a new computer? In this article, we'll take a look at both options.
Method 1 - Regular USB Sync
To sync, follow these steps: Step 1
Launch iTunes. Make sure you have the latest version installed and signed in to your account.

Step 2
Connect your iPhone to your computer using a USB cable.
Step 3
Go back to iTunes and open your phone (pressing the button with phone icon and model label). In the left panel, you will see all the sections that are available for synchronization with your device.

Note: if the library in iTunes is missing content in some sections (podcasts, TV shows, etc.), then in this case they will not be displayed. For example, if you don't have TV files in your iTunes library, then the TV section won't show up.
Tabs may include some or all of the sections listed below:
- Overview - here you will find complete information about the device's functions, backup options, as well as some settings.
- Apps - manage app synchronization between your devices.
- Music - Set the music sync options.
- Movies (video)—Set the movie sync options.
- Podcasts - Synchronization of podcasts.
- Information - a menu for synchronizing contacts, notes, email accounts and calendars.
- Books - settings for synchronization of books, as well as documents, including PDF.
- TV Shows or TV - Sync TV files.
- Ringtones - default synchronization of ringtones and other sounds.
- Photos (pictures) - synchronization of photos.
- On my device - here you can find all the information (music, movies, podcasts, books, ringtones, etc.) stored on your iPhone.
Customize Extra options(if it is needed). If the checkbox is checked, synchronization is enabled for this partition and will be performed the next time it is started. To disable synchronization, simply uncheck the box next to the desired item.

After the parameters have been configured, you can start the synchronization process. To do this, click the Sync button in the lower right corner of the screen. Everything that you set in the parameters is synchronized.
![]()
Method 2 - Transfer Data from iPhone to Pure iTunes
This method is useful for those who have changed computers or have not backed up their iTunes library. Also, this method can be used by those who have changed their phone and need to transfer data from a new phone to iTunes. To do this do the following:
Step 2
The first thing you can and should do is sync your contacts, mail accounts, calendars, and notes. They are imported either address book Windows, or to the Outlook client. Check the boxes next to what you want to sync.

Step 3
Transfer the games and applications installed on your iPhone. To do this, right-click on your device in the left panel and select Transfer purchases. The programs will automatically be transferred to the iTunes library.

Step 4
To transfer music, you need to use special software, otherwise, during synchronization, it, like photos from videos, will be erased from the phone, since they are not in the media library.
To transfer music, you can use SharePod v3.9.7. This is done very simply:
 Note: the program also allows you to transfer and video recordings, in addition, it works with the iPod.
Step 5
To copy photos, just open your iPhone in Windows Explorer, as it appears there as a camera. Just copy all the photos from there and transfer them to your media library.
Step 6
After the above manipulations, you can start syncing iTunes with your iPhone. The data will not disappear, but will be successfully synchronized.
Open iTunes (iTunes version must be at least 7.6.2.9, if yours is not, then download the latest version of iTunes from the Apple website).
Click the File button in the top bar, then click Add file to library and add a song from which you want to make a ringtone. After that, the selected music should appear in the Music folder. Select it and press the right mouse button, after which you need to select Information.
![]()
In the menu that opens after this, go to the Parameters tab, where you need to put two checkmarks next to Start and Stop time and specify a ringtone time interval that does not exceed 30 seconds (this is important!), Then click OK.

After the menu has collapsed, right-click again on the same song and select the seventh item Convert to ACC format from the menu that appears. After that, under your original melody will appear with the same name, but with a duration of 30 seconds.

We right-click on it and select the third item Show in Windows Explorer and in the opened folder there should be one file with a size of about 500 KB in m4a format. Change the file format to m4r and check that the file name is in English (typed in English letters). Remember where this file is located, after which you can close the folder.
Now we go back to our open iTunes and delete from the Music folder new file, then close iTunes (you can delete itune.exe in the processes). Open iTunes again and in the top menu, click File and Add File to Library, after which you need to remember where the created file is located and select it.
The selected file should automatically be added to the Ringtones folder in your library. Now we connect the phone and after it appears in the Devices, select it and go to the Ringtones tab on it, where you need to put three checkmarks:
Then click the Apply button at the bottom right. Now the file is in your iPhone. Close iTunes.
To make another ringtone, you need to do the same and at the end do not forget to check the box to synchronize it.
1. The file should not be longer than 30 seconds.
2. The name of the file when changing from m4a to m4r must be changed to English (if it is called in Russian).
3. It is advisable to restart iTunes after creating each ringtone.
4. RINGTONES CREATED SHOULD NOT BE MOVED OR DELETE FROM THE FOLDERS FROM WHERE THEY WERE ADDED TO ITUNES. It is also impossible to add music by dragging it to the desktop, since the program accesses the source during synchronization and, if it is missing, does not add it, and on iPhone it is displayed only as an inscription.
Hi all! To be honest, I try not to write about what is already described so many times on the Internet - it's boring to repeat the same thing several times. But sometimes you still have to make exceptions: firstly, someone, no, no, yes, will ask about creating ringtones (it’s much more convenient to give a link to your article than sending a person to “google”), and secondly, there are never too many instructions - maybe someone will come in handy.
But the main reason for the appearance of this article is different - I recently came across a cool song, I wanted to set it to a call, but in iTunes Store all the ringtones of this composition are as stupid as possible. What to do? That's right - create a ringtone yourself. And since such a booze has gone, why not write about it?
No sooner said than done. Let's go!
Attention! If something does not work out, then feel free to ask questions in the comments - I will try to help.
But first, at least try to create a ringtone yourself by following these instructions. Believe me, there is nothing difficult in this. Now let's go! :)
And immediately remember:
Ringtone duration cannot exceed 40 seconds.
If your music file fits within these limits, then steps 2 and 3 can be safely skipped. If not, then follow all the points strictly in order.
Step 1 (Determine the version of iTunes)
IN latest versions iTunes 2018 Apple company removed many features from the program. Including such important ones as full interaction with ringtones and the store of games and applications.
After that, the world was divided into two camps:
- Those who use the "old" and "correct" version of the program (with ringtones, App Store and blackjack). Do you want the same?
- Those who are completely satisfied with the changes - they have quietly updated to iTunes 12.7 and will always use only new versions of this program.
There is no fundamental difference in the process of creating ringtones between these versions. The only difference is "Step 6".
Spoiler: it will be a little easier for those who have iTunes 12.7 and "newer" installed :)
Well, it's time to start!
Step 2 (let's get started!)
Since my song has a duration of more than 40 seconds, it must first be cut. To do this, you can use any program, or the same iTunes.
We launch iTunes (we don’t connect the iPhone yet), open the “Songs” tab and simply drag and drop our “preparation” under the ringtone there.
Step 3 (cut the song)
Right-click on this song and select "Details".

A window opens in which we need to go to the "Options" tab.
See the two lines "Start" and "End"? This is exactly what we need. You must select the fragment of the song that you want to put on the call. I remind you that the duration is no more than 40 seconds.
In my case, I leave the very beginning of the track - from 0 to 40 seconds. Painfully there is a good guitar :)

Click "OK".
We return to the "Music" and see that nothing has changed. In fact, this is not the case - if you try to play this track, then its duration will be exactly 40 seconds.
Step 4 (Convert ringtone)
Now select our future ringtone and in the top menu of iTunes, click "File - Convert - Create AAC Version".

Oops! Another track has appeared in the list of songs with the duration we need!

By the way, now you can return the original file to its previous duration or delete it if you no longer need it.
Step 5 (change file extension)
We are almost there! We take the resulting 40-second fragment and simply drag and drop it onto the desktop.

Now we need to change the parameters of this file from .m4a on .m4r. But, there's a little catch here! The default Windows setting hides file extensions by default. How to be?

That's it, now we see that the ringtone file at the end of its name has the extension .m4a
Click on it with the right mouse button - select "Rename" and change one letter. Instead of .m4a should be .m4r

We do not pay attention to system warnings.
Step 6 (Transfer ringtone to iPhone)
Instructions for iTunes version 12.6.3.6
We connect the iPhone to the computer and:
- In the top menu of iTunes, select the "Sounds" section.
- Drag and drop our file (already with permission .m4r) in this window.
- Click on the phone icon.

The phone content management menu opens. What interests us here? That's right - again "Sounds" :)
Select this item - click synchronize - selected sounds - mark the ringtone we need. With a sense of accomplishment, click "Apply"!

The ringtone we created has moved to the iPhone!
Instructions for iTunes version 12.7 and older
In the new versions of iTunes, everything is much simpler - just drag the made ringtone to the left side of iTunes (section "On my device") and it will immediately appear on the iPhone.

Step 7 (set ringtone on iPhone)
On the phone, open "Settings - Sounds, tactile signals - Ringtone" and at the very top we find the melody we need.

All. We were able to independently install our ringtone music on the iPhone.
Honestly, I can imagine what feelings you are experiencing right now, probably something from the series ...
Hooray! Victory! Finally! Damn, Apple got it right! Tim Cook, are you out of your mind? Thank God it's over! :) Approximately such thoughts I had at the moment when I made and put my first ringtone on the iPhone. But in fact… Believe me, the main thing in this business is to “get your hand in” and subsequently everything will happen “automatically”. Maybe:)
P.S. Did the instructions help? Put likes, click on the buttons social networks, write in the comments! I will be very grateful - many thanks in advance!
P.S.S. Any problems? I understand that creating ringtones is not an easy task and some questions may arise. What to do in this case? Again, write in the comments - we will figure it out together!
Lately we have been receiving a lot of questions from new users of the equipment. Apple about creating ringtones for iPhone. The thing is that ringtones are one of the proprietary limitations of Apple phones. Do not panic, you need to accept it and learn how to quickly and easily create a ringtone from your favorite song.
To create a ringtone, we need a Mac or windows computer With installed program iTunes(you can download below) and, in fact, the composition from which we will make it. The song used must be in one of the supported formats, eg *.mp3. So.
How to Create a Ringtone for iPhone with iTunes
1.
Launch iTunes on your computer and add the desired song to the library. To do this, press the menu File -> Add to Library. After that, select the file and it will be imported into iTunes.  2.
Right-click on the downloaded file in iTunes and select " Intelligence". Go to the tab " Options«.
2.
Right-click on the downloaded file in iTunes and select " Intelligence". Go to the tab " Options«.
3.
Ringtone duration for iPhone is limited to 30 seconds. You need to tick the boxes " Start" And " End” and specify the time interval that will be used in the ringtone. We press "Ok".  4.
Now you need to right-click on the song in iTunes again and select " Create an AAC version". A duplicate of our song will appear in the media library.
4.
Now you need to right-click on the song in iTunes again and select " Create an AAC version". A duplicate of our song will appear in the media library.  5.
Now right-click on the new file and select " Show in Finder» (« Show in Explorer» for Windows). The folder containing this file will open.
5.
Now right-click on the new file and select " Show in Finder» (« Show in Explorer» for Windows). The folder containing this file will open.
6.
It was originally created in the format *.m4a and it needs to be changed to *.m4r(this is the iPhone ringtone format). It is enough to enable file renaming ("Enter" button for OS X or "F2" for Windows), and replace the extension. If it is not displayed in Windows, enable " Extension display for registered file types» in explorer menu Service —> Options folders (tab View). 7.
Now we need to go back to iTunes and delete the file we created. Right click on it and select " Delete» in the dialog box that appears, specify « Leave a file«.
7.
Now we need to go back to iTunes and delete the file we created. Right click on it and select " Delete» in the dialog box that appears, specify « Leave a file«.
8.
It remains only to return to the explorer to the renamed file and double-click on it. After that, the ringtone is imported into iTunes under the " Calls". Instead of double clicking, you can repeat the import procedure from point "1" and specify the new created ringtone.  9.
We connect the iPhone to the computer, go to the section " Calls» on the device and enable synchronization. After selecting ringtones and pressing the button " Synchronize» All ringtones will be sent to your phone.
9.
We connect the iPhone to the computer, go to the section " Calls» on the device and enable synchronization. After selecting ringtones and pressing the button " Synchronize» All ringtones will be sent to your phone.  10.
We go to iOS settings and go to point Sounds —> Ringtone. Your new downloads will appear among the default ringtones, and you can select them as your ringtone.
10.
We go to iOS settings and go to point Sounds —> Ringtone. Your new downloads will appear among the default ringtones, and you can select them as your ringtone.
If your iPhone is jailbroken, then you can use .