Acer aspire es 15 bios entry. Entering the BIOS on an Acer laptop
How to enter BIOS on Acer laptop? Recently, many users have a question: how to get BIOS (BIOS) on Acer laptops? The development of technologies in the field of IT is also proceeding at a rapid pace and concerns the basic input / output systems known as BIOS (Basic Input / Output System).
And if once there was one unified login procedure, now each company, in addition to developing its own system, is also implementing its own login options.
Acer is no exception here. In the latest models of Acer laptops, an unpleasant gift was the lack of prompts with which combinations you can get into the BIOS or select the boot priority.
Basically, Acer in the latest models uses the BIOS (BIOS) of two modifications Phoenix and InsydeH20. And if at the first (Phoenix) We can see a hint what and how to press, then (InsydeH20) we see only a black start screen without any information.
Below are the most common keys and combinations to get into the BIOS on Acer laptops, these are: F1, F2, Delete and Ctrl + Alt + Esc.
It should be remembered that when a new BIOS version or updates to it are released, the login options may also change, as well as the fact that when using the multimedia keyboard, sometimes you have to press the Fn key.
You can also often go into the BIOS on Acer from the boot priority selection menu by pressing the F10 key.
The BIOS is a special system that determines the progress of the computer boot process. BIOS is considered the basic system for input and output of information. The full BIOS decoding speaks for itself: basic (basic) input (input) / output (output) system (system). In order to proceed with the settings, you need to go into the BIOS.
The BIOS is stored on a chip and has a wide range of purposes:
The initial startup of a computer that will subsequently launch the operating system.
Performs routine testing of various parts of a personal computer.
With the help of software interrupts in the BIOS, the input and output function is supported.
Stores the hardware configuration of various individual devices and the entire computer system. This happens with the help of special settings (BIOS Setup).
The BIOS code is located on the system board and is written to a flash-memory (microchip).
From this it follows that the BIOS is an integral part of any computer. However, as a rule, an ordinary user does not understand the BIOS settings. It is closer to programmers. However, BIOS sometimes does not work correctly, and there may be some reasons for this.
Problems and Solutions
Problems that can cause the BIOS to work incorrectly:
When starting the computer system, an error appears that prevents it from turning on.
Devices are not recognized on the computer or laptop.
Periodic failures that are caused by the instability of the system.
The operating system does not load.
It is very important to return the BIOS to the original (factory) settings. This will help you avoid many problems. To do this, you need to go into BIOS and take a few steps:
Power on the computer. Then, from the moment the logo appears on the screen, you must immediately press the DEL or F2 key. This action will open the BIOS. The screen should turn blue.
If the BIOS is still not loaded, then you need to press F9. Then it is very important to go to the settings called Load Default Settings. You can control using the arrows on the computer.
The F10 key will save all changes.
What is BIOS Setup?
BIOS Setup - these are settings that allow you to enter the BIOS system and configure options. Users who solve any problem with a computer deal with BIOS Setup. Translated from English, setup means "settings". This section is managed using certain options and tasks.
Sometimes it happens that the computer fails. Many problems can be solved by the user. It is known that masters require a significant amount of money for a visit, that is, primitive knowledge of the BIOS settings system allows a person to save both time and money. Moreover, some secrets will improve computer performance. Most of the errors that occur in the computer are in the BIOS.
Initially, this system was supposed to control the keyboard and mouse, but over time, functions were added to it. These figures are constantly growing.
BIOS stores writable chips. Two types are known today:
EEPROM chips. You can remove the contents with an electrical signal. To do this, it is not at all necessary to remove it from the computer.
EPROM chips. You can remove data using ultraviolet radiation. For this, a special device is used. However, this technique is now considered obsolete.
Most BIOS settings are similar even for different firmware from several manufacturers
Modern computers contain not only a BIOS system improved with functions, but also advanced features of the motherboard as a whole. That is, a sound card, a video card, and so on. In such computers, you can disable or allow the use of boards in the settings. I went into the BIOS - allowed everything necessary.
What settings does the system BIOS contain?
Modern computers in BIOS motherboards contain a lot of different settings that can be changed if you go into BIOS:
Set the calendar date and time of the system clock.
Setting up peripherals that are not designed to work in plug and play mode
Disable or enable onboard hardware on the motherboard. For example, built-in sound or video adapters, as well as LPT, COM and USB ports.
Starting equipment in a gentle or forced mode or resetting the settings to factory settings.
Speeding up the operating system by disabling some tests.
The ability to enable bypass branches to eliminate visible errors in the operating system.
Creating a queue of media from which the computer boots. This includes the hard drive or CD-ROM. All possible options can be installed if you go into the BIOS. If any one possibility fails, then the BIOS automatically tries all the other options in turn.
In today's world, computers are used almost everywhere. Someone uses them for work, and someone organizes their leisure time. But every person wants his computer to work perfectly. That is why it is very important to refer to the settings in the BIOS (Bios Setup) in a timely manner. If the BIOS is working correctly, then the computer does not arouse suspicion (does not slow down, does not freeze, does not give errors in the OS). If the BIOS settings are not set properly, then numerous failures occur. This issue can be resolved in two ways:
Log in and reset all settings to factory defaults.
Try to understand the problem and find the cause of the failure.
BIOS setup on Acer laptop
In computers, it is always easier to replace a part that has failed. In a laptop, things are much more complicated. Therefore, those who constantly work with a laptop just need to understand the BIOS settings.
Consider these settings on an Acer laptop.
Knowledge of the English language will help a lot here, but if you don’t have them, then it’s enough just to understand what the main words (options) mean. In order to enter the BIOS, you need to press the hot keys DEL or F9.
EXIT - exit and save settings in BIOS.
BOOT - the ability to select a priority device that will boot the system.
SECURITY - the ability to set passwords to enter the BIOS settings.
MAIN is the main setup menu for working with BIOS settings, which contains all the mechanisms for managing a laptop.
INFORMATION is information about the state of the laptop and all settings related to it in BIOS.
INFORMATION
You don't have to read too much into the information. It is enough just to correctly set the calendar date and time. It is also worth checking the temperature of the processor and comparing it with normal parameters. If it is higher, then it is best to let the laptop cool down. Laptop heating is a very common problem. That is why now there are special stands that cool the processor in an Acer laptop. In this section, you can also check which devices are connected to the laptop.
The situation is much more complicated with the MAIN section, since it controls all processes.
System Time - system time.
System Date - system date.
System Memory - system memory. The amount of memory cannot be changed, it only shows information.
Video Memory - video memory size.
Quiet Boot - determines the boot type in a laptop. There are two options:
Enable - quiet. That is, information about the status of the device will not be displayed on the screen. The only exception is the manufacturer's logo.
Disable - the screen shows all the complete information about the state of the device. It occurs before the main operating system is loaded.
F12 Boot Menu - if you enable this option, then before loading the operating system, the user will be prompted to select a device from which to start booting.
Network Boot - literal translation - "network boot". This option is usually disabled and should not be enabled. Only in rare cases does it speed up system boot. In other situations, it may be necessary only if the laptop is connected to a network with a raised TFTP server. This is a server that allows you to download the laptop system kernel through the network.
Power On Display is the Acer laptop screen control. It contains two values: Auto and Both. Here you need to look at the situation. If an external monitor is connected to the laptop, then you need to decide: turn off the built-in screen and allow the image to be displayed through the connected display, or leave two screens to work.
D2D Recovery is a feature that allows you to activate System Boot Recovery. D2D Recovery only makes sense if you use the additional Acer eRecovery Management utility. In other cases, it is not needed. This function allows you to write data to a hidden partition in the laptop system.
These settings are basic in an Acer laptop, but you can also install some add-ons. It is important to remember that it is highly undesirable to use non-original BIOS firmware, as they can cause a number of complications.
This section does not have much effect on the operation of the laptop. It provides the ability to set passwords.
Supervisor password - this is the master password (to enter the BIOS and to the hard drive).
This section allows you to create a queue of requests to the laptop to install the operating system.
For example, if the following order is specified:
IDE CDROM
HDD
Flash drive
then initially it will boot from the CD-ROM sector, then from the hard disk, and lastly through the flash media.
It is necessary to contact the BIOS only for those who understand well what they are doing. Since any wrong or thoughtless decision can even lead to mechanical failure.
So, there is a need to install Windows 7 or Windows 8 on an Acer Aspire ES1-511 laptop from a USB flash drive. We need to configure the BIOS on our laptop.
We turn on the laptop and press the F2 key to enter the BIOS. After clicking, we will see the Acer logo, and then we get, in fact, into the BIOS.
Immediately pay attention to the fact that the flash drive, with which we will then install the operating system, must be placed in the black USB connector of the laptop.
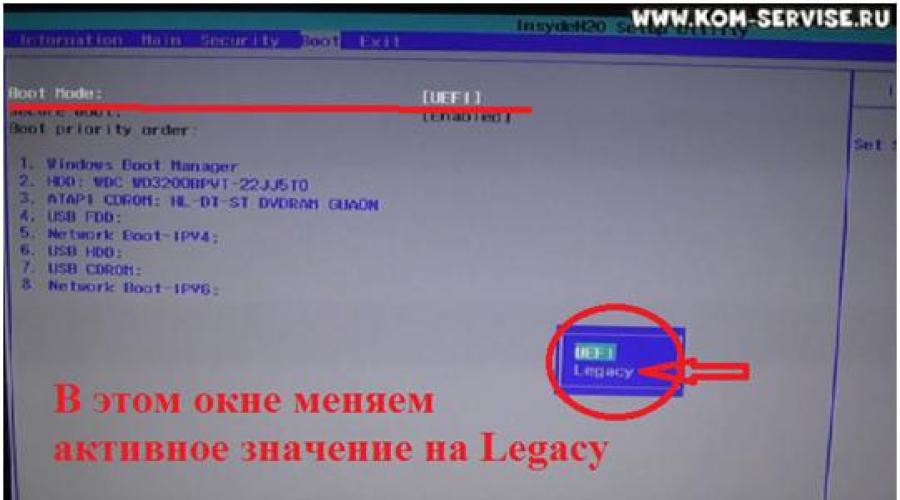
Go to the "Boot" menu tab.
In this window, go to the first line - "Boot Mode" with the up / down cursor keys ("?" and "?").
By default, "UEFI" is active. Select this line with the Enter key. A new small window will appear.
In the small window that appears, select the "Legacy" value. The computer may ask you about something a couple of times, we press Enter all the time.

After that, go to the "Exit" menu tab.
We have the first line "Exit Saving Changes" active. Press the Enter key. The computer will ask us about the need to save the changes and then exit.
We make sure that after the first press of the Enter key, the Yes value is active in the window that appears. We confirm our exit and save the changes by pressing the Enter key again.

The laptop should restart. At the end of the reboot, press the F2 key.
We are back in the BIOS.
We pass to the tab “Boot” already familiar to us. We see in the window that we already have the download sequence available. That is, where in turn the computer will look for our operating system to boot.
We find and use the cursor keys to go to our flash drive. The title should look something like this. USB HDD: model of our flash drive". In the picture, the name of our flash drive is Generic Flash Disc.

Go to the "Exit" menu tab. Press the Enter key. The computer in a new window will ask us about the need to save the changes made. We make sure that Yes is active and press Enter.
If the laptop begins to noticeably slow down or the operating system loads much more slowly than usual when the device is turned on (or even does not load at all), then the best cure for the disease, as a rule, is restoring the system or completely reinstalling it. There may be several reasons for such incorrect behavior of the OS: incorrect operation of one of their applications, errors in Windows 7 or 8 versions, excessive clogging of the registry and system areas of the hard disk with unnecessary ballast.
How, without resorting to the help of a specialist, to “repair” Windows on an Acer laptop yourself, will be discussed further.
Bios is the heart of the computer
With the complete collapse of windows, the user has only one thing to do - restore the system from a DVD or USB drive. In order for an acer laptop to understand what you want from it, you must explicitly tell it about it.
The fact is that any computer equipment, including acer computers, is equipped with a special factory microcircuit, the read-only memory device of which contains a set of microcommands, referred to in one word - BIOS.
The power button just launches the necessary BIOS procedures, under the control of which all existing nodes of the device are put into operation, and the installed OS is directly searched for.
What is the BIOS for? It is responsible for providing system access to the hardware elements of the computer and external peripherals.
The factory settings of an Acer laptop provide that when it is turned on, the BIOS first scans the hard drive for an operating system, then the CD drive, and then the rest of the potential devices. Trying to find a faulty Windows 7 or 8 on the hard drive in your case, the BIOS freezes - the user throws up his hands in bewilderment, looking at a blank screen.
You will have to explicitly tell the laptop that, first of all, it will be necessary to scan not the HDD, but your CD drive with the installer or resuscitator of windows 7 or 8 versions.
Welcome to Settings
When starting the laptop, as soon as the "Acer" logo appears on the screen, press "F2" (in some models "F1" or "Ctrl + Alt + Esc"). The BIOS setup window will appear on the display with a set of options. First of all, using the navigation keys, you need to go to the “Main” option and set the “F12 Boot Menu” value to the “enabled” state, which will later allow you to change, restore and save the settings.
Next, go to the "Boot" item. Look at the list of laptop media, which should contain several names: hard drive, cd drive, and usb devices. To reinstall the system from a DVD, select this position from the list and use the "F6" key to move it to the very top.
That's all. You have just explicitly indicated that the system will boot from the optical disk.
Press "F10" to save BIOS settings. After rebooting, the laptop will first turn to your optical drive with the windows installer on it.
When everything is installed and working for you in a new way, go back to BIOS and change the “Boot” menu, setting the initial boot from the HDD.
Unforeseen malfunction

If the OS is terribly slow, but still starts, try resetting the operating environment to factory settings using the built-in Acer eRecovery Management program (in new versions of windows 8 it is called Acer Recovery Management). In order not to waste time looking for it, press the "win" key and enter the name of the application.
The window that appears on the display will offer 3 different options:
- as will be seen by definition, system restore will return your equipment to its original state, during which all user data will be destroyed and the laptop will return to the factory settings that it had when it was first started.
- the option offers to restore the system with the preservation of certain documents and applications. The process, in principle, is similar to the first option, however, the necessary information on the disk will be saved after recovery.
- this mode is needed to reinstall applications and drivers on an Acer laptop.
What you need to solve the problem is contained in the first two paragraphs. The first option has the most effective action, the result of which, after deleting all the information, will return the laptop to factory settings. In order not to lose important information, before the recovery process, save it on an optical disc, USB flash drive or on a cloud server. Such user data means personal photos, video clips, text and other documents. Programs and applications installed during the entire period of using the device will be deleted.
What do the points mean
When choosing the first menu item, follow the instructions of the application and humbly wait for the result. This procedure is used when the OS has almost completely "fallen".
To restore the system while preserving your user account data, use the second mode "restore with preservation".
If window 7 or 8 cannot boot at all, or does not respond to user actions at boot, call the recovery program using a hotkey combination. To do this, when you turn on the laptop and the "Acer" logo appears on the screen, press "alt" + "F10" at the same time. Such magical manipulations will cause the Acer Recovery (eRecovery) Management application to work before the main OS is loaded.
Be careful and do not miss this important moment when you turn on your computer!
Recovery points
Another way to force the device to recover is to use system restore points. The developers of Windows 7 and 8 versions provided an excellent opportunity to "remember" the state of the computer at one time or another and restore the OS, returning it to this state. As a rule, such “security islands” are installed automatically once a week, as well as when the laptop configuration is explicitly modified, for example, when installing a new application or driver.
To use this option, you need to go to the "Control Panel", select the "System Restore" item and the checkpoint whose creation date suits you. When you select the appropriate item, following the instructions of the electronic assistant, you reconstruct your OS without losing user data. In the same program, you have the opportunity at any time to create a different restore point on your laptop.
If no restore points are found in the laptop, you will have to use other methods and possibilities to restore the crashed Windows of your electronic friend.
An ordinary user will have to use the BIOS if it is necessary to make special settings for the computer, reinstall the OS. Despite the fact that BIOS is available on all computers, the process for entering it on Acer laptops may vary depending on the model, manufacturer, equipment and individual PC settings.
BIOS entry options on Acer
For devices from Acer, the most common keys are F1 And F2. And the most used and inconvenient combination is Ctrl+Alt+Esc. On the popular model line of laptops - Acer Aspire, the key is used F2 or keyboard shortcut Ctrl+F2(the key combination is found on older laptops of this line). On newer lines (TravelMate and Extensa), the BIOS is also entered by pressing the key F2 or Delete.
If you have a laptop of a less common line, then in order to enter the BIOS, you will have to use special keys or combinations thereof. The list of hotkeys looks like this: F1, F2, F3, F4, F5, F6, F7, F8, F9, F10, F11, F12, Delete, Esc. There are also laptop models where their combinations are found using Shift, ctrl or fn.
Rarely, but still come across laptops from this manufacturer, where to enter you need to use such complex combinations as "Ctrl+Alt+Del", "Ctrl+Alt+B", "Ctrl+Alt+S", "Ctrl+Alt+Esc"(the latter is more often used), but this can only be found on models that were produced in a limited edition. Only one key or combination is suitable for entering, which causes certain inconveniences in the selection.

The technical documentation for the laptop should indicate which key or combination of keys is responsible for entering the BIOS. If you cannot find the papers that came with the device, then search by manufacturer.

After entering the full name of the laptop in a special line, you can view the necessary technical documentation in electronic format.

On some Acer laptops, when you first turn it on, the following message may appear along with the company logo: "Press (desired key) to enter setup", and if you use the key / combination that is indicated there, then you can enter the BIOS.