The processor lacks the necessary virtualization capabilities. How to enable virtualization in the BIOS and why it is needed
Read also
Virtualization may be necessary for those users who work with various emulators and/or virtual machines. Both of them can work quite well without enabling this parameter, however, if you require high performance while using the emulator, you will have to enable it.
Important Warning
Initially, it is advisable to make sure whether your computer supports virtualization. If it is not there, then you risk simply wasting your time trying to activate it through the BIOS. Many popular emulators and virtual machines warn the user that his computer supports virtualization and if you enable this parameter, the system will work much faster.
If you do not receive such a message when you first launch an emulator/virtual machine, this may mean the following:
- Virtualization is already enabled by default (this rarely happens);
- Your computer does not support this setting;
- The emulator is not able to analyze and notify the user about the possibility of connecting virtualization.
Enable virtualization on an Intel processor
Using these step-by-step instructions, you can activate virtualization (only relevant for computers running on an Intel processor):

Enable virtualization on an AMD processor
The step-by-step instructions in this case look similar:

It’s easy to enable virtualization on your computer; all you need to do is follow step by step instructions. However, if the BIOS does not have the ability to enable this function, then you should not try to do this using third party programs, as this will not give any result, but may worsen the performance of the computer.
We are glad that we were able to help you solve the problem.
Poll: did this article help you?
Not reallylumpics.ru
Virtual Secure Mode (VSM) in Windows 10 Enterprise
Windows 10 Enterprise (and this edition only) introduces a new Hyper-V component called Virtual Secure Mode (VSM). VSM is a protected container (virtual machine) running on a hypervisor and separated from the host Windows 10 and its kernel. Security-critical system components run inside this secure virtual container. No third party code can be executed inside VSM, and the integrity of the code is constantly checked for modification. This architecture allows you to protect data in VSM, even if the kernel of the host Windows 10 is compromised, because even the kernel does not have direct access to the VSM.
The VSM container cannot be connected to the network, and no one can gain administrative privileges on it. Encryption keys, user authorization data and other information critical from the point of view of compromise can be stored inside the Virtual Secure Mode container. Thus, an attacker will no longer be able to penetrate the corporate infrastructure using locally cached domain user account data.
 The following system components can run inside VSM:
- LSASS (Local Security Subsystem Service) is a component responsible for authorization and isolation of local users (thus the system is protected from “pass the hash” attacks and utilities like mimikatz). This means that passwords (and/or hashes) of users registered in the system cannot be obtained even by a user with local administrator rights.
- Virtual TPM (vTPM) is a synthetic TPM device for guest machines, necessary for encrypting the contents of disks
- OS code integrity monitoring system – protecting system code from modification
To be able to use VSM mode, the environment must meet the following hardware requirements:
- UEFI, Secure Boot and Trusted Platform Module (TPM) support for secure key storage
- Hardware virtualization support (at least VT-x or AMD-V)
How to enable Virtual Secure Mode (VSM) in Windows 10
Let's look at how to enable Virtual Secure mode Mode Windows 10 (in our example this is Build 10130).

Checking VSM operation
You can make sure that VSM mode is active by the presence of the Secure System process in the task manager.
 Or by the event “Credential Guard (Lsalso.exe) was started and will protect LSA credential” in the system log.

VSM Security Testing
So, on machines with VSM mode enabled, we register under the domain name account and as a local administrator we run the following mimikatz command:
mimikatz.exe privilege::debug sekurlsa::logonpasswords exit
We see that the LSA is running in an isolated environment and user password hashes cannot be obtained.
 If the same operation is performed on a machine with VSM disabled, we obtain an NTLM hash of the user's password, which can be used for “pass-the-hash” attacks.
A virtualization server is a physical computer that has the necessary resources to run virtual machines. Using Hyper-V Manager, you can create, configure, and manage virtual machines on a virtualization server.
Using virtual machines you can perform various tasks. Each virtual machine runs in an isolated execution environment, allowing you to run different operating systems and applications on your computer.
This article will tell you how to enable Hyper-V virtualization in Windows 10. First of all, we will look at how to check the Hyper-V system requirements, and only then enable Hyper-V and configure the virtual machine.
So, if we talk about the system requirements for the operating system on which the hypervisor called Hyper-V will be deployed, then the Windows 10 Enterprise, Professional and Education editions are suitable. You must have a 64-bit version of the Windows 10 operating system, since 32-bit versions do not have the ability to use Hyper-V.
In addition, you will need a 64-bit processor that supports virtualization technologies, such as VM Monitor Mode Extension and support for Second Level Address Translation. Minimum 4 GB recommended random access memory, if you run it at a smaller volume, then the virtual machine will not get anything.
It will also be necessary to enable these same virtualization technologies, as well as enable Hardware Enforced Data Execution Prevention (DEP). Without this technology, you will not be able to run virtual machines. There are a number of features associated with specific model BIOS or UEFI. Some technologies may compete with virtualization and therefore prevent you from running virtual machines.
The Windows 10 operating system has a tool to check your hardware compatibility with installing Hyper-V, which is useful for beginners. Using the systeminfo.exe utility, we will see the parameters for the requirements for Hyper-V.
At the bottom of the window, find the Hyper-V requirements item and check whether installation of a virtual machine on your computer is supported. If you find the following value parameters, then you will not have any problems installing Hyper-V on this machine:
- Virtual Machine Monitoring Mode Extensions: Yes
- Virtualization enabled in firmware: Yes
- Second level address translation: Yes
- Data execution prevention available: Yes
How to enable Hyper-V on Windows 10
Control Panel

The installation of the components will proceed quite quickly and the system will request a system reboot. During the reboot process, the user will also see updates working.
Windows PowerShell
Installing and configuring Hyper-V
The wizard will help you create virtual machine. Virtual machines can be used instead of physical computers for a variety of purposes. You can configure the virtual machine using a wizard or using Hyper-V Manager.
Before creating a virtual machine in Hyper-V, you need to download an operating system image. It can be done easily.
- Open the Hyper-V Manager, which appeared in the system after enabling the Hyper-V hypervisor component.
- Right-click on your device in Hyper-V Manager and in context menu select an item New > Virtual Machine…

- In the virtual machine creation wizard window that opens, click the button Further to create a virtual machine with specific configuration settings.

- Set the name and location for this virtual machine and click Further(the values of the current window can be left as default if you have enough memory on the system disk).

- Depending on the bitness of the operating system that we will install on the virtual machine, we select the generation (the generation of the virtual machine you have chosen cannot be changed after creation).

- Next, indicate how much RAM you need to allocate for this virtual machine (when deciding on the amount of memory allocated to the virtual machine, you should take into account the purposes for which it will be used).

- Select a virtual switch from the available connections or leave network adapter virtual machine unconnected.

- Now let's create a virtual one HDD by specifying its name, location and size (we recommend freeing up memory on your hard drive in advance).

- Next, in the installation options, select Install operating system from file boot image
and specify the desired operating system image.

- The last step in creating a virtual machine will be to check all the above parameters in the tab Summary and pressing a button Ready.

- Now in the Hyper-V manager you just need to launch the created virtual machine by selecting Start in the context menu and connect to it by selecting To plug.

After connecting to the new virtual machine, a new window will open with the image that was selected earlier. Then it is enough to manage and follow the steps of installing the operating system.

Conclusion
You can enable Hyper-V virtualization on Windows 10 using the Create a Virtual Machine Wizard in Hyper-V Manager. But before turning it on, make sure your computer is responding system requirements Hyper-V. Only then is it recommended to enable, install and configure the virtual machine in Hyper-V.
Hi all! Now we will talk about such a confusing topic, which sounds like this: how to enable virtualization in the BIOS. Let’s also try to figure out why, in general, this needs to be done.
So, my friends, in simple terms, this technology is needed for the operation of various software virtual machines and emulators. With its help, the performance of such software increases significantly.
This means that, without the use of third-party programs, we can install and test operating systems on virtual machines created for this purpose. In this article we will learn how to launch it. After rebooting and logging in, we launch the control panel.
Click on the magnifying glass and enter the panel. When the Control Panel window appears on your monitor, go to the “Programs” tab. To do this, select its checkboxes by selecting them with the mouse. When the entire process is successful, the system will display a message indicating the completion of the changes.
But let's start with the fact that the reason for writing this article was the following message that one of the very Androids issued upon startup. Let's look and analyze:
And this is nothing more than a call to enable this very damn virtualization. After all, this technology is abbreviated as VT-x or AMD-V. It all depends on which manufacturer’s process it is used in.
Click right click mouse over the pop-up menu and select "Run as administrator". Then enter the command. There is still a computer reboot. After rebooting and logging in, we will launch the control panel. Go to the "Programs" tab.
To enable these features, select the check boxes by clicking them. To complete the installation, we must restart the computer as soon as possible. Virtualization can save you money on upgrading your computing infrastructure. Instead of purchasing multiple computers, all systems can run simultaneously.
Well, let's try to take the first steps in the right direction. First of all, we need to enter the BIOS in order to actually activate this very function. Therefore, from words to deeds.
Of course, it’s worth mentioning right away that each manufacturer has a BIOS entry and sections in it. But for clarity and as an example, all further actions will be shown on a Lenovo laptop.
This is ideal for testers or technical support. This way of working also allows you to make optimal use of your PC's resources, which are usually idle for most of the time. Working in a virtual environment also improves security.
If you want to limit its operation in one direction, for example to improve security, you will do this in the "Shared Storage" field on the "Advanced" tab. The default bidirectional setting allows you to copy data from basic system to virtual and vice versa. On the same tab, you can also move the virtual machine toolbar from the bottom edge of the screen to the top. All you have to do is select "Show" at the top of the screen.
So, let's go in and immediately go to the "Configuration" section. There we find the “Intel Virtual Technology” item we need so much and activate it by selecting the “Enable” value:

That's all, now virtualization is enabled in the BIOS, you can use it. All that remains is to save the changes made. To do this, go to the "Exit" section and select the "Exit Saving Changes" item:
Configuration virtual hardware performed in the “System” section. On the Motherboard tab you can increase the volume virtual memory, assigned to the main memory slider. You will also enter a value in the box on the right. Remember that it is not recommended to record more than half of the used physical memory. Below, using the arrows, you will change the starting order. If you want to use a virtual network adapter for this purpose, check the Network checkbox.
You'll change the number of virtual processors on the Processor tab. If your processor supports hardware virtualization, you can enable it in the program by selecting the appropriate options on the Accelerator tab. Graphics card memory and graphics acceleration are determined in the Video tab under Display. In the same section, but on the "Remote Desktop" tab, you can run the function remote access. This gives you the ability to remotely manage a virtual system over a network connection.

But in conclusion, let's talk a little about one not very pleasant nuance that you may encounter, including the technology described above. The thing is that some manufacturers block it by default.
That is, the computer hardware can support virtualization, but the BIOS will not be able to activate the desired item. In this case, alas, you won’t be able to get away with little blood.
Possible errors in the event log
We save the changes. I am interested in backup technologies and security issues. Most newly shipped server machines are now configured in Green mode, which reduces power consumption at the cost of significantly reducing the performance of the newly purchased server. It is available on many Thomas-Krenn servers.
You will receive an error message: "Virtualization hardware support is not available." The selected setting is locked and cannot be changed while the system is running. After saving the configuration, the server must be disabled and then enabled. The right column contains the following help text.
There is a lot of information on the Internet about how to remove such a block. But we must say right away that it is clearly not designed for the average user, since it requires specific computer knowledge:

And our story about enabling virtualization is coming to an end. If you have any questions, please ask them in the comments to the article. And now we invite everyone who is curious to watch a very interesting video.
Once the setting is changed, one power cycle will occur. A few years ago, someone noticed something very obvious: companies all over the world had several dedicated servers for specific purposes. But what is most annoying? Sounds great, you just need to write the software!
The application installed inside such a "pretend" computer is convinced that it is running on real physical hardware, so there is no compatibility problem. However, now is the time for reflection and time to turn plans into action. Genius and the best possible. This system verifies the legitimacy of computer components.
How to enable virtualization in BIOS? This was the question asked a large number of users of personal computers. Some people have probably heard of this technology, but do not understand what benefits it can provide, or what it actually involves. These issues will be discussed in this article.
What is virtualization?
Before telling you how to enable virtualization support in BIOS, you need to explain what it is. IN computer technologies this term refers to hardware modeling using software methods. Thanks to virtualization technology, it is possible to create a number of virtual computers, that is, those that are simulated in software. In this case, only one sufficiently powerful physical computer is used.
Create a virtual disk
However, the virtual machine is identified, for obvious reasons, as a different piece of hardware than the physical computer. This leads to reports of systemic illegality. For example, in my case it is a disk with a number. In my case this command looks like this. It is also possible to select only one or a few partitions rather than the entire disk.
If we don't do this, our machine won't start. This requires direct disk access. The following guide will walk you through the installation process, step by step. We will make our computer pretend to be another, new computer - we will launch a virtual machine. After that your original computer will be intact, you use it in the same way as before.
Main advantages

What's good about virtualization? Here are its main advantages:
- Increases the efficiency of hardware use.
- Material costs are reduced.
- Resource allocation is optimized.
- Work safety becomes higher.
- Simplified administration.
- Increased reliability.
In order to create virtual systems, special software called a hypervisor is used. But due to some features of older processors built on Intel architecture, the hypervisor could not use their computing power as efficiently as possible to create virtual machines.
The suggested installation method is probably the safest. It is possible, however, that you have nothing to warn and try to try. Even when the features have been enabled, virtualization features are not available in the operating system. This will result in an error message indicating that hardware virtualization support is not available.
Only after this the new setting will take effect. After saving the configuration settings, the server must be turned off and on again. Next helpful information will appear in the right column of this view. A screenshot similar to the message on the screen will look like this.
For this reason, leading companies developing processors for personal computers have created hardware virtualization technology. It can optimize the operation of processors in such a way as to significantly increase the efficiency of the software for this process. Intel's hardware virtualization support technology is called Intel-VT, while AMD's is called AMD-V.
Principle of operation

The basis is the division of the processor into guest and monitor parts. For example, when switching from the host OS to the guest OS, the processor automatically switches to the guest state. At the same time, it shows the system the register values that it wants to see and that it needs for stable operation. Thus, the processor is a “deceiver”, which relieves the system of all sorts of tricks. The guest OS works directly with the processor, making the virtual machine run much faster than on a PC without virtualization support.
Technology support
Since hardware virtualization is integrated into the central processor, in order for the user to take full advantage of its benefits, it is necessary that his computer also supports this technology at the processor level. In addition, it is also necessary that the technology be implemented by the operating system and BIOS. If the latter supports hardware virtualization, the user has the opportunity to enable or disable it in the settings. It is necessary to take into account that there are chipsets for which are based on AMD processors, and in which it is not possible to disable support for this technology.
How to enable virtualization in BIOS?

To enable or disable this option, the BIOS has a special function called Virtualization Technology. Typically, this option is found in the CPU or Chipset related sections.
So, how to enable virtualization in BIOS? Very simple. Typically, setting the value to Enabled allows you to enable the technology, and setting it to Disabled allows you to disable it. Please keep in mind that activating the setting only affects the performance of virtual computers that run within the hypervisor. The performance of all operating system programs is not affected in any way.
Different manufacturers use their own settings, but it is still not difficult to enable virtualization in the BIOS (Asus, Lenovo and others have similar settings).
Conclusion
We found out how to enable virtualization in the BIOS. This technology is a very powerful tool that allows you to expand the capabilities of computers and use the available hardware much more efficiently. Most modern personal computers have processors that have this solution built into them. This improves their performance if virtual machines are used. In addition, most PCs have the ability to configure support for hardware virtualization.
Some users are interested in how to enable virtualization without BIOS. This is impossible to do, since manufacturers hardware They are introducing technology into hardware. And only BIOS has direct access to it.
How to enable virtualization in BIOS - you've probably already asked this question. Other users may have heard about virtualization technology, but do not know what benefits it provides and what it involves. We will try to consider these questions in this article.
First of all, what does the concept of virtualization mean? Virtualization in computer technology means hardware modeling using software methods. With the help of virtualization technology, you can create several virtual, that is, computers simulated by software, using only one, sufficiently powerful physical computer.
Key benefits of virtualization:
- Improving hardware efficiency
- Reducing material costs
- Optimizing resource allocation
- Increased work safety
- Simplified administration
- Increased reliability
For creating virtual systems special software called a hypervisor is used. However, due to a number of features of older processors Intel architecture the hypervisor was not able to make the most of their computing power to create virtual machines.
Therefore, leading PC processor developers Intel and AMD, have developed what they call hardware virtualization technology, which optimizes the performance of processors in a way that significantly improves the efficiency of virtualization software. Intel's version of hardware virtualization support technology is called Intel-VT, and AMD's version is called AMD-V.
Virtualization support
Since hardware virtualization technology is embedded in the central processor, in order for a user to maximize the benefits provided by virtualization, it is necessary that his computer supports this technology at the processor level. In addition, technology support from the BIOS and operating system is also required. In BIOSes that support hardware virtualization, the user has the ability to enable or disable virtualization support in BIOS Setup. Please note that there are chipsets for motherboards on the base AMD processors, in which virtualization support cannot be disabled.
Enabling virtualization in BIOS
So, how to enable virtualization in BIOS? To enable or disable virtualization in the BIOS, there is a special option Virtualization Technology. Typically you can find this option in the BIOS Chipset or Processor sections.
Typically, setting the value to Enabled allows you to enable hardware virtualization, and setting the value to Disabled turns it off. It should be kept in mind that enabling the option only affects the performance of virtual machines running within the hypervisor and does not affect performance in any way regular programs operating system. We discussed this option in more detail in the corresponding article.
Conclusion
Virtualization is a powerful tool that allows you to expand your capabilities computer systems and make the most efficient use of existing hardware. Most modern computers have solutions built into the processor that can improve their performance when using virtual machines. In addition, most computers based on Intel processors and AMD has the ability to configure support for hardware virtualization.
We enable hardware virtualization of central processors, AMD - AMD-V and Intel - VT-X technologies. Learn more about how to check whether virtualization is supported by the processor and how to enable virtualization in the BIOS. The technology is checked and activated simply...
Virtualization is — virtualization means a processor architecture with the ability to simulate hardware (virtual guest systems) using software methods. Virtualization technology makes it possible to run multiple operating systems(virtual OS) on one real physical computer, with isolated separated computing processes, with dedicated logical resources, part of which is processor power, RAM, and a file subsystem from a common pool.
In simple words, virtualization allows the user to run on one physical personal computer diverse virtual machines with different types operating systems (Windows, Android, Linux, MacOS X) or the same, with any set of programs. Most in demand this moment for gamers, allows you to launch and speed up .
How to check whether virtualization is supported and enabled.
For those who are afraid to enter the BIOS, you can check whether the processor supports virtualization technology or not and whether it is enabled in the BIOS, you can use the SecurAble program. The utility is free and does not require installation - portable version, literally in two clicks - launched, found out the result, closed. You can download the program by going to SecurAble official website or download via direct link from - office. site.


Securable parameters:
1. Parameter value Maximum Bit Length indicates the maximum available bit depth of the system, 32-bit or 64-bit.
2. Values Hardware D.E.P.— technology responsible for security, introduced to counter the launch of malicious code.
3. Option Hardware Virtualization— the parameter can produce four values:
Yes— virtualization technology is supported by the processor — enabled;
No— virtualization is not supported by the processor;
Locked On— enabled and supported, but cannot be disabled in the BIOS;
Locked Off— the technology is supported, but it is disabled and cannot be enabled in the BIOS.
The inscription Locked Off is not always a sentence - BIOS flashing can correct the situation.
How to enable virtualization in BIOS.
Virtualization Technology is responsible for enabling hardware virtualization in the BIOS. To disable the option or enable virtualization in the BIOS, we send the PC to reboot. When the first signs of loading appear, click on the keyboard key “F2” or “Delete” ( different versions BIOS), look for a hint at the bottom of the screen at startup.
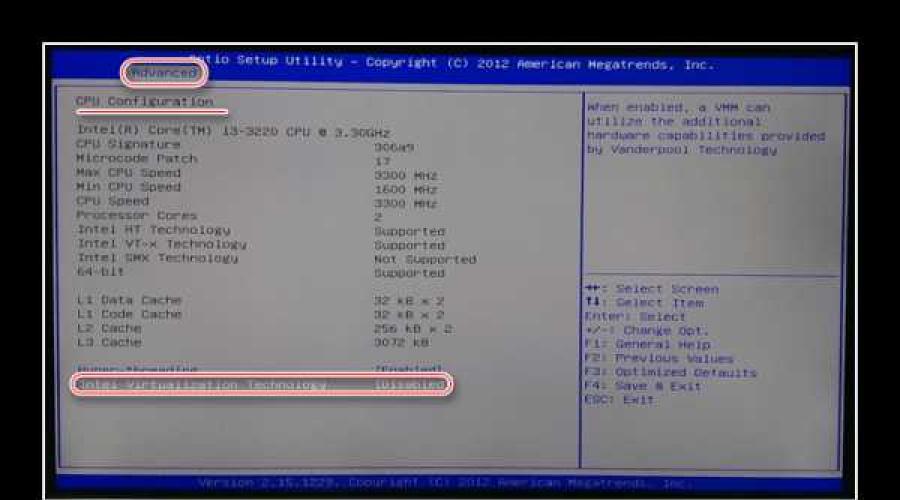
Go to the “Advanced BIOS - Features” section, find the “Virtualization” or “Advanced” option → “CPU Configuration”, option “ Intel Virtualization Technology".

We move using the keyboard arrows (in BIOS UEFI with the mouse), press “Enter”, change the “Virtualization” parameter from “Disabled” to “Enabled” (enabled). Virtualization has been enabled in the BIOS, all that remains is not to miss one important click - don’t forget to press the “F10” button, which corresponds to the value - save settings (Save).

And most importantly, remember - Virtualization Technology only creates an environment for Android emulators and operating systems and does not affect the actual performance of the hardware in any way (it does not make the computer powerful). Work hard first , choosing components wisely and only then demand something from it.