Uninstall windows 8.1 updates. How to turn off automatic Windows updates
Less than a week ago, Microsoft officially announced the imminent release of an update for its operating system. The update (also known as Windows 8.1 Update 1) will be available tomorrow for everyone Windows users 8.1 and Windows 8.1 RT, and completely free.
This update is Microsoft's attempt to reassure classic PC users who haven't embraced the latest version Windows operating system, or simply dissatisfied with it. The update adds several new features, including buttons for minimizing and closing applications from Windows Store. In addition, after Windows installation 8.1 Update users will be able to pin modern applications on the desktop taskbar, and on the home screen there will be elements for managing the power of the computer (shutdown, restart, etc.).
The update greatly improves the user experience, but mainly on desktop machines. Thus, if you installed Windows 8.1 Update on a tablet or other device with touch screen, and not happy with the innovations included in this update, you can easily return to Windows 8.1.
The best thing about upgrading to Windows 8.1 from upgrading to Windows 8.1 Update is that the latter is very easy to uninstall. However, if you're not sure how to uninstall installed updates, follow the simple steps below to help you roll back from Windows 8.1 Update to Windows 8.1.
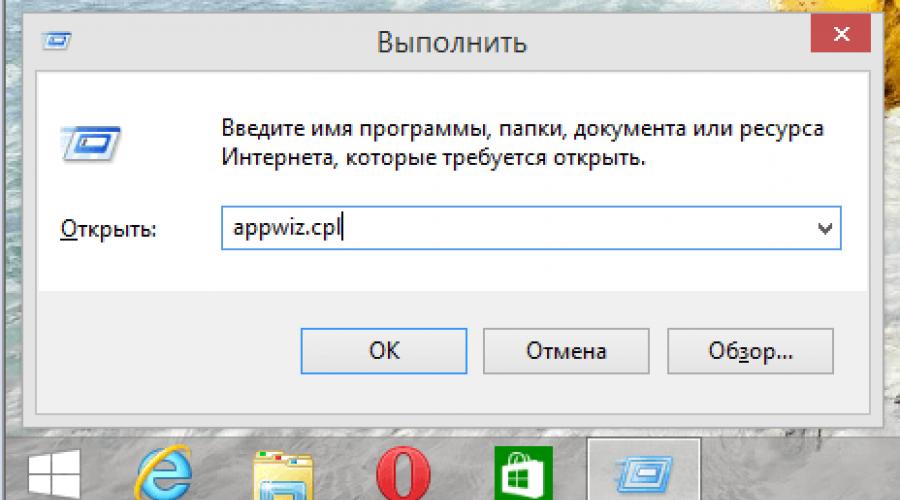
Step 1: Press the Windows logo key and R at the same time to open the Run dialog box. In the window that opens, type the command Appwiz.cpl, and then press Enter or OK to open the Programs and Features window.

Step 2: On the left side of the Programs and Features window, click the View Installed Updates link to see all the updates that are installed on your system.

Step 3: In the list of installed updates, go to the " Microsoft Windows and look for update KB2919355 there. Click on it right click mouse and click Remove.

Step 4: Click the "Yes" button when a window appears on the screen with the message "Are you sure you want to uninstall this update?".

Step 5: Once the update has been removed, you will be prompted to restart your computer. Do this to completely uninstall Windows 8.1 Update.
Note: you don't need to uninstall the rest of the updates that were installed with KB2919355, as uninstalling the main update removes everything else related to Win 8.1 Update from the system as well.
Have a great day!
Not all Windows folders are equally useful. Many users have already made this conclusion for themselves. Some folders in the system can take up a lot of space, but not always with the necessary data. If we somehow figured out the system snapshot folder (restore points), then not everyone knows how to approach the WinSxS folder. In this article I will explain what this folder is, why it takes up so much space and how it should be put in order.
Why is WinSxS so big?
There is nothing mysterious about the WinSxS folder. Windows sends "snapshots" to it system files that affect another update. Hence the meaning of this folder - to ensure the rollback of the system after the update, if it began to work incorrectly or unstable. Claims against the WinSxS folder are related to the monstrous size that the research tools show hard drive, like .
And there is no mystery. The actual size of the WinSxS folder is much smaller - "hard links" are to blame.
"Hard Link" - Conquest file system NTFS. In reality, there is only one file, but there can be many “hard links” to it. But they, from the point of view of the file manager, are completely separate files with the same size as the referenced file. But in reality, their size is zero.
When standard tools calculate the size of the WinSxS folder, they are told the files themselves, regardless of the fact that these are "hard links". In reality, the size of the WinSxS folder is not that big and rarely reaches 15 GB. However, with large updates, of which there have been many lately, the size of this folder raises questions.
How to properly clean up the WinSxS folder?
The answer depends on the version of the operating system you are using.
Windows 7
On Windows 7, install the SP1 update or package number KB2852386. The fact is that the developers have included the cleaning of this folder in the system disk cleanup utility. There, this item is called "Windows Update Cleanup".

Old files are deleted in the following way. All files related to updates installed earlier than 30 days ago are deleted.
Windows 8
In Windows 8, the WinSxS folder has undergone small but important changes. Now it stores not just old files, but compressed old files. This greatly reduces the actual physical size of the folder.
Starting with Windows 8, you can see the actual size of WinSxS with the following command "Dism.exe /Online /Cleanup-Image /AnalyzeComponentStore". To do this, you need to call the system utility " Command line"("cmd") as administrator.

The native Disk Cleanup tool here has always been able to clean up Windows updates, as described for Windows 7 SP1.

Windows 8.1 and 10
Windows 8.1 introduced additional function remove all old versions Windows components. This is done with the command "Dism.exe /Online /Cleanup-Image /StartComponentCleanup /ResetBase".
Attention! Use non-standard commands only if the free space is simply catastrophically valuable. In all other cases, "disk cleanup" will give a completely satisfactory result. And system security due to a 30-day moratorium on the removal of updates will be higher.
Good day. This week the site received a new record in terms of attendance - 5407 unique visitors per day, for which we thank you very much. Although I rarely write lately, the site is still growing :)
Now let's talk about our problem. What is this WinSxS folder? This folder is where the Windows Updates and Features file is stored. Why does she weigh so much? Hmm ... In fact, it weighs much less :) Files from the Windows, System32 folders are projected into this folder using , which is why everything file managers show such big size They don't see the difference between real files and symbolic links. Based on the same, it is highly recommended not to climb into this folder through the explorer and try to delete everything manually. There are a few standard means, which will help to safely and efficiently clean this folder. And by the way, as updates are installed, it is constantly growing, so it is recommended to periodically repeat these steps. By the way, I recommend using method #2.
Method number 1. Cleaning up Windows Updates using the Disk Cleanup utility (also works on Windows 7 SP1 with KB2852386 installed).
A very simple way and does not require any decisions from the user. But the evaluation of files works mediocre, it is wrong both up and down. But it doesn't really matter to us.
1) We need the "Run" utility, so press the key combination Win+R and enter in the opened window cleanmgr.


3) We are waiting for the assessment of free space and click the "Clean up system files" button.

4) Put a tick on "Clean up Windows updates". And click OK. The process of cleaning up the update files will begin. 
But this way you can delete only part of the files, more accurate cleaning can be done using method number 2.
Method number 2. Clean up Windows Updates, Disabled Features, and Windows Cache stored in the WinSxS folder using the DISM utility. (I recommend)
This method allows you to clean not only update files, but also all other garbage from the WinSxS folder.
1) Open the command prompt as administrator, for this we press the keyboard shortcut Win+X and choose " Command Prompt (Admin)«.
Dism.exe /Online /Cleanup-Image /AnalyzeComponentStore

As you can see, 4.77GB of the total occupied is in Windows folder and in no way are superfluous, since these are files necessary for the system to work. But here backups(needed in case the system does not boot after installing updates) and the cache with temporary files can be cleared. Well, carefully read the penultimate line " Component Store Cleanup Recommended: Yes". So let's move on to the next step.
Dism.exe /Online /Cleanup-Image /StartComponentCleanup


That's all. I hope this article was useful to you, click one of the buttons below to tell your friends about it. Also subscribe to site updates by entering your e-mail in the field on the right.
Everyone has experienced automatic Windows updates.
In my case, this experience turned out to be negative and I removed the Windows 8.1 automatic update feature, which I recommend to everyone. But first of all, you should understand why they are needed at all.
Experts write that they are necessary for the normal functioning of the operating system, namely:
All this is understandable, the system is being improved and it seems that it should work better and faster.
But what is really happening? Due to the ever-increasing number of updates, the computer slows down and starts to freeze. It is simply impossible to work with such a load "on the shoulders".
Initially, I had Windows 8 on my laptop - heavy and clumsy, but when it was updated to new version 8.1 has become easy and pleasant to work with. Until the time when the updates that are downloaded almost every day have not reached a critical mass.
After installing the next innovations, it became impossible to work at all - the programs hung, when the browser was opened, a black screen appeared that blocked the work, and when the computer was booted, a window began to pop up announcing an error in the operation of one of the system programs– Catalyst Control Center host application.
How to fix an error in the Catalyst Control Center can be found
In a word, the opposite is true - instead of improving, a complete stop of work.
Then I removed the latest installed updates and the computer began to work normally.
How to get rid of updates?
For your convenience, you can work with two windows at the same time by separating them with hot keys: WIN + Left Arrow - browser window, WIN + Right Arrow - the second window.
1. First of all, you should clear the "Download" folder where they are downloaded.
Path: Drive C ⇨ Windows ⇨ SoftwareDistribution ⇨ Download.
2. Then delete the last downloads, after which the computer began to freeze (if you remember the approximate date of this "event").
Path: Control Panel ⇨ Programs and Features ⇨ Installed updates(link top left).
To make it easier to find interfering updates, rearrange them under the date of installation: right-click, select Sort ⇨ Installed. Remove the necessary, but do not overload the computer.
3. The next step is to cancel automatic download updates.
Control Panel ⇨ Update Center ⇨ Enable or disable automatic updates. Select "Do not check for updates (not recommended)".
Now restart your computer.
It should be fate that updates are also contraindicated for unlicensed copies of Windows.
If you purchased a laptop or computer with Windows 8, or simply installed this OS on your computer, then sooner or later (unless, of course, you turned off all updates), you will see a store message offering to get Windows 8.1 for free, the acceptance of which allows you to upgrade the system to a new one. versions. But what if you don’t want to update, but at the same time it’s also undesirable to refuse regular system updates?
The second method is actually the same as described above, but disable the upgrade to Windows 8.1 using the registry editor, which you can launch by pressing the Win + R keys on your keyboard and typing regedit.
In the registry editor, open the HKEY_LOCAL_MACHINE\SOFTWARE\Policies\Microsoft\ key and create the WindowsStore subkey in it.

After that, with the newly created key selected, right-click in the right area of the Registry Editor and create a DWORD value called DisableOSUpgrade and set its value to 1.
That's all, you can close the registry editor, the update will no longer bother you.
Another way to disable the Windows 8.1 upgrade notification in the Registry Editor
IN this method the registry editor is also used, and it can help if the previous option did not help:
- Launch the Registry Editor as described earlier
- Open the HKEY_LOCAL_MACHINE\System\Setup\UpgradeNotification key
- Change the value of the UpgradeAvailable parameter from one to zero.
If there is no such section and parameter, you can create them yourself, in the same way as in the previous option.
If in the future you need to disable the changes described in this guide, then simply perform the reverse operations and the system will be able to update to the latest version on its own.