1c two platforms on one server. Parallel launch of several 1C:Enterprise servers of different versions on one computer
Read also
Server 1C 8.2 and 8.3 on one computer (Windows)
September 24, 2015
Let's say you have a functioning 1C 8.3 server and you additionally need to upgrade to 8.2. However, after installing 8.2 and running it, this led to problems with version 8.3.
The easiest way to start is to write the necessary values in the registry operating system.
Let's stop the 1s 8.2 server.
Now open “Start - Run” and enter the command regedit. The system registry will open. Find the ImagePath parameter in the HKEY_LOCAL_MACHINE\SYSTEM\CurrentControlSet\Services\1C:Enterprise 8 Server Agent branch. this key The registry contains ports for 1c. Let's change them, for example to:
C:\Program Files\1cv82\8.2.хх.хх\bin\ragent.exe" -srvc -agent -regport 2041 -port 2040 -range 2060:2091 -d "C:\Program Files\1cv82\srvinfo
regport - clients are connected through it.
port — server management port (administration panel, postgresql).
range - ports for connecting a PC.
Don't forget to open the firewall ports!
Restart servers 1C 8.3 and 8.2.
Now let’s create a central server in the server administration panel.
Create a central server.
The port must be set for the central server.
For a server cluster, you need to set the port value to regport.
For worker processes, the port range is set to range
To connect to the 1c 8.2 server, you now need to specify nameserver in the “Server name” field:
It is also possible that you want to rename the cluster, which may result in the error "Error network access to the server"
We install the 1C 8.3 server for collaboration from 8.2, and if necessary, then from 8.1.
Or we simply launch an unlimited number of 1C servers for different tasks.
If the server has not yet been installed, then:
1. Download the server distribution. It is usually called like this: " Server 1C:Enterprise (64-bit) for Windows"
or "Technological platform 1C:Enterprise for Windows"
If the installer crashes when you try to start the service, click “Skip”.
Registry settings:
1. Go to the registry using regedit and follow the path:
"HKEY_LOCAL_MACHINE\SYSTEM\CurrentControlSet\Services\1C:Enterprise 8.3 Server Agent"
The final path may vary depending on installed version, For example:
1C:Enterprise 8.3 Server Agent (x86-64)
1C:Enterprise 8.3 Server Agent
1C:Enterprise 8.2 Server Agent
and so on.
2. If a second server is created, the same version or the same edition as the one already running, then:
We create a full copy of the directory and rename it, for example to
HKEY_LOCAL_MACHINE\SYSTEM\CurrentControlSet\Services\1C:Enterprise 8.3 Server Agent Debug
3. Find the key with the name " ImagePath", we edit all ports and port ranges in it from 15xx to others, for example 16xx, 17xx, 18xx, etc.
The result should be:
"C:\Program Files\1cv8\8.3.6.2299\bin\ragent.exe" -srvc -agent -regport 1741 -port 1740 -range 1760:1791 -d "C:\Program Files\1cv8\srvinfo"
4. If we launch the server for debugging or another version of the same edition, add the key at the end -debug
"C:\Program Files\1cv8\8.3.7.1751\bin\ragent.exe" -srvc -agent -regport 1741 -port 1740 -range 1760:1791 -d "C:\Program Files\1cv8\srvinfo" -debug
In this case, it is also necessary to change the working directory of the server from "C:\Program Files\1cv8\srvinfo" on "C:\Program Files\1cv8\srvinfo_debug",
having previously created a directory on the disk.
5. For the service to appear in the list of services, you must restart the server, or run the following command:
sc create "1C:Enterprise 8.3 Server Agent Debug" binPath="C:\Program Files (x86)\1cv8\8.3.5.1482\bin\ragent.exe"
Where
1C:Enterprise 8.3 Server Agent Debug- the name of the directory we created in the registry (it’s also the name of the service)
"C:\Program Files (x86)\1cv8\8.3.5.1482\bin\ragent.exe"- let to the service being started (the key starts with it " ImagePath")
6. Go to services and start the service "1C:Enterprise 8.3 Server Agent Debug".
The service name is set in the registry with the key DisplayName
7. When updating the platform, the version will change only on the main server, folder 1C:Enterprise 8.3 Server Agent
For added services, the platform version will have to be changed manually.
8. The operation can be repeated an unlimited number of times, depending on how many and what servers are needed.
For example, three different 8.1, two 8.2, two 8.3.
8. When installing the client part of the platform, the cluster console has a different path for different versions; if we install it “by default”, then this is:
8.2 - "C:\Program Files\1cv82\common\1CV8 Servers.msc"
8.3 - "C:\Program Files\1cv8\common\1CV8 Servers.msc"
IN current article Let's look at the process of launching and setting up parallel operation of several 1C:Enterprise servers of different versions (relevant for versions 8.1 , 8.2 And 8.3 ) on one computer. IN in this example the 1C:Enterprise server 8.3 will be launched while the server version 8.2 is running, but the article will be relevant for other similar situations, for example, when starting the 1C:Enterprise server version 8.1 while the server version 8.3 is running or running two servers of different bitness.
1. Statement of the problem
Let's assume there is a working server "1C:Enterprise" version 8.2 . Moreover, the server agent is launched as a service and selected standard parameters starting the server agent, i.e.:
- 1540
- 1541
- 1560:1591
- These clusters are located in the directory: " C:\Program Files\1cv82\srvinfo"
- The service is started as a local user USR1CV8

Let's launch and configure the 1C:Enterprise version server to work on the same physical computer 8.3 .
2. Installation of the 1C:Enterprise server part version 8.3
We start the installation of the 1C:Enterprise server (I wrote in detail about installing the 1C:Enterprise server), select the components for installation:
- Components for accessing 1C:Enterprise 8 servers
- Server 1C:Enterprise 8
And at the same time, remember the installation directory of the “1C:Enterprise” files (in this case - “ C:\Program Files\1cv8\8.3.4.389»).

We install the “1C:Enterprise” server not as a service, but as an application, i.e. we remove the flag “ Install 1C:Enterprise 8 server as a Windows service" during installation.

3. Registration of the 1C:Enterprise server version 8.3
Now let’s manually register the new 1C:Enterprise server as a Windows service with changed parameters. To do this, use the command line or program Windows PowerShell. You can launch PowerShell by running the command powershell(to do this, press the combination Win keys+ R, in the window that appears “ Execute" (Run) enter the command name in the field " Open"(Open) and press " OK") or by clicking on the corresponding shortcut in the taskbar.

In the Windows PowerShell console that opens, for the convenience of entering further commands, let's go to the directory bin catalog with installed files“1C:Enterprise” (catalog from point 1) by executing the command
Cd "C:\Program Files\1cv8\8.3.4.389\bin"
If the 1C:Enterprise server version 8.3 was installed previously as a service, you must delete the existing server registration. To do this you need to run the command
.\ragent.exe -rmsrvc

You also need to delete all files in the cluster registry directory from the previous installation of the 1C:Enterprise server. By default this is the directory C:\Program Files\1cv8\srvinfo.

Now you can proceed to registering a new 1C:Enterprise server agent service. Because the default ports ( 1540 , 1541 , 1560-1690 ) are already occupied by the 1C:Enterprise server service version 8.2, it is necessary to use alternative ports, for example 2540 , 2541 and range 2560-2591 . To register a server with these parameters, run the command
.\ragent.exe -instsrvc -port 2540 -regport 2541 -range 2560:2591 -usr .\USR1CV8 -pwd UsrPass8 -d "C:\Program Files\1cv8\srvinfo"
(you can read more about the 1C:Enterprise server agent launch parameters in the article)
This example registers a server with the following parameter values:
- Server agent network port number - 2540
- Cluster manager network port number - 2541
- Port range for dynamic selection - 2560:2591
- The service is started as a local user − USR1CV8
- The password of the user on behalf of which the service is running is UsrPass8
- Cluster registry data is located in the directory "C:\Program Files\1cv8\srvinfo"
- If you need to enable debugging on the server, you need to add the parameter to the startup line - debug
Well, let’s immediately start the service by running the command
.\ragent.exe -start

Let's go to Windows services and we will see that the required service with the name appears in the list 1C:Enterprise 8.3 Server Agent (x86-64). The service is running, and the service startup uses the parameters you just entered.

And if we go to the directory with the cluster registry files, we will see that the corresponding files have appeared there.

5. Adding the 1C:Enterprise server version 8.3 to the server administration console
To administer the 1C:Enterprise server, use the 1C:Enterprise server administration console. You can open the administration console of the required version from the subdirectory common directory with installed 1C:Enterprise program files (optional of this computer- the console can be installed separately on any computer on the network) by running the snap-in 1CV8 Server (x86-64).msc.

In the 1C:Enterprise server administration console, click right click mouse in the settings tree on the “ Central 1C:Enterprise 8.3 servers", select the item " Create» — « Central server 1C:Enterprise 8.3».

In the parameters window for the central 1C:Enterprise server that appears, specify:
- Protocol - tcp
- Name - the name of the computer on which the 1C:Enterprise server is running
- IP port — network port number of the server agent, in this case 2540
- Description - arbitrary description of the central 1C:Enterprise server
Click " OK» to save the entered parameters.

After which the newly installed 1C:Enterprise server version 8.3 will be available for administration through this snap-in.

Did this article help you?
Background... Our company successfully operates 1C:Enterprise version 8.2, which has about 100 intensively used accounting databases. Dedicated to this case separate server with quite impressive characteristics, because During operation, it turned out that the combination 1C:Enterprise 8.2 + MS SQL 2005 is very demanding on such hardware resources as hard disks, processor, and most importantly - quantity random access memory. The cost of such a server for us exceeded 250 thousand rubles (not counting licenses for both the OS and 1C itself).
It was considered unreasonable to allocate separate hardware for 1C:Enterprise version 8.3, and besides, paying another 100 thousand rubles for the second set of keys for the 1C server is very expensive! An attempt to install 1C:Enterprise version 8.3 directly led to the fact that the cluster with existing databases was lost. This is where the peculiarities of installing and running two server versions of 1C:Enterprise on one computer were revealed.
The installation program for 1C:Enterprise 8.2 and 8.3 configures software to use their standard ports: 1540 (used by the server agent), 1541 (used by the cluster manager), 1560-1591 (range of ports used for workflows). Therefore, if the 1C:Enterprise 8.3 server must work simultaneously with the 1C:Enterprise 8.2 server, then the former must specify ports different from those already used by the running instance of the previous version of the server.
On a computer with the 1C:Enterprise server version 8.2 already installed, the “1C:Enterprise 8.2 Server Agent” service is registered and running, already using the standard ports indicated above. If you installed a 1C:Enterprise 8.3 server “nearby”, then the launch of its service “1C:Enterprise 8.3 Server Agent” will end abnormally, because it will try to use already “occupied” ports. To avoid this, you must do the following.
(Everything described below is true for Windows Server 2008 R2 Enterprise (and Standart) 64 bit + SP1 and 32-bit server versions of 1C:Enterprise 8.2 and 8.3).
I installed 1C:Enterprise 8.2 (version 8.2.19.90) as a Windows service with rights to run as an existing local user “Administrator”.

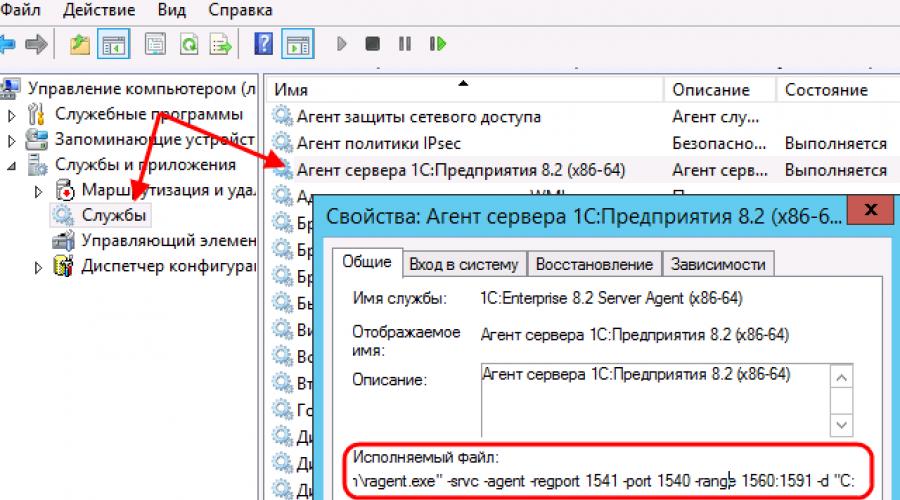
After installation is complete, the window Server Manager -> Configuration -> Services we see running service“Server Agent 1C:Enterprise 8.2”:

launched with parameters:

C:\Program Files (x86)\1cv82\8.2.19.90\bin\ragent.exe" -srvc -agent -regport 1541 -port 1540 -range 1560:1591 -d "C:\Program Files (x86)\1cv82\ srvinfo"
I installed 1C:Enterprise 8.3 server (version 8.3.4.437) in a similar way:

However, as we see in the window Server Manager -> Configuration -> Services, the “1C:Enterprise 8.3 Server Agent” service did not start:

Now we need to open the window command line cmd and go to the bin directory of the installed server version of 1C:Enterprise 8.3 and try to delete the registration of the “1C:Enterprise 8.3 Server Agent” service with the command ragent.exe -rmsrvc:
C:\Users\administrator>cd C:\Program Files (x86)\1cv8\8.3.4.437\bin C:\Program Files (x86)\1cv8\8.3.4.437\bin>ragent.exe -rmsrvc Error! ControlService error!
I got it error Error! ControlService error! , which is in principle expected, because the service has not registered properly in the system. But in fact, he should leave. In the window Server Manager -> Configuration -> Services you won't see him again.
Now you need to produce re-registration of this server, but at the same time specify ports different from those already used by the 1C:Enterprise 8.2 agent. In my case the command will look like:
C:\Program Files (x86)\1cv8\8.3.4.437\bin>
- -port 2540— port on which the 1C:Enterprise server agent version 8.3 will run;
- -regport 2541— port through which the 1C:Enterprise server cluster, version 8.3, will be administered;
- -range 2560:2591— range of ports for workflows;
- -in “C:\Program Files (x86)\1cv8\srvinfo”— a directory for storing information about the new 1C:Enterprise server cluster being created, version 8.3;
- -usr .\Administrator— the user on whose behalf the 1C:Enterprise server agent version 8.3 will be launched;
- -pwd********— password for the specified user (enter yours).
After this, you will again see the “1C:Enterprise 8.3 Server Agent” service in the window Server Manager -> Configuration -> Services. All you have to do is run it with the command ragent.exe -start:
C:\Program Files (x86)\1cv8\8.3.4.437\bin>ragent.exe -start
In the window Server Manager -> Configuration -> Services we see the “1C:Enterprise 8.3 Server Agent” service:

launched with parameters:

where the “Executable file” field has the setting:
C:\Program Files (x86)\1cv8\8.3.4.437\bin\ragent.exe" -srvc -agent -regport 2541 -port 2540 -range 2560:2591 -d "C:\Program Files (x86)\1cv8\ srvinfo"
And now the most interesting part: you will have to do this operation every time there is a need to update the 1C:Enterprise 8.3 server version! Bravo, developers...
Now a little about how to live with this connection. There is no longer a need to run the 1C:Enterprise program itself with the old version (from the folder C:\Program Files (x86)\1cv82\common). When installing 1C:Enterprise version 8.3, the desktop shortcut will automatically be overwritten to launch the program from the folder C:\Program Files (x86)\1cv8\common. If you open an accounting database running on a server version 8.2, it will automatically open in the required version thin client.
Templates for creating databases (accounting or ZIK) are placed by default in the directory of the user on whose behalf you launched their installation. If you are doing this as an administrator, you will find them in the path C:\Users\administrator\AppData\Roaming\1C\1cv8\tmplts . If you would like to add new base Based on the installed template, the thin client version 8.3 will see them all:

Now, if you need to register the database version 8.3, then you will need to indicate in the “1C:Enterprise server cluster” field the computer with the 1C server version 8.3 installed and, separated by a colon, the cluster manager port that you specified when registering the 1C server agent version 8.3. In my case it is 2541:

When adding a new one to the list of accounting databases, located on an enterprise server running 1C:Enterprise version 8.3, you must also indicate the server name, followed by a colon - the port used by the cluster manager:

The need to register the utility for cluster administration with both 1C servers (both versions 8.2 and 8.3) remains after each installation/update.
Now let's move on to administering clusters running different versions of 1C:Enterprise servers on one computer. Open the folder in Explorer along the path C:\Program Files (x86)\1cv8\common, and create a shortcut on the desktop for the cluster administration console version 8.3 (it’s better to immediately rename the shortcut accordingly, for example 1CV8.3):

In the same way, open the folder in Explorer along the path C:\Program Files (x86)\1cv82\common , and create a shortcut on the desktop for the cluster administration console version 8.2 (it’s better to immediately rename the shortcut, for example to 1CV8.2):

On your desktop you will get the following:

Let’s launch the 1C:Enterprise server cluster administration utility version 8.2 with the shortcut “1CV8.2” (since the server uses default ports, the cluster will be displayed without problems):

When you try to open this cluster from the console intended for administering the 1C:Enterprise server cluster version 8.3 (using the desktop shortcut named “1CV8.3”), you will see the error:
Error connecting to the 1C:Enterprise 8.3 server: The client and server versions differ (8.3.4.437 - 8.2.19.90), client application: Cluster Console

To display the 1C:Enterprise server cluster version 8.3 we need, we need to create a new central 1C:Enterprise 8.3 server in this snap-in:

- in field Name you must specify the name of the computer with the 1C:Enterprise 8.3 server installed;
- in field IP port you must specify the port on which the 1C:Enterprise 8.3 server agent runs, which you designated when setting up the agent launch service;
- in field Description indicate description.

After clicking the “OK” button, you will be able to see your new cluster, which was created after installing the 1C:Enterprise server version 8.3.

Those. administration of clusters of different versions of 1C:Enterprise server installed on one computer is carried out using the appropriate snap-ins.
That's basically it. Good luck!
_________
UPD. As practice has shown, the method described in this article is not suitable for simultaneously running several instances of 1C:Enterprise server version 8.3 on one server. When trying to create a new 1C agent service from a different version of 1C:Enterprise, running on different ports, the operation:
C:\Program Files (x86)\1cv8\8.3.4.437\bin>ragent.exe -instsrvc -port 2540 -regport 2541 -range 2560:2591 -d "C:\Program Files (x86)\1cv8\srvinfo" - usr .\Administrator -pwd ********
ends up removing an already running service old version 1C 8.3, but a new one is not created.
In I described a method for installing, creating the appropriate ones and running several versions of 1C:Enterprise 8.3 server on one server...
After the release of platform 8.2.11, the task appeared to install on one physical server several application servers 1C 8.2 - 8.2.10 and 8.2.11. I did not find information on how to do this in the 1C documentation; moreover, it was said that the second server can only be started in manual mode.
A third-party utility for creating Windows services helped solve this issue (Only a registered user can download files!).
First, you need to unpack the archive into a folder, go into it using the command line and run the service creation command, for example:
"INSTSRV "Server Agent 8.2.11" "C:\Program Files\1cv82\8.2.11.229\bin\ragent.exe"", Where Server Agent 8.2.11- made up name of the service. If everything is done correctly, a message will appear confirming the successful creation of the service: 
Now go to Administration - Services. Find the newly created service, double click brings up the service properties. On the first tab you can select launch options - Automatic(automatically when the computer boots), Manual(Manually) and Disabled(disabled). To operate the created service in separate window It is necessary to mark on the second tab (Login) the item Allow Service to Interact with Desktop(Allow interaction with the desktop) + specify login parameters.
The next step is to edit the registry. Launch the registry editor Regedit. We are looking for the line " C:\Program Files\1cv82\8.2.11.229\bin\ragent.ex e" and change it to the correct launch command with parameters, for example: " "C:\Program Files\1cv82\8.2.11.229\bin\ragent.exe" /Debug -srvc -agent -regport 11641 -port 11640 -range 11660:11691 -d "C:\Program Files\1cv82\srvinfo2""
You can start a service, if it is not disabled, in several ways, firstly through the command line: Net Start ServiceName - where ServiceName is the name of your service. And in another way - directly through the applet administrative panel- services.
To remove a service, you must first stop it: net stop ServiceName, then again in the command line run the command INSTSRV ServiceName remove.
P.S. - information for “especially smart” skeptics:
Quote from http://users.v8.1c.ru/Adm3413.aspx:
Installing a new instance of 1C:Enterprise 8.1/8.2 server while running 1C:Enterprise server of the same version
1C:Enterprise does not have standard capabilities for registering multiple instances of the 1C:Enterprise server of the same version (8.1 or 8.2).
If after installation you intend to launch a new server instance, and not simply update the 1C:Enterprise version, then when installing 1C:Enterprise with the same first two digits of the version number, you should not register the 1C:Enterprise server as a service.
Additional instances of the 1C:Enterprise server can only be launched from the command line. It is important that they differ not only in ports, but also in the cluster registry directories.