How to clear temporary files in Windows 10. Delete temporary files in Windows
Windows 10, like its predecessors, has the amazing ability to accumulate a bunch of junk files and remnants of long-deleted applications. All this can be aggravated by viruses that accumulate during work. And despite the fact that the operating system has its own resources for automatically removing garbage, they still need to be activated, and to fully believe in cleanliness and order, periodically clean the computer manually.
Cleaning the Temp folder in Windows 10
The Temp folder is the main storehouse of junk for Windows 7. All it contains is system garbage in the form of temporary files, which can and should be deleted with an absolutely clear conscience, without the slightest risk of harming your computer.
Through parameters
One of the most relevant innovations in Windows 10 is bringing temporary file cleaning to the user level. Now, in order to get rid of ill-fated garbage, it is not at all necessary to look for specially designated places for it, but rather just use standard services.
Cleaning Temp
This time you won’t have to go far and all you need to do is go to the “Options” tab.
- Right-click on Start and select Settings.
Select Options"
- Open to the “System” section.
Open to the “System” section
- Go to the “Storage” tab and select the drive with your system (usually C:\).
Go to the “Storage” tab and select the disk with your system
- After a short analysis, go to the temporary files.
Go to temporary file
- Check "Temporary files" and delete them. At the same time, you can clean the basket with loads.
Check "Temporary files" and delete them
Enabling Temp autocleaning
To avoid repeating this procedure again, you can set automatic deletion of temporary files.

Traditionally
The other side of the coin of the new Windows functionality is its limitations, as a result of which many users vehemently dislike the very mention of the Settings tab. Moreover, in some cases, cleaning temporary files using standard tools may fail, be unavailable, or do nothing at all.
If for one reason or another the methods described above do not suit you, you can always use the old methods of removing system garbage.
How to find The most in a simple way

will not go uphill, but use the search.
- If you are using a limited version of Windows, you may not be able to find this folder as it is located in "AppData", which is hidden.
Due to the same secrecy, you will also not be able to find it directly and will have to go into the control panel.
- Right-click on Start and go to Control Panel.
Go to Control Panel
- On later versions of Windows 10, this button may not be available. If you don't have it, go through the search.
Can't find it through start, go through search
- Go to “Design and Personalization” when sorting into categories.
Go to “Design and Personalization”
- Go to "Show hidden files and folders". Go to "Show hidden files and folders" Scroll to the bottom, check “Show
hidden files
, folders and drives" and click "OK". After this, access to the Temp folder will be open to you in any way.
Check "Show hidden files, folders and drives" and click "OK"
How to clean Once in the Temp folder, you won’t have to sort through anything. Press the key combination “Ctrl+A” and feel free to delete everything. May pinch when removed Shift key so you don't have to empty the trash later. All files contained here do not have any uniqueness and even after deleting those in use, all the necessary ones will simply be created anew.
If some files are not deleted, they are most likely active in
this moment
- and you can forget about them or restart your computer to unlink them and try to delete them again.
How to transfer
- Now go to the control panel.
Can be found via search
- Go to the “System and Security” tab when sorting by categories.
Go to the "System and Security" tab
- Open the "System" section.
Open the "System" section
- Press " Extra options systems" in the context menu.
Click on "Advanced system settings"
- In the "Advanced" tab, open "Environment Variables...".
Open "Environment Variables..."
- Select TEMP and click Change.
Select TEMP and click "Change"
- Enter the path to the folder you created here and click OK.
Enter the path to the folder you created here
- Repeat what was done with TMP. When finished, click “OK” in all previously opened windows and restart your computer.
Repeat what you did with TMP
- After reboot, don't forget to delete old folder with all its contents.
After reboot, don't forget to delete the old folder
How to clean your Windows 10 computer from junk using an application
A bad feature of the Temp folder is that only those files that the system has assessed as temporary are stored in it. But Windows 10 is not omnipotent and a large number of It does not consider system garbage as such and leaves it in place. You can, of course, remove all this junk manually, carefully searching through the dark corners of your system, but it will be much easier and more practical to download special application
, can clean everything in just a couple of clicks. Cleaning the system using third party application , we will look at an example CCleaner programs
- , which is the simplest and most powerful among all its analogues.
Download the free CCleaner utility from this link and install it.
When finished, restart your computer and delete your backups
Cleaning the system from viruses
In addition to system garbage and forgotten files, there may be more unpleasant things that it wouldn’t hurt to get rid of. And even if you already have an antivirus, this does not guarantee you protection from all sorts of nasty things and may require checking with a program from alternative developers. To download an antivirus, it is not at all necessary to shell out money for a full-fledged edition or surf torrents. Many security software developers provide free versions
- your programs that don’t even need to be installed on your computer. Download free antivirus
- Dr. WebCureIt.
- Start the scan, it will take some time.
- When the antivirus scans the entire computer, neutralize everything it finds.
Even after activating automatic removal of temporary files, do not forget to periodically clean your computer yourself, since standard Windows tools are far from all-powerful. And if you start to notice a gradual decline in performance and a long system loading time when you turn on the computer, it’s time to repeat a couple of points from the above.
Temporary files are commonly referred to as those files that applications store on your computer to temporarily store information. However, there are many other temporary file types in Windows 10, including those left behind after installation new version, update logs, error reports, temporary setup files Windows and much more.
Typically, these files do not cause any problems, but they can grow quickly, using up valuable hard drive space, which may be the reason preventing you from installing a new version of Windows 10, or the reason why you are running out of space.
Luckily, Windows 10 offers several ways safe removal temporary files on your computer using the Settings app and the Disk Cleanup tool.
This guide will teach you how to quickly delete temporary files in Windows 10 to free up space, or free up space after installing a feature update such as Windows 10 version 1903.
How to delete temporary files using settings
In Windows 10, you can use the Settings app to delete temporary files manually or automatically, but the steps will be slightly different depending on the version you're using.
Delete temporary files in Windows 10 version 1903 or later
Use these steps to delete temporary files using the Settings app in Windows 10 version 1903, May 2019 Update, or later editions:
After completing these steps, unnecessary files will be removed from your computer, freeing up space for more important files.
Delete temporary files in Windows 10 version 1809 or earlier
Follow these steps to manually delete temporary files using the Settings app in Windows 10 version 1809, October 2018 Update, or earlier releases:

After completing these steps, the files you selected will be permanently deleted from your computer, freeing up space for more valuable files.
If you delete previous version Windows 10, please note that you will not be able to downgrade to more early version without these files. However, after installing a feature update on your computer, the operating system automatically deletes these files after 10 days anyway.
Automatically delete temporary files in Windows 10 version 1903 or later
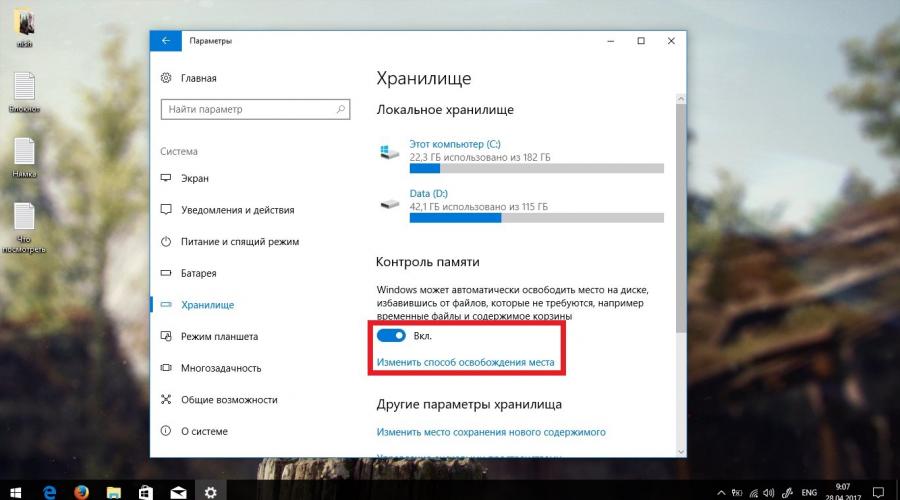
Additionally, you can use "Storage sense" to automatically free up space by deleting those temporary files and contents from the Recycle Bin.
Use these steps to automatically delete space-wasting files using Storage Sense in Windows 10 version 1903 or later:

After you complete these steps, Storage sense will delete most temporary files, as well as those files that have been in the trash for more than 30 days.
Additionally, you can always click the Configure Storage Sense button or run it now to configure cleanup settings or run Storage Sense on demand.

Automatically delete temporary files in Windows 10 version 1809 or earlier
Use these steps to automatically delete space-wasting files using Storage Sense in Windows 10 version 1809 or earlier editions:

After completing these steps, Windows 10 will automatically delete temporary files and those files that have been in the Recycle Bin for more than 30 days.

How to Delete Temporary Files Using Disk Cleanup
If you receive a message that your device is low on space, you can also use the Disk Cleanup tool to delete temporary files to free up space on your computer.
To remove temporary files from Windows 10 using Disk Cleanup, follow these steps:

Once you complete these steps, the files will be permanently deleted from your computer, freeing up space for new files.
You should always try to remove all unnecessary files. Removing temporary files from the system is one of the most important ways quick access to PC. Temporary files are those that the local disk stores for the operating system during the process. Once the task is completed, these files become useless and are considered only junk. Let's look at methods on how to manually delete temporary files contained in the Temp folder.
How to delete the contents of temporary files in the Temp folder in Windows 10
1. Delete temporary files in Windows 10 using Windows Settings
- Open windows settings and press System.
- Next, go to the section Storage and select This PC drive C, where C is the local drive on which the windows system is installed.

- Scroll down a little and click on .

- In the new window, check the box and click on the button below Delete. You can also select other items to get rid of them. Wait for the process to complete when the circle with dots stops spinning.

2. Delete temporary files manually
- Press a combination of buttons Win+R and write the command in the "Run" dialog box %TEMP%.

- The location of the Temp folder itself will open. Click Ctrl+A to select all the contents of files and folders, then right click and select Delete. Some files will not be able to be deleted due to their current use by the system. Just check the box provided Do this for all current elements and press Skip.

3. Removing temporary files using Disk Cleanup
- Press a combination of buttons Win+R and enter the command cleanmgr.

- You will be prompted to select a drive. Select drive C, where the Windows system itself is installed.

- Now check the box, I also recommend checking the boxes everywhere. Click OK, to remove them.
4. Create a batch file to quickly remove junk files from the Temp folder
- Open Start and write in search Notebook, then launch it by clicking on it. For those who find this method difficult, simply download the finished file for automated deletion of files from the temp folder.

Hello dear site visitors. In this lesson we will look at one very useful topic called: How to delete temporary files in Windows 10.
What is this procedure? If you follow the steps described below, you will free your computer from various garbage and temporary files, thereby increasing the volume disk space.
This article will discuss a method for cleaning a computer without resorting to third-party software.
There are situations when you open " My computer“and you see that the disk space is full, this may be due to the fact that you have a lot of various garbage and temporary files on your computer that you don’t need!
Cleaning your computer from temporary files
To start cleaning disks, go to “ My computer» select the disk to clean (we’ll clean it as an example Local disk C:) right-click on it and select “ Properties»
In the " General"You can see the inscription: " Disk Cleanup» click on it
After this, the Disk Cleanup window opens; the program is currently scanning the files that need to be cleaned.
These files accumulate from running programs, surfing the Internet, that is, it’s a bunch unnecessary files who create applications.
When you use the Internet, view photos, videos, and the entire cache will often be saved in temporary files and, roughly speaking, take up unnecessary space
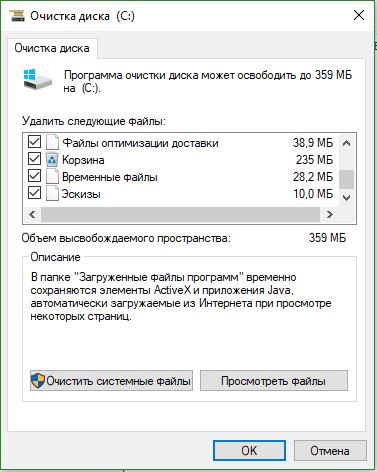
A window appears showing files that we can delete
Check the following boxes:
1) Downloaded program files
2) Temporary Internet files
3) Shopping cart
4) Temporary files
5) Sketches
At your discretion, you can tick the “ User file history" - designed to save a copy of your previous files, if you do not need so-called backups of these files, then check the box
After we have set the settings, we can start deleting temporary files in Windows 10 by clicking “ Clean system files»
After this, the disk cleanup program begins its work and cleans everything that we have specified.
To confirm deletion, click " OK" then " Delete files»
That's it, we've freed up some space on the disk, we'll clean up the rest manually
Let's move on to the next stage, open " My computer» ⇒ « Local drive C:» ⇒ « Windows» ⇒ « Temp» select all the files that are located in it and delete with the button Delete
For Windows operating systems, temporary files are a permanent evil. Users have been fighting them since the first editions of the OS. Microsoft has developed software removal tools, but many users are unaware of their existence or do not know how to use them. Today we will figure out how to delete temporary files in Windows.
In all modern operating systems running on the NT kernel Microsoft systems Temporary files are located the same way. Two folders have been allocated for storing them. One is for system temporary files, and the second is for user files.
To check the storage directories, call the “Run” menu. Press the key combination “Win” + “R” and enter the command “sysdm.cpl” as shown in the screenshot.
In the properties window that opens, at the top, switch to the “Advanced” tab. We find the second designated item and open it.


The Environment Variables system menu is divided into two parts. The upper area is user, and the lower is system. The values of the "TEMP" and "TMP" variables indicate the storage directories.

If desired, you can remove them from your computer manually. This method is not the best or most convenient. Some of the files located in these folders can be currently used by programs or operating system and will be protected from erasure.
Internet Explorer Cache
Another place where temporary files are stored in Windows 7 is the Intenet Explorer browser cache directory. He is not popular and people rarely work with him. Most users consider it a program necessary to download a “normal” browser.
To see where IE stores temporary Internet files, open it and go into settings.
Clicking on the “gear” brings up a context menu. We move on to the designated point.

Browser properties will open to the General tab. We need a “Options” button on it.

The window that opens specifies the directory and storage settings for temporary Internet files.

In Windows 10, IE is not the main browser, but is still present in all OS builds. The order of his settings has not changed, but Microsoft has renamed the folder for storing temporary files. Now it is called not Temporary Internet Files, but INetCache.

The screenshots show that this is the only change in the IE settings. All other parameters and values are in place.
Cleaning using Windows
The tools responsible for deleting temporary files in Windows have always been located in the system disk management menu. The only exception is latest version OS Microsoft uses new interface settings. Let's look at the classic method first. Open Explorer to display system disk.

By pressing right button activate service menu. Select the very last item.

In the properties window that opens, next to the diagram showing how the disk is filled with data, there is a “Cleanup” button.

The screenshot shows the top and Bottom part list of temporary files available for deletion. Check the boxes in the required places and press the “OK” button.

The system will ask for confirmation, after which it will clear temporary files in Windows.
Windows 10
Launch the new OS settings menu using the keyboard shortcut “Win” + “i”. Select the marked item.

Using the area quick transition icon on the left to select the Storage option. Open the second hyperlink indicated in the screenshot.

The switch marked with an arrow allows the system to automatically delete temporary files. Some items require performing this operation once a month. Basic cleaning is performed only when free space runs out.

Both methods offered by Microsoft cannot be called convenient. They imply direct user participation in the process or cleaning when the disk space reaches a critical level for the system.
Process automation
The proposed method allows you to configure the automatic execution of operations to delete temporary files every time you restart your PC. More precisely, it solves two problems:
- Extremely shortens the storage path for temporary files. During the installation process, programs unpack the contents of installation packages into a user folder. The path to it is already quite long, and the presence of Cyrillic characters in it can lead to a malfunction of the installer. As a result, the program “loses” the location of the unpacked files and its execution is interrupted by an error;
- Cleaning the system of “garbage” is performed without user intervention or third-party programs.
First of all, create a new folder “Temp” in the root area of the disk. Changing system parameters variable environments. We consistently bring everything to the form indicated in the screenshot with the number “2”.

We perform this operation for user and system variables. As a result, the settings should get next view.

Apply the changes made by clicking on the “OK” button. Here, in shared folder You can transfer the contents of temporary Internet files from IE. In the browser options, select the highlighted item.

In the window that appears, specify the new storage directory.

After confirming the actions, the path selection window closes. System parameters take the form shown in the screenshot. The frame indicates the new storage location.

When saving changes, a warning window will appear. We check that the data is in open programs were saved and agree.

Now, having collected everything in one directory, we will create a script that allows you to delete temporary files in Windows. Open Notepad and copy into it next lines:
pushd %TEMP% &&rd/s/q.> nul 2>&1
pushd C:\TEMP && rd /s /q . > nul 2>&1

Save the created file with the CMD extension. By default it is written to the user's folder.

We issue the command to launch the administrative console in the “Run” dialog box.

In the transition area, expand " Windows Configuration" and go to the "Scenarios" section. The items available for editing will be displayed on the right side of the window. We launch the one marked with the number “2”.

We use the specified item to add a cleaning script.

The designated Browse button will open the custom folder.

Find the file created in Notepad. Confirm your choice by clicking on the “Open” button.

The preview area should display a ready-to-use script. We confirm our actions by successively pressing the indicated buttons.

This completes the automation process. You can close the editor group policies and go about your normal business.
Finally
As you can see, the task at hand can be completed without using special programs and "secret" knowledge. Thanks to the created script, temporary files in the Temp folder will be cleaned every time the system is rebooted, and the computer will not become “clogged” with unnecessary “garbage”.