What are the bios. Types of bios

Modern computers on new motherboards are equipped with a new firmware or UEFI firmware that has replaced the old BIOS. Both options are maximum low-level programs that are launched at the start of the hardware of the computer, before the installed OS is loaded. The new generation of BIOS or UEFI supports modern hardware, large disks (volume), it loads much faster, the level of security is higher, and it also has a convenient and beautiful graphical interface that immediately supports working with a mouse.

If on a computer that you bought recently, you saw a mention of the BIOS somewhere, know that this was done so as not to confuse the user who is used to the traditional old names, but in fact there is UEFI. The birth of UEFI can be considered 2007, when computer and component manufacturers agreed on new specifications. A modern set of firmware became available with the advent of Windows 7
Why UEFI is better than BIOS

The new firmware can work with drives larger than 2.2 terabytes, which the BIOS was not able to do. Moreover, the maximum limit for UEFI today is more than nine zettabytes or 9 to the ninth power of terabytes, that is, the most that is now on the Internet. Perhaps this is because UEFI uses a different partitioning. The bit depth of the new firmware is higher, which means that the address space is much larger. Thanks to this, you can make beautiful loading screens and menus with graphics, mouse support. But you can always switch to text mode.

In addition, UEFI has many additional features, as well as Secure Boot, that is, secure boot, which ensures that no malware changes the system boot parameters. Another useful feature is network support, that is, debugging, configuration can be done remotely.
In fact, UEFI is no longer a set of firmware, like the BIOS, it is a real miniature operating system, respectively, and it has more possibilities. Copies can be stored on the cloud, on a flash drive, disk. The UEFI interface is more diverse, and it can vary greatly depending on the manufacturer of the motherboard or computer.
It is not uncommon for PC users to have to dig into BIOS settings. There are many questions and problems here, since on various motherboards there are sewn different types of BIOS. Menu items differ in name and location, but in general they perform similar functions.
The own type of BIOS is integrated by the motherboard developers themselves or by third-party companies that have concluded an agreement with the manufacturers. The market is dominated by third-party companies.
Three main types of BIOS should be distinguished:
- AWARD
Let's dwell on these types and consider in more detail the interface and distinctive features.
AWARD BIOS:
It is a leader in this field. Back in 1998, Award Software was bought by Phoenix, but BIOS is still labeled as Award.
Traditionally, the base system shell has a blue (grey) background with English menu items. The interface is different in different versions.
For example, in version 4.51 PG, navigation is visually divided into two vertical compartments. At the very bottom are the control keys.
If we consider version 6.0, then surprisingly the appearance already looks different. The gray color scheme prevails. The menu items have different names. The main sections are arranged horizontally. In the column on the right, there is a brief background information.
Takes an honorable second place. It is the property of American Megatrends Incorporated, hence the abbreviation AMI. In all respects, the similarity with the AWARD BIOS is noticeable. The names and location of the main sections coincide, but not always.
The presence or absence of BIOS options primarily depends on the manufacturer of the motherboard and its functions. Therefore, it is impossible to single out specific features of AMI unambiguously. Also, different versions have different interfaces.
The appearance of BIOS versions 2.5x (2.6x)

And this is what BIOS 3.31 looks like

UEFI BIOS:
The third type of BIOS is a truly modern technology. It has a graphical interface, something even resembles an operating system.
The menu is made in the form of pictures with inscriptions. Without knowing English, you can intuitively guess what this or that section is responsible for.

It has a big advantage over the old types. As you know, the traditional BIOS, due to its functional limitations, is able to see no more than 2 TB. UEFI breaks the limits, as there are practically no volume limits.
The new software boasts a rich set of system utilities. It is possible to backup data or optimize the operation of RAM. The following features should be highlighted:
- Convenient interface;
- Ability to control the mouse;
- Expanding functionality by adding new utilities;
- Internet update;
Of course there are many more benefits. Large manufacturers have already begun the transition to a new type of BIOS. UEFI technology has proven itself only from the best side, it is not for nothing that such giants as Intel and Microsoft are interested in it.
How to find out the type and version of BIOS
There are cases when you need to find out the current BIOS version. This can be done in the operating system Windows 7, XP. To do this, click "Start" - "All Programs" - "Accessories" - "Utilities" - "System Information". In the window that opens, find and read the item “BIOS version”.
Another common way when turning on the PC before loading the operating system, when the hardware is checked, below you can see what BIOS you have. Read the post on how to find out the BIOS version.
At its core, there is no big difference between AMI and AWARD. They perform the same function, the distinctive differences were discussed above. Particular attention should be paid to UEFI, since this type of BIOS is a new technology with high functionality.
For novice users of computers or laptops, understanding BIOS is not easy. It is not only in English, but also has several varieties (versions).
Therefore, here the description of the types of BIOS will be simplified to a minimum, so that no one has any difficulties - in simple language.
Currently, three types of BIOS are most popular among computers / laptops, and each of them has more than one version. These are AMI, Award and Uefi.
There are other versions as well. If simply and in a few words, then the types of BIOS can be described as follows:
American Megatrends Inc (AMI) - manufactures motherboards, RAID controllers, diagnostic utilities and BIOS software. Award Software - acquired by Phoenix Technologies, but the name is Award
MrBIOS - was popular in the past, but now forgotten forever, so it will no longer be mentioned here.
General Software Inc. - releases products for x86, and supplies OEM versions of the BIOS. System Soft - develops BIOS software for mobile computers.
UEFI is the newest version (technology). It has a graphical interface, reminiscent of an operating system - simplicity and accessibility are especially attractive.
A Brief History of BIOS Versions
American Megatrends, Inc or AMI can be classified as a "veteran". At the beginning of the BIOS era, it was on almost all PCs. It was then supplanted by Award Software, Inc.
Recently the AMI BIOS took off again. It was enthusiastically adopted by manufacturers ASUS, Gigabyte, MSI, ESC and many others. The second is Intel, although it is very closely related to AMI, but recently, after significant revision, it has its own name "Intel BIOS" - it used to be "AMI / Intel BIOS".
Only it is not installed on all mats. boards, but only on those manufactured directly by INTEL. The third "player" - Phoenix Technologies, he absorbed Award Software, Inc, although at that time, he was not particularly popular.
Acquisition of Award Software, Inc. allowed Phoenix Technologies to significantly expand its influence. Today, its BIOS is used by all motherboard manufacturers.
Description with pictures of the main types of BIOS
Not often, but still you have to dig into the BIOS settings. Beginners immediately have problems and questions, because not only are they different, but also in English.
Therefore, in different versions, the menu, the method of entry and settings are different.
Since today the market is dominated by companies of BIOS types: "AWARD", "AMI" and "UEFI", let's consider them.
Types of versions A ward
BIOS "Award" in 1998, was bought by Phoenix, but the name is marked as Award.
The background of it, depending on the version, is blue or gray, and the menu itself, unfortunately (at the time of this writing), is only in English.
For example, in version 4.51 PG, the menu is divided into two vertical sections, and at the bottom there are tips on which key is responsible for what.
In the new version 6.0, the appearance is gray and the menus are different. The sections in this version are already arranged horizontally, and on the right side, a small background information has been added.

Types of AMI versions
The AMI menu is very similar to "Award", although not always (meaning the location of the sections and the name).
Its options depend on the motherboard and its parameters. Like "Award", the interface depends on the BIOS version. For example, version 2.5x and 2.6x looks like the picture below.

But in version 3.31, the view is completely different. See below.

Type UEFI
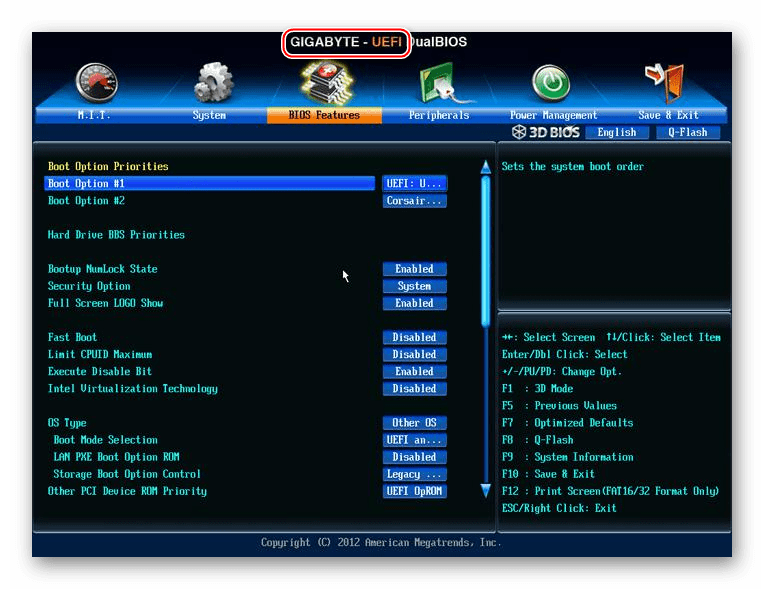
You can dwell on UEFI in more detail. The menu is in the form of pictures with captions. What the sections are responsible for, you can guess without knowing English. Look at the picture below.

UEFI has an advantage over older types. It has no size restrictions and many additional system utilities are installed.
Large companies have already begun to switch to this new type of BIOS, and its technology has shown itself only from the best side.
UEFI contains many features not available in older versions. Motherboards with UEFI do not need a BIOS, they have their own module. In the menu, everything can be done with the mouse - in older versions only with the keyboard.
Quite recently, only Apple produced computers with UEFI, but other companies will soon switch to advanced technologies, because already now Asrok, Asus, MSI companies are releasing motherboards equipped with UEFI.
How to find out the type and version of BIOS
The easiest and fastest way to find out the BIOS version is to enter it and compare with the pictures above.
You will also quickly find out if you download the "aida64" program - the first month can be used for free.
You can also determine the BIOS version in the operating system. To do this, click "Start" => "All Programs" => "Accessories" => "Utilities" => "System Information". In the window that appears, read the item “BIOS version”.
Another way when you turn on a computer or laptop before loading the operating system, the BIOS version is very often displayed at the bottom.
You can simply enter the BIOS and find the name directly there and find out which version is installed. Good luck.
If you purchased an assembled computer or laptop, then its BIOS is already configured properly, but you can always make any personal adjustments. When the computer is assembled on its own, then for its proper operation, you must configure the BIOS yourself. Also, this need may arise if a new component was connected to the motherboard and all parameters were reset to default.
The interface of most BIOS versions, with the exception of the most modern ones, is a primitive graphical shell, where there are several menu items from which you can go to another screen with already configured parameters. For example, the menu item Boot opens the user the parameters for distributing the priority of loading the computer, that is, there you can select the device from which the PC will be loaded.
In total, there are 3 BIOS manufacturers on the market, and each of them has an interface that can vary significantly in appearance. For example, AMI (American Megatrands Inc.) has a top menu:

In some versions of Phoenix and Award, all section items are located on the main page in the form of columns.

Plus, depending on the manufacturer, the names of some items and parameters may also differ, although they will carry the same meaning.
All movement between items occurs using the arrow keys, and selection - using Enter. Some manufacturers even make a special footnote in the BIOS interface, which says which key is responsible for what. UEFI (the most modern type of BIOS) has a more advanced user interface, the ability to control using a computer mouse, as well as the translation of some items into Russian (the latter is quite rare).
Basic settings
The basic settings include time, date, computer boot priority, various settings for memory, hard drives and drives. Provided that you have just assembled the computer, you need to configure these parameters.
They will be in the section Main, Standard CMOS Features And Boot. It is worth remembering that depending on the manufacturer, the names may differ. To get started, set the date and time according to these instructions:

Now you need to make a priority setting for hard drives and drives. Sometimes, if you do not do it, the system simply will not boot. All the necessary parameters are in the section Main or Standard CMOS Features(depending on the BIOS version). A step-by-step instruction using the Award/Phoenix BIOS as an example is as follows:

Similar settings need to be made for BIOS users from AMI, only here the SATA parameters change. Use this guide to get things done:

AMI BIOS users can complete the standard settings on this, but the Award and Phoenix developers have a few more additional items that need user participation. All of them are in the section Standard CMOS Features. Here is their list:

This completes the standard settings. Usually half of these items will already have what they need.
Options "Advanced"
This time, all settings will be made in the section "Advanced". It is in the BIOS from any manufacturer, however, it may have a slightly different name. Inside it may be a different number of items depending on the manufacturer.
Consider the interface on the example of AMI BIOS:

Now let's proceed directly to the parameter settings from the item :

Award and Phoenix do not need to configure these parameters, since they are configured correctly by default and are located in a completely different section. But in the section "Advanced" you will find advanced settings for setting download priorities. If the computer already has a hard disk with an operating system installed on it, then in "First Boot Device" select value "HDD-1"(sometimes you have to choose "HDD-0").

If the operating system has not yet been installed on the hard disk, then it is recommended to set the value instead. "USB FDD".
Also at Award and Phoenix in the section "Advanced" there is an item regarding the settings for entering the BIOS with a password - "Password Check". If you have set a password, then it is recommended to pay attention to this item and set a value that is acceptable to you, there are only two of them:

Setting up security and stability
This feature is relevant only for owners of machines with BIOS from Award or Phoenix. You can enable maximum performance or stability mode. In the first case, the system will work a little faster, but there is a risk of incompatibility with some operating systems. In the second case, everything works more stable, but slower (not always).
To enable high performance mode, from the main menu select "Top performance" and put a value in it "Enable". It is worth remembering that there is a risk of disrupting the stability of the operating system, so work in this mode for several days, and if any failures appear in the system that were not previously observed, then disable it by setting the value Disable.

If you prefer stability to speed, then it is recommended to download the secure settings protocol, there are two types of them:

To download any of these protocols, you need to select one of the items discussed above on the right side of the screen, and then confirm the download using the keys Enter or Y.
Setting a password
After completing the basic settings, you can set a password. In this case, no one except you will be able to access the BIOS and / or the ability to change its parameters in any way (depending on the settings that were described above).
In Award and Phoenix, in order to set a password, you need to select the item on the main screen "Set Supervisor Password". A window will open where you enter a password up to 8 characters long, after entering a similar window opens where you need to enter the same password for confirmation. When typing, use only Latin characters and Arabic numerals.

To remove the password, you need to select the item again. "Set Supervisor Password", but when the window for entering a new password appears, just leave it blank and click Enter.
In AMI BIOS, the password is set a little differently. First you need to go to the section Boot, which is in the top menu, and there already find "Supervisor Password". The password is set and removed in the same way with Award/Phoenix.

Upon completion of all manipulations in the BIOS, you need to exit it while saving the previously made settings. To do this, find the item "Save & Exit". In some cases, you can use the hot key F10.
Setting up the BIOS is not as difficult as it might seem at first glance. In addition, most of the described settings are often already set by default, as is necessary for the normal operation of the computer.
Without exaggeration, BIOS setup is the basis of any computer, it is perhaps the most important process in system setup.
Many of you know that the BIOS is a basic input / output system, on which the stability and reliability of the system as a whole directly depends. To optimize your computer and increase its performance, you need to start with the basic settings. Here you can achieve the highest performance.
And now about everything in more detail. To enter the BIOS setup program (or Setup), just press " DEL" (or " F2") when the computer boots up.
In order to restore the default settings, select “Load SETUP Defaults” in the BIOS settings, the computer will reboot with factory settings.
Below I will indicate the basic settings for both modern PCs and well-deserved oldies that I would like to return to service.

CPU Level 1 Cache- be sure to enable this option. It is responsible for the use of the first level cache, significantly improves the performance of the entire system.
CPU Level 2 Cache- this parameter plays no less important role than the previous one. So we turn it on. For reference: disabling the cache memory can only be done when it fails, but this will significantly reduce the performance of the system as a whole.
CPU Level 2 Cache ECC Check– parameter enabling/disabling the algorithm for checking error correction in the cache memory of the 2nd level. Enabling this option slightly reduces performance, but improves stability. If you are not overclocking the processor, I advise you not to enable this option.
Boot Up System Speed– the parameter is set to High or Low and determines the processor speed and system bus frequency. Our choice is High.
Cache Timing Control– the parameter controls the read speed of the 2nd level cache memory. Our choice - Fast (Turbo) - high speed, high performance.

With the processor setup finished, let's move on to setting up the RAM. These settings are either under “Chipset Features Setup” or here “Advanced”.
DRAM Frequency– parameter defines the speed of RAM operation. If you know this parameter for sure (usually indicated on the packaging for the memory module), then set it manually, if in doubt, then select the Auto value.
SDRAM Cycle Length– parameter defines the number of cycles required to output data to the bus after the CAS signal arrives. One of the most important parameters affecting performance. If memory allows, you need to set the value to 2.
RAS-to-CAS Delay— The number of cycles required for the data line to enter the amplifier. It also affects performance. A value of 2 is preferred and suitable in most cases.
SDRAM RAS Precharge Time- recharging time of memory cells. Usually the value is 2.
FSB/SDRAM/PCI Freq– determines the frequency of the FSB bus, SDRAM and PCI memory.
Memory Hole At 15-16M– the parameter is responsible for allocating a part of the address space for the memory of ISA devices. Be sure to enable this option if your computer has older ISA bus expansion cards installed, such as an appropriate sound card.
Optimization Method– parameter defines the overall speed of data exchange with RAM. It is determined empirically, starting with the highest value.
There are other parameters, the settings of which will significantly speed up the process of exchanging data with RAM.
The lower the value of time delays or timing (this is the slang of IT engineers and system administrators), the higher the performance, but it is possible that all this will lead to unstable operation.
Experiment on your health, do not forget that you can reset the settings and load the factory settings.

CPU to PCI Write Buffer- when the processor works with a PCI device, it writes to the ports. The data is sent to the bus controller and then to the device registers.
If we enable this option, a write buffer is enabled that accumulates data before the PCI device is ready. And the processor does not have to wait for it - it can release the data and continue executing the program. I advise you to enable this option.
PCI Dynamic Bursting- This parameter is also associated with the write buffer. It includes a data accumulation mode, in which the write operation is performed only when a whole packet of 32 bits is collected in the buffer. Be sure to include.
PCI Latency Timer– parameter sets the number of cycles allocated to each PCI device for data exchange operation. The more cycles, the higher the efficiency of the devices. However, if you have ISA devices, this setting cannot be increased to 128 cycles.

The graphics card tends to have the biggest impact on gaming performance, so optimizing your graphics card settings can make a big difference in overall system performance.
This is especially true for happy owners of old video cards with AGP interface. Consider the main parameters.
Display Cache Window size– the parameter defines the size of cached memory for the needs of the video system. If your computer has less than 256 MB of RAM, set this parameter to 32 MB. Otherwise, set the value to 64 MB.
AGP Capability– the parameter defines the mode of operation of the video card. The main performance characteristic of AGP video cards. Select the fastest mode - 8X.
However, not all video cards support this mode. If after rebooting the computer the operating system does not load or the image deteriorates, reduce the value of this setting.
AGP Master 1WS Read / 1WS Write– parameter sets the number of cycles of one read or write cycle. As with the RAM settings, the timing parameter significantly increases the performance of the process, however, read and write operations may become unstable.
When this parameter is enabled, reading / writing will occur in one clock cycle - the performance is maximum. When the parameter is turned off, the system works stably, but slowly.
VGA 128 Range Attribute– turns on the data exchange buffer between the central processor and the video adapter. Productivity increases.
I also advise you to disable the AGP Spread Spectrum parameter and be sure to enable AGP Fast Write Capability.

HDD S.M.A.R.T Capability– the parameter enables or disables the S.M.A.R.T. diagnostic system, which warns of possible hard drive failures. Use this system or not, it's up to you. I personally turn it off, tk. using specialized software. This feature slightly reduces the speed of your computer when running.
IDE HDD Block Mode– parameter responsible for block data transfer. Those. more information is transmitted per unit of time, which also improves system performance. It is possible to automatically determine the appropriate parameter.
IDE Burst Mode– the parameter connects the data clipboard with the IDE interface, which also increases performance.
Virus Warning I always disable this feature. It will not replace the antivirus, but your performance will slow down.
Quick Power on Self Test (or Quick Boot)- you must enable this option so that there is no testing of the hardware of your computer. There is also practically no benefit, and the resource is wasted.
Boot Up Floppy Seek- disable this option. We don't need to look for a boot floppy when starting the computer.
And most importantly, if the system does not boot after a reboot and / or there are beeps, go back to the BIOS and load the default settings (I described how this is done at the very beginning of the article).
Or there is another sure way to reset the settings - turn off the computer, unplug the power cable, open the cover of the system unit and carefully remove the battery from the motherboard, insert it back after 2 minutes, assemble the computer and try to start it. The settings should be reset, the BIOS settings will return to the default values, and the system will boot normally.