P5q se bios firmware. How to flash ASUS BIOS (AFUDOS utility) Favorites
Read also
In one of my previous articles I described how you can update firmware on ASUS motherboards . But this applied to motherboards that support UEFI, but what should those with the good old BIOS do? In this article I will correct this situation and describe the process of updating the BIOS on an old computer (more precisely on old motherboards) .
So, we have a computer presumably from 2008 with installed motherboard ASUS P5E-VM hdmi. The goal is to update the BIOS firmware for more stable operation SSD drive. The first thing you need to do is look at what version of BIOS is currently in use. To do this, at the very beginning of the computer boot, press the DEL button, this will take you to the BIOS.
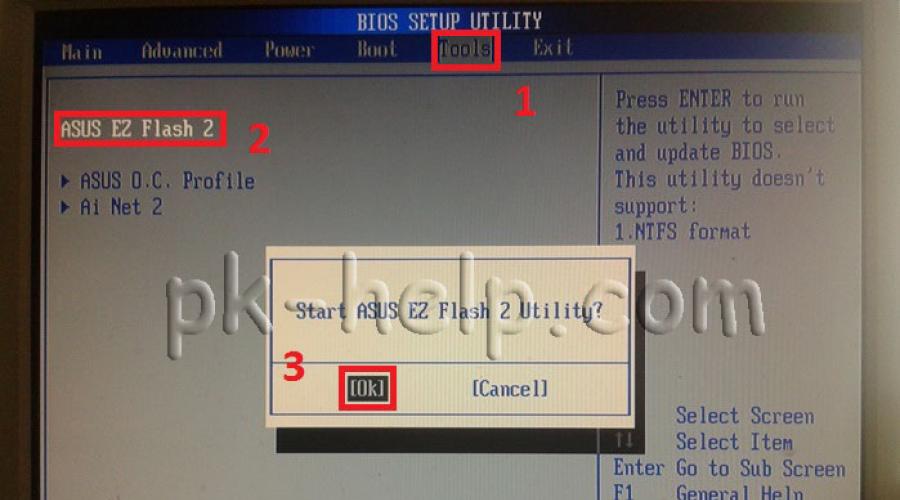
After this, go to the "Tools" menu, select "ASUS EZ Flash 2" (using the same utility, the BIOS will be updated in the future). When the utility login window appears, click "Ok".

You will be able to view the version of the installed BIOS.

Next, from another computer or reboot this one, go to the site ASUS and find your motherboard model there (use the search on the site). Find latest version BIOS firmware. If you have more than old version download a new one from the site.
In order to update the motherboard firmware, you will need a flash drive (size more than 128 MB). Transfer all data from it and format as FAT32 . Next, unzip the archive with the new BIOS downloaded from the site and copy the resulting folder to a flash drive. Connect the flash drive to the computer on which you want to update the BIOS and go into the BIOS on it. Select the menu "Tools" - "ASUS EZ Flash 2", in this utility select your media below (with updated BIOS, in in this example C:) and double-click on the firmware file.

Confirm your choice of firmware update by clicking "Yes".

Basic Input/Output System (BIOS)
The BIOS is stored in a non-volatile memory chip located on the motherboard.
Using the BIOS Setup Utility, you can configure or update the BIOS. BIOS screens contain
navigation buttons and quick help. If after the change BIOS settings the system has become
is unstable, restore the default settings (Setup Defaults). Updates
can be found on the ASUS website (www.asus.com).
To enter setup mode when the system boots:
press the Delete key while the system is running a self-test program
(POST). If you do not press the Delete key, program execution will continue.
self-testing.
To enter setup mode after program completion
self-test (POST):
Reboot the system using the Ctrl + Alt + Delete keys, then press the key
Delete while a self-test program is running or
Press the reset button on the case, then press the Delete key while
performing a self-test program
Turn the system off and on again, then press the Delete key while
performing the self-test program.
For BIOS updates using AFUDOS:
Boot the system from the floppy disk that contains the latest BIOS version. In the team
at the DOS prompt enter afudos /i
restart the system.
To update BIOS using ASUS EZ Flash 2:
Click
which contains the latest BIOS file. EZ Flash 2 will begin the BIOS update process
and then reboot the system.
To restore BIOS using CrashFree BIOS 3:
Turn on the system. If the BIOS is corrupted, CrashFree BIOS 3 will automatically
will restore the BIOS from a floppy disk or DVD. Insert DVD from motherboard or
floppy disk that contains the original or latest BIOS file. Then reboot
system.
Software CD Information
This motherboard is supported by Windows operating systems
It is recommended that you install the latest operating systems and appropriate
updates to take full advantage of the hardware capabilities.
The CD that came with your system board contains useful programs and
utilities that expand the capabilities of the motherboard. To get started with this compact
disk, insert it into the drive
Filled
ROM. The welcome screen will automatically open and
installation menus (if Autorun is enabled). If the welcome screen does not appear
automatically, to display it, find and run the ASSETUP.EXE file located
in the BIN directory on the CD.
If your ASUS device is implemented on a modern motherboard, then you can use the instructions How to flash ASUS BIOS (ASUS EZ Flash 2)(in this case create bootable USB flash drive not required)
Preparatory stage:
- First of all, go to the ASUS website.
- Select your product (laptop or motherboard), then the series and model, then press the Enter key or the Search button.
- The site will prompt you to choose operating system, if possible, select the one you use, if it is on the list.
- Go to the BIOS section and download the latest BIOS version.
- Download the utility for flashing the BIOS - AFUDOS. You can do this on the same page ASUS product to the BIOS Utilities section. Or
- Create a bootable DOS USB flash drive(additionally - another way to create a bootable DOS flash drive)
- I also recommend connecting the device to be flashed to an uninterruptible power supply (for a laptop, fully charge a working battery), because In the event of a power failure during the firmware process, the device will have to be carried service center recovery.
- Open our bootable USB flash drive, write the afudos program onto it (file afudos.exe) and the BIOS itself (example: file p4c800b.rom).
- We reboot and when the first picture appears on the monitor, press F8. We get to the menu quick launch and select our flash drive. Either at startup, press F2 for laptops or Del for desktop PCs, go to the Boot tab and put the flash drive in first place, usually for this in the 1st option Boot Device you need to set Removable Device, then press F10 and confirm that you want to save the changes in the settings.
- The computer will boot from the flash drive and will prompt you to work with C:\> on a black screen. (or another drive letter - it doesn't matter)
- To start the firmware process we write afudos /i p4c800b.rom and press the Enter key. Launching BIOS firmware
- Note: Do not turn off the power or reboot the system while updating the BIOS! This can cause serious damage to your system.
- After the BIOS update is completed, the utility will return to DOS. Remove the floppy disk (flash drive) and reboot the system to enter the BIOS menu. BIOS flashing completed
- Go to BIOS and reset settings to original values.