Installing widgets on the desktop in Windows OS. We set up widgets on the start page of Yandex Wordpress how to add a widget to the page
Read also
Widgets are one of many amazing features of WordPress. If in order to edit the content of the site, we use the editor and , then to change the content of the sidebar or footer, we need widgets.
In fact, widgets can be added anywhere on the pages of the site, but it depends on the WordPress theme you are using, more precisely on the number of registered . There are themes that do not support widgets at all.
How to Add or Remove Widgets (For Beginners)
To create a widget in WordPress, you first need to have at least one sidebar connected, if you are having trouble with this, then you should read the detailed one (it also describes how to add widget support to WordPress theme). Widgets can also be displayed on the site directly through PHP code using the .
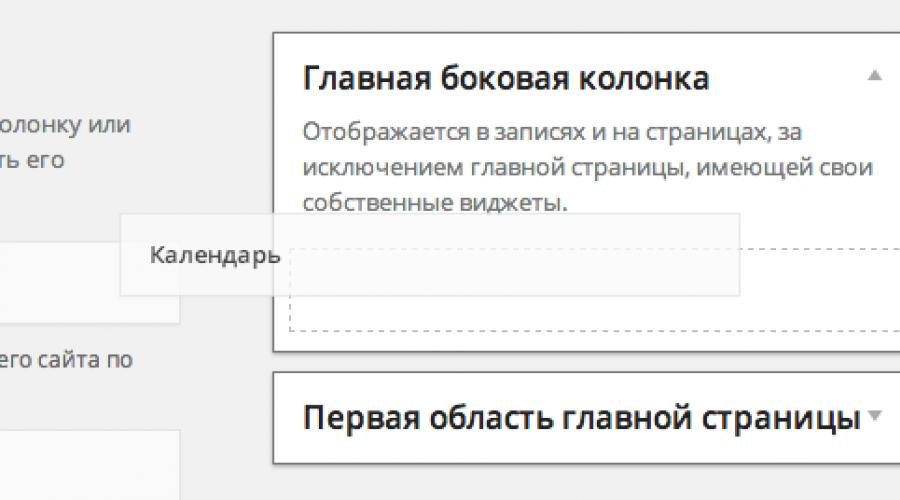
If we figured it out, go to the page in the admin panel Appearance> Widgets. See the list of available widgets? In order to add a widget to the site, you need to drag it to one of the areas on the right (sidebars).

In later WordPress versions There is another way to add a widget - you just need to click on its title and select the sidebar you want to add it to from the drop-down list:

When the widget is added, we will see its settings. In the Calendar widget, this is the title:

Thus, we can add an unlimited number of widgets to any of the areas of the site, customize, edit them, change the order by dragging and dropping.
In order to remove the widget, click the "Delete" link (it can be seen in the previous screenshot). If you just want to temporarily disable the widget, saving its settings, drag it to the Inactive Widgets block, which is located under the Available Widgets block.
Disabling Default WordPress Widgets
If you do not use and do not plan to use any of the standard WordPress widgets, you can completely disable it using the function, after which the widget will no longer be displayed in the admin panel on the page Appearance > Widgets, it will also disappear from the pages of the site.
To disable widgets, you can use the ready-made code below:
- Paste the code in your current theme's functions.php file.
- Delete or comment out the lines with those widgets that you don't need to delete.
- And only then can you save the file.
| function true_remove_default_widget() ( unregister_widget("WP_Widget_Archives" ) ; // Archives unregister_widget("WP_Widget_Calendar" ) ; // Calendar unregister_widget("WP_Widget_Categories" ) ; // Categories unregister_widget("WP_Widget_Meta" ) ; // Meta unregister_widget("WP_Widget_Pages" ) ;// Pages unregister_widget("WP_Widget_Recent_Comments" ) ; // Fresh comments unregister_widget("WP_Widget_Recent_Posts" ) ; // Recent Entries unregister_widget("WP_Widget_RSS" ) ; // RSS unregister_widget("WP_Widget_Search" ) ; // Search unregister_widget("WP_Widget_Tag_Cloud" ) ; // Label cloud unregister_widget("WP_Widget_Text" ) ; // Text unregister_widget("WP_Nav_Menu_Widget" ) ; // Custom menu) add_action ( "widgets_init" , "true_remove_default_widget" , 20 ) ; |
This feature allows you to delete more than just standard widgets. As a function parameter, you can specify the class name of any widget (for example, which was registered in a plugin).
If you have any customized widgets on the site, please note that when you delete a widget, all its settings will also be deleted, so if you suddenly decide later that you need a widget that you disabled, you will have to configure it again.
Creating Your Own Widget
Adding your own customization widget to WordPress is not at all difficult, but of course, it would not hurt to have at least a little understanding of PHP for this. I will not describe how the PHP code works in this post, just ask your question in the comments if you have any difficulties with the code.
And now we will create a widget of popular posts - we will display the entries sorted by the number of comments through .
In its structure, our widget will be similar to the standard WordPress widget "", i.e. it will have similar parameters (title and number of displayed posts) and a similar HTML template for displaying posts (post titles with links in the form
- -list).
- ">
- Beautiful Yahoo Weather- a weather forecast widget, pretty good and beautiful compared to its counterparts. But for these purposes, it is probably better to use WordPress in conjunction with informers from Gismeteo, Yandex, etc.
- NextGEN Gallery is a plugin for creating and managing image galleries in WordPress, one of the functions of which is a gallery widget.
- Search by Google- a form of search on the site from Google (Google Custom Search).
- Slick Contact Forms— feedback form widget.
- Tabbed Login Widget- authorization widget, made in the form of three tabs - "Login", "Registration", "Forgot password", very convenient.
- WP Currency Converter- Currency Converter.
- WP Editor Widget- use the WordPress editor to populate this widget.
- WP-Cumulus- adds a flash cloud of tags and / or categories.
- WP Polls- a convenient plugin for creating polls on the site.
- Yet Another Related Posts Plugin (YARPP) is a powerful plugin for displaying related posts.
- Youtube Channel Gallery- Widget with fresh videos from the channel on YouTube. The widget looks very nice, good and easy to customize.
- List Statistics
- New contacts
- Mailing statistics
- Autoresponders
- Landing statistics
- Form Statistics
- Webinar Statistics
- Poll Statistics
- Fast access
Paste this code into functions.php:
/* * create widget */ function __construct() ( parent::__construct( "true_top_widget" , "Popular Posts", // widget title array( "description" => "Allows you to display posts sorted by the number of comments in them.") // description ) ; ) /* * widget frontend */ public function widget( $args , $instance ) ( $title = apply_filters( "widget_title" , $instance [ "title" ] ) ; // apply a filter to the header (optional)$posts_per_page = $instance [ "posts_per_page" ] ; echo $args [ "before_widget" ] ; if ( ! empty ( $title ) ) echo $args [ "before_title" ] . $title. $args [ "after_title" ] ; $q = new WP_Query( "posts_per_page=$posts_per_page &orderby=comment_count") ; if ( $q ->have_posts () ) : ?>
"name="get_field_name("title"); ?> "type="text" value=" !}" /> "name="get_field_name("posts_per_page"); ?> "type="text" value=""size="3" /> /* * save widget settings */ public function update( $new_instance , $old_instance ) ( $instance = array () ; $instance [ "title" ] = ( ! empty ( $new_instance [ "title" ] ) ) ? strip_tags ( $new_instance [ "title" ] ) : "" ; $instance [ "posts_per_page" ] = ( is_numeric ( $new_instance [ "posts_per_page" ] ) ) ? $new_instance [ "posts_per_page" ] : "5" ; // 5 posts are displayed by default return $instance ; ) ) /* * register widget */ function true_top_posts_widget_load() ( register_widget( "trueTopPostsWidget" ) ; ) add_action ( "widgets_init" , "true_top_posts_widget_load" ) ; |
I dragged this code "as is" (naturally removing the first lineAppearance > Widgets we see our widget:

Let's drag it to some sidebar on the right:

That's all, specify the title of the widget (if necessary), the number of posts that we want to display and click "Save" - after that the widget will appear on the site.
List of plugins with useful widgets
Of course, it is not necessary to create each widget yourself, you can use ready-made solutions for specific tasks.
In order to add any of these plugins to your site, copy its name, go to the admin panel in Plugins > Add New and paste the copied name into the search form.
I will not describe each plugin in detail - the description of almost each of them pulls on a new post. Install, watch, test (at the time of publication of this post, each of the plugins was tested by me personally and everything worked perfectly).
Over time, the list will grow.
I will not consider all the other social network widgets (Facebook, Vkontakte, Twitter, etc.) - in principle, the official widgets are quite convenient - just copy the code that we are given and paste it into the WordPress widget "".
If you need help with your website or maybe even development from scratch - .
In more functional WordPress themes, among other details, there is an advantage in displaying information through a widget in different places on the site. They are not limited to the sidebar alone and can be located on pages, in posts, in the header, in the footer, etc. All this makes working with the site much easier and more convenient, and also avoids the need to edit the source code in every case (except for the first time when we add our own widget display area to the theme). In the future, it will only be necessary to add widgets with any information to it.
The complete construction of the widget area consists of three components: styling, a registration function, and an output function that we can place anywhere on the site. After all these manipulations, new tabs for widgets will appear in the "Appearance - Widgets" section. For their full functionality, you need to do to be able to put functions directly in the widget.
Registering Your Widget Area
The first thing to start with is the registration function. As an example, I'll create four widget areas in more appropriate places on the site. Further, you can simply duplicate the code, thereby creating even more areas. Only with this action you need to change the unique identifier. It is also worth noting that depending on what we want to display in the widgets, the design styles will have to be changed to our own. That is, if we are dealing with an advertising banner, then the widget block should stretch. And if, for example, this is, then there should be a different approach to design.
Widget area in the sidebar
We add the first part of the code to the functions.php file. This is the registration function.
// sidebar area if (function_exists("register_sidebar"))( register_sidebar(array("name" => "Sidebar area", //widget name in admin panel "id" => "wsidebar-1", / /widget ID "description" => "visible in all sections of the site", //widget description in the admin panel "before_widget" => " ", //closing widget tag with clearing block "before_title" => "
The second part of the code is responsible for the place where this or that content is displayed, which in this case is placed in the sidebar. Open the file sidebar.php , find the main block (it usually comes with a sidebar class or id). And immediately after it, we insert our function.
We pay attention to the inscription in single quotes - this is the widget identifier. When duplicating code, do not forget to change the ID in the output function (the one above). Next in line should be styling. But here, given the location of the output, styles from the design theme should come up.
Widget area on pages
Now we repeat everything, only change the ID and the output location. Add the following code to the functions.php file.
// widget area on pages if (function_exists("register_sidebar"))( register_sidebar(array("name" => "Area on pages", //widget name in admin panel "id" => "wsidebar-2", //widget ID "description" => "page content", //widget description in admin panel "before_widget" => "
", //closing widget tag with clearing block "before_title" => " ",//widget title closing tag)); )Open the page.php file and find the function in it. Immediately after it, we can insert our call function. The code is wrapped in a condition that specifies a specific page ID. This means that only the content of the widget will be displayed on this page (if desired, remove the condition).
Widget area in posts
Open the functions.php file and add the code to it.
// area in posts if (function_exists("register_sidebar"))( register_sidebar(array("name" => "area in posts", //widget name in admin panel "id" => "wsidebar-3", / /widget ID "description" => "content for posts", //widget description in the admin panel "before_widget" => "
", //closing widget tag with clearing block "before_title" => " ",//widget title closing tag)); )Open the single.php file and after the functionor paste the code anywhere.
Widget area in header
In the latter case, the same scheme. Open the functions.php file and add the code.
// header area if (function_exists("register_sidebar"))( register_sidebar(array("name" => "header area", //widget name in admin panel "id" => "wsidebar-4", / /widget ID "description" => "content for the header", //widget description in the admin panel "before_widget" => "
", //closing widget tag with clearing block "before_title" => " ",//widget title closing tag)); )Open the header.php file and after the main block, for example, insert a call function. It also has a condition to show content only on the main page (you can remove this condition if you wish).
After all this, it remains to make minor style changes, depending on the content of the widget.
To add a widget to the site, go to the admin panel and select in the management menu (on the left) the section "Widgets".
Then select the column where you want to add the widget.
If your site has just a narrow column on the left, to place widgets use column number 1(column 2 widgets will not be displayed on the site). For sites with a narrow column on the right - column number 2.

Save your changes and the widget will be published in the selected site column.
How to set the visibility of the widget on the main page and in the mobile version of the site
You you can control the display of the widget on website from using special checkboxes top of the page. You can, for example, make the widget appear only on main page of the site or was only visible from mobile. You can hide the widget altogether with all pages and versions of the site, but save it in the admin panel - To do this, you need to uncheck "Publish to website".
 |
 |
| Widget is displayed on all pages of the site | Widget not displayed on the site, but editable in admin panel |

|

|
| Widget is displayed on all pages of the desktop site version, but not available on mobile | Widget is displayed only on the home page both mobile and desktop versions |
How to remove a widget from a site
To remove from the site one widget, find it in the column, click on the icon with a red cross (on the right) and confirm the deletion with the "OK" button. To remove immediately multiple widgets, select them with checkboxes (on the left), click the "Delete" button and confirm the action in the pop-up window.
With GetResponse Widgets you can customize Main panel at your discretion. You can add an unlimited number of widgets with the most important indicators for you and arrange them in the right order. Widgets can move , tune or, if they are no longer needed, delete.
Widgets can be customized quick action or track statistics of contact lists, mailing lists, autoresponders, surveys, processes, landing pages, webinars and forms.
Track subscriptions and list updates
Sort lists by name, size, added and removed contacts. This widget is useful for keeping track of changes in your contact lists.
Track the number of subscriptions to one or more lists in a given period. The graph of the widget displays data on the increase, decrease or constant number of subscriptions. You can view the total number of subscriptions or switch between lists to view statistics for each one individually.
Tracking the effectiveness of mailings
Track open and click rates for the latest email from your selected list.
View autoresponder lists, open rates, and the number of contacts that receive autoresponder emails.
Track visits and registrations
Track the number of unique visitors, page hits, new contacts and registrations for a specific period.
Track the number of unique visitors, form views, new contacts and registrations for a specific period.
Track the number of members, unique visitors, invitations sent, and participation rates.
Track how many people have opened and completed your survey.
Track how many people have completed all stages of the process
Find out how many people completed and did not complete all stages of the processes. This widget displays information for published and unpublished processes. You can set the time range for displaying the results.
Create up to 5 shortcut buttons for frequently used tools
This is your collection of links to newsletter builders, web forms, landing pages, webinars, processes, autoresponders, or surveys. And also a quick link to the section Add contacts.
How to add more widgets and change widget options?
Each widget has two "sides". Frontal - with indicators, and reverse - with widget parameters. To go to setup options, click Options(gear icon) in the upper right corner. To return to data display click Cancel or Save(if parameters have been changed).
To add more widgets, hover over the plus sign in the lower left corner. The plus sign will turn into a button Add new widget. Click on the button to go to the widget library. Find the widget you want and click the plus sign to add it to your home dashboard. Newly added widgets first display the options page (back side). Customize the widget options and click Save.
To change options or remove a widget, click Actions. Change settings and click Save or click Delete widget.
Yandex is a huge portal that millions of people visit every day. The company's developers take care of the users of their resource, allowing each of them to customize its start page to suit their needs.
Unfortunately, the function of adding and creating widgets was suspended indefinitely, but the main information islands were left suitable for change. Let's take a look at the page layout first.


Now let's move on to customizing certain widgets. To open access to the parameters, click on the gear icon located next to some columns.

News
This widget displays a news feed, which is divided into categories. Initially, it displays materials on all topics from the list, but still provides access to a selection of them. To edit, click on the settings icon and in the pop-up window opposite the line "Favorite Section" open the list of news topics. Select the position you are interested in and click "Save". After that, the main page will provide the latest news from the selected section.

Weather
Everything is simple here - enter in a special field the name of the settlement, the weather of which you need to know, and click on the button "Save".

visited
This widget shows user requests for the services you select. Go back to "Settings" and tick off the resources that you are interested in, then click on the button "Save".

TV program
The program guide widget is configured in the same way as the previous ones. Go to the settings and check the channels you are interested in. Below, select their number displayed on the page, to fix it, click "Save".

In order for all the changes to be applied, in the lower right corner of the screen, once again click on the button "Save".

To return the page settings to their original state, click on "Reset settings", then agree with the action with the button "Yes".

Thus, by customizing the Yandex start page to suit your needs and interests, you will save time searching for various information in the future. Widgets will provide it immediately when visiting the resource.