Rambler mail mb. Rambler Mail: instructions for creating and configuring an email account

Read also
Rambler.ru (rambler.ru) is an Internet portal that includes a variety of services (Mail, Dating, Real Estate, Video, News, etc.). The project was officially launched in August 2000. During its existence, the site has changed four design options. According to statistics, more than 90 million letters pass through Rambler's mail.
This article will instruct you in detail how to work with Rambler email: how to change your password, how to restore access to your profile and log in.
Registration
Method number 1: standard account creation in the mail
1. Open in the browser - http://www.rambler.ru/.
2. Click the "Mail" or "Login" link to open the login panel.
3. On the page that opens, click "Registration".
Attention! E-mail at the Rambler mail is provided free of charge.

4. To create an account, fill out the registration form. Enter your first and last name.

5. Think of a login or select one of the proposed free addresses in the list below the line.
6. Make up a password from Latin letters, special characters (@#$&*^%) and numbers from 6 to 32 characters long (optimally 10-20) and type it twice in the appropriate form fields.
Advice! Come up with a complex password, so you reduce the risk of hacking e-mail on Rambler.
7. Enter personal data: date of birth, gender, place of residence.
8. Enter the mobile number (in the first block of the field, set the international country code).

9. To verify the phone, click "Send code".
10. Dial the code from the received SMS message.

11. Click "Register".
When you first log into your account, increase the level of its security - create a security question (through it you can confirm the rights to e-mail):

- in the "Security question" block, click "Specify";
- select the appropriate question from the list;
- enter the answer to it (come up with an original, complex phrase so that crackers cannot pick it up);
- enter the current profile password;
- retype the letters from the picture (captcha);
- click Save.

To go to the e-mail profile, click on the "Mail" in the top bar.

To manage correspondence, use the menu on the left side of the page and the button bar under the service logo.

Method number 2: integration with a social network
1. On the page with the registration form, click the icon of the social network that you want to connect to your account.


3. Verify the connected account:

- in the column "Mailboxes" near the address, click "Confirm";
- go to the social network profile and a message from Rambler click on the activation link.
4. Complete the rest of the fields and submit the form.

All! Now you can send out to colleagues and friends the message “Here is my email on Rambler …@rambler.ru”.
How to change the password from e-mail?
1. Click on your name at the top right.

2. In the panel that appears, click the "My Profile" section.
3. In the "Password" column, click "Change".

4. Enter the current password and 2 times a new one.

5. Retype the captcha from the image.
How to delete an e-mail?
Open the settings panel (My profile) and at the bottom of the page, click the "Delete mailbox" link. Then follow the hints of Rambler.

How to log in?
Click on the "Login" button on the main page of the service. Enter login and password. Click "Login" again.
Enjoy your use of Rambler mail!
Rambler mail appeared in the era of the birth of the Russian Runet - more than 15 years ago. For a long time, there were no visible changes to its system and interface, but in 2012 the developers announced an upgrade.
The entrance to the Rambler mail is located here: Email.rambler.ru.
If you want to start a new mailbox on Rambler, then on the page you will find the green button “Start mail”, which will take you to the registration page. As you could see from the previous screenshot, there are several options for ending your future mailbox, in addition to the standard @rambler.ru. This will help you if the name you have chosen is already taken:

At the next step, you will be prompted to come up with a password, select a security question and answer it (you may need this information when restoring access to your mailbox). Everyone, you will be congratulated on successful registration and offered to view your profile. By analogy with a Yandex passport or a Google account, your mailbox login and password will become your account for other services owned by Rambler. Here you can set your avatar, which will be visible to the recipients of your letters.

After logging in and registering in email. mail, it is worth noting that Rambler-mail does not link to a mobile phone number, which reduces the security of working with the mailbox, a very interesting solution. As you can understand, the argument that you have nothing in your inbox is not particularly relevant, because almost one hundred percent of emails are hacked on stream, and not on order. Hackers hunt not only for money, but also for social network accounts and other things, which can then be sold in bulk to spammers or some other “bots”.
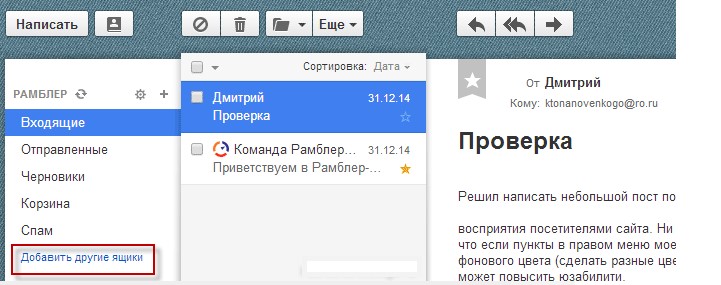
The appearance of the web interface is similar to some very simple mail client (a program installed on your computer that collects correspondence from all your mailboxes). Rambler invites you to click on the “Add other mailboxes” link located in the left column, and thereby you are offered to set up the collection of mail from all other mailboxes you have (including from other services) to view correspondence in Rambler.

A very bold proposal in light of the fact that the main attacks and criticism of Rambler-mail are associated with the poor performance of spam protection, and this is a fundamental fact when choosing the main mailbox where all correspondence will be collected. prefers the service from Gmail, and its functionality is at a higher level. But it's still an amateur. Its simplicity and obviousness can speak in favor of this interface. In the lower left corner you will find a couple of buttons with horizontal and vertical stripes that allow you to switch from a two-column mail view to a three-column view, when the mail list remains open and the content of the mail you are interested in opens to the right in a separate area.

In the same place, but a little to the right, you will find a button to go to the settings of your mailbox in Rambler mail.
How can I check inbox in Rambler-mail
There are traditionally several options. You can log in to the web interface and look at the counter of unread messages:
You will observe approximately the same thing in the mobile version of mail from Rambler.
Also, being on the main page of Rambler.ru and some other services of this company, you will see the number of unread messages next to the "Mail" tab.
If you wish, you can install an extension for your browsers called Rambler-Assistant (it includes several blocks, including mail). After that, in your browser, on the panel reserved for extensions, you will see an icon with the number of unread messages.

And when you click on it, you can read the headers of new letters and, if you wish, log into your mail account to familiarize yourself with their contents. You can set up the collection of mail from your mailbox in Rambler mail to your main mailbox on another service or to the mail client program installed on your computer. To do this, you will need to know the connection parameters to the outgoing and incoming Rambler servers. Now the client program or the interface of another mail service (Google, Yandex, Mile.ru or something else that you are more used to) will be responsible for checking and notifying you about the arrival of new messages.
Web interface (your page) in Rambler Mail
At the top are the most necessary buttons for managing and sorting incoming correspondence: At the top are the most necessary buttons for managing and sorting incoming correspondence:

To write a new letter:

In the window for creating a new message, the “Formatted” mode is enabled by default, which allows you to format the text of the letter using tools that resemble the capabilities of a classic text editor such as World. Everything else is very simple - only the necessary and nothing more. To go to the Rambler address book. You can export your contacts to it from existing mailboxes using the buttons shown in the screenshot. You can also add contacts manually, using the "New Contact" button located at the top:

Another new contact can be added when reading the letter by clicking in the "From" field and selecting the appropriate item. In the left column of the address book, you can configure grouping of contacts (for example, by friends, work, etc.), and on the "Automatic" tab, contacts of those users with whom you corresponded through this mailbox will accumulate.
- To add the selected email to spam or delete it.
- To move letters between existing folders and to create new ones.
- To mark correspondence as read or important.
- Well, and the most necessary - buttons for answering and for forwarding the selected correspondence to anyone.

Well, in order to later set the background highlighting of only important or unread letters, you will need to select the appropriate option from the drop-down list shown in the screenshot. You can use the search bar at the top to search through all emails. The service is so simple that even people far from the Internet will figure out the functionality in no time.
Rambler email settings
Let's now go over the mail settings from Rambler, which are hidden behind the gear button located at the bottom of the left column. Actually, there are not so many of them. On the one hand, this will not scare away an inexperienced user, but for a user who is more or less accustomed to comfort and convenience, they can be somewhat disappointing. However, what is, is. On the first settings tab, you can set the sender's name (and, if you wish, specify a different Email to which replies will be sent), add a signature that will be added at the bottom of all letters you send, and you can also change the cover of pages with your mail (blue is used by default). texture, but you can replace it with one of a dozen background options). Well, you can also see how much free space is left in your free mailbox, which is initially given not so much compared to competitors (only 2 Giga).

On the next tab of the Rambler Mail settings page, you can add new folders if necessary. On the "Other mailboxes" tab, you can configure the collection of mail from all your mailboxes in this or any other services. It will be enough just to specify the login and password from these same boxes. If the service from where the correspondence should be collected is not standard (the addresses and ports of the POP3 server are already known for them), then this data will also have to be specified.

This email service has filters. They live on the corresponding settings tab. They allow you to configure the processing of incoming correspondence by checking all letters for compliance with the specified conditions, and if they are satisfied, perform one of the following actions on them.
Good afternoon, dear readers! In this article, I will show you how to create a Rambler mail. Registration is free and will not take much time, and the created Rambler mailbox will come in handy many times.
Rambler began its activity back in 1996 and was initially positioned as a search engine. Over time, it became the first Internet portal in Russia, as well, Rambler was the first domestic Internet resource to be listed on the stock exchange.
One of the popular Rambler services is Rambler-mail, which we will now create.
How to create a mailbox Rambler
1. First of all, you need to go to the Rambler website www.rambler.ru
2. On the page that opens, click the "Login" button located in the upper right corner.
3. In the window that opens, click on the "Register" link. 
4. In the first step of registration, enter your first name, last name, and also think of a mail name, then click the "Next" button.
5. In the second step of registration, you must:
- Come up with a password - The password must consist of numbers and English letters, the number of characters from six to sixteen.
- Confirm password - Re-enter the password you created.
- Security question - Select a security question category.
- Answer to the question - Enter the answer to the question, be sure to save the answer, with it you can recover the lost password.
- Spare mail - leave this field blank.
- Gender - Enter your gender.
- Date of Birth - Enter your date of birth.
- Enter the characters from the picture - Fill in the captcha by entering the characters shown in the picture.
After filling in these fields, click the "Register" button. 
6. Now we see that we are congratulated on successful registration, in order to enter the newly created mail, click on the "Mail" menu item. 
As you can see, there is nothing complicated in creating a Rambler mailbox.
How to enter the Rambler mail
After you created the Rambler mail, your account was automatically saved, to re-enter the mail you need to go to the Rambler website and click on the "Mail" menu item, after which your mailbox will open. 
If you previously logged out of your account, then in the window that opens, you must enter the login and password created when registering the Rambler mail. Then click the "Login" button. And you will again be in your mailbox. 
That's all for me, I wish you success!
Any e-mail service offers the user on its website a complete list of tools for normal work with it. The Rambler is no exception. However, if more than one mailbox is used, it is much more convenient to use email clients to quickly switch between services.
The process of setting up an email client is not something complicated, although there are some nuances. There are different email clients, and each has its own characteristics. But before setting up the client itself:

You can start setting up the program itself.
Method 1: Microsoft Outlook
Speaking of email clients, one cannot but mention Outlook from the Redmond giant. It stands out for its convenience, safety and, unfortunately, a large price tag of 8,000 rubles. That, however, does not prevent a huge number of users around the world from using it. The most current version at the moment is MS Outlook 2016, and it is on its example that the configuration will be performed.
To do this, we do the following:

- "your name"— first and last name of the user;
- Email address- Rambler mail address;
- password- mail password;
- "Password Retype"- confirm the password by re-entering.


- "Account type" — IMAP.
- "Incoming mail server" imap.rambler.ru
- "Outgoing mail server (SMTP)"- smtp.rambler.ru

Setup completed, Outlook is ready to use.
Method 2: Mozilla Thunderbird
Mozilla's free email client is a great choice. It has a user-friendly interface and ensures the security of user data. To set it up:

- Username.
- Registered mail address on Rambler.
- Rambler mail password.

After that, you will need to select the type of server that is most acceptable to the user. There are only two of them:
- IMAP- all received data will be stored on the server.
- "POP3"- all received mail will be stored on the PC.

After selecting a server, press "Ready". If all the data has been entered correctly, Thunderbird will configure all the parameters by itself.
Method 3: The Bat!
The Bat! convenient no less than Thunderbird, but has its drawbacks. The biggest one is the price of 2000 rubles for the Home version. Nevertheless, it also deserves attention, since there is a free demo version. To set it up:
- During the first launch, you will be prompted to set up a new profile. Here you need to enter the following data:
- Username.
- Rambler mailbox.
- Mailbox password.
- "Protocol": "IMAP or POP".

- "To receive mail use": POP.
- "Server Address": pop.rambler.ru . To check the correctness, you can click on "Check". If a message appears "Test OK", Everything is fine.

We do not touch the rest of the data, click "Further". After that, you need to specify the parameters of outgoing mail. Here you need to fill in the following:
- "Server address for outgoing messages": smtp.rambler.ru . The correctness of the data can be checked as well as on incoming messages.
- Put a tick next to "My SMTP server requires authentication".

Similarly, do not touch other fields and click "Further". This is the setting for The Bat! finished.
By setting up the mail client in this way, the user will get quick access and instant notifications about new messages in Rambler mail, without having to visit the site of the mail service.
Today we will look at:
Today exists. But a few years ago, the leader among them was Rambler. In the vastness of the CIS countries, this domain appeared not only as the main device for exchanging e-mails, but also for communication using the ICQ method, the first social network. On its users, accustomed to Rambler, the structure is still holding on, although the leading positions have slightly diminished. Therefore, let's figure out how to enter the mailbox.
How to start mail rambler
Access to the mailbox opens on the email.rambler.ru page. Before you is a standard window in which you need to specify the prepared data. If you do not have a Rambler mailbox yet, then start it simply by pressing the green “Start mail” button.

Come up with an original login, or just use the last name and first name. You can choose any domain from the proposed list.

The password must consist of letters and numbers in random order. Length - at least 8 characters.
Together with the mailbox, you get authorized access to other services from Rambler. For recognition by friends, you can set your photo on the avatar. It is worth noting that, unlike other similar systems, Rambler is not tied to a mobile phone. This approach significantly reduces security, since hacking such an account will not be difficult for any program designed for this. This is used by hackers to resell logins to spammers and virus distributors.
The domain interface itself is very simple. The system offers to merge several mailboxes into one for easy transition between them.
How to check mail
There are several options to see unread emails:

The advantage of Rambler is that it is a convenient and simple service. It is not burdened with complex innovations, incomprehensible services and advertising. Even the weakest “teapot” can understand its interface, and an inexperienced user can send a letter.
By registering a username and password, you can access your mailbox from anywhere and from any computer.