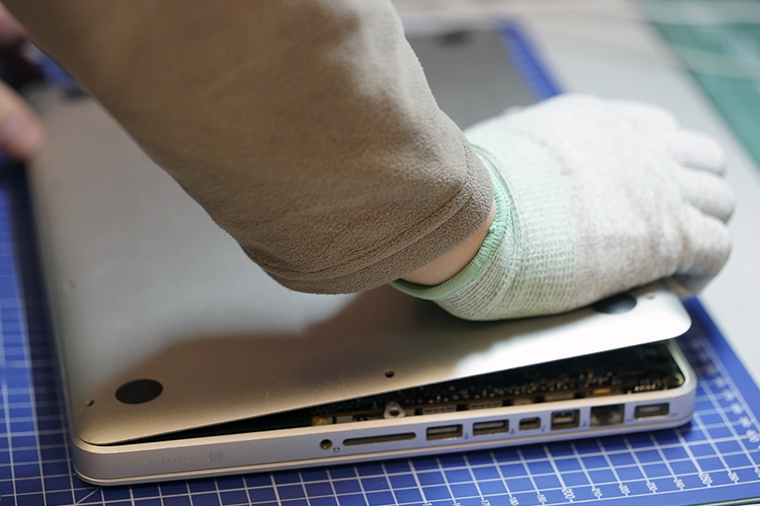
Tools for replacing the hard drive in a MacBook. The Easiest Way to Increase Memory on Your MacBook
Read also
The MacBook hard drive is quite fragile, so its failure is a common reason for contacting service centers. The hard drive can fail if the laptop is dropped or hit, or if there is a short circuit in the network.
The main “symptoms” of a hard drive failure are as follows:
1. The operating system does not load (a question mark appears on the screen);
2. The laptop refuses to turn on;
3. Malfunctions operating system(appearance of strange characters, errors when opening files, etc.);
4. Strange noises, creaks, clicks when the laptop is running.
The user may want to change a working hard drive - if he wants to increase the volume hard drive and system performance. In any case, you need to keep in mind that the procedure for replacing it is quite complicated, and it is better not to undertake it yourself.
How is a hard drive replaced?
1) The specialist removes the laptop battery and unscrews the screws holding the cover of the RAM compartment.
3) You need to disconnect the keyboard panel. The difficulty is that it is held in place by latches on the inside, and if you are not careful, you can damage the fasteners, bend or scratch the panel. Typically, a thin screwdriver is used to remove the keyboard.
4) The next step is to disconnect the ribbon cable from the motherboard.
5) Finally, you can remove the old hard drive. To do this, the master disconnects the cable supplying the HDD power supply and going to the SATA plug, and unscrews the bar holding it.
6) Having installed a new hard drive, the specialist carries out the assembly. Since the MacBook case is very thin, it is easy to bend, so only a technician who knows the architecture of Apple laptops well will be able to carry out all the procedures without damaging it.
The advantage of contacting service center Macsave is also the ability to order original parts that are best compatible with your laptop model.
(early 2011) at home.
There is a crisis outside, and dreams of buying a new Macbook are dissipating like smoke. In these harsh times, when a kilogram of ordinary cucumbers costs as much as a kilogram of Israeli apples, it’s time to take out a screwdriver and update your faithful aluminum comrade with your own hands.
If you don’t have a screwdriver, hands, or lack the courage, please turn to the professionals of modding and repair. Trusted professionals live in the company ModMac, who, with unwavering hands, will mercilessly disassemble any gadget, repair it and put it back together without any unnecessary remaining parts.
On a winter Saturday morning, from the pattern of clouds in the sky, I realized it was time! Having made a backup, we and my MacBook Pro, went to workshop for rejuvenation surgery. The plans were to replace the original HDD cable with a new one, as well as replace the optical drive with a super-fast one SSD drive, using a special Optibay tray.
Few people know, but if you install an SSD drive instead of the native HDD, and install the native HDD second hard drive instead of a CD drive, then in this situation the system will work a little slower. Better SSD drive stick it in place of the optical drive, and leave the original HDD in its place. Productivity will be higher.

Upon arrival at the place, my laptop immediately passed into the hands of the specialist, and I got the small role of an impassive extra who recorded on camera every movement of the specialist’s hands.
Preparation
So, the MacBook Pro sat on the table, turned upside down, revealing its defenseless belly to our eyes. With deft movements of a Phillips screwdriver, 10 screws were unscrewed along the perimeter of the back cover. And then, without much effort, the lid was removed and carefully set aside.


Once again, I marveled at the ergonomic arrangement of all the components inside the brainchild of Steve Jobs. How fascinating it is that all the filling fits together!

The first stage has been successfully completed, we move on to the next level.
Replacing the HDD cable
In my MacBook, the hard drive is very easy to remove. In some models, for example, to remove the HDD you must first remove the battery, but this is not our case. So, what needs to be done, point by point:
1) Disconnect the cable leading from the battery to the board;


2) unscrew two screws and pull out the clamping bar;


3) gently pull the hard drive by the special tab and use your fingers (a mediator, a special plastic spatula) to disconnect the cable from the hard drive.


The hard drive cable is very fragile; tugging, tearing or twisting it strongly is not recommended.

Why do you need to change the cable to a new one: sometimes (rarely, but still) after replacing an ordinary HDD with an SSD, the MacBook disk begins to behave strangely. It seems that disk utility sees the new SSD, formats it and does not find any errors; The operating system is downloading, but all installation attempts are interrupted by a gray screen with a blinking folder icon or question mark.

In this case, replacing the hard drive cable helps. The operation is very delicate and requires confident movements and some skill in such actions. Here's how to replace the HDD cable:
1) Carefully disconnect the cable connector from the board, unscrew the two screws that secure the cable in the case and the two screws that secure the black strip on the front inner wall of the case.


Using your fingers, carefully pull out the black strip to which the HDD cable is glued and you will be horrified by the miniature size of the connector, which must be carefully removed.

At this stage you need to gather all your concentration and use tweezers to disconnect the connector from the HDD cable. You can’t swear at your mother, it’s advisable to breathe every other time.


After this dangerous procedure, you can exhale and relax, the HDD cable has been completely removed.

So on at this stage We have removed the original hard drive and completely disconnected its cable. To install a new cable, all the above steps must be repeated in reverse order. Again, the hardest part is connecting the small connector to the connector of the new HDD cable.
Replacing an optical drive with an SSD drive


Carefully disconnect the cable responsible for Airport/Bluetooth and the camera cable from the board. These cables (like most others) are quite fragile and breakable.


Then carefully remove the cable around the perimeter of the CD drive and disconnect the antenna connector.


The easiest thing remains: unscrew the three screws holding optical drive, carefully remove it and disconnect the cable connector. That's it, half the job is done, now you need to insert an SSD drive into the resulting void.
SSD and Optibay


Everything is simple here. Take an Optibay tray, insert a brand new SSD drive into it, tighten two fixing screws on the side, insert a short cable from the CD drive into the tray, which was removed in the previous step, and insert the entire resulting structure into place. Finally, repeat all the above-described manipulations to remove the drive in reverse order.

At the very end, the main thing is not to forget to connect back the battery cable, which was disconnected at the very beginning of this instruction article.
Note to the hostess

After “upgrading” the MacBook master from ModMac can set up something like Fusion Drive.
Fusion Drive is a technology that combines a conventional hard drive (HDD) and a solid state drive (SSD) with 128 GB of flash memory into a single logical volume. Mac OS X automatically manages its contents, so frequently used files such as applications, documents, photos (and so on) are dynamically moved to flash memory for faster access. For example, if a program is used frequently, it will automatically be moved to the SSD drive to speed up access to it. As a result, startup times are reduced, and as the system accumulates data about the computer's usage profile, program launch and file access speeds up.
– Wikipedia
Through clever manipulations with terminal commands, the guys from ModMac can configure a MacBook so that the system will see one shared disk with a capacity of 768 gigs (total capacity of SSD and HDD drives) as if it were one SSD drive.
Productivity increases, nerves are protected, and the owner is happy. I highly recommend it. The only caveat is that you need to avoid emergency shutdowns while using the laptop; Fusion Drive may “crumble” and you will have to restore all the information again ( so you should always remember about backup!).

Finally, as a bonus, the insides of the laptop were cleaned of dust with a powerful jet of compressed air. After this, the MacBook became even quieter.

What have we learned new from this story, friends?
All operations, taking into account the master’s experience in such matters, took at most 20 minutes. I received my “old man” in my arms, who literally came to life. Loading OS X now takes 4 seconds, all programs load so that I couldn’t be happier, plus there’s an additional 500 gigs of storage for files. I didn’t use the CD drive anyway, so I didn’t really notice its loss.
4.50 out of 5, rated: 2 )
![]()
Let's figure out if it's possible to upgrade MacBook Air at home, increasing his memory.
It is not difficult. But there are several very important points that you need to know. Otherwise you will lose money.
Which MacBook Air models can replace the SSD drive?
IN MacBook Air before 2010 you can replace the drive with a 1.8-inch SSD with a SATA interface. We won’t talk about them today, since the computers are outdated, and the SSD drives themselves of this form factor are publicly available and do not differ in any features critical for the Mac. Just bought it and installed it.
IN MacBook Air models from 2010 year, you can also replace the SSD drive. But there is a rare form of it, hence the need for this article.
Apple in its repertoire. SSD drives in all modern MacBook Airs have a rather specific connector 28pin. Thank you for at least not unsoldering the drive on the motherboard.
Posted by site (@site) Dec 6, 2017 at 11:53 PST
Because of this, replacing an SSD becomes very difficult, leaving the following options:
1. Buy an original SSD drive for your MacBook. You will have to look for such components, and the price for them is frankly not encouraging.
2. Find a similar third-party SSD. Again, it all comes down to price, as they say, the game is not worth the candle.
3. Use a special adapter. A small adapter for $13 on Amazon or $9.5 from AliExpress allows you to install almost any modern M.2 drive instead of a standard one.
A suitable 256 GB SSD will cost 7-10 thousand rubles. For 15-17 thousand rubles. (the difference between MacBook Air models) you can find a 512 GB model.
After the upgrade, you will still have a 128 GB stock drive that can be sold.
Important: it’s not enough to just buy a “flat” SSD
Not every SSD drive is suitable for use with an adapter.
Firstly, The SSD must support the Serial ATA interface and the AHCI (Advanced Host Controller Interface) mechanism. This is usually indicated in the device specifications.Secondly, the drive must have a connection key M or universal B&M, but not key B.
Third, the length of the SSD board should not exceed 80mm, otherwise it will not fit. If the drive is too short or an adapter board is used, you will most likely not be able to fit into the mounting hole and will have to use double-sided tape to secure the drive.
How to replace SSD on MacBook Air
Attention! Replacing computer components yourself will void the warranty. You carry out all actions at your own peril and risk.
To replace you will need a pair of screwdrivers: T5 Torx And P5 Pentalobe.
1. Using P5 Pentalobe, unscrew the 10 screws on the back cover of the laptop.
2. Carefully lift the cover near the display hinge.
3. To disconnect the laptop and prevent accidental startup, it is recommended to disconnect the battery. To do this, you need to find the power connector and pull the plastic tab.
4. Using a T9 Torx screwdriver, remove the screw securing the SSD drive.
5. Install a new drive and repeat the operations in reverse order.
That's not all, you need to configure macOS
After replacing the disk, you can clean install macOS or roll backup copy. In any case, after starting the system, you will need to perform another operation.
At using SSD Third-party drives running macOS must enable the TRIM command. Otherwise, over time, the drive's performance will decrease and write operations will be slower.
Since version OS X 10.11 El Capitan You can activate TRIM on all SSDs using the terminal command:


Apple has always been expensive when it comes to pricing storage in its devices. In both the iPhone, iPad, and MacBook, every step to increase the storage capacity costs a pretty penny. And gigabytes from Apple are significantly more expensive than the market average. There is no doubt about it, these are usually very fast gigabytes, and you don’t have to particularly regret overpaying. And yet sometimes the toad strangles. And you buy the option with a smaller drive. You hope to squeeze in and somehow get by. But you always, absolutely always face a lack of volume.
In the case of iPhone and iPad problem partly, and on relatively old MacBooks (before 2016) you can change the SSD. But if you use original components, this is a very expensive pleasure. For example, a 256 GB drive will cost 30 thousand rubles if you buy a new one, and 18-20 thousand for a used one. It bites, you know. Meanwhile, “just an SSD” of this size is sold for 9-10 thousand. For 16-18 thousand you can get a 512 gigabyte model. The proprietary nature of the Apple connector is overcome with the help of an adapter, which costs about 1000 rubles on Aliexpress, and 2-3 thousand in Russian shops.
The autopsy showed...
I’ll tell you about my own experience with the MacBook Pro 13, model Early 2015. I got it with a 128 gigabyte SSD, which, in general, was enough, but still somehow itched - suddenly I need to edit some kind of incendiary video, and not enough space? For some reason I didn’t want to spend 30 thousand. But with non-native SSDs, everything is not so simple. The fact is that Apple has its own problems, due to which disks from other manufacturers are seen by the operating system only after dancing with a tambourine, enabling TRIM also requires shamanism, and there are also problems with hibernation, which has to be disabled.
In particular, such overlays occur with the Samsung 960 EVO, which is often purchased to upgrade MacBooks. I didn't want to deal with something like this.
 It’s even funny that Samsung SSDs are trying to glitch in MacBooks, because, as you can easily see, the original SSD (pictured below) was made by nobody.
 Deep googling showed that one of the least problematic SSDs for the MacBook Pro Early 2015 is the Kingston KC1000. The 240 GB model (I certainly don’t need more) costs an average of 8,500 rubles. For this we get a drive with a stated read speed of 2700 MB/s and write speed of 900 MB/s. For comparison, the original Apple SSD produces 1200/700 read and write speeds, respectively. It’s worth mentioning here that Kingston’s recording is relatively slow only on the younger model, and already from 480 GB it grows to 1600 MB/s. But, I repeat, I don’t need such a volume, and overpaying would not make any sense.
Considering that I had never upgraded a MacBook before, I asked the guys from the Fixed.One service to help me with this matter. Looking ahead a little, I will say that if you have special screwdrivers (five- and hexagonal stars), the operation can be done at home.
Let's go. First we unscrew back cover and admire how beautifully everything is arranged inside. The SSD is secured with one screw. A slight movement and the slot is free.
 Above is a Kingston SSD with an adapter already installed
 The adapter came from China, it looks modest, but, on the other hand, it doesn’t need to work miracles. There are no electronics on it - everything is limited to redirecting contacts from the Apple connector to a regular M.2 connector. Something similar happened with proprietary Sony cards: it quickly became clear that regular microSD can be inserted into a portable PSP console just fine through a cheap adapter.
The installation procedure is as follows: first insert the adapter into the connector, then insert the new SSD into it. If we're talking about For a capacious model (for example, a terabyte), it makes sense to wrap the contact area with thermal tape for secure fastening and additional heat dissipation. But in our case this would be clearly unnecessary, because this model Kingston heats up very moderately, and in conjunction with the existing adapter it sticks out above the board slightly higher than the original and is in excellent contact with the thermal interface on the cover. The length matches completely, so the KC1000 was fixed with a screw from its predecessor.

When turned on, the MacBook expectedly complained that there was no boot disk, but after inserting the flash drive with the High Sierra distribution, I immediately saw the new SSD and offered to install the OS on it. Very important point: Install without upgrading to High Sierra third party drive It’s impossible, and you need to upgrade the operating system BEFORE replacing the drive.

The installation went without the slightest hiccups. It’s real - there’s not even anything to tell. After completion, restored all data from copies of Time Machine on a flash drive. This turned out to be significantly faster than over the air, but still slow relative to the capabilities of the flash drive. It can transfer up to 300 megabytes per second, and recovery proceeded at an average speed of 20 megabytes, only sometimes increasing to 40-50 megabytes.
Immediately after the recovery, I ran a benchmark and, frankly, was pretty discouraged: according to its data, the read and write speed was below 400 MB/s. At the same time, the speed of work was the same. Launching applications, switching between them - that's it. I have a suspicion that the problem is in the background tasks with which the system loads the disk, and in particular with the Spotlight indexing service. The latter works furiously in the first days after installing a new drive, re-learning files, letters, contacts, etc., which leads not only to slower operation, but also to increased energy consumption. You can disable indexing by entering the command in Terminal sudo mdutil -a -i off. But it’s probably better to just wait until the system realizes itself again and calms down.

Actually, the very next day the benchmark showed completely different, more encouraging numbers. This is not at the peak of SSD capabilities, but noticeably higher than on the original drive, released, let me remind you, three years ago.
What pitfalls may arise? Firstly, with a non-native SSD MacBook Pro tends to wake up incorrectly from hibernation - it crashes and goes into reboot. I had this happen a couple of times, but only on the first day, when FileVault data encryption was going on in the background. After it ended (pah-pah-pah) everything became normal. If your problem persists, you need to type the command in the terminal sudo pmset -a hibernatemode 25. But the best thing, as experts say, is to reset the laptop and set it up from scratch, rather than restore it from Time Machine. Then there will be no problems getting out of sleep. I haven’t checked it myself yet, but I trust the experts.
Secondly, the drive may not operate at full capacity. This is also stated in the honest descriptions of the adapters: they do not pump more than 2 GB/s. Plus, not all PCI Express lines can work, for example, only two instead of the maximum four. My diagnostic utility shows either x2 or x4. This does not affect performance. And by the way, I don’t even know - maybe the original SSD had the same problem.
But in general, especially after the release of High Sierra 10.13.3, third-party SSDs work decently, and if you're lucky with the adapter, you'll save a very significant amount. To be lucky, it is still better to buy it in Russia and from companies that conduct preliminary testing of this kind of hardware.

Many thanks to Fixed.One for help with the upgrade. The Kingston KC1000 has shown full suitability for use in a MacBook, and given that they have a maximum capacity of 960 GB, this will allow someone to increase the storage capacity to a very impressive size at a very reasonable cost.
Views: 10,673
Hi all! Today I’ll tell you how I changed the hard drive to an SSD drive in my new MacBook. I already talked about on my blog, and that I bought a MacBook Pro 13 without Retina. So this laptop is terribly slow HDD Hard disk, its rotation speed is 5400 because of this there are noticeable freezes when launching certain applications or when waking up from sleep. I especially notice this due to the fact that I have been using an SSD Hard Drive in my desktop computer for 3 years now, on which I have installed the system and necessary programs, plus I also bought one SSD drive for games, sometimes I like to play various cool games.
I'm not saying that Apple missed the mark with this laptop and made it slow, no. It’s just different, someone wouldn’t even notice it if there was nothing to compare it with.
This laptop has a disk drive, I found a lot of videos and articles on the Internet about the upgrade option by replacing the disk drive with optibay (DVD slim 9.5mm adapter for HDD) in which you can put a hard drive instead of a disk drive and put an SSD in the place where the HDD was. I bought everything, an adapter and an SSD drive for 256 GB Vertex 450 from the manufacturer OCZ (It has a crazy price of 7890 rubles.) Why did I choose OCZ? – For me, this is a proven longevity manufacturer, since SSDs have a limited number of write cycles.
Optibay - This is a very interesting thing, many thanks to whoever came up with it, I think this thing will be useful for those whose laptop is not quite new, it will be possible to install an SSD drive instead of a disk drive and Windows will work many times faster even on not very powerful hardware.
I thought for a long time and decided that, in principle, I didn’t need a second HDD instead of a disk drive and decided to leave the disk drive and just install a 256 gigabyte SSD, this is not so small for a work laptop, especially since I have an external one USB hard and desktop PC.
Let's get started replacing that very slow HDD!
The first thing we need is a tool, we need a small Torx Phillips screwdriver, I still have it from the time I changed the glass on my old iPhone 4. Hexagon and plastic spatula, also included in the kit. The tool plays a very important role when disassembling Apple equipment! No need to twist those little bolts with a knife! I recommend not to rush and if you don’t have the necessary tools, then it’s better not to start, but first buy everything you need.

Now I need to remove static electricity from myself, I looked on the Internet how to do this and decided that it would be easier to just strip down to my underpants than to look for all sorts of antistatic agents
Turn off the laptop and turn it over

Before unscrewing, draw a diagram on a piece of paper so as not to get confused in the bolts, because in all Apple technology, almost all the bolts are different. Here we have 3 long and 7 short in these seven by 4 there is a border, this is important.

So let’s draw something like this and put the bolts in their places so that we can screw them back into place without any problems! This method works in disassembling any device, and it is very effective - why didn’t I know about it when I was disassembling my toys as a child
Unscrew it, arrange the bolts, remove the cover and disconnect the power cable! Otherwise, if you accidentally drop a screwdriver or some other metal object on motherboard will happen short circuit and that’s it, screw it, replace the motherboard... and maybe something else.

We do everything confidently and carefully with a plastic spatula!
Next, unscrew the hard drive holder. Again, I’m surprised at how simple and high-quality everything is made, the holder is metal, the orange rubber bands in the photo clamp the mounting bolts so that the hard drive feels comfortable, I think it even cushions it a little when hit and causes less damage to the hard drive.

After removing the holder, carefully lift the hard drive and pull out the SATA cables; if it is difficult to disconnect, pry it off with a plastic spatula.


We twisted it, now we put our SSD in place, carefully connect the cable, and first insert the lower bolts into the orange rubber bands and clamp them with the holder.


We close the lid back, take the bolts from our diagram, and screw everything into place.
Don’t worry about the operating system, Apple excelled here too! Now we'll install everything. Yes, all data from the old hard drive will have to be transferred by connecting to a computer or via SATA adapter– USB, I think this won’t be a problem.
We connect the laptop to the Internet via cable (this is faster) or via Wi Fi, it will ask you to select an access point, which one to connect to, enter the password and that’s it.
Turn on the laptop and hold down the CMD + R keys until the progress bar appears, after the bar is filled we will see this image:

Unfortunately, they offer to install OS X Mountain Lion, although OS X Mavericks has been released for a long time, but it’s okay to update later, we don’t have Hackintosh (I used Hackintosh on my desktop PC for about a year, that’s when my craving for Apple began, especially caught the attention of Time Machine, this thing will never be in Windows!)
Don't rush to click continue, first go to top menu in Utilities, Disk Utility and create or partition a hard drive. After that, click “Continue” and accept license agreement, and select the disk on which we will install.
I have one, I didn’t share it:

Waiting for the download process installation files system, you don’t have to sit and wait, he will do everything to the end in automatic mode, after downloading the files, it will reboot and the installation will begin, which will proceed quite quickly.
Here is the result of the work speed, using an example Adobe launch Photoshop CS 6:
There was a case when I installed Windows 8 on an SSD using the installation USB flash drive 3.0, on PC with Intel processor i5, to be honest I was shocked because the installation time from start to desktop took only 8 minutes! This is cool, what will happen in the future?
That's all, I think the information will be useful. Thank you for your attention! Subscribe to my blog updates. Ask questions in the comments, in the future I think I’ll write how I installed more random access memory, but for now I’m happy with 4 gigabytes on my laptop.